All About Etcom
What is the etcom file? All data downloaded from the terminal into the TCMSv2 software is stored in the terminal data audit list and the etcom file.
When the data is downloaded from the terminal, the data will go into the etcom file. Once the data is downloaded into the etcom file, the TCMSv2 software will then calculate the amount of data inside the etcom file to match the amount of data inside the terminal. If it tallies, the terminal will clear all the data inside the terminal. If the data does not tally, the software will prompt an error for the customer to check the terminal.
The downloaded data will then be stored in the Terminal Data List of the TCMSv2 software. Using the downloaded data, users can then configure the Attendance sheet and view or print the Reports.
The etcom file is located at c:\Program Files\FingerTec Worldwide\TCMSv2\etcom. After you have located the file, you will need to open the file with Notepad.
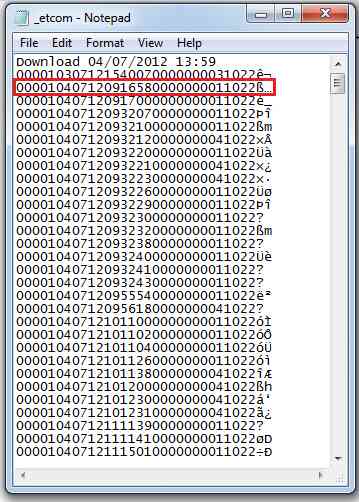
Let’s take a look inside the file. There are so many transactions in the file. How do we read the transactions? You may breakdown the code as below:
000010407120916580000000011022ß…
- TTTTT - Terminal ID is 010
- DDMMYY - Date is 04/07/12
- hhmmss - Time is 09:16:58
- UUUUUUUUU - user ID is 000000001
- The 25th digit “1” is for In and “0” is for out.
- AA - work code is 02
- The 28th digit is verify type, “0” is for password, “1” is for fingerprint.
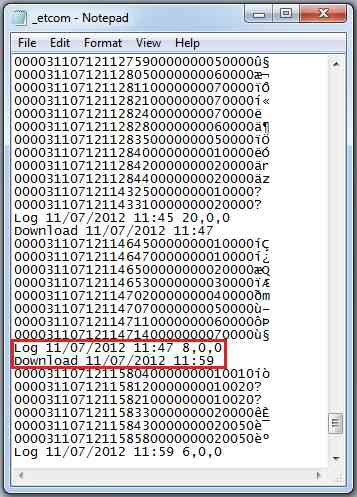
The etcom file will also display the data downloaded date and time. Besides that, it will also display the total amount of log transaction downloaded.
Etcom Errors
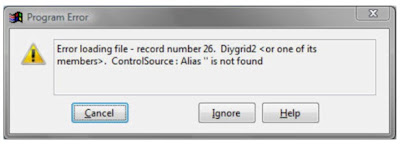
If you encountered this error, it means your fptaudit.dbf file is corrupted. To solve this error it will involve deleting the fptaudit.dbf file and all the data in the terminal data audit list will be gone. To download the data to the TCMSv2 software, please follow the steps below:
- Go to C:\\ Program Files > FingerTec Worldwide > TCMSv2 > etcom and copy the _etcom file.
- Then paste the _etcom file into the remote folder inside the TCMSv2 folder.
- Start up the TCMSv2 software, go to Attendance and click Download.
- The system will download the raw clocking data from the _etcom file.
- After the process is completed, the system will delete the file that you paste in the remote folder.
If you accidentally restored the previous backup database and the database has been replaced with the old data:
- Go to C:\\ Program Files > FingerTec Worldwide > TCMSv2 > etcom and copy the _etcom file.
- Then paste the _etcom file into the remote folder inside the TCMSv2 folder.
- Start up the TCMSv2 software, go to Attendance and click Download.
- The system will download the raw clocking data from the _etcom file.
- After the process is completed, the system will delete the file that you paste in the remote folder.
If you accidentally downloaded the transaction data into another computer, you will need to merge the data into the TCMSv2 software.
- At the wrongly downloaded data computer, Go to C:\\ Program Files > FingerTec Worldwide > TCMSv2 > etcom and copy the _etcom file and store it to a USB pendrive.
- Transfer the _etcom file into the remote folder inside the TCMSv2 folder computer that you want to merge with.
- Start up the TCMSv2 software, go to Attendance and click Download.
- The system will download the raw clocking data from the _etcom file.
- After the process is completed, the system will delete the file that you paste in the remote folder.








12 comments:
Have any questions or inquiries about FingerTec? Drop your input here.