Introduction
TimeTec BLE-2 Control Board functions as an intermediary device between a user’s Mobile App and the Barrier Gate controller. With this installation in place, a user can scan a QR Code to access the parking area via Bluetooth. Therefore, users no longer need access cards or other physical access gadgets; instead, they need to use their smartphone as the ONLY credential, as the smartphone with the Bluetooth Low Energy (BLE) technology processes encrypted access activities of the Parking Lot in real-time for high transparency and extra security.
When TimeTec BLE-2 Smart Barrier System is integrated into TimeTec Parking, it can upgrade the conventional parking system into a well-monitored and fully integrated smart parking system. All required is the embedment of TimeTec BLE-2 Smart Barrier in the barrier gate system at the entry and exit points of the parking, and integrate it with TimeTec Parking System. The parking system then would uplift barrier gates via Bluetooth technology through a smartphone installed with TimeTec Parking App and get all the access activities, including calculating and charging the parking fee in real-time for transparency and extra security.
Process
1. Installation and wiring diagram
- Connect the BLE-2 Channel 1 (OUT1 & COM) to the Barrier Gate Controller port (OPEN/UP & COM/GND).
- For more information on TimeTec BLE-2 controller, please refer here
2. Activate the TimeTec BLE-2 Controller into the TimeTec Smart Parking System.
- Login into TimeTec Parking account > click Device > Manage BLE-2
- Click Add button > Insert Device ID for reference (must be a unique number) > insert BLE-
2 Serial number, refer to the BLE-2’s back casing or box > insert Description for reference (location).
3. Assign the BLE-2 controller into the Entrance and Exit Channel.
- Click Parking Rule > Entrance and Exit Channel
- Click Add button > select BLE on Device Type column 6.jpg)
- Name the channel (Parking Area) > select added BLE-2 for Entrance and Exit.
4. Assign the Entrance and Exit Channel into the Parking Lot.
- Click Parking Rule > Parking Lots.
- Select added Car Park > click Edit3.jpg)
- Assign the created Entrance and Exit Channel into Car Par > Click Save.Note: If some of the screenshots or steps viewed here are different from the ones in the current system, this is due to our continuous effort to improve our system from time to time. Please notify us at [email protected], we will update it as soon as possible.
Introduction
QR code is a great addition to the TimeTec smart product and solutions line. This QR code will be served as a credential to grant access via your mobile App (QF Master) using an Android smartphone. This unique access code will control the IN and OUT activities of each door when it is paired with a TimeTec BLE-2 via a Bluetooth connection.
Process
Step 1 - On TimeTec Access, click on the User tab > Face Enrollment and QR code.
Step 2 - Search User and click the Generate button under the QR Code column.
Step 3 - Re-login to the User account on TimeTec Access mobile apps to refresh the settings. Tap on the Unlock tab > Show QR Code. Use the QR code to access to the QF Master device for door unlocking purposes.
Step 4 - In TimeTec Access, you may reset the User’s QR code by clicking on the ‘Reset’ button under the QR code column.
Step 5 - To manage the QR code by batch, you may select your desired users and click on the Manage button. Note: If some of the screenshots or steps viewed here are different from the ones in the current system, this is due to our continuous effort to improve our system from time to time. Please notify us at [email protected], we will update it as soon as possible.
Introduction
Even with the current advanced Visitor Management System implemented in respective gated guarded communities, issues caused by human behaviour still tend to occur daily. Guards are still granting visitors entry without going through proper registration in the system.
TimeTec BLE-2 is a device meant to be an intermediary between i-Neighbour guard panel and a barrier gate controller, intending to automate and monitor the opening of the barrier gate upon registration of a visitor through the i-Neighbour Visitor Management System using Bluetooth Low Energy (BLE) technology.
In this article, we cover topics as follows:
1. Benefits of using TimeTec BLE-2 and the challenges it overcomes
2. How it connects to the barrier gate & i-Neighbour Visitor Management System (i-Vizit)
BLE-2 Benefits
Facilitate the workflow of security guards - Guards will no longer need to press on the push button to open the barrier gate after registering a visitor. With BLE-2 installed, the guards will only have to register the visitors via i-Vizit system and the barrier gate would automatically be raised allowing the visitor to enter.
The Challenges it Overcomes
The push-button can also be locked to prevent guards from using the push button to open the barrier gate manually to improve security. This way, we can ensure that the guards will be compelled to register the visitors before allowing them to enter the compound. Hence, it prevents guards from manually pressing the push button, bypassing the system to grant visitors entry without registration.
How it connects to the barrier gate & i-Vizit.
BLE-2 I/O is connected to the barrier gate via a push button. Upon completing the registration process, i-Vizit will send a signal to BLE-2 via Bluetooth Low Energy network. BLE-2 will then trigger the push button to open the barrier gate.
Note: If some of the screenshots or steps shown here are different from the current system, this might be due to our continuous effort to improve our system from time to time. Please notify us at [email protected], and we will update it as soon as possible.
When a visitor arrives at a company’s lobby, he/she can use the i-Comm tablet to video call the host. Pre-registered visitors can directly scan their QR code for immediate access. The host will receive video calls via the TimeTec VMS App installed in his/her smartphone. Simultaneously, the host can view the video stream captured directly by the tablet’s front camera to approve the visitors’ access. Upon confirmation, the tablet (i-Comm) will send a command to the designated BLE-2 to trigger the door unlocking function. In the case of an accident that the door did not open, visitors can also touch the screen to request for a retry within 30 seconds.
Process
1. Ensure the i-Comm tablet is added to the TimeTec VMS account. For confirmation, please access the TimeTec VMS using an admin account, go to Settings > Kiosk. .jpg)
2. Go to Manage IOT > Access Point. Click on the Add button to add Access Point and insert the BLE-2 Serial number. You may retrieve the Serial Number at the back cover of the BLE-2. Then, enable the Interlink function and select i-Comm.1.jpg)
3. On the Interlink Action drop-down selection, select 1st Check-In for Entry Door. You may repeat the same process as stated above to connect another i-Comm tablet for Exit Door that is installed for the Check-Out process. Select 1st Check-Out on the Interlink Action..jpg)
4. Select which i-Comm account should be connected for each particular Access Point and click Save.1.jpg)
5. After setting up the Access Point(s), click on the User Icon to input the Access Right for specific Access Points. This indicates that only selected visitors will be granted access to the particular access points of the companies/departments.1.jpg)
6. Select which particular staff have the authority to invite visitors to access the selected Access Point. Click Apply to save.2.jpg)
Note: If some of the screenshots or steps viewed here are different from the ones in the current system, this is due to our continuous effort to improve our system from time to time. Please notify us at [email protected], we will update it as soon as possible.
Introduction
TimeTec BLE-2 Control Board functions as an intermediary device between a user’s Mobile App and the Door or Turnstile controller, whereby a user can tap on his/her Mobile Apps, send a voice command, or scan a QR Code to unlock the TimeTec BLE-2 via Bluetooth connection. Users no longer need to carry access cards or other physical access gadgets, this installation uses your smartphone as the ONLY credential powered by the Bluetooth Low Energy (BLE) technology to get encrypted access activities of the Access Point in real-time for high transparency and extra security.
Process
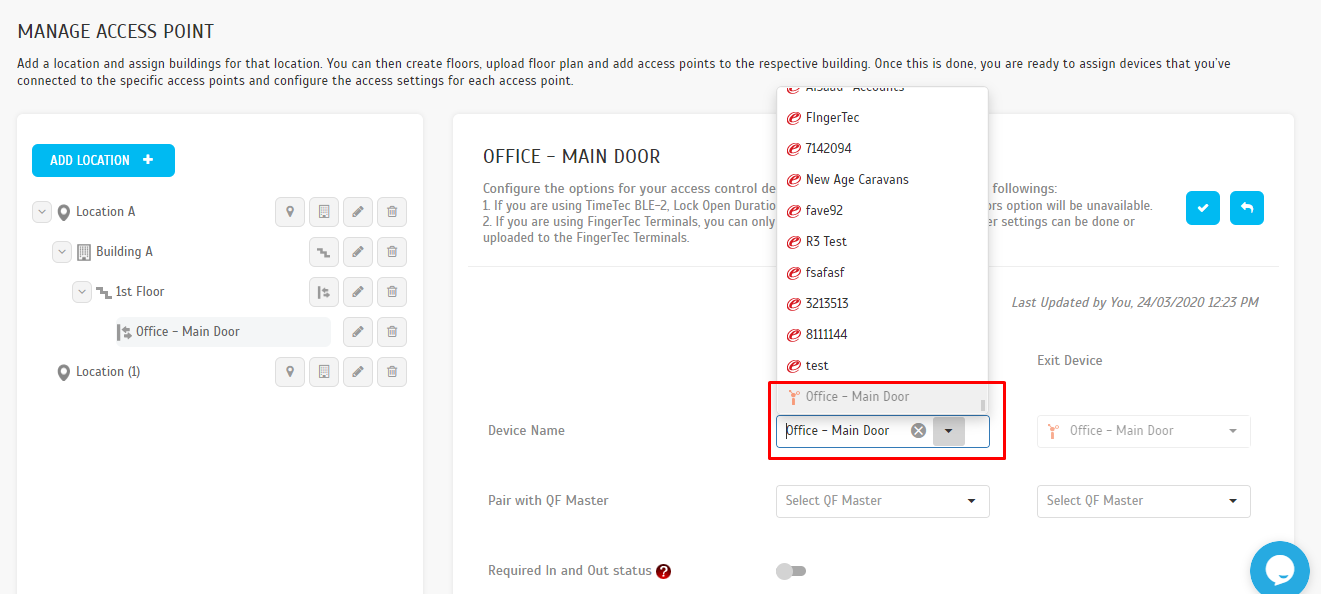
Step 1 - Log onto TimeTec Access, go to the Access Point tab > click Manage Devices > BLE Devices. Click the Add button, then insert BLE-2’s serial number and name of the location. The Serial Number can be retrieved at the back cover of the BLE-2.


Step 2 - Assign added BLE-2 to the Access Point by click on Access Point tab > Manage Access Point > Select Access Point and click on the Add button.
Step 3 - Select Added BLE-2 from the list and click the Save button.
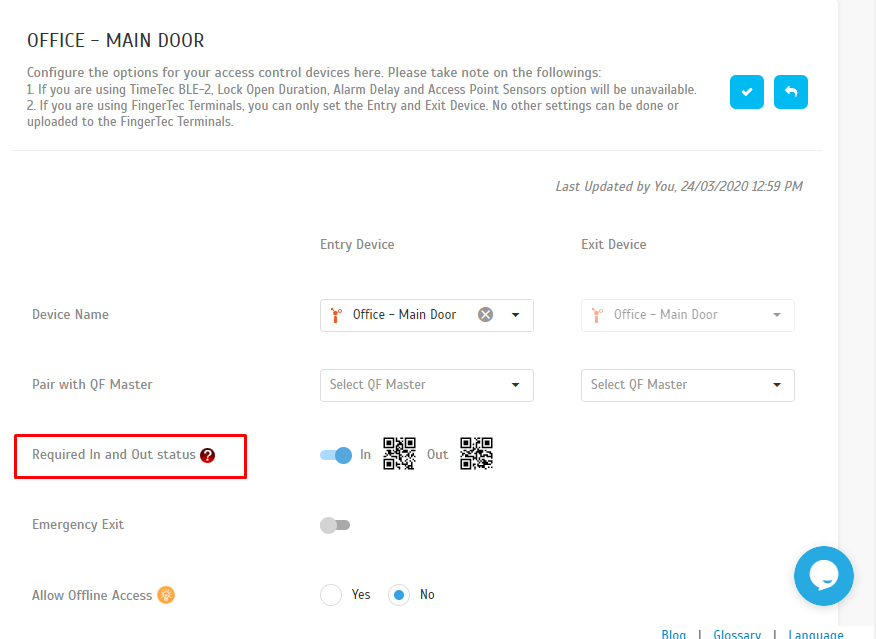
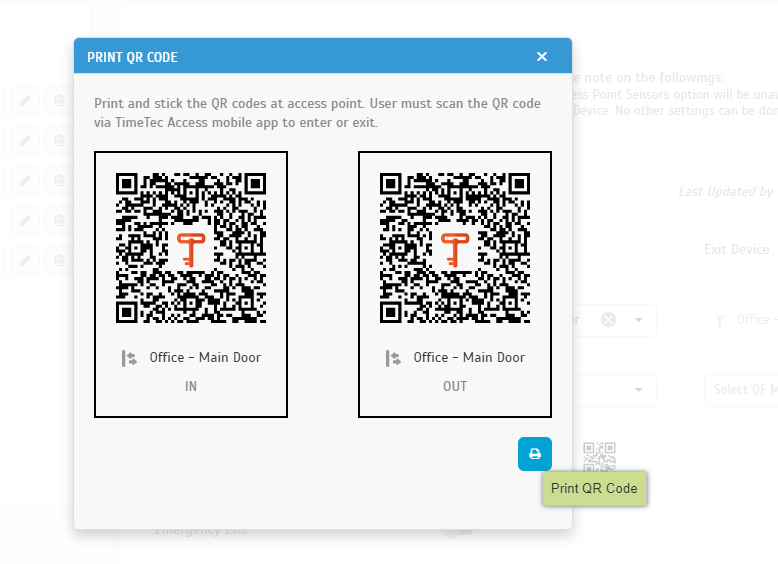
Step 4 - Additionally, you may enable the ‘In and Out status’ function if required. This will require all users of the TimeTec Access mobile app to scan the QR Code (install at Access Point) in order to get access at the Entry or Exit via setup Access Point. You may also acquire the QR Code sticker provided at the BLE-2’s box. Please click on the QR icon to print it otherwise.
Note: If some of the screenshots or steps viewed here are different from the ones in the current system, this is due to our continuous effort to improve our system from time to time. Please notify us at [email protected], we will update it as soon as possible.
Introduction
TimeTec BLE-2 Control Board functions as an intermediary device between a user’s Mobile App and the barrier gate controller, whereby a user can tap on his/her Mobile Ap or send a voice command to TimeTec BLE-2 via Bluetooth connection. TimeTec BLE-2 will then translate the command into digital pulse and instructs the opening of the barrier gate. Hence, we have prepared a short guide on how to setup BLE-2 in i-Neighbour web.
Steps required:
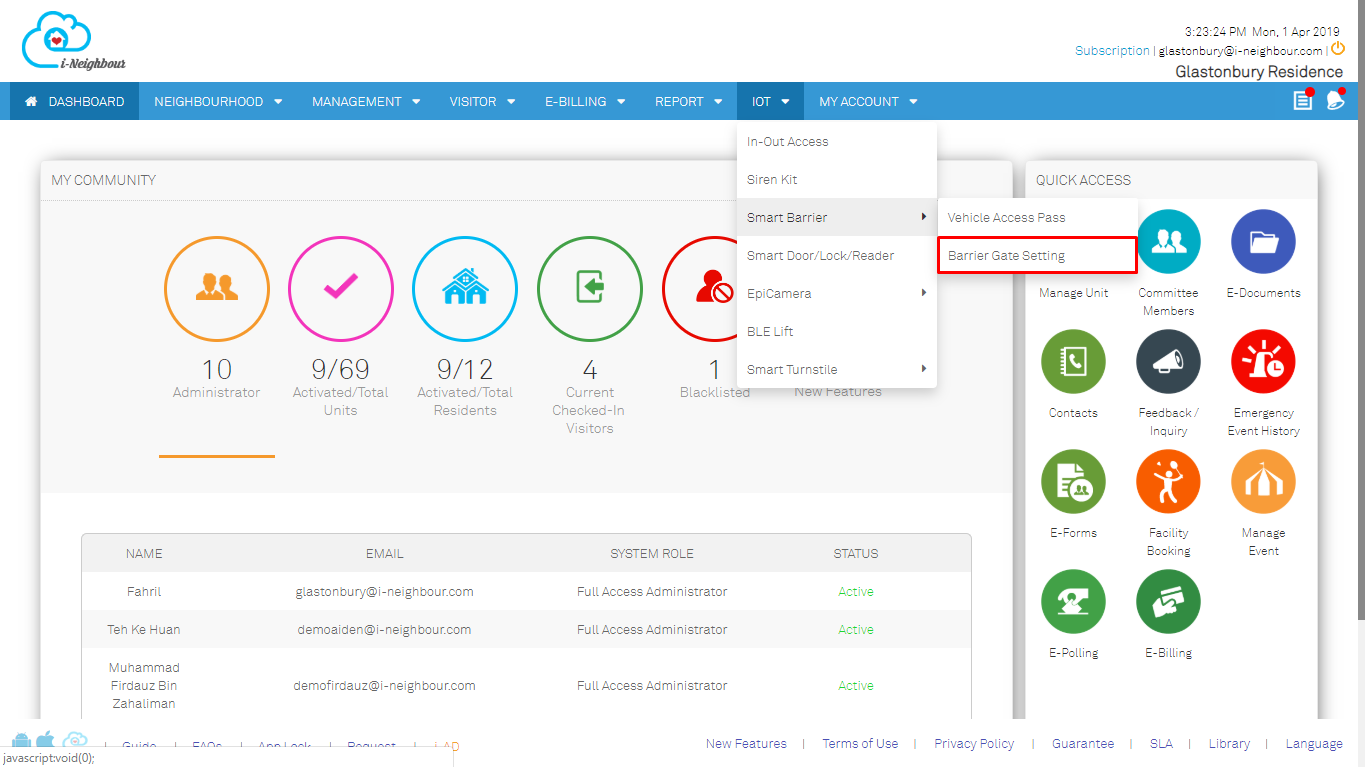
Login to i-Neighbour admin web portal, select IOT > Smart Barrier > Barrier Gate Setting.
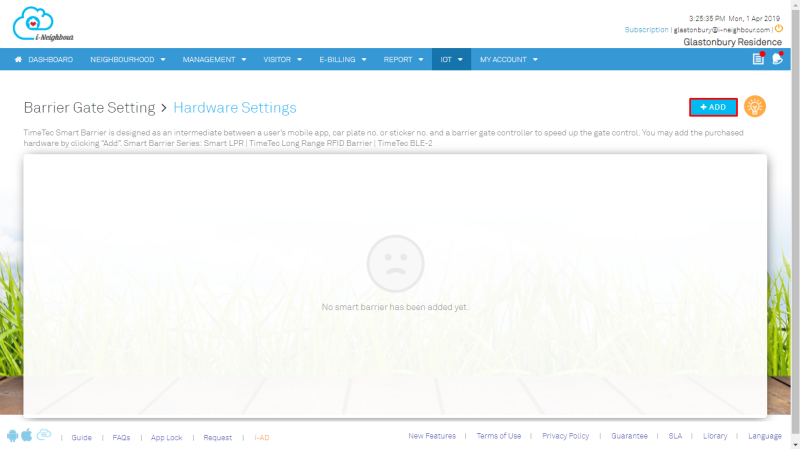
2. To add BLE-2 in system tab on Add at top right.
3. Choose hardware type TimeTec BLE-2
4. Enter BLE-2 serial number. Mac address will automatically fill after you enter serial number.
5. Choose Controller name for example Entrance. Then select access type to control BLE-2 that have be install in barrier gate.
6. Choose your purchased BLE-2 date at calendar in red box, then submit.
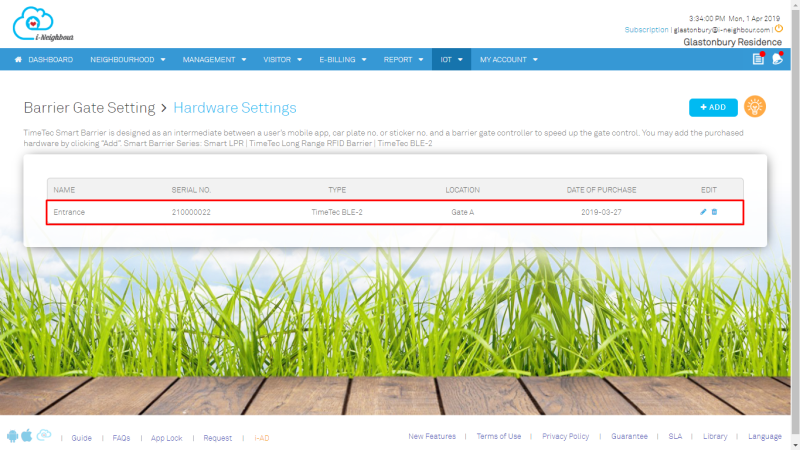
7. You can see BLE-2 after you added in Barrier Gate Setting.
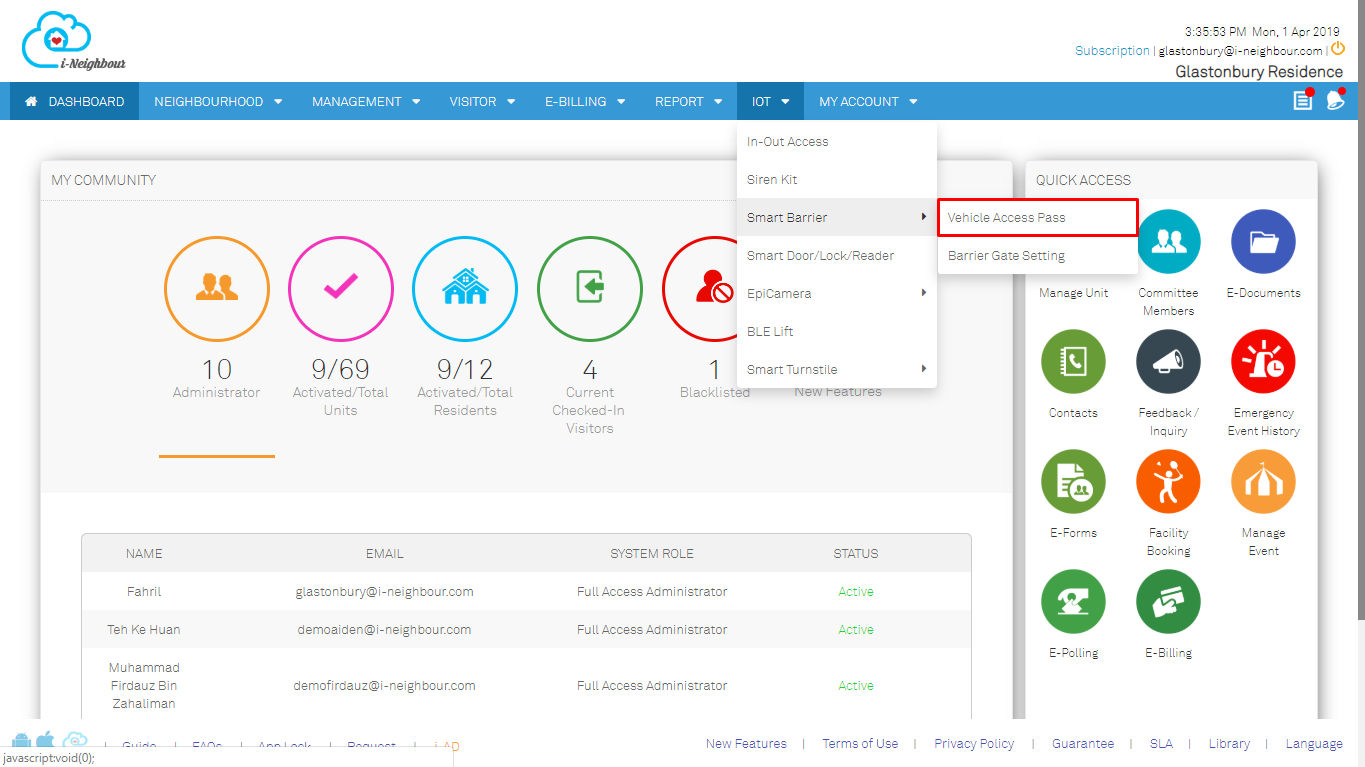
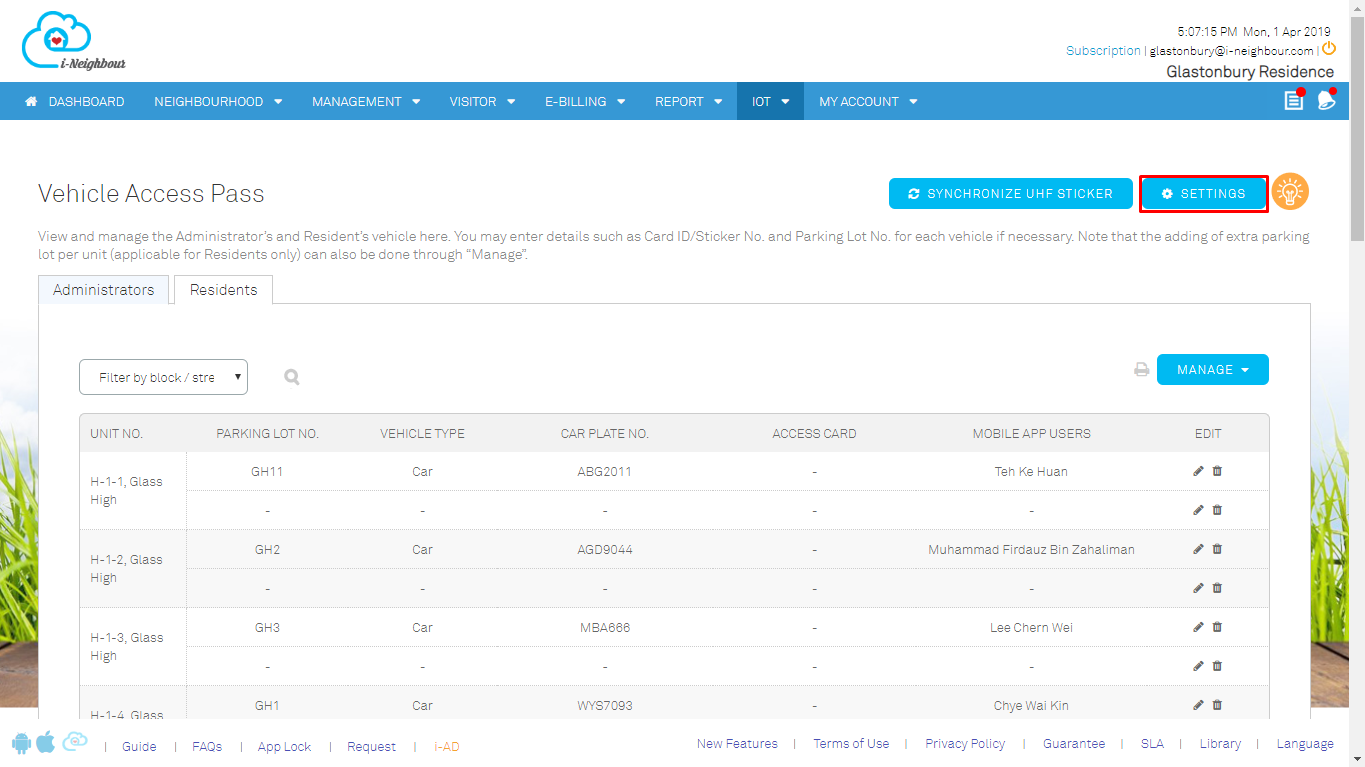
8. To setup barrier gate for resident, select IOT > Smart Barrier > Vehicle Access Pass.
9. Go to setting at bottom right to set BLE-2
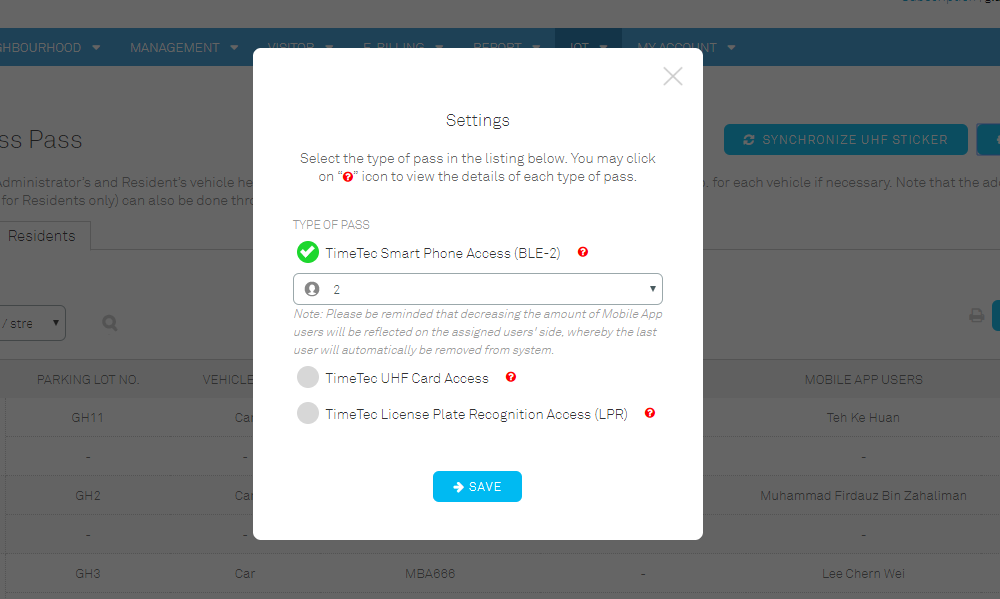
10. Choose TimeTec Smart Phone Access (BLE-2) and choose how many car park to setup for resident.
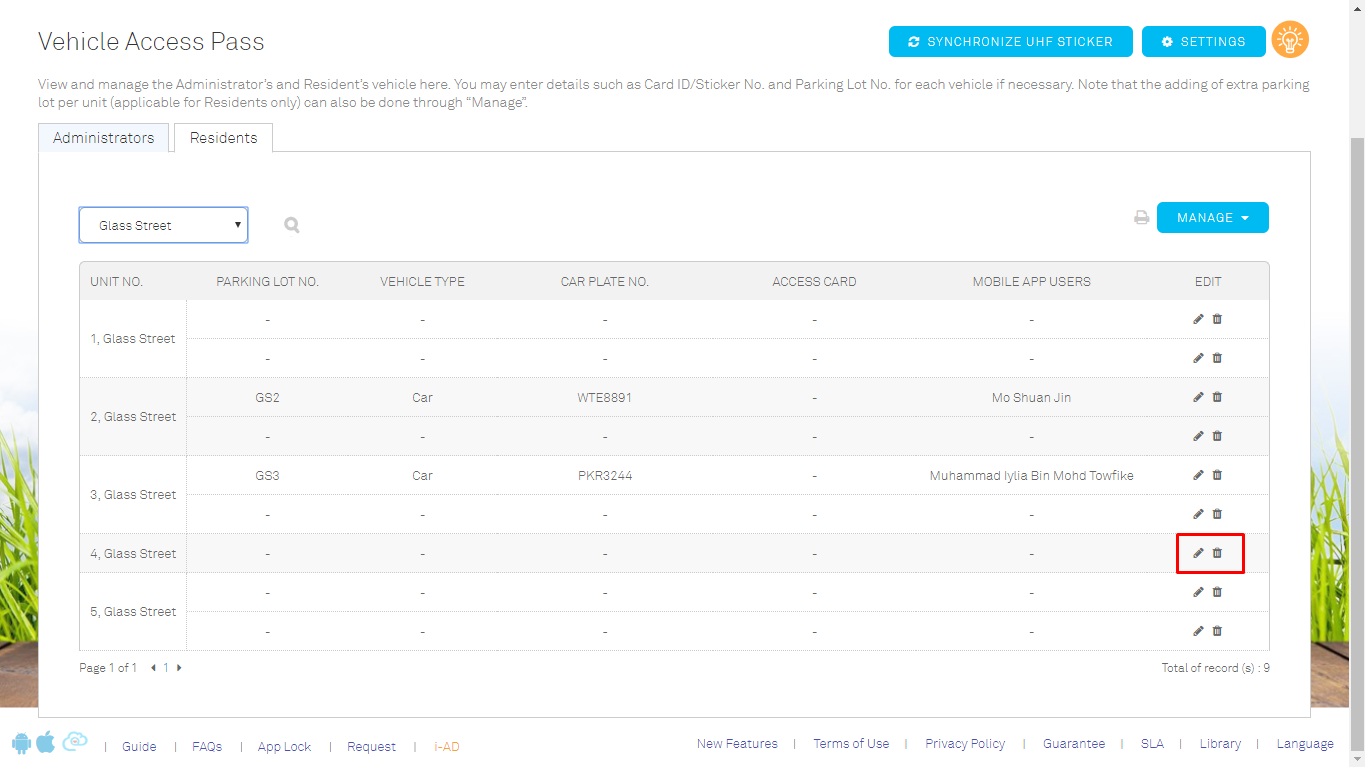
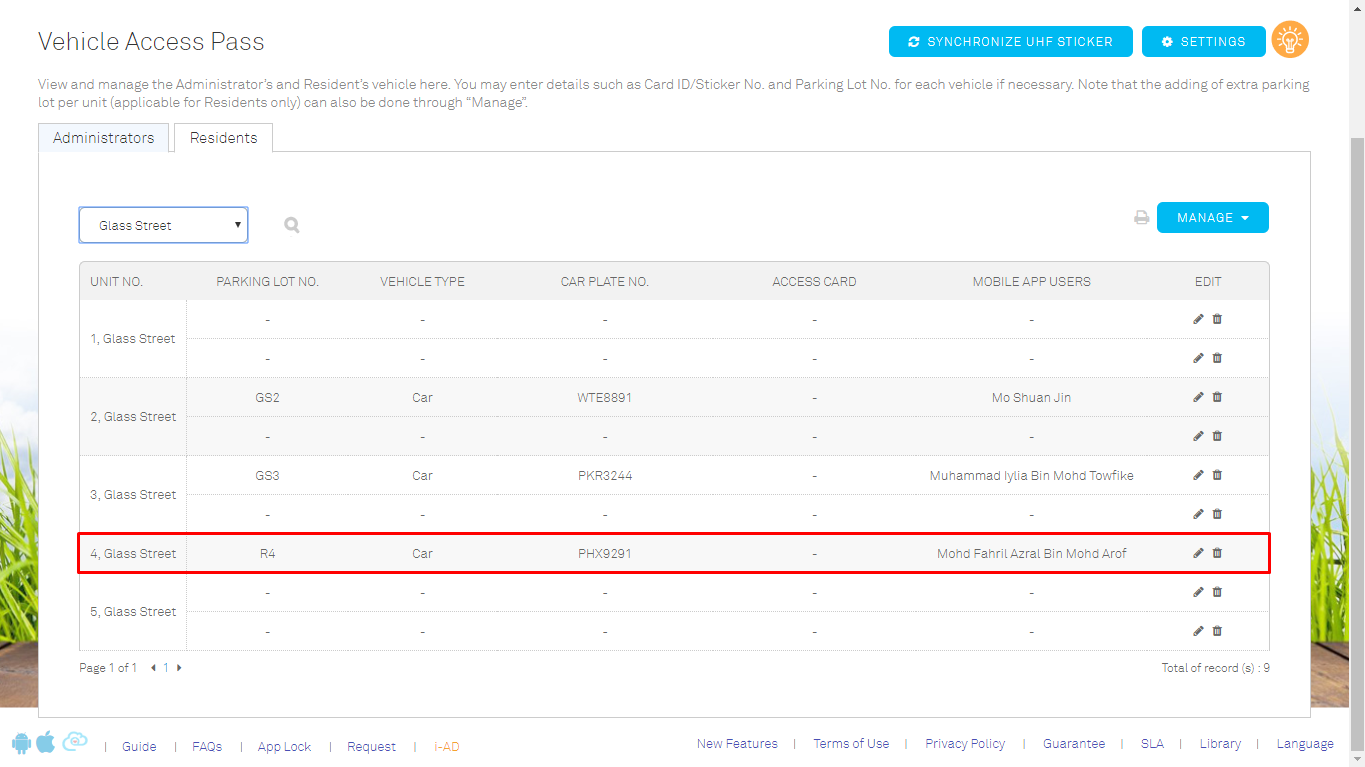
11. Choose pencil icon at right screen to enter resident detail for parking lot.
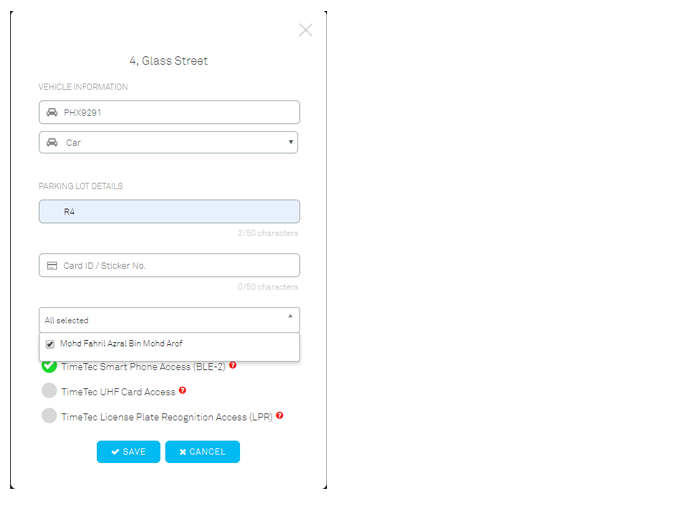
12. Enter resident detail and choose BLE-2.
13. Once done, you can see resident parking lot has been successful.
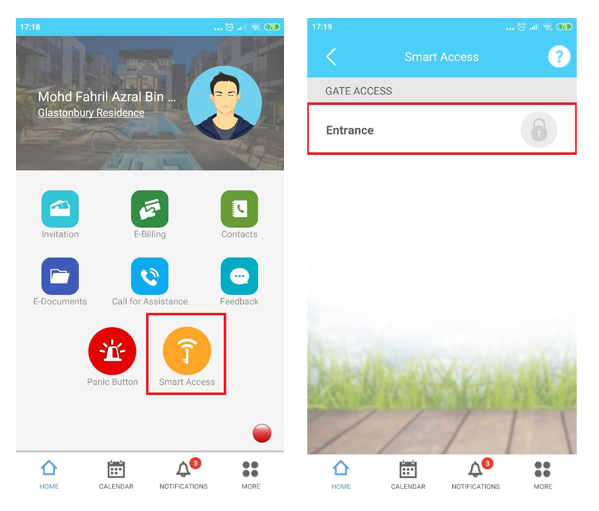
14. Resident can see Smart Access in i-Neighbour Apps.
If you are still having problems after completing all of the steps stated above, please contact us via:
[email protected]
Note: If some of the screenshots or steps viewed here are different from the ones in the current system, this is due to our continuous effort to improve our system from time to time. Please notify us at
[email protected], we will update it as soon as possible.



1.jpg)
8.jpg)
7.jpg)
10.jpg)
7.jpg)
6.jpg)
4.jpg)
4.jpg)
3.jpg)
3.jpg)
4.jpg)


1.jpg)
.jpg)
.png)
1.png)
.png)
.jpg)
.jpg)
.png)
.png)
.png)

.jpg)
1.jpg)
.jpg)
1.jpg)
1.jpg)
2.jpg)


