How to Assign Task for Patrol Checkpoint in TimeTec Patrol

Thursday, December 24, 2020 TimeTec 0 Comments


Introduction
In TimeTec Patrol, the Admin can add additional checking or tasks to be conducted at each checkpoint to ensure the guards pay extra attention when patrolling. These tasks can be controlled and customized by the Admin. For example, if a guard needs to check and verify whether a gate is locked or not, the question for this action can be set to appear after the guard has scanned at the checkpoint. 

In this article, we will guide you on how to set and assign the task for each patrol checkpoint in TimeTec Patrol.

Process
Login to TimeTec Patrol, click Routes > choose Location & Checkpoints


Click on one of the checkpoint > click Edit (pencil icon)


You may choose the type of action you wish to set for that checkpoint.
Display message –You may key in an important message as a remark or add a note for the guard. The message will be displayed after the checkpoint has been scanned. After configuration is completed, you may click save to proceed.


When the guard scans at the checkpoint, the message will be displayed as below.


Check and report incident – You may input information for each incident report. Tick the box and click Save. Note that the incidents to report selection list will be based on Incidents & Notifications settings. (/2020/02/timetec-patrol-how-to-create-incident.html)


After the guard has scanned the checkpoint, the incident lists will be displayed for the guards to select and report.


Report the correct value – Here you may set up a question for the guards to answer. Click Save to confirm the setting. 


When the guard scans at the checkpoint, he will then have to insert the value as what is being asked in the question.


Answer Yes or No – A Close-ended question can be set up as well. Click Save to confirm the setting.


When the guard scans at the checkpoint, there will be a Yes or No question following the scanning.


Prompt guard for remarks – When the guard arrives at the checkpoint for a scan, the guard must place a remark before continuing patrolling.


For a checkpoint that has been set to prompt guards for remarks, the guard will be required to insert remarks after scanning at the checkpoint.


As above, an action can be established for each checkpoint. The guard must complete this action in order to fulfill the patrolling requirement. Changes of action can be adjusted or amended.

Note: If some of the screenshots or steps viewed here are different from the ones in the current system, this is due to our continuous effort to improve our system from time to time. Please notify us at [email protected], we will update it as soon as possible.

0 comments:

Have any questions or inquiries about FingerTec? Drop your input here.

How to Add New Device (Smart AC1 Series / Face ID 5 Series) in existing Ingress Software and TimeTec AWDMS

Wednesday, December 23, 2020 TimeTec 55 Comments


Introduction
Adding new Smart AC1, Smart AC1/TD, Smart AC1/FTD, Face ID 5, Face ID 5/TD, or Face ID 5/FTD in existing TimeTec AWDMS and Ingress software might lead to problems of synchronizing user data from software to the new device. This is due to not having configured an access level for the new device. Follow the steps below to overcome this difficulty:

Process
Before connecting your devices into the TimeTec AWDMS and Ingress software, kindly check the following:

1. Please check your PC server IP address using Windows Command Prompt. Run CMD > Type ipconfig > Press Enter. You can see from the picture below that the PC IP address is 192.168.4.214. (Wireless LAN)


2. Go to the device. Press Menu > COMM. > Cloud Server Setting > Insert your PC IP address > Set Server Port to 8088.

IMPORTANT NOTE: If you are using Wireless network (WIFI), please make sure you connect the device with the same wireless network. Menu > Wireless Network > Turn ON WIFI > Select the same network with your server PC.


3. Then, run TimeTec Cloud AWDMS > Click on Access > Device > Search Device > Search. After completed, the device details will be listed as per screenshot below.


4. After you manage to get the device listed in AWDMS, please run your Ingress software. Go to Devices > Add Device > Set the Device Name > Select AWDMS as Communication Mode > Key in Serial Number > Click ADD.


5. After you successfully add the device in Ingress software, you need to assign the new device to the existing Access Group. Go to Access level > Select Full Access > Click Edit > Click Add > Select Door (New door) > Click OK > Save. Please make sure to not skip these steps as the new device needs to be assigned to the existing access group in order for the user data to get synchronized to the new device.


6. Then, you need to do synchronization from Ingress software to the AWDMS. This will sync all the access level settings that have been made in Ingress software to the new device. Click on the Ingress logo at top left corner > Notification > Synchronize Device Setting > Tick all check box > Tick sync to AWDMS > Click on Start Synchronize. During this access group sync, the user list should also be synced to the device automatically. 

IMPORTANT NOTE: Please make sure you already download all the user data such as Face, Fingerprint or Palm template from the current device into Ingress software. This is to make sure there is no data missing during the synchronization process.

*IMPORTANT NOTES : 
1) ONLY SYNC 1 TIME TO THE DEVICE. 
2) IF YOU ADD NEW USER IN THE FUTURE, ASSIGN USER TO EXISTING ACCESS  
    LEVEL AND USE UPLOAD FUNCTION TO UPLOAD NEW USER
3) IF YOU ADD NEW USER IN THE FUTURE AND ASSIGN TO A NEW ACCESS LEVEL, 
    PLEASE SYNC THE SETTING AGAIN FOLLOWING THE STEPS BELOW


7. Lastly, you may check in AWDMS if the new device is already assigned to the access group. Click on Access > Access Control > Access Level > Select one of the access levels > Check the device listed at the right side. Then, you can check in the device whether the user data is successfully transferred.

Note: If some of the screenshots or steps viewed here are different from the ones in the current system, this is due to our continuous effort to improve our system from time to time. Please notify us at [email protected], we will update it as soon as possible.

55 comments:

Have any questions or inquiries about FingerTec? Drop your input here.

Assign User Access Level in Ingress and Synchronize to AWDMS for Smart AC1 and Face ID 5 Series

Wednesday, December 23, 2020 TimeTec 1 Comments


Introduction
The Smart AC1 and Face ID 5 series are the new facial recognition devices with options of scanning a mask or/and body temperature reading. These new devices require connection to the AWDMS before it can be connected to Ingress software. 
This article explains the steps on how to assign User Access Level in Ingress and synchronize it to AWDMS for these new models. 

Process
When a user has been created and enrolled in the Smart AC1 and Face ID 5 series devices, please make sure that the user and its data have been synchronized with AWDMS first before downloading the user in Ingress.


In case some of the user data is not showing, please download the user data in AWDMS first from the device. Go to Access > Device > Device > select the device > View and get device info > Get Personnel information.


1. Once completed, please download all the users into the Ingress Software from AWDMS. Go to Users > Download User > double click at AWDMS > select data and user you want to download > Download.


2. Now, all users should be listed under the Users module in Ingress.


3. Start to set and assign the access level in Ingress Software > Access Level Module. Basically, once you have added the Smart AC1 or Face ID 5 series devices, the system will add the Doors for you automatically. 


4. Go to Access Level Module and configure the Time Set or Time Zone that you want. By default, there will be Anytime and No Time under Time Set with its following Time Zone interval. 1 Time Set have 3 Time Zone intervals, so the 1st , 2nd and 3rd Time Zone are for Anytime Time Set and 4th 5th and 6th are for No Time Time Set.


5. You can add your own preferred Time Set. Click Add Time Set and configure the time intervals where users are allowed to access the door. Define the start and end time applicable for this Time Set. You can configure up to 3 different time sets in a day.


6. Then you may add a new access group to separate the user access to its own access level. Click Add Access Group. And add the door in each Access Group accordingly and Time Set for each door. For example, add the door in Full Access, set the time set to Anytime and assign User ID 1 to this Full Access Group (refer to image below)


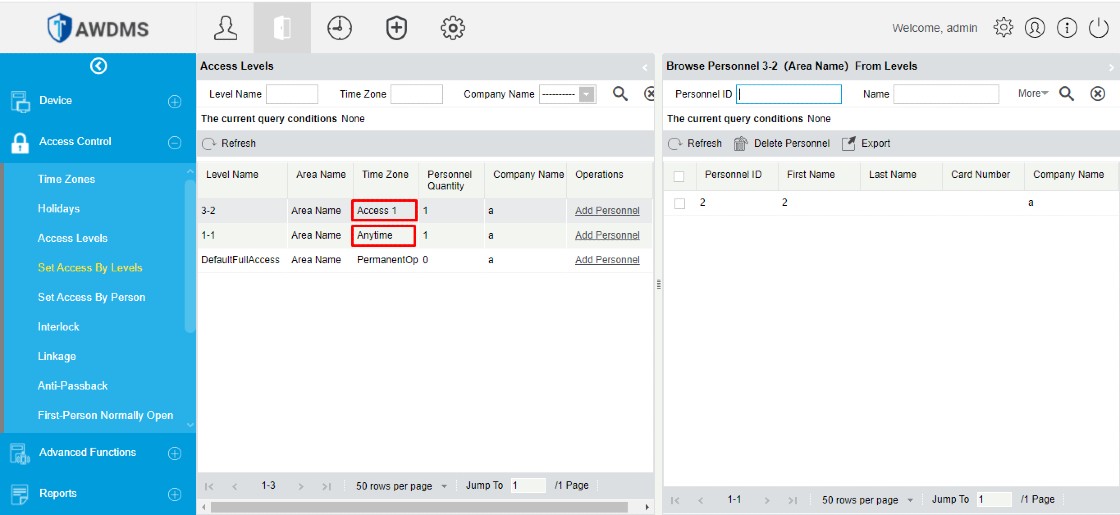
7. Please make sure to assign each user to 1 Access Level Group and for the above scenario, repeat the same process for the Access Group Access 1 and assigned User ID 2. With this configuration, User ID 1 will have Full Access Group (Anytime Time Zone) and User ID 2 will have Access 1 Group (Access 1 Time Zone). 


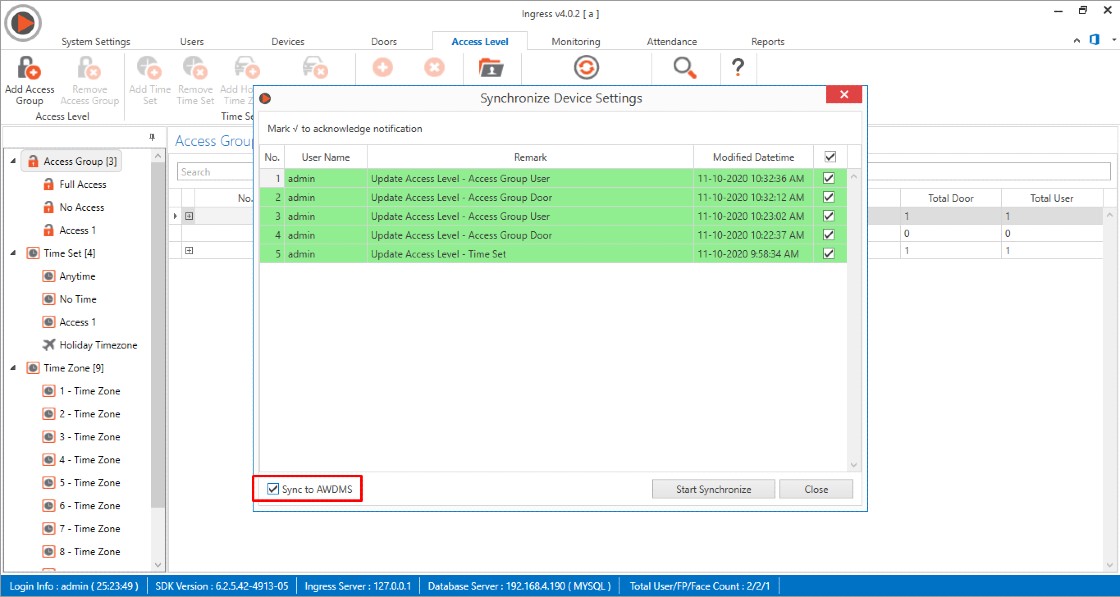
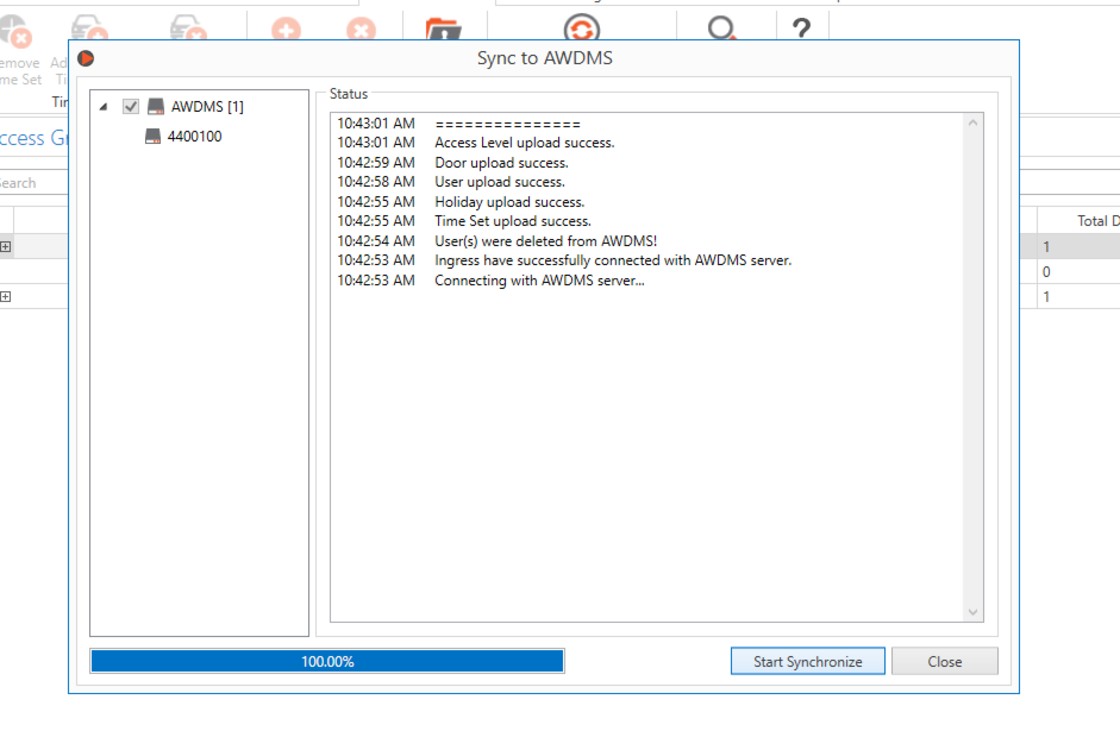
8. When everything has been configured, please sync the settings to AWDMS so that all the settings you have configured are sent to AWDMS and uploaded to the device successfully. Go to Ingress Logo (top Left) > Notification > Synchronize Device Setting > tick sync to AWDMS > Start Sync.

*IMPORTANT NOTES : 
1) ONLY SYNC 1 TIME TO THE DEVICE. 
2) IF YOU ADD NEW USER IN THE FUTURE, ASSIGN USER TO EXISTING ACCESS LEVEL AND USE UPLOAD FUNCTION TO UPLOAD NEW USER
3) IF YOU ADD NEW USER IN THE FUTURE AND ASSIGN TO A NEW ACCESS LEVEL, PLEASE SYNC THE SETTING AGAIN FOLLOWING THE STEPS BELOW


9. In AWDMS, you can check this at Access > Access Control > Set Access by Level > Set Access by Level. 


10. If the settings have been successfully uploaded to AWDMS and the device, the user Access Level will follow the settings that you have configured. If the user access level setting is not working, there might be a possibility that the access level has not been synced to the AWDMS and device successfully. In this case, please check the access level configuration once again.

Note: If some of the screenshots or steps viewed here are different from the ones in the current system, this is due to our continuous effort to improve our system from time to time. Please notify us at [email protected], we will update it as soon as possible.


1 comments:

Have any questions or inquiries about FingerTec? Drop your input here.

Steps to Download Temperature Data from Smart AC1/TD or Face ID 5/TD in Ingress Software and Generate Health Screening Reports

Tuesday, December 22, 2020 TimeTec 0 Comments


Introduction
The Health Screening report is based on the data in the Health Screening under the Monitoring module. These data will be automatically downloaded if the Real-time Monitoring function is turned on. However, you may also download the data from the device through this section before you proceed to generate the report.

Process
1. Go to Monitoring Module > Health Screen > click Download > select the device and date range > click OK. The message will prompt after the download process completes and the available temperature and mask data will be listed in this Health Screening.


2. You may also view the Visitor Health Screening report to monitor your visitor.


3. When the system displays the data, you can proceed to generate the Health Screening report.


Note: If some of the screenshots or steps viewed here are different from the ones in the current system, this is due to our continuous effort to improve our system from time to time. Please notify us at [email protected], we will update it as soon as possible.

0 comments:

Have any questions or inquiries about FingerTec? Drop your input here.

How to Cancel Multi In-Out Visitor Invitations in TimeTec VMS

Tuesday, December 22, 2020 TimeTec 0 Comments


Introduction
In TimeTec VMS, hosts can invite visitors with a single or a multiple in-out visit type. The single in-out is the common visit type for walk-in and a one-time visit, while multiple in-out is typical for recurring visitors that need to visit for multiple days. However, in case the host or visitors need to end the visitation duration earlier, the host can cancel the invitation in TimeTec VMS to prevent any unsanctioned re-entry. 

Process
1. Login to TimeTec VMS mobile app with staff account. Go to the Visitor module.

2. In My Visitors, go to the Upcoming visitor list. Then click on the visitor to select. Cancelling a visitor's invitation is permissible before the visitor checks in or after he/she checks out, as long as the visitor’s name appears in the Upcoming visitor list.  

3. You will be able to see the visitor’s details. Scroll down and tap on Cancel Invitation.


4. Enter the reason for cancelling the invitation and submit. Once submitted, the visitor’s status will turn to Cancelled.


5. When an invitation is cancelled, the visitor cannot enter using the same QR code as before and need to perform a new registration to obtain a new valid QR code.


Note: If some of the screenshots or steps viewed here are different from the ones in the current system, this is due to our continuous effort to improve our system from time to time. Please notify us at [email protected], we will update it as soon as possible.

0 comments:

Have any questions or inquiries about FingerTec? Drop your input here.