Introduction
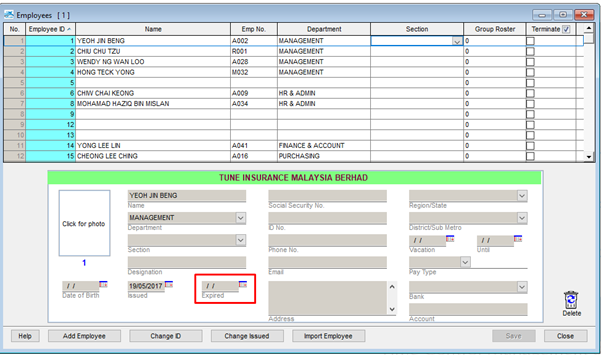
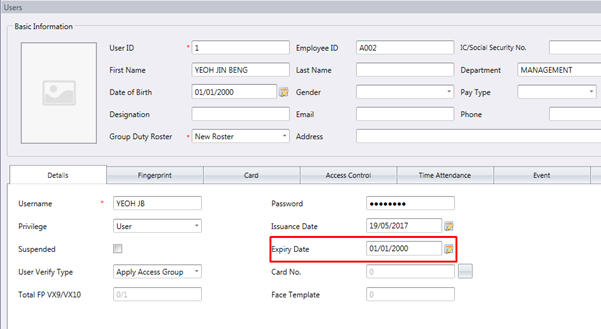
Recently, there are several issues related to database migration from TCMS V2 to TCMS V3 and Ingress software. First, user details migrated without the issuance date, wrong issuance date, or expiry date auto-configured to 1/1/2000.
Solutions
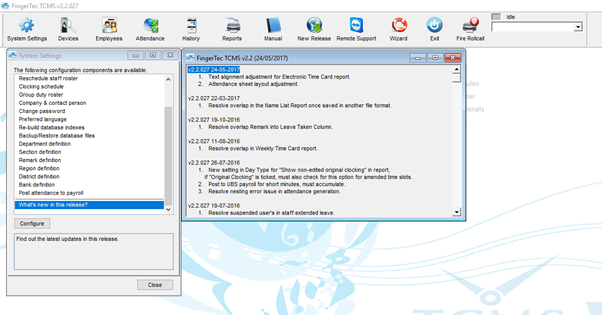
Make sure the backup database made with the latest version of TCMS V2 software. Please be informed that the final version of TCMS V2 software is version 2.2.027 with patch date 24-05-2017.
1. If you are using an old version of TCMS V2 software, please update the TCMS Vv2 software to version 2.2.027 by downloading the software installer at the following link.
https://www.fingertec.com/softwareupdate/software-tcmsv2_download_e.html
2. Also, if you are already using TCMS V2 version 2.2.027, please check the patch date version you are using. Go to System Settings > What’s new in this release? And check the patch date.
3. If the software patch date is older than 24-05-2017, please follow the steps below to update the software patch date.
1) Download the latest ft.exe file from this link:
https://s3.amazonaws.com/files.fingertec.com/Faiz+Tools/TCMSv2+Software+FT+Setup/ft-75+22027+240517.exe
2) Rename the downloaded file to "ft.exe" (remove all the numbers in the file name, and leave it as ft.exe)
3) Copy the above file, and paste it in TCMS v2 folder (Local Disk C > Program Files (x86) >Fingertec Worldwide > TCMSv2) to replace the existing ft.exe file
4) Relaunch TCMSv2 software - Run as administrator [go to System Settings > What's new in the release > Make sure the version is updated: v2.2.027 24-05-2017
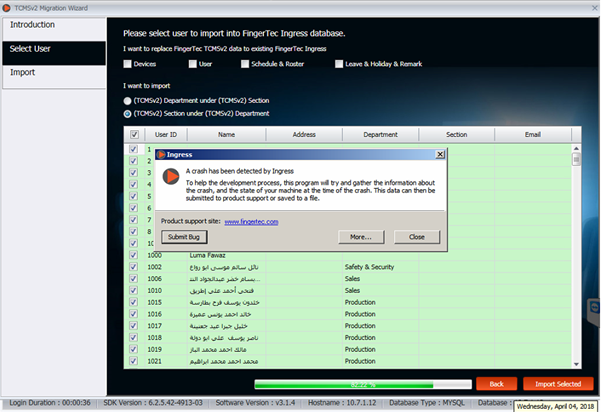
Secondly, please make sure you have installed the latest version of TCMS V3 and Ingress Software before proceeding with the migration process. You are also required to install minimum Microsoft .Net Framework 4.6.2 in your workstation PC. You may refer to the following link for Microsoft .Net Framework 4.6.2 installer.
https://dotnet.microsoft.com/download/dotnet-framework
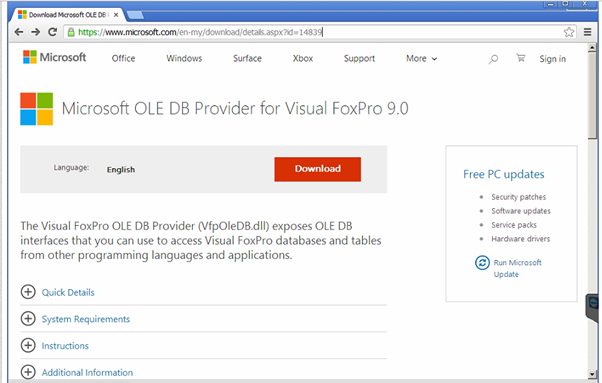
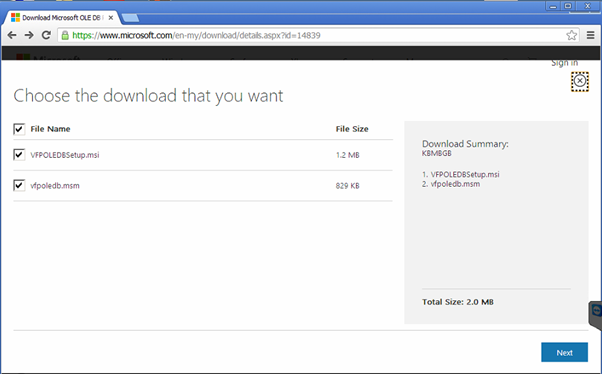
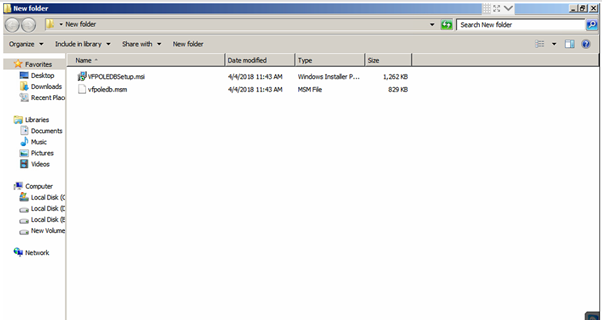
Lastly, you also required to install Microsoft OLE DB Provider for Visual FoxPro 9.0 in your workstation. The TCMS V2 is using FoxPro database type so, this installer allows the OLE DB in the workstation to give access for Visual FoxPro database and tables for migration purpose. You may download the installer from the following link.
https://www.microsoft.com/en-my/download/details.aspx?id=14839
Note: If some of the screenshots or steps viewed here are different from the ones in the current system, this is due to our continuous effort to improve our system from time to time. Please notify us at
[email protected], we update it as soon as possible.
Introduction
Occasionally, users might be facing some issues while using TCMS V3 or Ingress software after
migrating the database from TCMS V2. Below are some examples of common issues that arise after
the migration process.
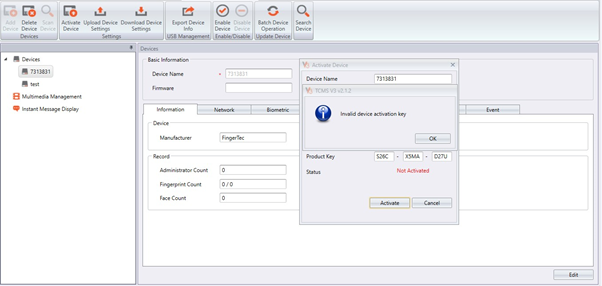
Issue 1: Failed or Invalid Device Activation
To prevent any activation issues, please do not use TCMS V2 product key when activating TCMS V3
or Ingress software. If your PC has an Internet connection, opt for Online Activation in order to
activate the device after the migration process.
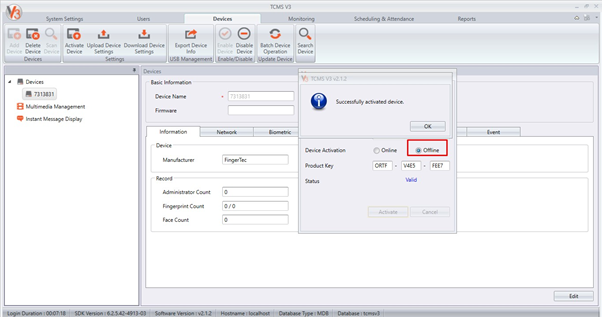
However, if your PC do not have any Internet connection, you will need to carry out offline activation.
device(s) and insert the product key manually to activate.
Issue 2: Different Schedule ID
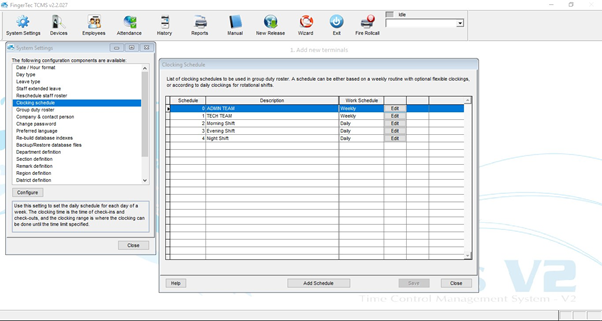
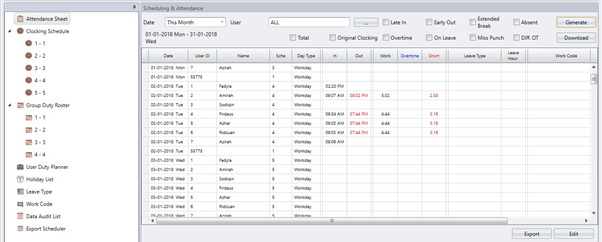
Schedule ID in TCMS V3 and Ingress is different from TCMS V2. TCMS V2 Schedule ID starts from
0, while TCMS V3 and Ingress Schedule ID starts from 1. Thus, you might see a different set of
Schedule ID in TCMS V3 or Ingress after the database migration. For example, in TCMS V2, your
Schedule IDs are 0 - 4; however, once you migrated to TCMS V3 or Ingress, the Schedule IDs will
be labelled as 1 - 5. Don’t worry, this is not a bug, it happens because of the difference in software
architecture.
TCMS V2:
After Migration:
Issue 3 - Open Schedule Differences in TCMS V2 and TCMS V3/Ingress
After migrating the database from TCMS V2, you might encounter certain issues related to Open
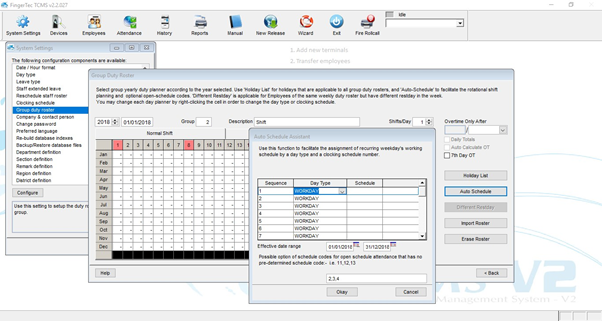
Schedule roster in TCMS V3 or Ingress. Open Schedule roster configuration in TCMS V2 slightly
differs with TCMS V3 or Ingress. Shift Roster is used to create Open Schedule for TCMS V2, but for
TCMS V3/Ingress, you will have to use Weekly Roster to configure an Open Schedule. Note that you will have to reconfigure the roster in TCMS V3/Ingress after the migration. Otherwise, the data
will not be allocated correctly in the software.
Open Schedule settings in TCMS V2:
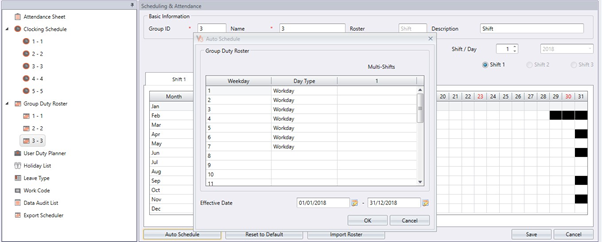
After Migration:
In TCMS V3/Ingress, there is no option for you to configure the Open Schedule within the migrated
shift roster. To ensure that Open Schedule roster works in TCMS V3 or Ingress, we suggest that you
create a new Open Weekly Roster and re-configure the Open Schedule configuration. Note that you
can still use the existing migrated Schedule ID in the new Weekly Open Roster.
To create Open Schedule Roster in TCMS V3/Ingress:
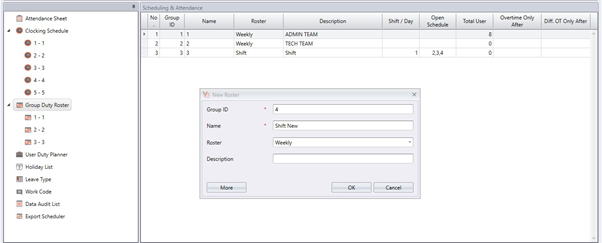
1) Go to Group Duty Roster > Click Add Roster > Configure the roster name and set the roster as
Weekly > OK
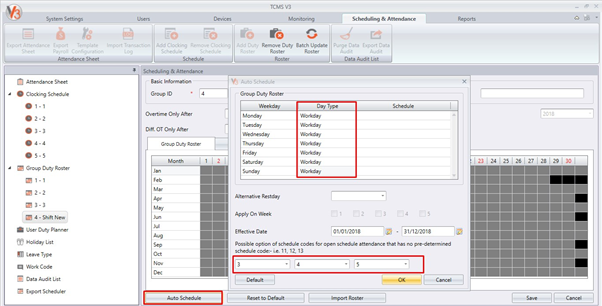
2) Select the new roster and click Edit > Auto Schedule > Set the Day Type and add the Open
Schedule ID
INTRODUCTION
TCMS V2 is FingerTec’s bundled software since 14 years ago and over the years we have made progress on the software front. Earlier this year we have introduced the latest and more powerful bundled software TCMS V3 designed for time attendance purpose. Now, you can migrate your data from TCMS V2 to TCMS V3 software easily. Learn how.
BENEFITS
You neither need to redo the clocking schedule setup, nor do you need to insert employee biodata into the TCMS V3 software. The types of data to migrate are as follow:
1. Company hierarchy (names of departments and sections)
2. Attendance rules and calculations (clocking schedules, group duty roster, holiday, leave types)
3. Employees’ biodata (name, address, phone, designation etc.)
4. Employees’ verification credentials (ID, fingerprints, password, card ID)
However, please note that the manually edited data in your TCMS V2’s attendance will not be migrated because the data migration only takes the raw clocking in your Audit list, and generate a new attendance sheet in TCMS V3.
Note : We are strongly recommending user to do housekeeping before migration process for large scale database so that it can decrease migration time and enhance migration process.You can refer
here on how to do housekeeping in TCMS V2.
PROCESS
1) Backup your TCMS V2 software database at TCMSv2 > System Settings > Backup/Restore Database > Backup Database.
Note: You must make sure that you are using TCMS v2.2.027 to make the backup. If you are using an older version of TCMS v2, please first update your software to v2.2.027. The installer of TCMS v2.2.027 can be downloaded
here
2) Now, go to the TCMS V3 software > Click v3 icon > Migration Wizard > FingerTec TCMSv2.
3) Click browse and choose your TCMSv2 backup database and click upload.
4) Select all employees and tick all options that you want to migrate such as devices / user / schedule & roster / leave,holiday,remark. After done, click import selected.
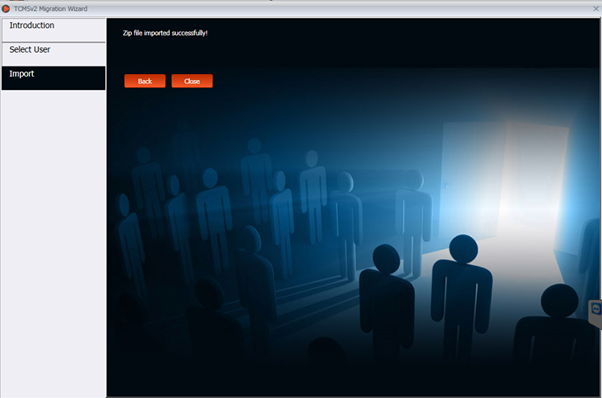
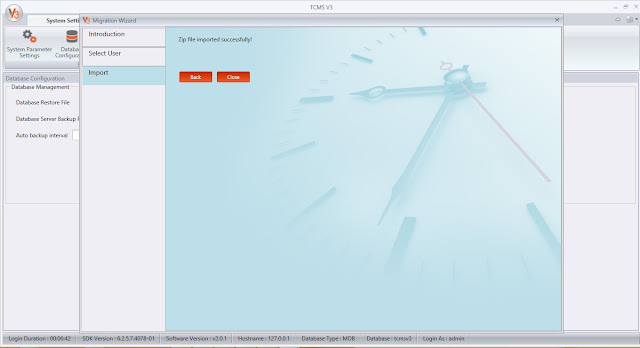
5) The migration process is finished when the zip file has been imported successfully.
AFTER MIGRATION
1. Please ensure you activate your device in
TCMS V3 so that you will have full access to all tabs. Before activating any
device, only these selected tabs: System Settings, Users and Devices are accessible. Monitoring, Scheduling & Attendance and Reports are initially disabled.
2. Go to Devices, select the device > click Activate Device.
System will automatically activate the old device with the TCMS V3 software
through online activation.
3. However, if you need to activate the
device manually (Activate
Device >
select Offline) you can always retrieve the TCMS V3 key from the following link:
4. TCMS V2's and TCMS V3's license keys are
different, so you will not be able to use the previous activation key.
5. It is
advisable for users to disconnect device from TCMS V2 once you successfully
connect device to TCMS V3 software. Once you have downloaded data into TCMS V2
software, it will automatically delete transaction data from the device and you
will not be able to download that data into TCMS V3.
6. If you are
testing attendance and reports after the migration, firstly, please generate
attendance for all users to ensure relevant data enters the attendance sheet (Scheduling
& Attendance > Attendance Sheet > Generate > Select User ID and Date Range> Ok). Also, check user Issuance Date and
ensure that it is prior to the date selected for generating attendance.
For more guidance on TCMS V3 such as user manual, video guides and training slides, please visit our website at www.fingertec.com/software/ and select TCMS V3 or click here.
You can also find links to other tips available for TCMS V3 at the following page:
http://user.fingertec.com/technical-tips-software-tcmsv3.html
Related Posts:
Common Issues in TCMS V3 / Ingress Software After Database Migration
15 TCMS V3 Most Common Technical Questions Answered
INTRODUCTION
TImeTec TA and TCMS V2 software are two difference application with the nearly similar functions where you can centralize, store and manage all transactions data. Both applications enable you to download and process attendance records to help organizations better manage their dynamic workforce.
Here we will discuss and explain about Migration and Rollback Wizard that available is in TimeTec TA application. In computing term, Migration is the process of transferring data between one operating environment to another operating environment. In the meantime Rollback is the process of restoring a database or program to a previously defined state, typically to recover from an error. In simpler term, to Undo.
BENEFIT
This feature provides a simple backup and restoration process for users who are sceptical about moving to a new software without experiencing data lost, where there can use both TimeTec and TCMS software as an easy one-way to store employee data. In this wizard it will ease the admin’s job and give them the flexibility to either keep the existing data such as Company information and hierarchy, User or employee data, Devices, Schedules & Rosters, Leaves and Holidays between this two application (TimeTec TA and TCMS V2).
Migration from TCMS V2 to TimeTec TA
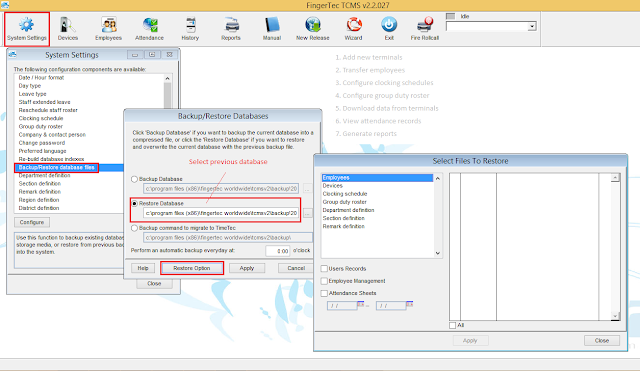
1) It’s important that you backup the database file from TCMS V2 software by going to System Setting > Backup/Restore database > select Backup command to migrate to TimeTec > Apply.
2) Copy the file and save in one folder for easy tracking.
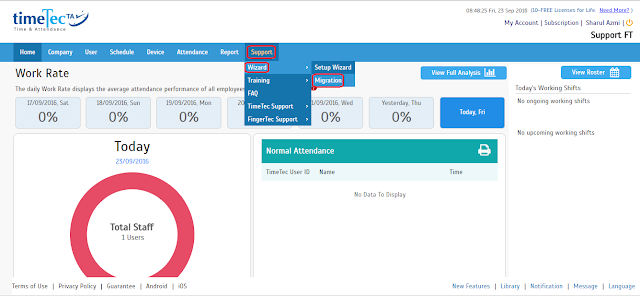
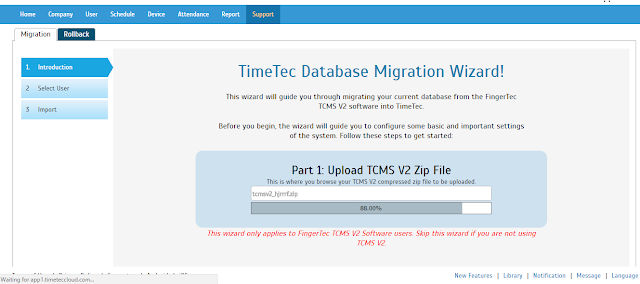
3) Login to your TimeTec TA account and go to Support > Wizard > select Migration.
4) Inside the Migration wizard, click on Browser, select the TCMSv2 backup file, then press Upload.
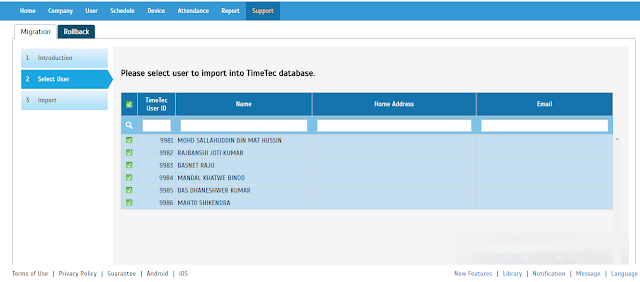
5) Select the employees to migrate into TimeTec TA (You can ignore those who are suspended or have resigned.) > Click Import Selected. System will process and a successful message will appear once completed.
6) Now you can see all the Company Info, User data, Schedule, Roster and other info that have been updated into your TimeTec account.
7) For details step, you can also refer to the following link /2014/02/migrating-data-from-tcms-v2-to-timetec.html
TimeTec TA is a better choice for your time attendance needs because it is on cloud, it’s effective, accessible, scalable and affordable. Find out more at www.timetecta.com
Introduction
Any unmaintained database will be accumulating problems in one or more
areas, which can eventually lead to poor application performance or even
downtime, data loss and file corruption.
When referring to computer program, housekeeping is a term used to describe the optimization
of database. It commonly involves removing old or unused files and data,
backing up, or running disk utilities such as a ScanDisk, Defrag, or simply an antivirus
scan.
Benefit
In this article, we will explain how to maintain the database and demonstrate
some simple ways to manage and do housekeeping on TCMS V2’s database to keep the system organized and to ensure that it runs properly. It is advised for this routine to be performed at least six months once.
Process
1. First of all, before you make
any changes on the database and system, it is
recommended to backup the
database file. In TCMS V2 software you can backup
the database at System
Setting > Backup/Restore Database > select Backup > Apply.
You can
also refer to the article in the link here.
2. Once you are done with the backup
process, close the program and open the TCMS V2
folder file. By default the
TCMS V2 folder are located in C:\Program Files (x86)\
FingerTec Worldwide\TCMS V2.
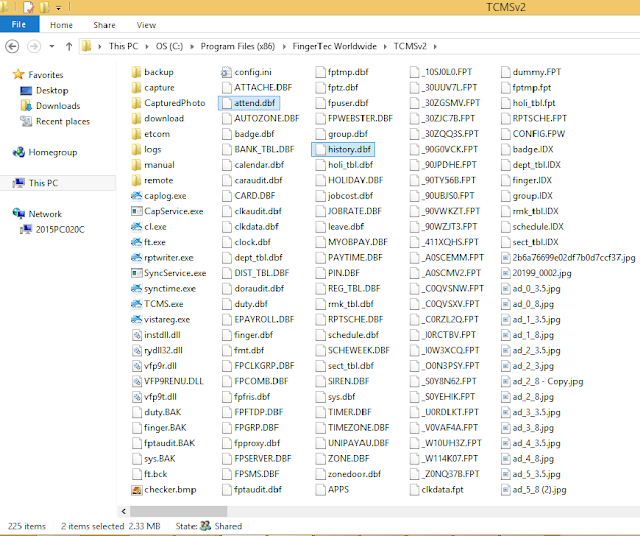
Delete all the .CDX file and remove database file
named Attend.DBF, History.DBF, Clkdata.DBF, and Fptaudit.DBF to another folder.
3. Replace a new fptaudit.dbf from here into the TCMSv2 folder.
4. Go to C:\\ Program Files > FingerTec Worldwide > TCMSv2 > etcom and copy the
_etcom file. Then paste the _etcom file into the remote
folder inside the TCMSv2 folder. Start up the TCMSv2 software, go to Attendance and
click Download.
The system will download the raw clocking data from the _etcom file. After the
process is completed, the system will delete the file that you paste in the remote
folder.
5. Go to
Employee tab and delete the user or employee who has resigned from the
company.
6. Last
step is to proceed to the Attendance tab and generate new Attendance record
based on the current transaction log and employee data. Perform the
database backup
again after you finish generate.
Kindly take note, by following these housekeeping steps, you can
minimize the database size. If you need to view the transaction log that has
been deleted, you can restore back the database file and retrieve User record
and Transaction log by using the Restore Option features.
1. To
retrieve User or Employee Record, you can select Employee > tick on
User Record
and Employee Management >
select Employee you want to restore > Apply.
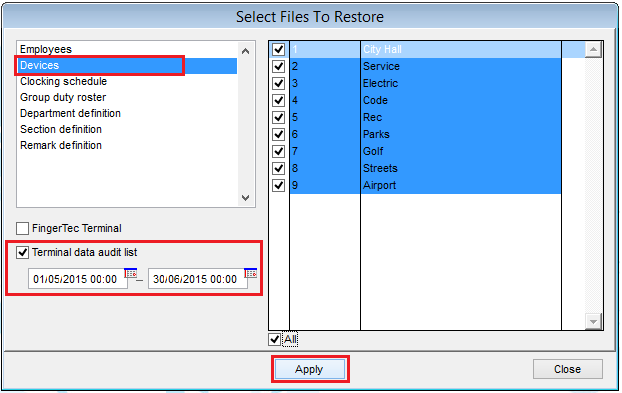
2. To restore
Transaction Log, you can select Devices > tick on Terminal Data Audit List
>
select the Date Range > select All terminal > Apply
3. After
you done this two step, please re generate the record at Attendance >
Generate
to view all the transaction log again.
Introduction
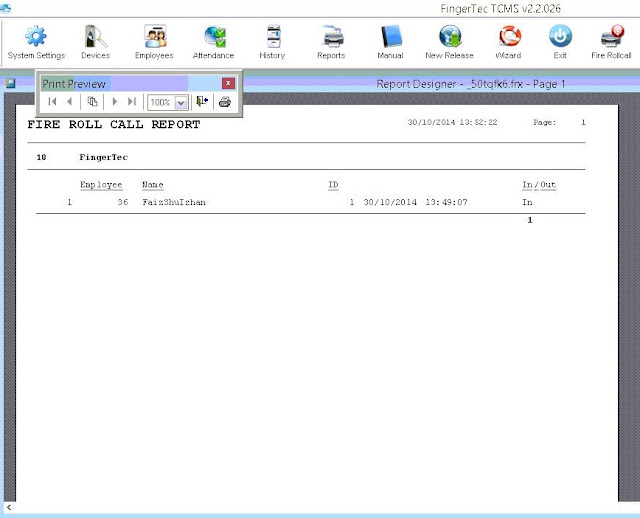
TCMS V2 has a shortcut
button to print the fire roll call report. The report will display a list of users
who are still stranded in a certain zone or office during emergency. This
report will only work if you have installed an In-Out reader system with
anti-passback (No & Save) activated or In-Out reader system using two
TCP/IP connections.
The In-Out reader system is
a system where it compiles records of users who are entering a zone. Similarly
to leave a zone the particular user is required to verify his/her fingerprint. Nobody
is allowed to re-enter without performing a verification to leave the zone.
TCMS V2 constantly checks
users that are entering and leaving the zone by gathering transaction logs from
these two readers. The report will ONLY display the user ID of users whom have
not checked out from a zone, making it easy to detect trapped victims.
Benefit
This function/feature is very
useful to the HR department at times of emergency, as it will help them
identify and keep track off employees that are yet to evacuate the building.
Upon learning of this information, the respective HR personnel may alert the
authorities to ensure necessary and timely rescue efforts.
Process
1) Activate both terminal in
TCMSv2 > Devices > Setup FingerTec Terminal and
assign as IN & OUT
Door.
2) You will need to configure the Entry
and Exit door in TCMSv2 > Devices >
Configure Access Zone.
3) Download all the clocking
data back into TCMSv2. You may check all the
clocking data at the terminal data
audit list.
4) Click the Fire Roll Call
button to identify which employees is trapped in the
building. The Fire Roll
Call report will then make available the list of
employees who has a
transaction recorded at IN door.
Introduction
Recently, there
have been multiple cases where users encountered an error while downloading
data from terminals into TCMS v2.2.027. This is identified as the “OLE error”
where the software is not able to read and retrieve the data due to
incompatibility of the BioBridge SDK that is bundled with TCMS v2 software.
Benefits
By adhering to
these tips, users will be able to clarify and solve
the OLE error when downloading clocking data from FingerTec terminals.
Process
To resolve your issue, kindly follow these
steps:
1) Close TCMS v2 software
2) Download the latest ft.exe file from
HERE.
3) Rename the downloaded file to
"ft.exe" (remove all the numbers in the file name, and
leave it as
ft.exe or ft depending on your PC's setting).
4) Copy the above file, and paste it in
TCMS v2 folder (Local Disk C > Program Files (x86) >
FingerTec Worldwide
> TCMSv2) to replace the existing ft.exe file.
5) Download SDK Installer from this HERE.
6) Unzip the downloaded file and run the installer
accordingly. Please note that there are 2
files in this folder, kindly select
the one with .exe format.
7) Restart PC
8) The OLE error will not re-appear once
you relaunch the TCMSv2 Software.
Introduction
Using the
TCMS V2 on a PC that is running on Windows Vista, Windows 7, Windows 8, and
Windows 10, can occasionally cause some glitches. Due to the extra security
features that are built into the newer operating systems, an error message will
pop up regularly when you launch TCMS V2 software. This is because the program
files and system registry files on these Operating System (OS) are protected,
and running the TCMS V2 requires access to these protected files. To prevent the prompting of
the error messages and to ensure that the TCMS V2 is running smoothly on your
OS, there are a few steps that need to be taken.
Benefits
By
performing these steps, users will be able to launch TCMS V2 software without
encountering the “Required Active X is not registered properly or is outdated”
error message.
Process
1) Close TCMS V2 software
2) Go to TCMSv2
folder ( Local Disk C > Program Files (x86) > Fingertec Worldwide >
TCMSv2
3) Run Vistareg.exe
as Administrator
4) Once done, return
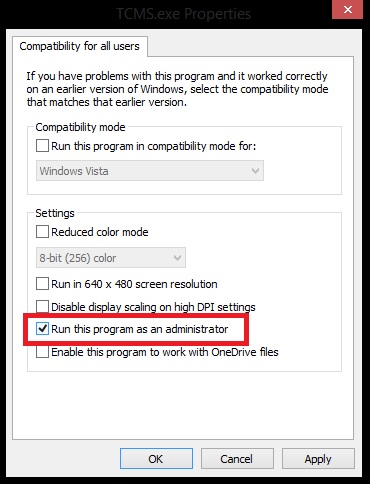
to your desktop, and right-click at TCMS V2 icon, then select “Properties”.
5) Go to
“Compatibility” tab, and click on “Change settings for all users”.
6) Check the “Run
this program as an administrator” option, then click “Apply” and “OK”, and the
problem will be out of your site.


 INTRODUCTION -