Steps to Solve “Backdate is not permissible” Error in the TCMSv3/Ingress Software

Monday, December 23, 2019 TimeTec 4 Comments


Introduction
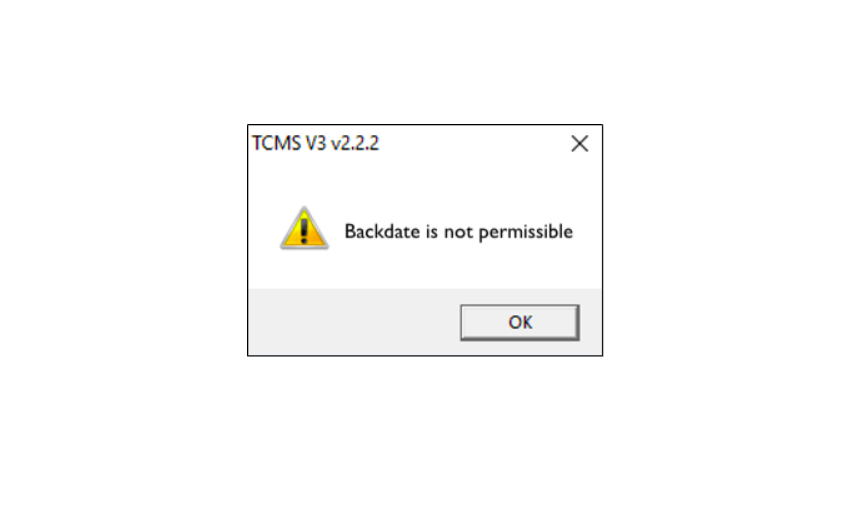
The above message will be prompted when a user restores a database that is labeled under a different time zone. This issue occurs can be due to the time in the current PC does not match with the time fixed in the database. Additionally, changing the timezone of the PC can result in backdating errors as well. Here is a step-by-step guide to resolve this error.

Process
1) Disable PC antivirus
2) Download the tool from the link below
https://bit.ly/ft-initdate 
3) Copy and paste the tool into the TCMSv3 or Ingress Server folder. By default,
i- TCMSv3 folder is located in C: > Program Files (x86) > FingerTec > FingerTec TCMS V3 > TCMS V3
ii- Ingress Server folder is located in C: > Program Files (x86) > FingerTec Worldwide > FingerTec Ingress > Ingress Server
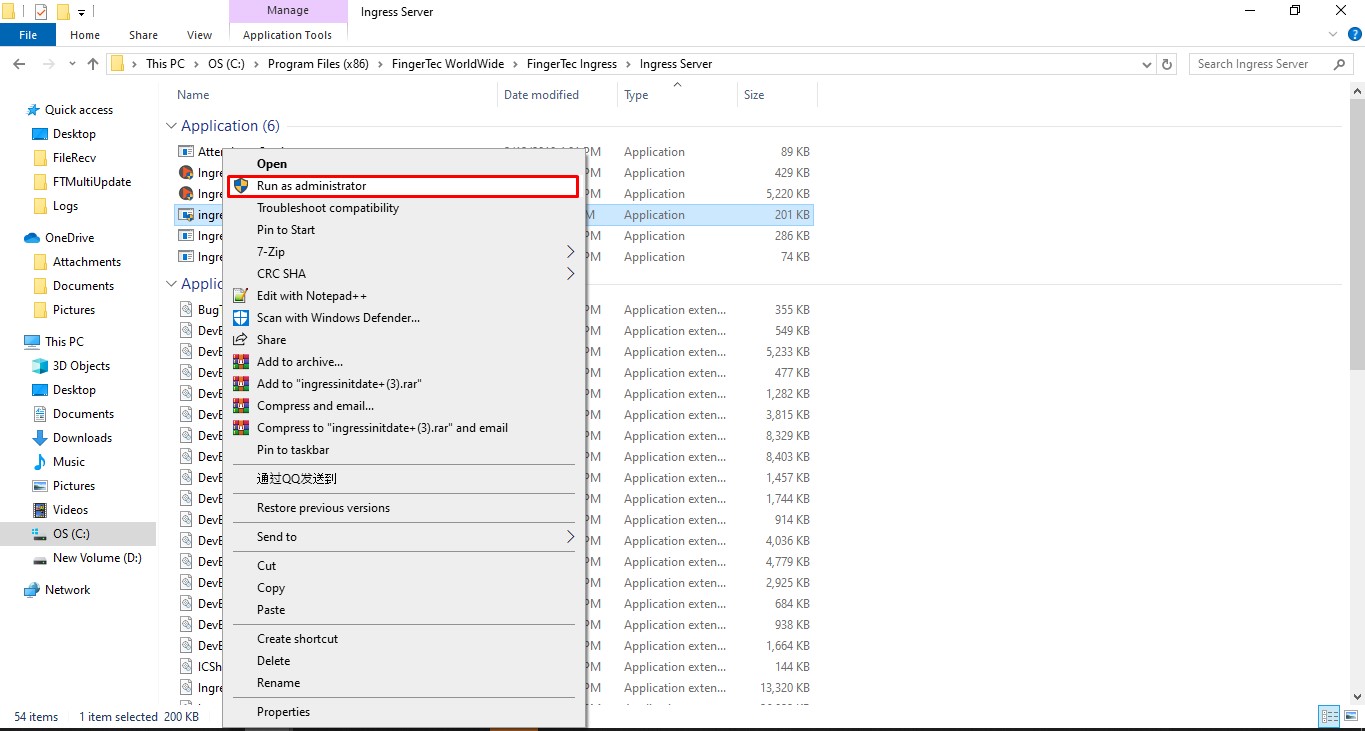
4) Run the tool as an administrator 


5) When a window pops up, provide the 5-digit number to our team at [email protected] in order to obtain the password. Please note that the window shall not be closed until we have provided the actual password.

6) Below is an example of the password that will be provided by the support team for users to insert in the password field as stated above.

Remark: Once the password is provided, it is advisable for users to type in manually. Do not attempt to copy and paste the password.


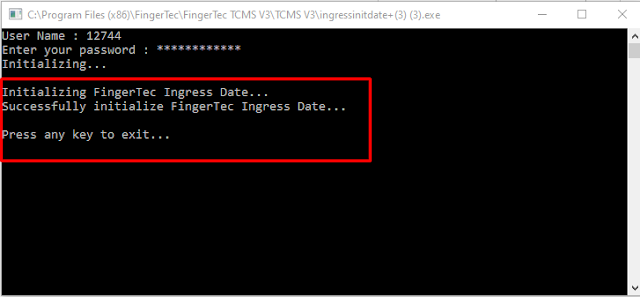
7) Once the password is correctly entered, the successful message will show on the screen and users can press any keys on the keyboard for program exit. 


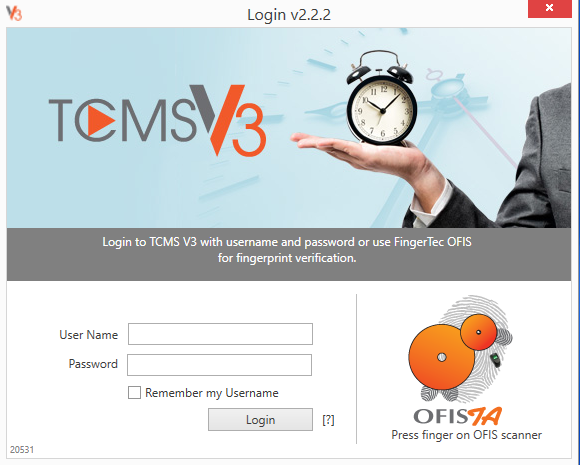
8) Now, users are able to login to the software without further delay.

Note: If some of the screenshots or steps viewed here are different from the ones in the current system, this is due to our continuous effort to improve our system from time to time. Please notify us at [email protected], we will update it as soon as possible.

4 comments:

Have any questions or inquiries about FingerTec? Drop your input here.

Time Zone Setting in TimeTec TA

Monday, December 23, 2019 TimeTec 1 Comments


Introduction
The time zone setting will allow the system to identify the time used in a particular area. The default time in the app follows the users’ or the company’s time zone and server time instead of the time indicated on the mobile phones. The issue with the time zone feature is, the login time does not display the exact time as shown in the phones. It will automatically synchronize the time zone according to the server time.
Process
TimeTec TA
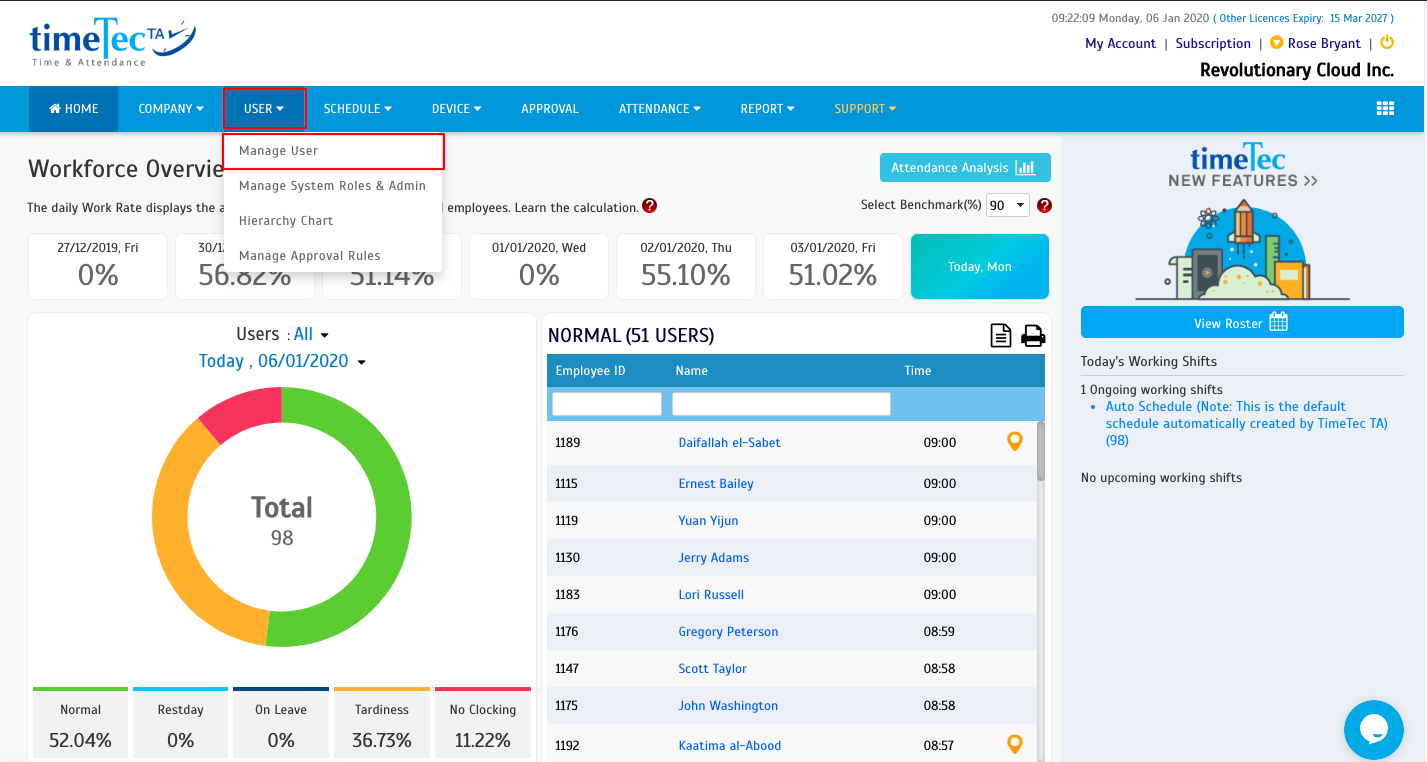
1) Log in Timetec TA, click user > choose manage user.

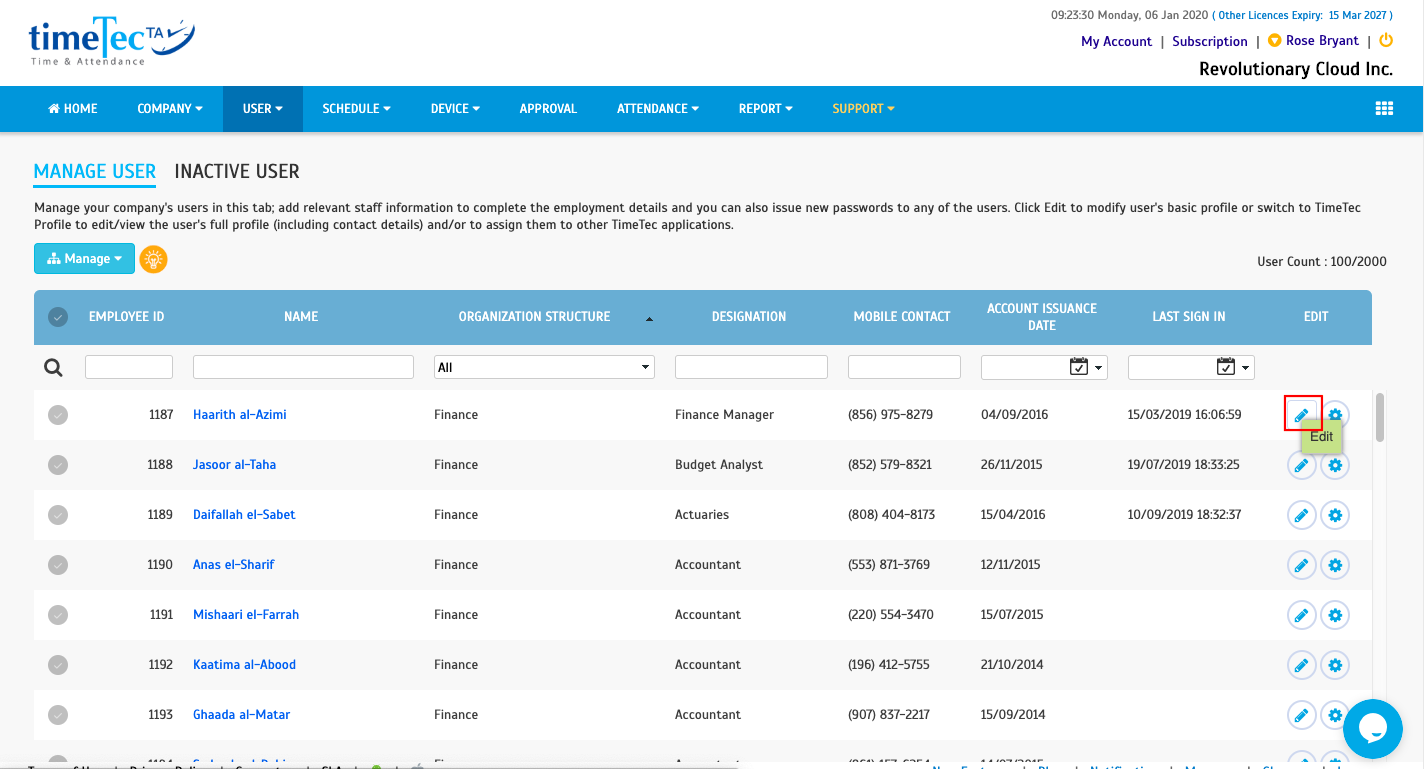
2) Select user and click edit, the ‘pencil icon’.

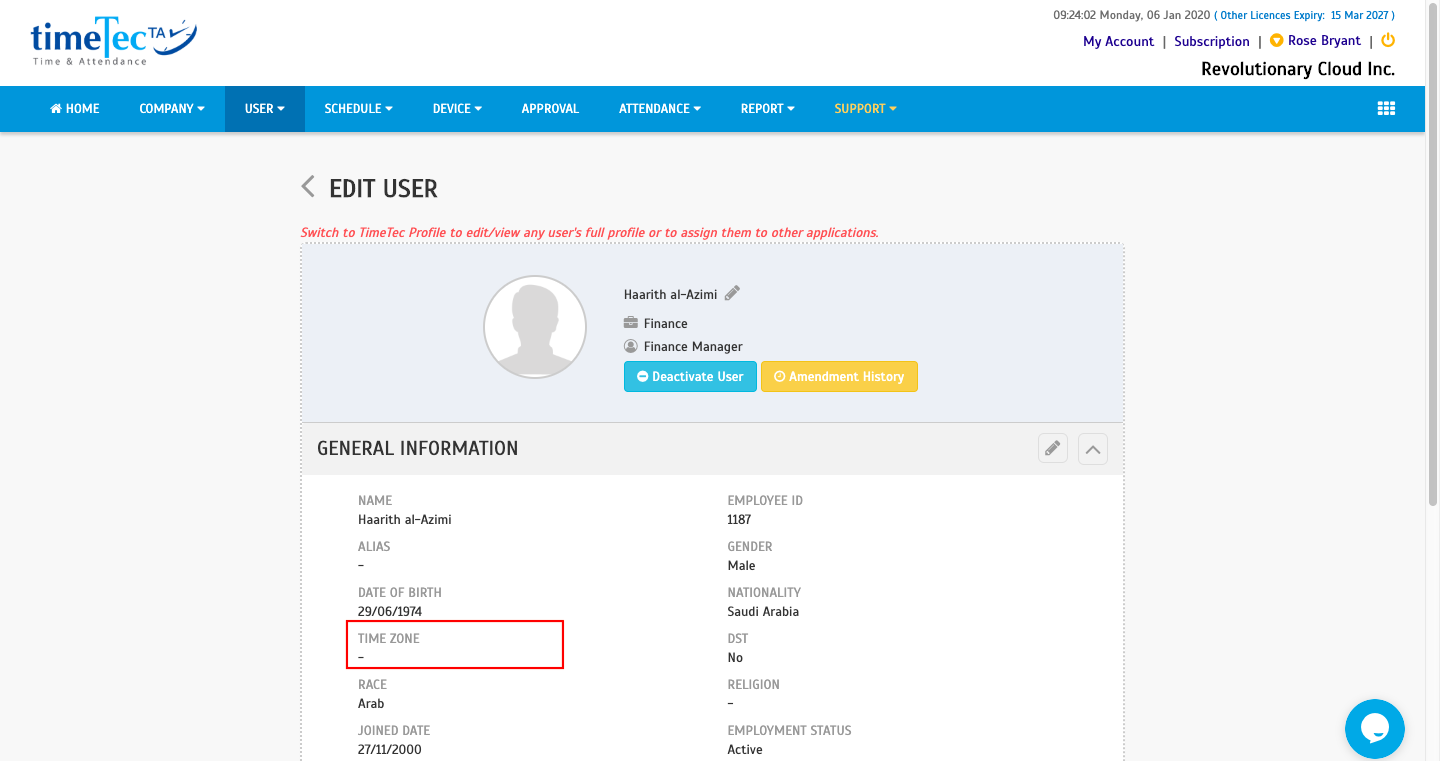
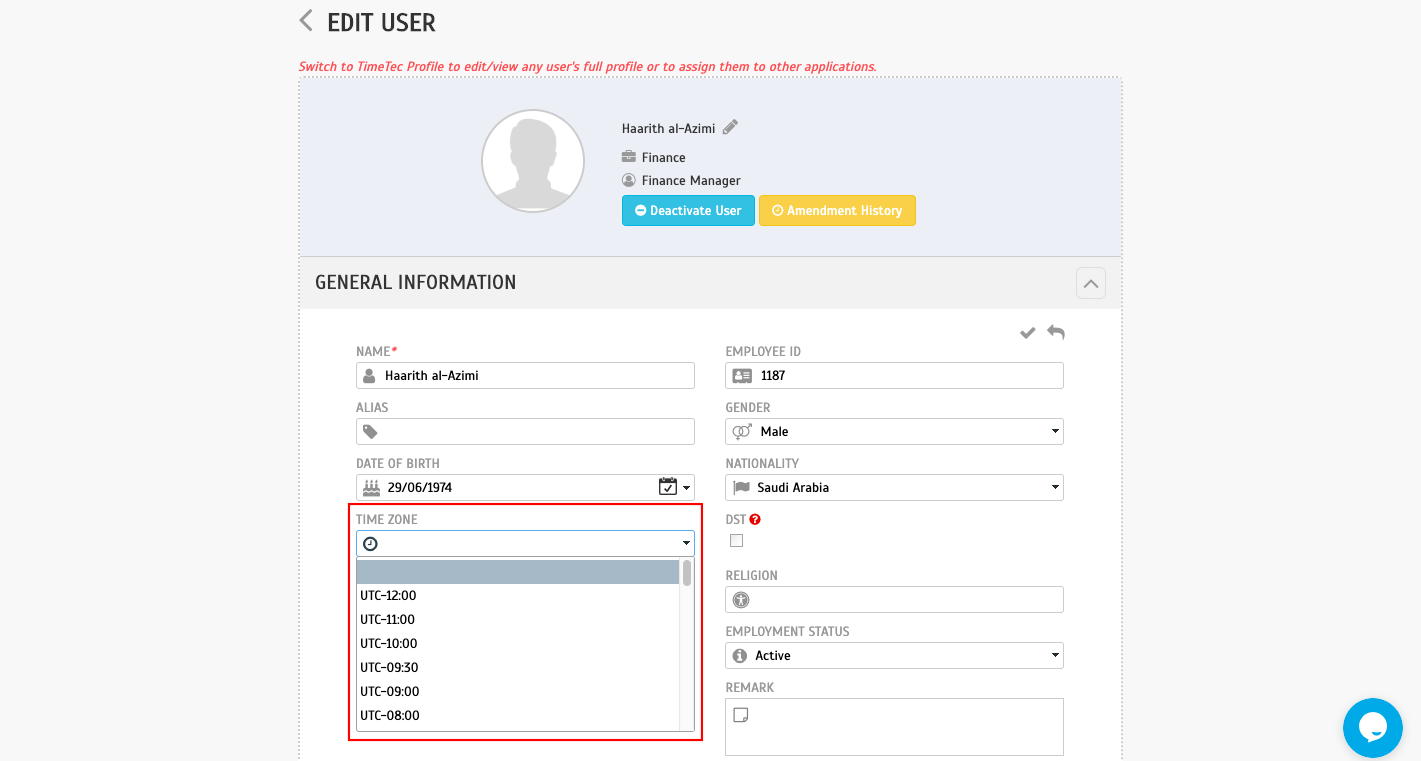
3) A new window will pop up for user profile editing, look for time zone.

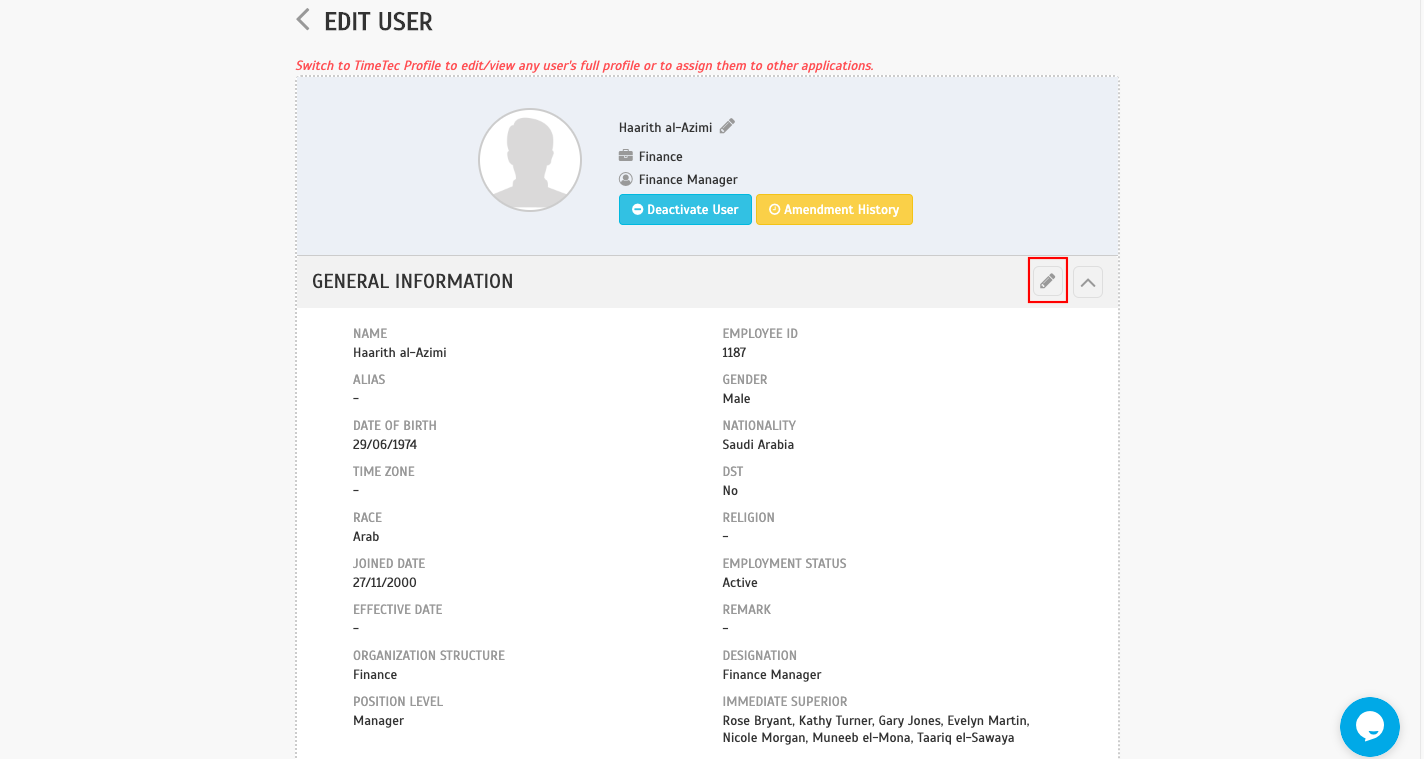
4) Users can make a configuration by clicking on the edit button ‘pencil icon’.

5) Choose the desired timezone.

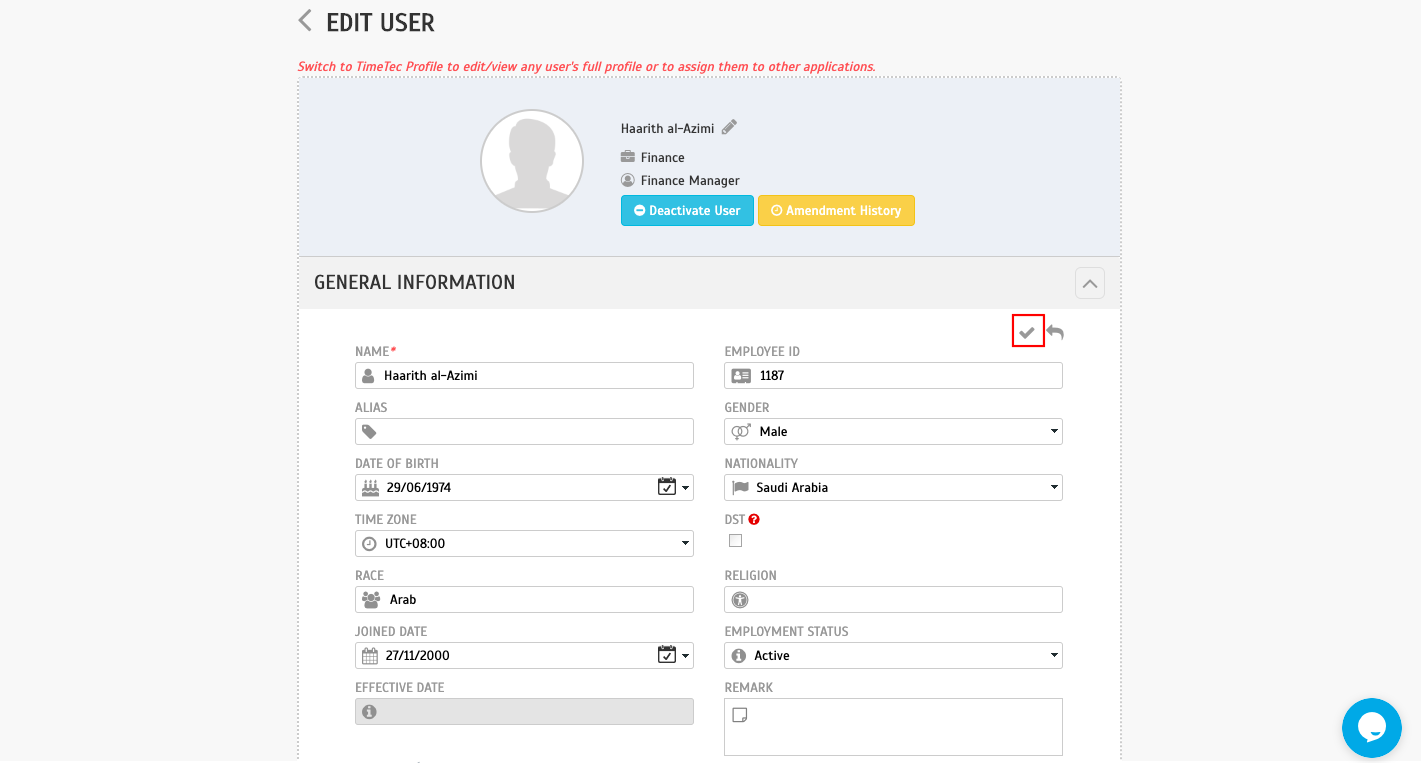
6) Once a time zone is selected, save your changes by clicking on the Tick to save.


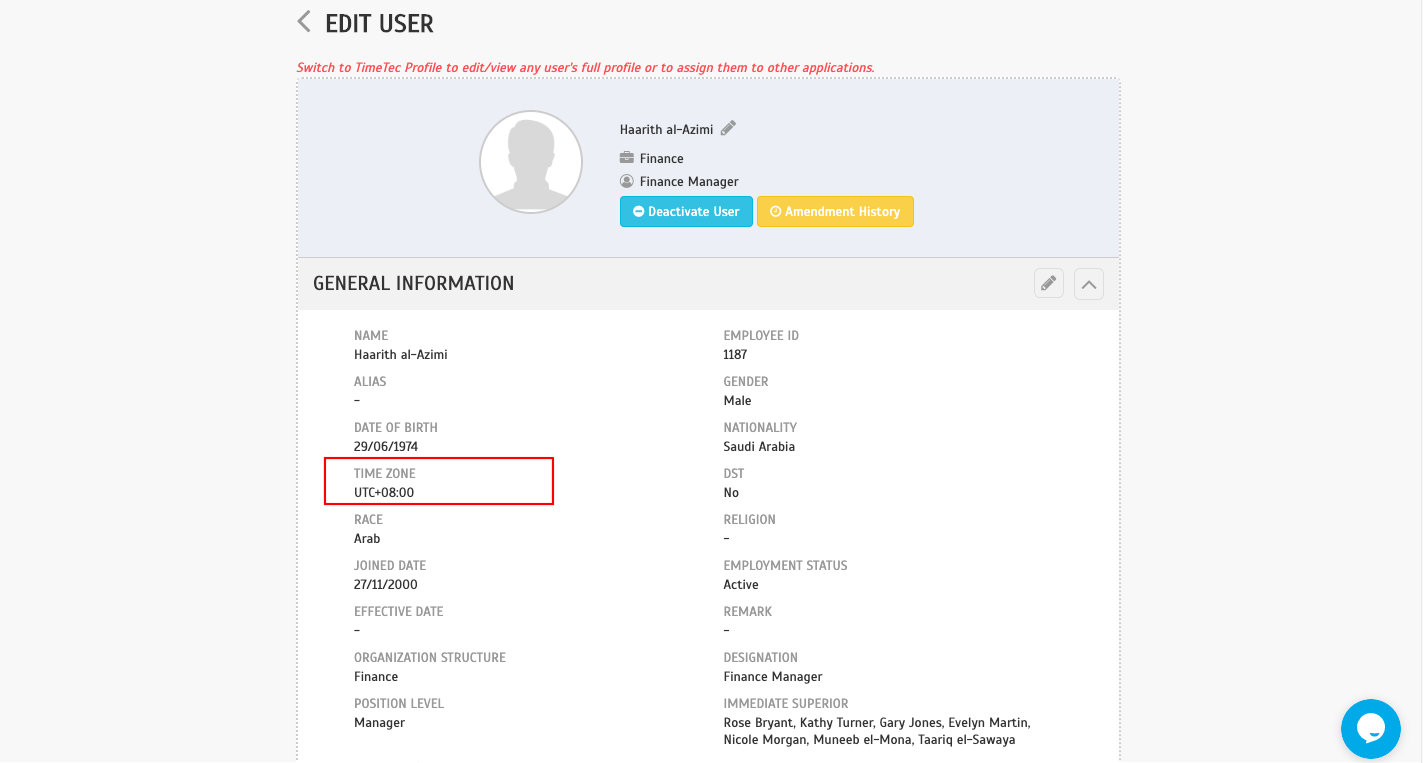
7) The configuration for time zone setup is completed.

Note: If some of the screenshots or steps viewed here are different from the ones in the current system, this is due to our continuous effort to improve our system from time to time. Please notify us at [email protected], we will update it as soon as possible.

1 comments:

Have any questions or inquiries about FingerTec? Drop your input here.

How to Solve the Red Color Issue in the Data Audit List for Ingress/TCMSv3 software

Monday, December 23, 2019 TimeTec 0 Comments


Introduction
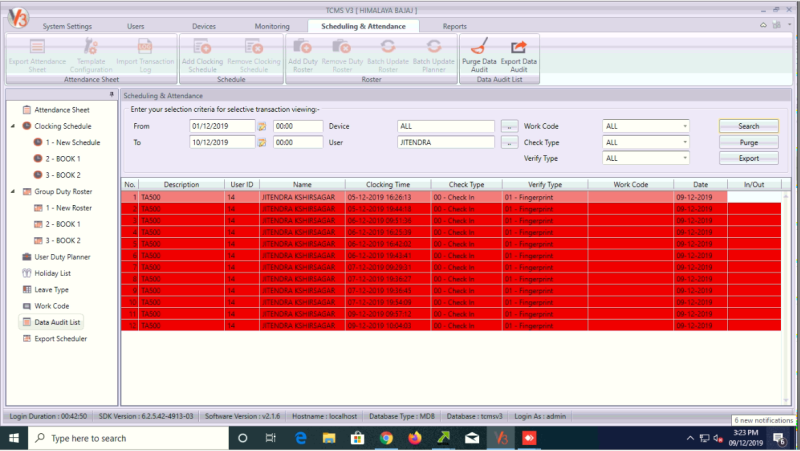
We have been receiving feedback from some TCMS V3/Ingress Software users, whereby their transaction log data in the Data Audit List become red in colour and have inadvertently caused the users’ clocking data to not have appeared in the Attendance Sheet. This issue has occurred due to the process of incorrect change of User ID.
Example: Based on the picture below, the transaction log in the Data Audit List listed in red can be observed.


Processes
Therefore, we have prepared a guide to help users to resolve the TCMS V3 and Ingress software issues. Please follow the steps below:
1) Download the tool from the link below > Extract the folder
2) Once finished, please copy the downloaded zip file and paste it into a specified location in the software. The location for Ingress or TCMS v3 software is provided below.


Ingress Software Location: C:\Program Files (x86)\FingerTec Worldwide\FingerTec Ingress\Ingress Server
TCMSv3 Software Location: C:\Program Files (x86)\FingerTec\FingerTec TCMS V3\TCMS V3
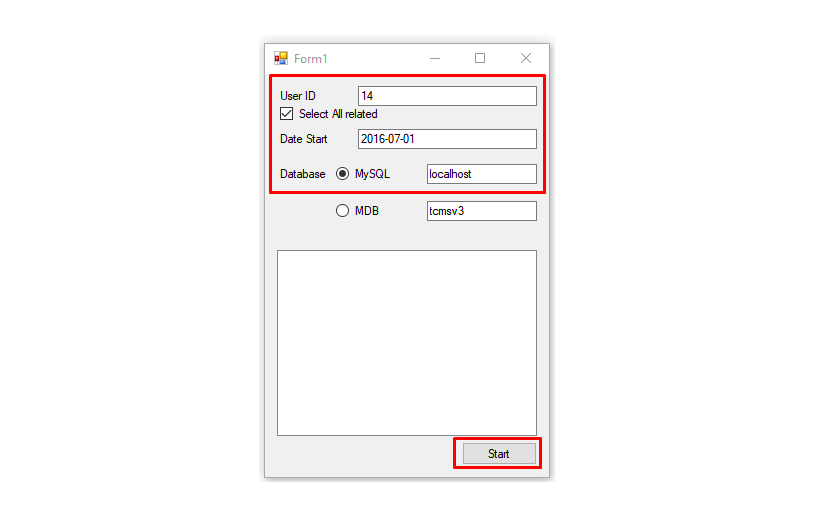
3) Run the file as an administrator > Fill up the user ID in the bracket stated in red > Tick Select all related > Choose MySQL / MDB depend on software > Click Start

4) Once the loading up has finished > Go to the Attendance Sheet > Click Generate > Select the User and Date range that is showed in the red brackets below.


Note: If some of the screenshots or steps viewed here are different from the ones in the current system, this is due to our continuous effort to improve our system from time to time. Please notify us at [email protected] we will update it as soon as possible.

0 comments:

Have any questions or inquiries about FingerTec? Drop your input here.

Pairing R3c with Face ID X

Monday, December 23, 2019 TimeTec 0 Comments


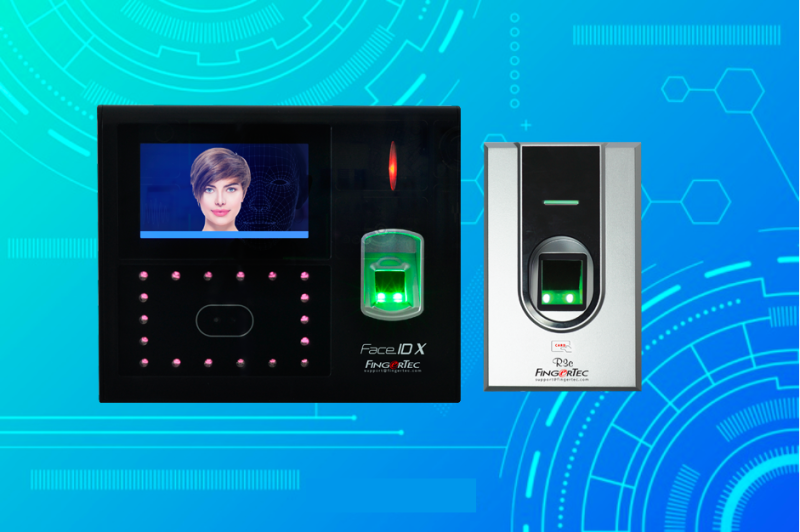
Master-slave is a model communication or process to controls one or more other devices that serve as their communication hub. One device will act as the Master control and other devices will automatically label as the slave terminal(s). In this case, we will be using the new Face ID X pairs with the R3c device as an example.

Requirement
-         Master device ( Face ID X )
-         Slave device ( R3c )
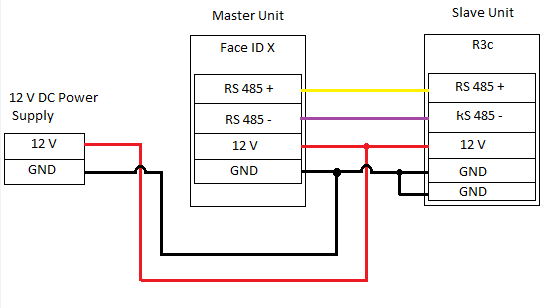
-         12V Power Supply
-         RS485 Power and communication cable

Wiring diagram

Setting up the Master-slave function
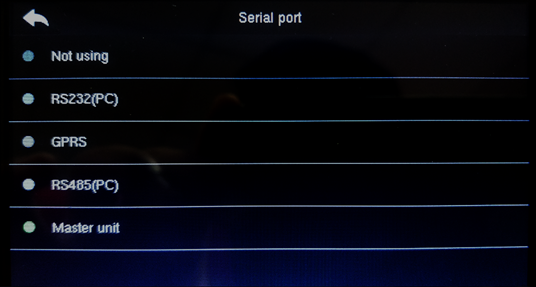
Changing the serial port setting:
By the device screen, select MENU > select Comm > select Serial Comm > select Serial Port > select Master Unit.
 Verification Type:
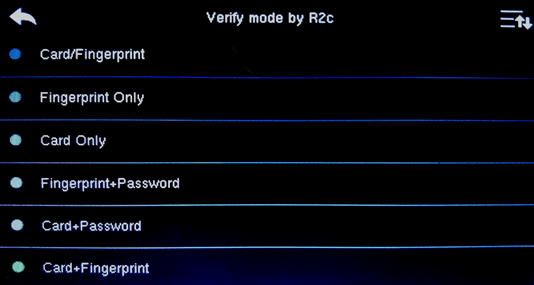
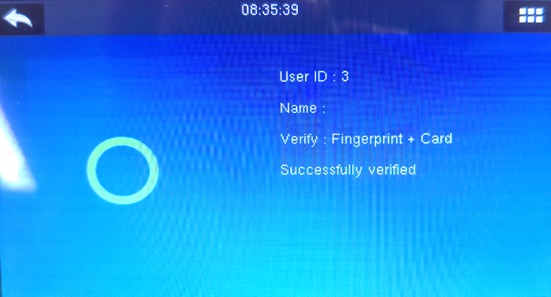
Go to MENU > Access control > Access control options > Verify mode > select Verification type

Anti-Passback Setup (optional)
A security protocol that prevents users from entering an area twice without exiting the premise at all (the card/fingerprint will auto deny access of the same user who tries to enter the door for a second attempt).
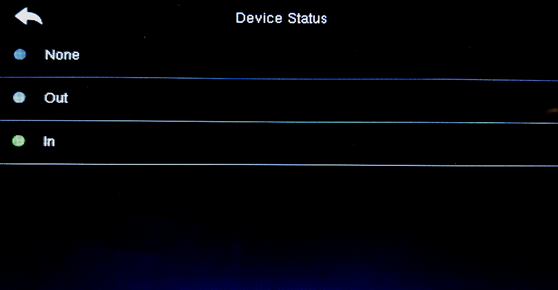
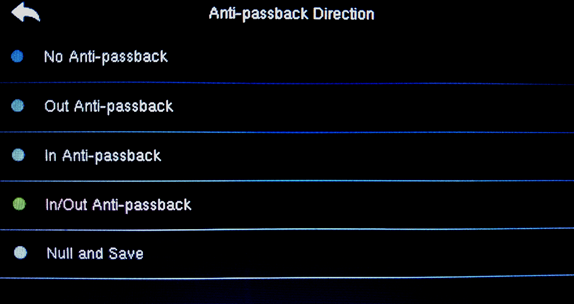
MENU > Access control > Access control options > Anti-passback setup > Device status (for Face ID x either IN/OUT) > Anti-passback Direction (Select the preferred setup users wish to apply)
Device Status Setting
Anti-passback Direction Setting

Note: If some of the screenshots or steps viewed here are different from the ones in the current system, this is due to our continuous effort to improve our system from time to time. Please notify us at [email protected], we will update it as soon as possible.

0 comments:

Have any questions or inquiries about FingerTec? Drop your input here.

How to Amend and Import User Leave Balance from Excel/Text File in TimeTec Leave

Monday, December 23, 2019 TimeTec 0 Comments


Introduction
TimeTec Leave is a cloud-based solution that facilitates all leave proceedings online for a company regardless of its size. One of the handy features included in TimeTec Leave is the capability to import user leave balance records from an Excel or a Text file. This particular feature is especially useful for companies that are upgrading to TimeTec Leave as all balance records will be safely stored within the system.

Process
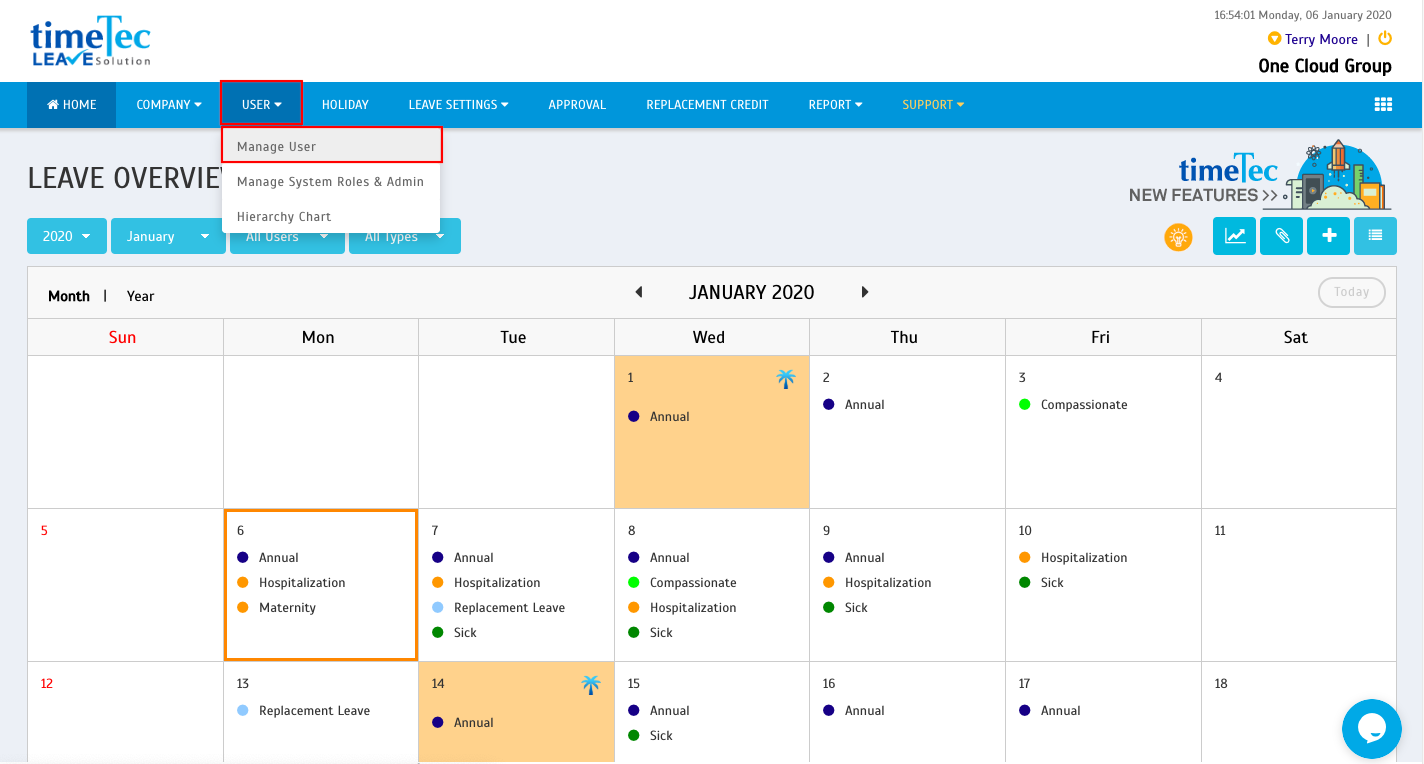
1. To start importing the Leave Balance records, users must first log onto the TimeTec Leave website.
Click on User > Manage User

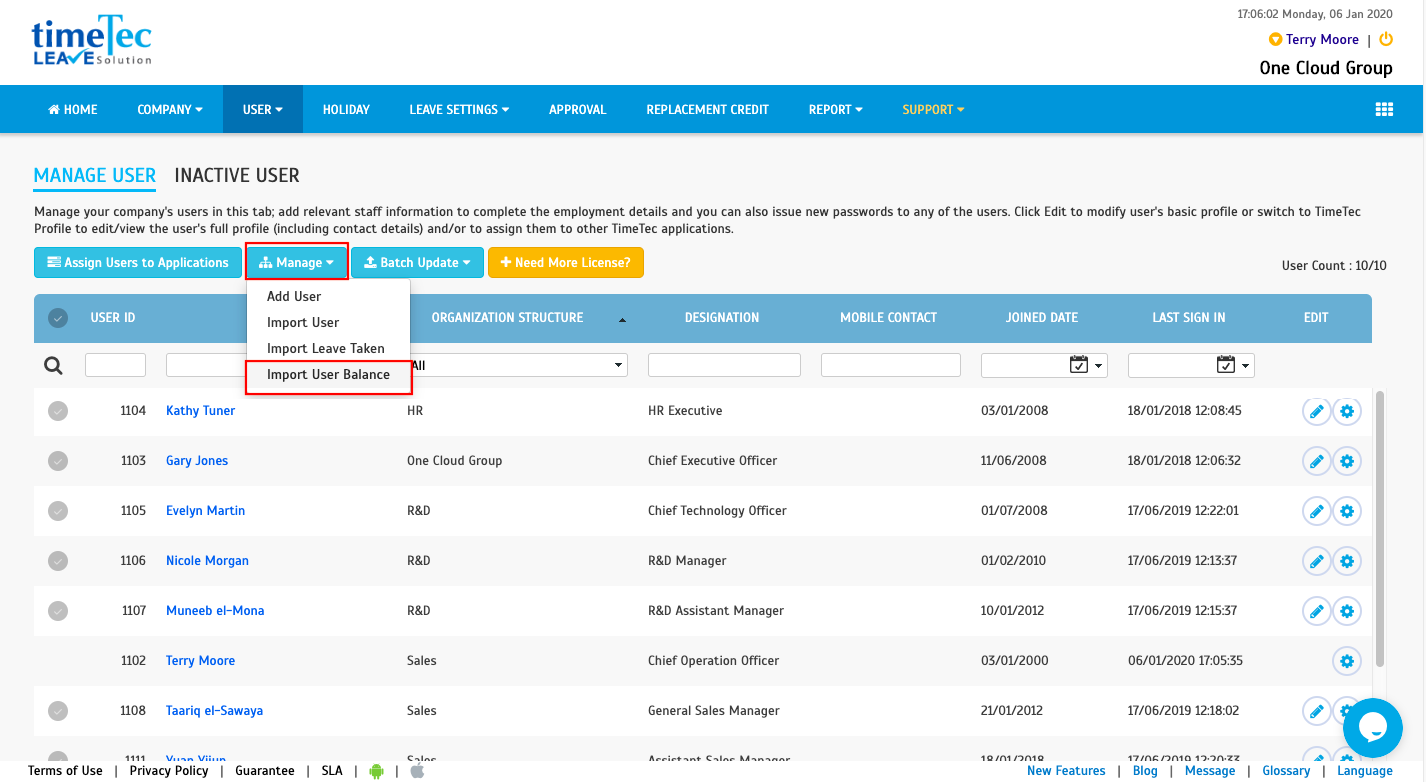
2. Once the Manage User page shows up, click Manage > Import User Balance.

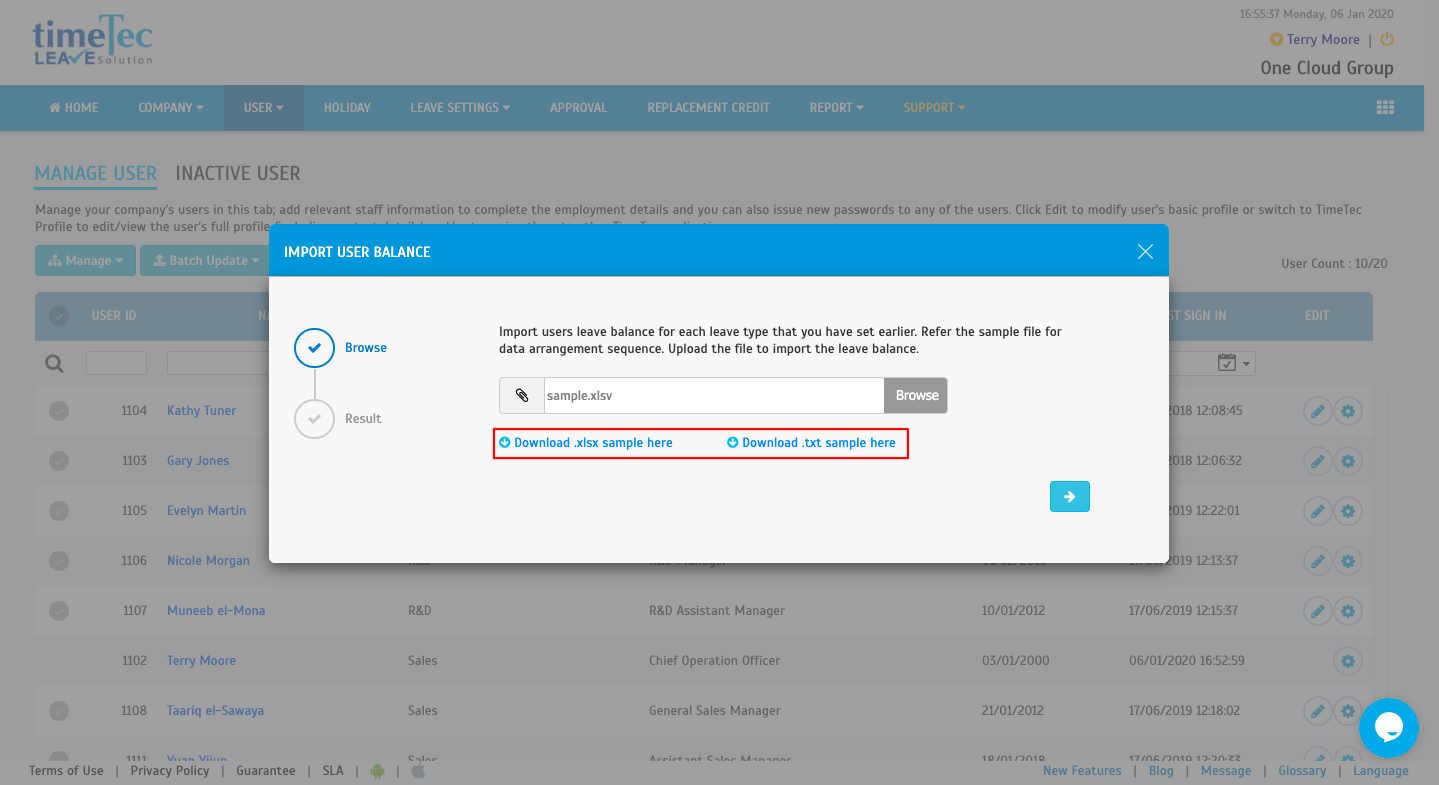
3. Proceed to download the samples in the preferred format (Excel format or Text format).

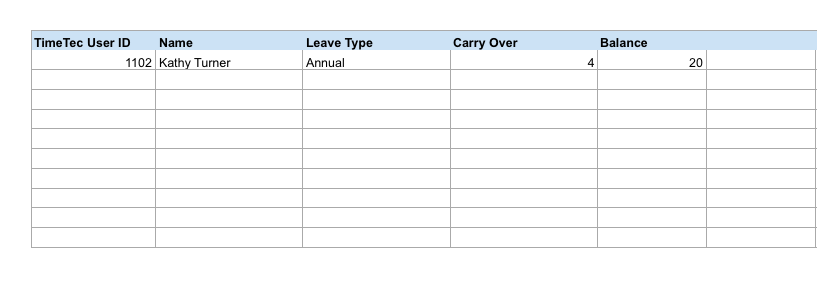
4. After downloading the respective files (e.g. Excel file as shown in the screenshot below), proceed to fill in the leave balance record details in the given column. *Note that carry over is only for system record.

5. *Important* Users must match the leave names with TimeTec Leave before starting the Import process.
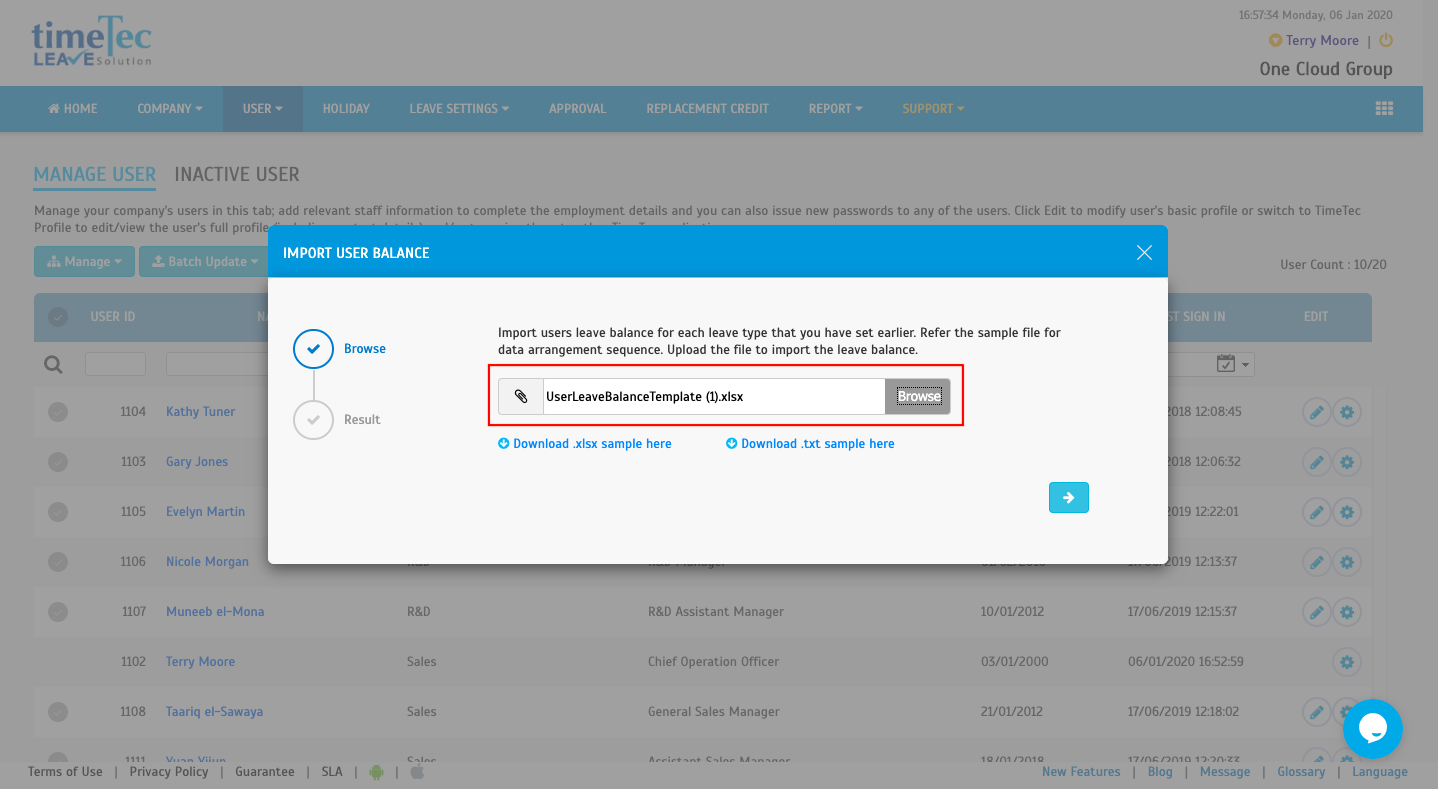
6. After filling the data in the file, proceed to the page. Click on Browse and select the leave record file. Once it is done, click Next to begin importing the leave balance file.

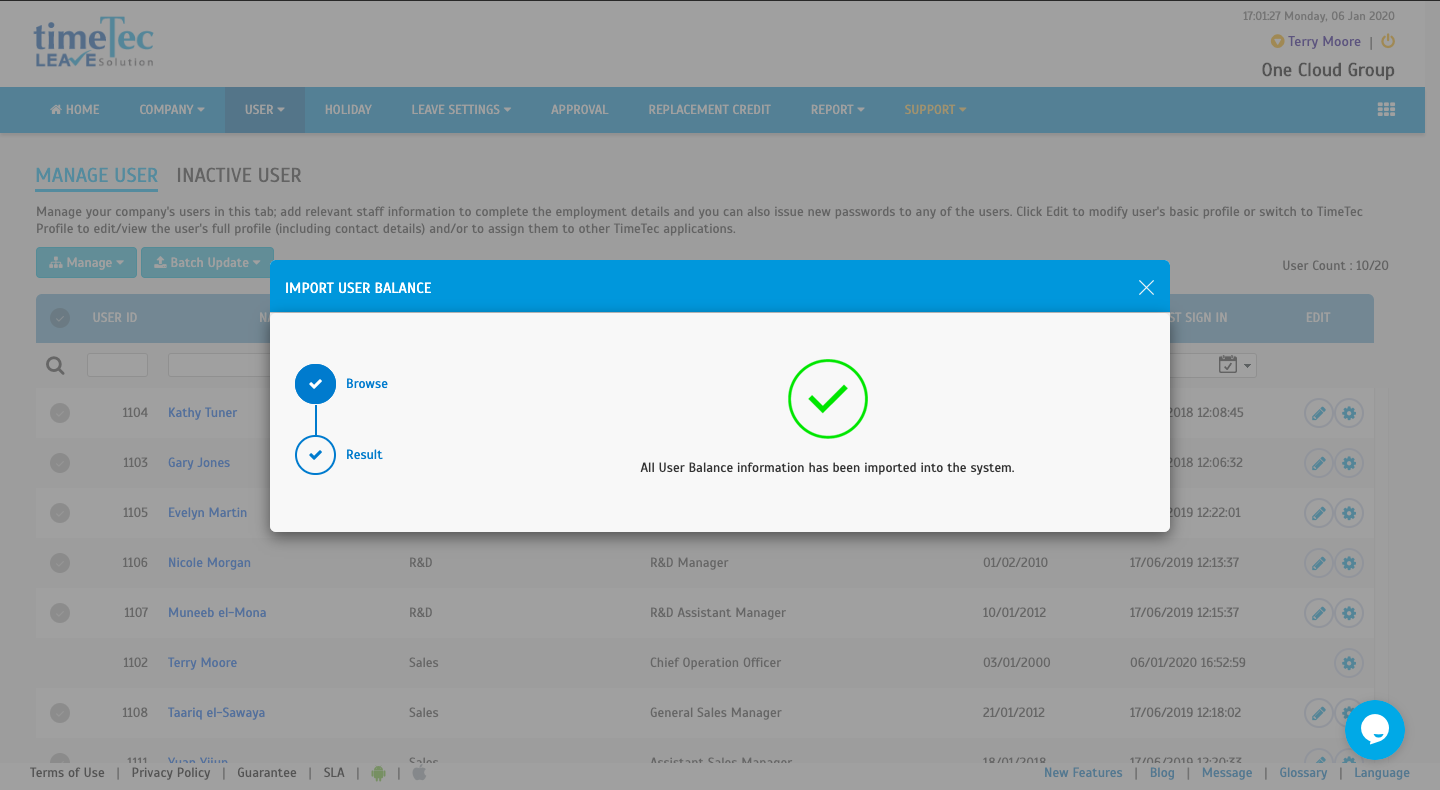
7. After the file has successfully imported, users may check on the updated version of users' leave balances.

Note: If some of the screenshots or steps viewed here are different from the ones in the current system, this is due to our continuous effort to improve our system from time to time. Please notify us at [email protected], we will update it as soon as possible.

0 comments:

Have any questions or inquiries about FingerTec? Drop your input here.

Book facilities via i-Neighbour Mobile App

Monday, December 23, 2019 TimeTec 0 Comments


The management team or the admin can list down all the facilities available in their neighbourhood in the i-Neighbour account. (Even though some neighbourhood might not necessarily require for prior facility reservation).

Barbeque pit, Badminton/Tennis court, Gymnasium and Swimming pool are some examples of the types of facilities that are generally offered by most neighbourhood.

Booking facilities feature available in the i-Neighbour system will simplify the management work for residents to manage bookings and to make it easier for reservations, without having to visit the management office just to book in slots. A click on the i-neighbour application is all they need.

Make a booking
Step 1: Home > Select “More” on the bottom of the page

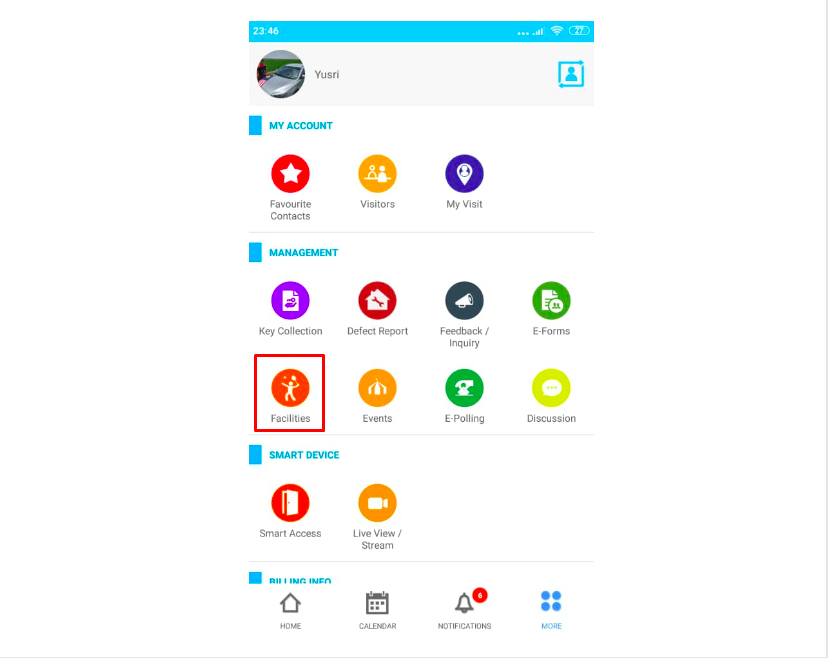
Step 2: Under Management, click on Facilities

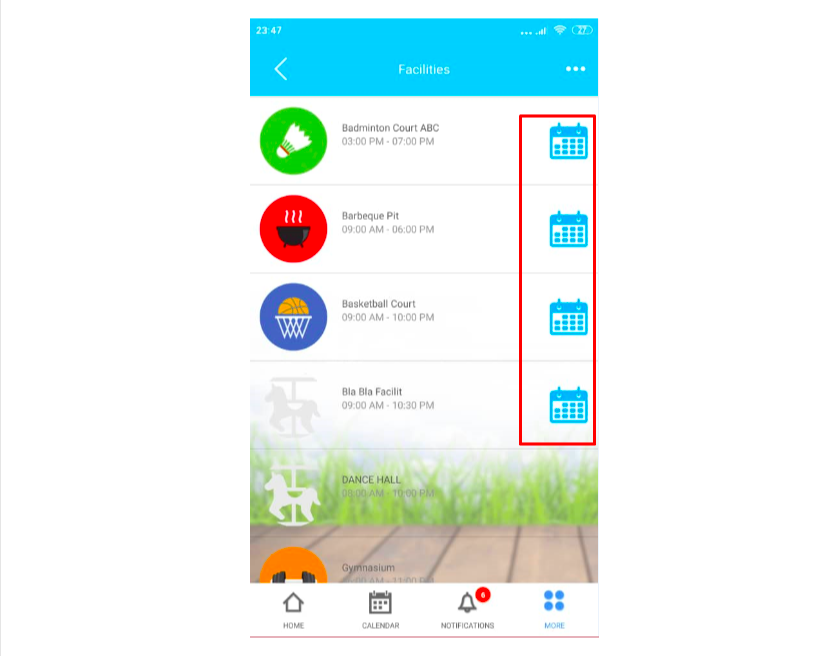
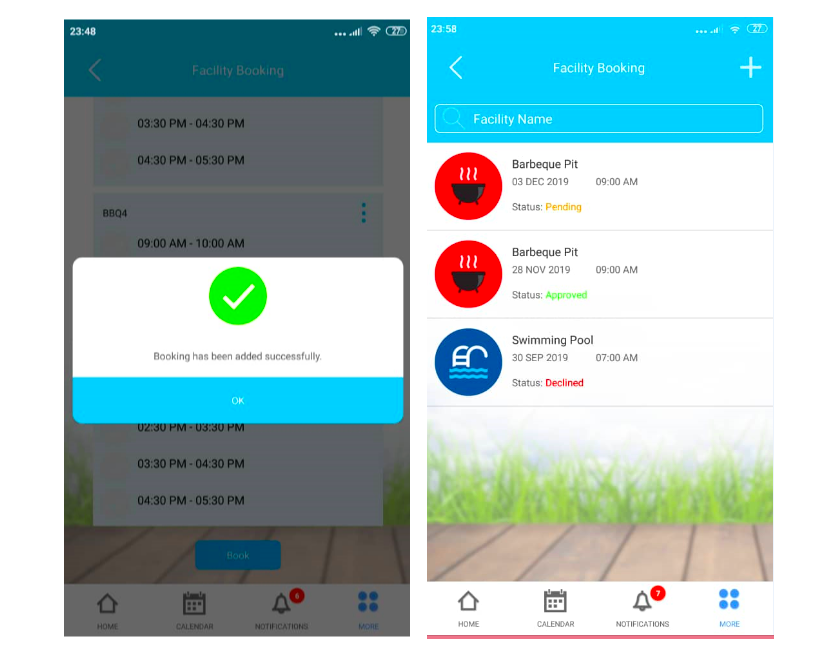
Step 3: All facilities available in the neighbourhood will be listed accordingly on the Facilities page. However, only facilities attached to the calendar icon are available for booking. Click on the calendar icon to start a new booking.

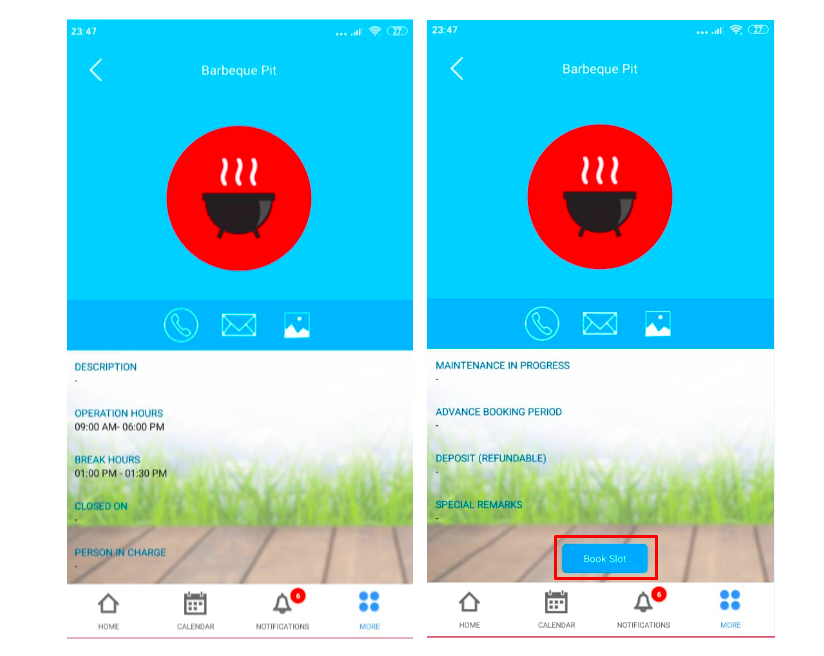
Step 4: All the booking details will be showed here. Scroll down and click Book Slot for confirmation.


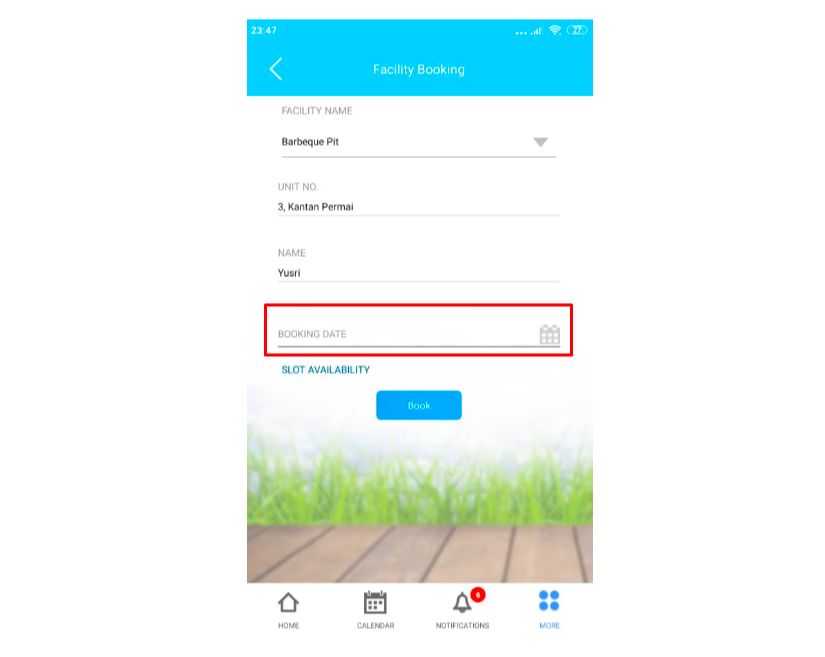
Step 5: Select a booking date and check for slot availability on the selected date.

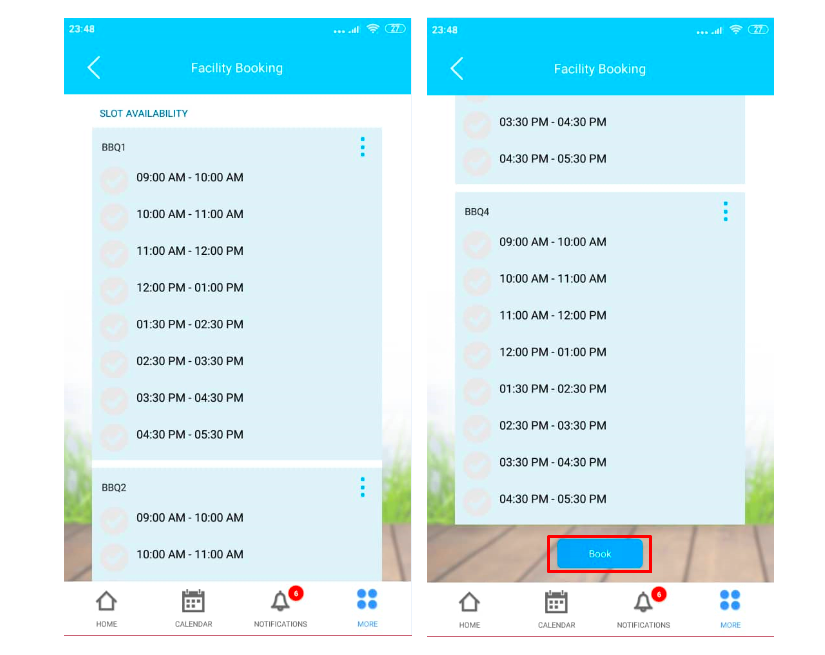
Step 6: Select the preferred available slot and press book.

Step 7: The approval process may be varied depending on the management setting.
Auto Approval - the system will directly approve the booking Manual Approval - the management will have to approve the booking for confirmation (Refer to
the screenshot below)
If you are still encountering problems after completing the steps stated above, please do not hesitate to contact us via [email protected].

Note: If some of the screenshots or steps viewed here are different from the ones in the current system, this is due to our continuous effort to improve our system from time to time. Please notify us at [email protected], we will update it as soon as possible.

0 comments:

Have any questions or inquiries about FingerTec? Drop your input here.

Problems with i-Neighbour Mobile Application?

Monday, December 23, 2019 TimeTec 0 Comments


Here are the steps to lodge a feedback report directly from the i-Neighbour Mobile application.

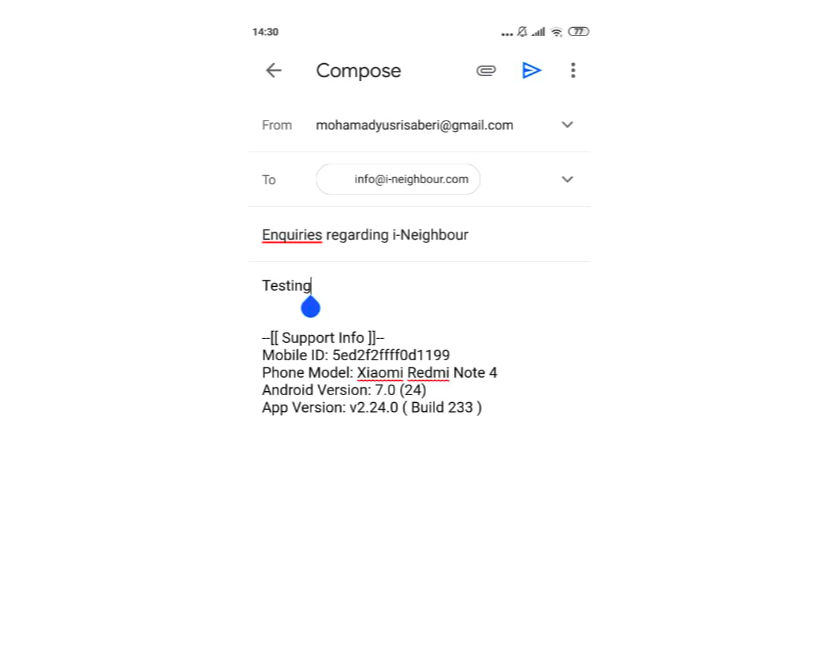
We recommend users to lodge feedback following the steps below. Fill in the details required by the system to facilitate our programmers to retrieve all phones and application details for swifter rectification of issues:

1) Phone Mobile ID
2) Phone Model
3) Android Version
4) App Version

To lodge a report in the i-Neighbour App

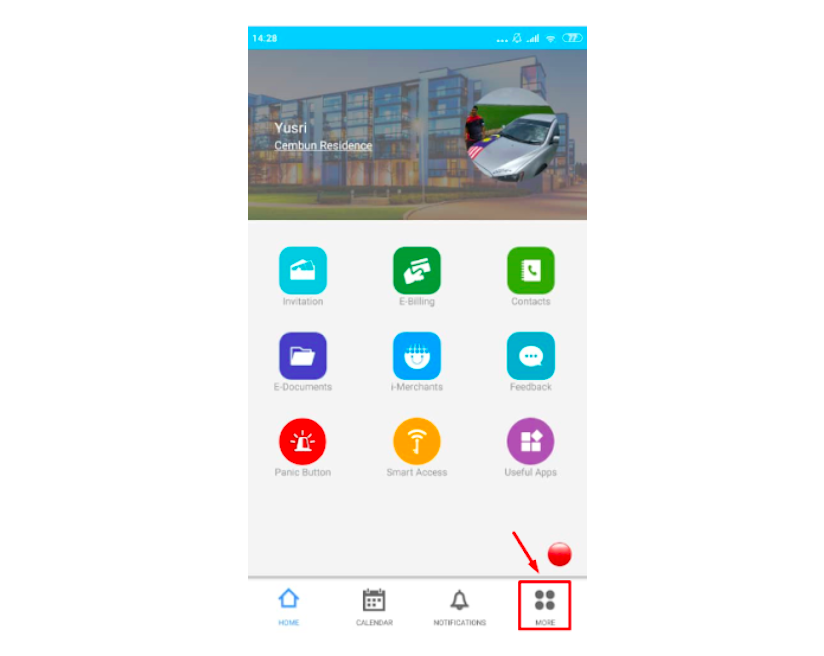
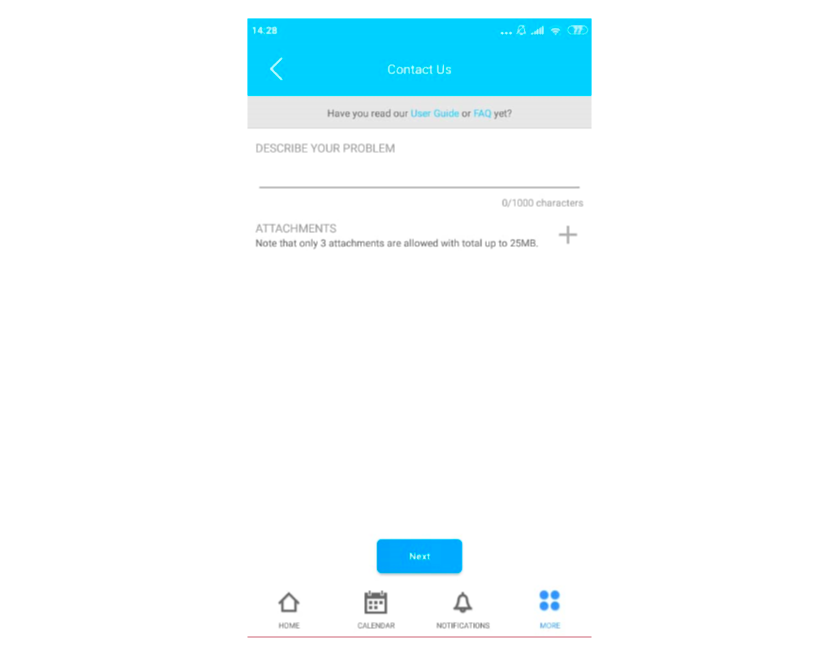
1) Open up Homepage, select More at the bottom of the page

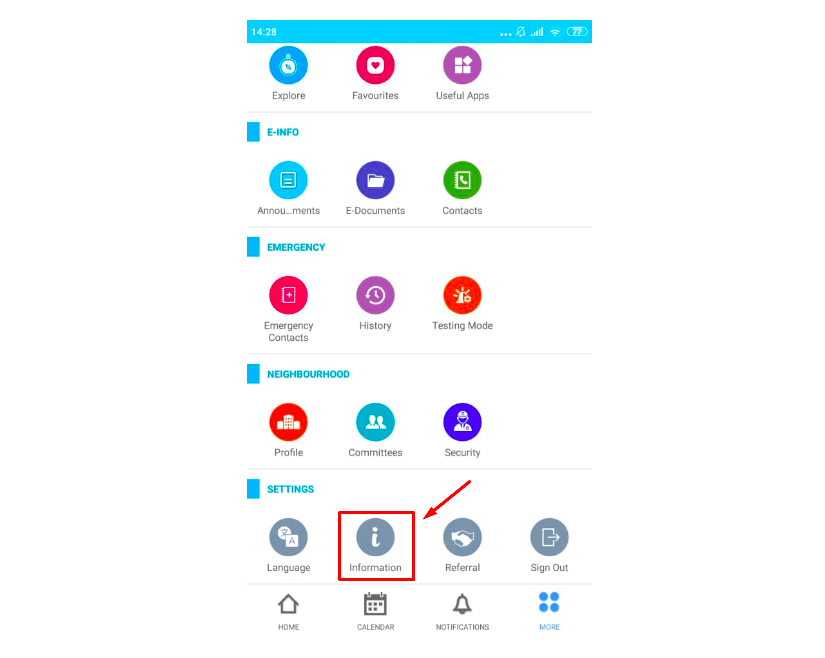
2) Under Settings, select the Information icon
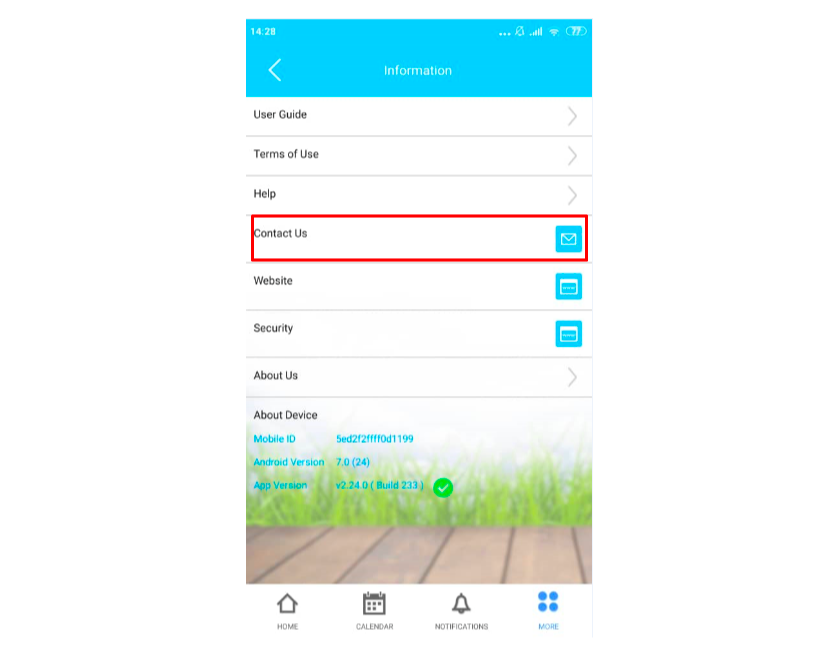
3) Then, click on Contact Us
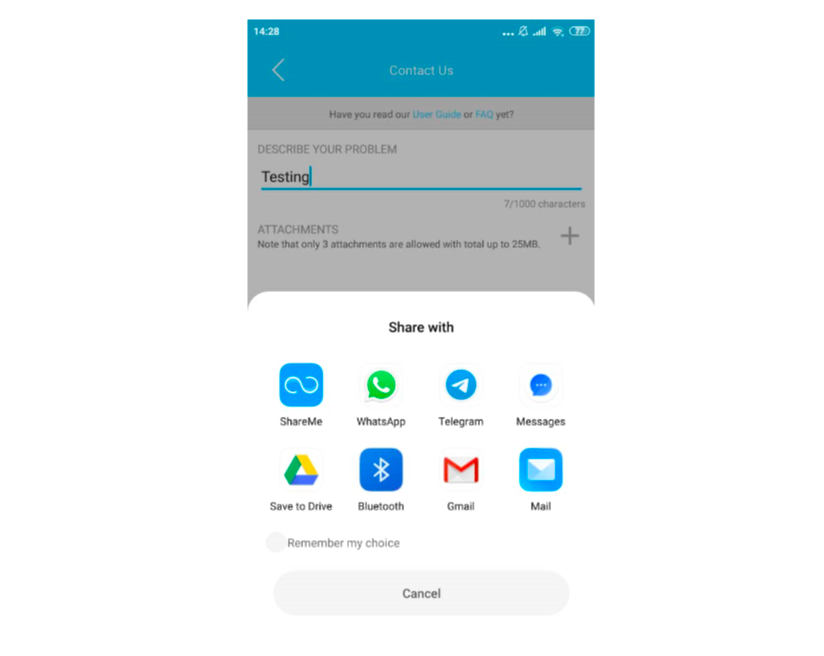
4) Address problems in the box below and attach relevant screenshots and videos (if applicable)
5) Click Next to submit feedback and select to send via Email
6) The system will automatically set the default recipient as [email protected] with the supporting info keyed in previously.
7) If you are still encountering problems after completing the steps above, please do not hesitate to contact us via [email protected].

Note: If some of the screenshots or steps viewed here are different from the ones in the current system, this is due to our continuous effort to improve our system from time to time. Please notify us at [email protected], we will update it as soon as possible.

0 comments:

Have any questions or inquiries about FingerTec? Drop your input here.

Ingress Release Note v3.2.3.9

Monday, December 16, 2019 TimeTec 6 Comments


For this month, FingerTec has released Ingress v3.2.3.9 which adds 23 new features and 11 bugs fixes to enhance the user experience when using Ingress software.

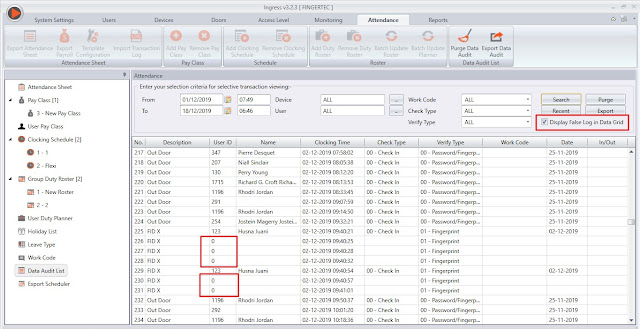
1.Export false log (User ID = 0) in the Export Type 2 file

2.Added download new user only when Download User from Device

3. Added search user when Remove User from Device

4. Added Total Work in Detailed Employee Time Card Report

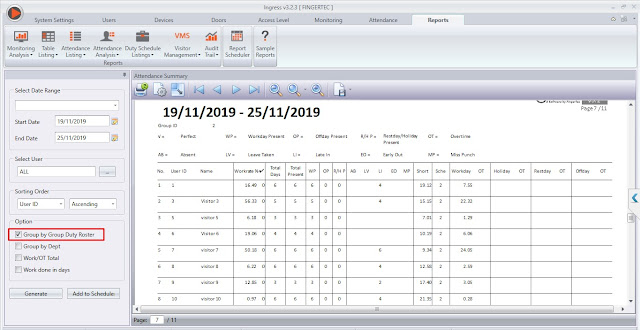
5.Added new option Group By Group Duty Roster for Attendance Summary report and Attendance
Analysis report

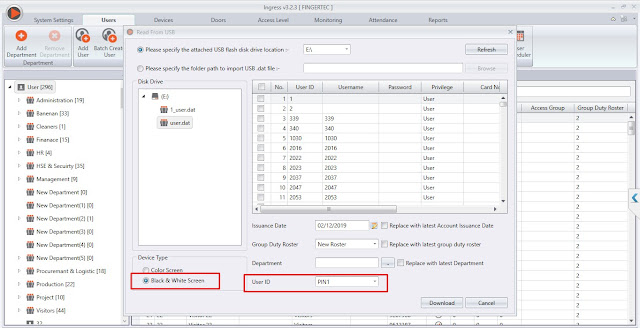
6.Added PIN1, PIN2 selection for Import User from USB which device type is Black & White

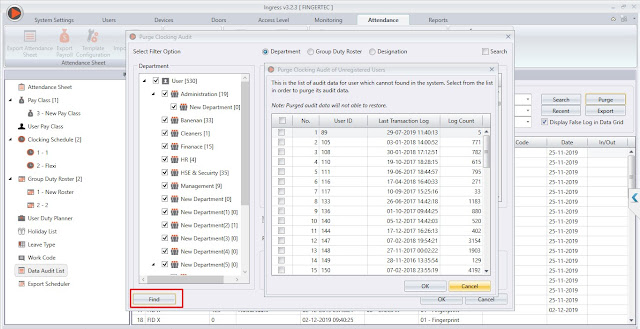
7.Added Delete audit data log from user which have been removed

8.Revamp UI Roster assign user into Roster

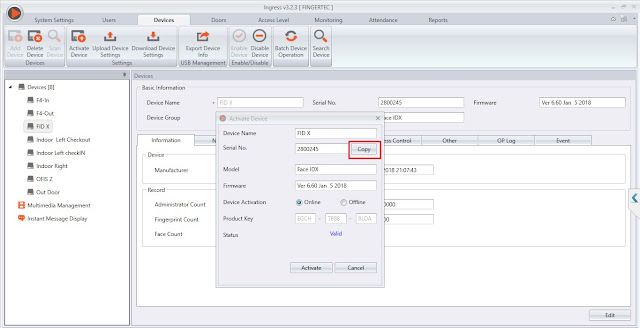
9.Added button to copy Serial No. at Device Activation Window

10.Revamp UI for Database Configuration in System Settings

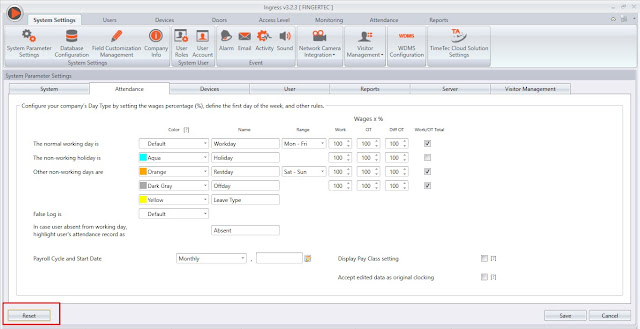
11.Added Reset button for reset default settings Attendance Tab in System Settings

12.Added new filter option "Day Type" in Attendance Sheet

13. Added list for holiday details for Calendar View when mouse over total holiday

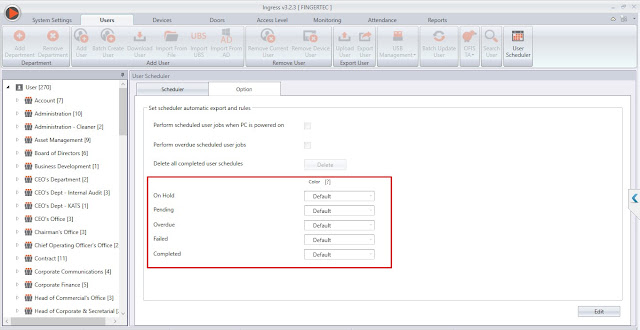
14.Added option to configure color each status for User Scheduler

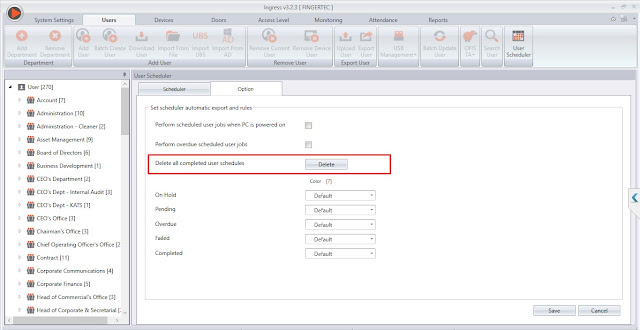
15.Added option to Duplicate User Scheduler Task which completed


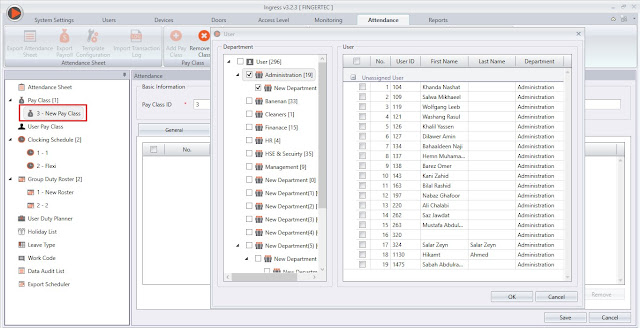
16.Revamp UI Payclass add user into Payclass

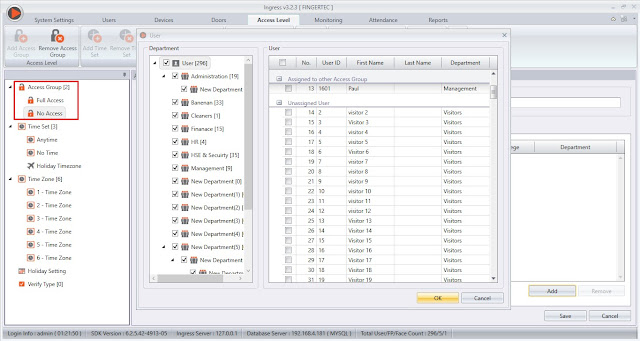
17. Revamp UI Access Group add user into Access Group

18.  Revamp Data Audit List
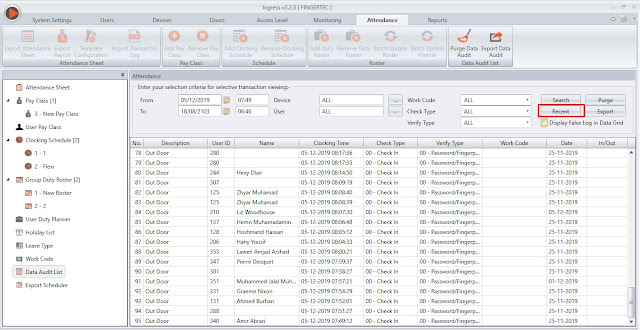
i)  Added Recent button in Data Audit List which display recent 100 logs 


     ii) Added filter option for Display False Log (User ID = 0) in Data Grid 

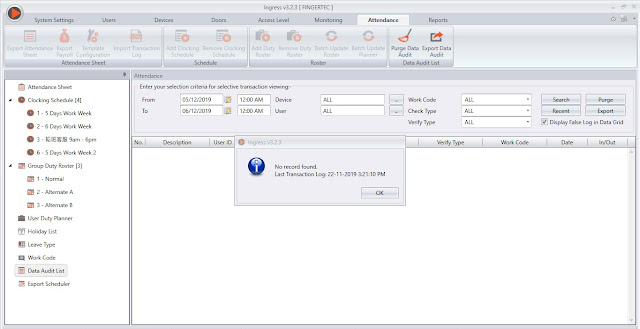
     iii) Enhance No Record message in Data Audit List which always display last record information

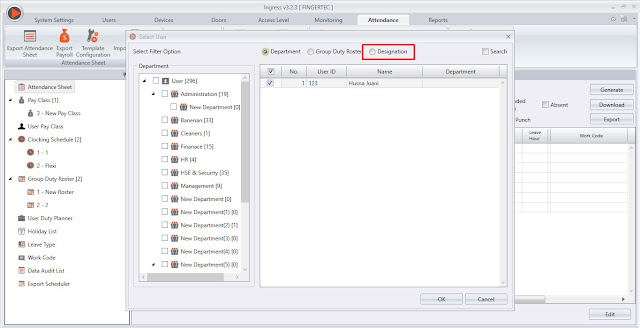
19. Added filter option "Designation" when Select User from list

20. Enhance Schedule Rounding which can support up to 3 digits

21. Added compatibility for OFIS-Z

22.  Added Compact & Repair in Database Management

23.  Added Diagnostic in Database Management

24. Fixed incorrect department info when migrating database from TCMSv2 to Ingress
25. Fixed failed to display Employee ID column in Export Scheduler Data Audit List
26. Fixed failed to filter users by department in Export Payroll window
27. Fixed failed to update template selection box for other tabs in Export Payroll window after
 configuration
28. Fixed unreadable small font size of "Date" in ETC report Arabic language
29. Fixed failed to generate Overtime Approval Worksheet Report if contains both OT and Diff OT
30. Fixed failed to display Arabic language reports exported from report scheduler in Right-To-Left
 format
31. Fixed incorrect users from devices displayed if current user role do not have the rights to access
 all the users in the devices
32. Fixed failed to display user selected in User Scheduler Options windows when add to scheduler
 from Remove from Device windows
33. Fixed system crashed when select option "Display False Log" in Data Audit List
34. Fixed system crashed when select non-Workday day type in Attendance

6 comments:

Have any questions or inquiries about FingerTec? Drop your input here.