Introduction:
WiFi is considered as one of the most required technological aspects for a modern lifestyle. As such, there are many WiFi compatible devices offered in the market today that can connect to the Internet. The WiFi option also allows for an easier biometric device installation without the need for wiring as well as facilitates a faster and stable real-time transfer of attendance data. That said, FingerTec likewise provides a variety of biometric devices which can support WiFi connection, i.e. TA100C, TA200 Plus, Q2i, TA700W and all Face ID Models.
Hence in this technical tip, we will be providing a step by step guide on how to connect FingerTec TA100C device to a WiFi Hotspot.
Process:
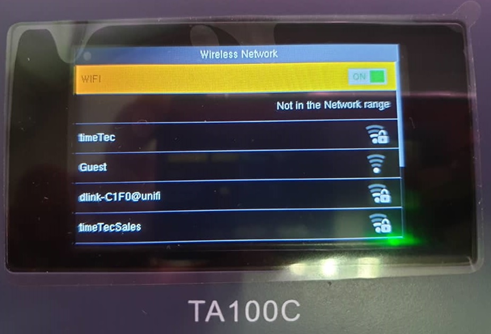
1. In FingerTec TA100C device, proceed to Menu > Comm > Wireless Network. *Note that Wireless Network in the Comm section will only be displayed after the WiFi Settings has been enabled for the device.
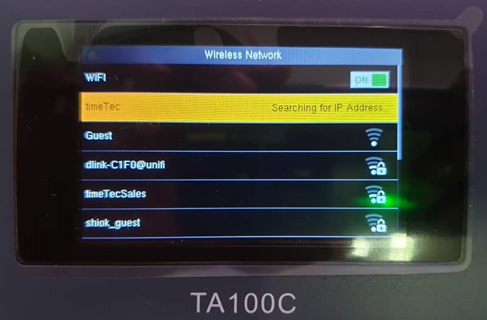
2. Once done, the list of available WiFi Hotspot in range will be displayed in the Wireless Network section.
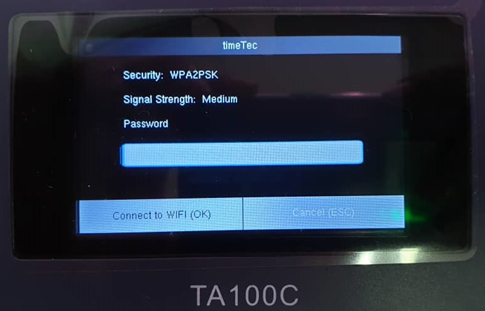
3. Choose the Network that you want to connect to and proceed to Insert the Network Password. Once done, select Connect to WiFi. Please note to use the Right Key button to switch between Alphabetic Characters and Alphanumeric Characters.
4. Moving on, the device will then proceed to connect into the network. If the error “Searching for IP Address” still persists after two minutes; please check your WiFi password again or your Wi-fi router setting.
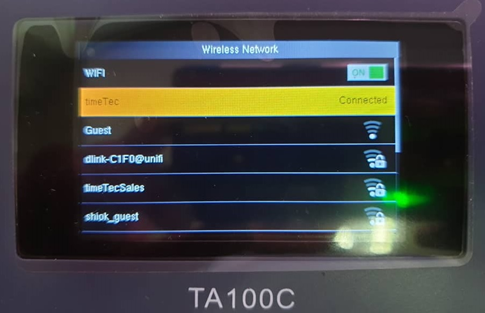
5. The connection Status will display the text ‘Connected’ after the device has successfully connect to the WiFi router.
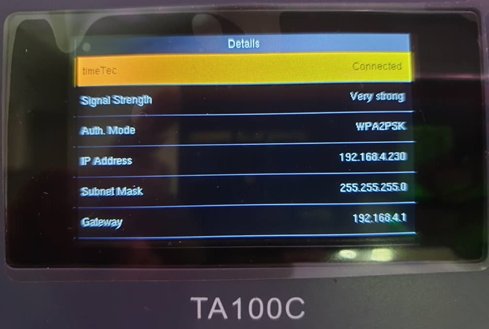
6. You can also press the M/Ok button to view the WiFi Connection details as shown in the screenshot below. Here, the WiFi Signal Strength and Device IP address will be displayed as well.
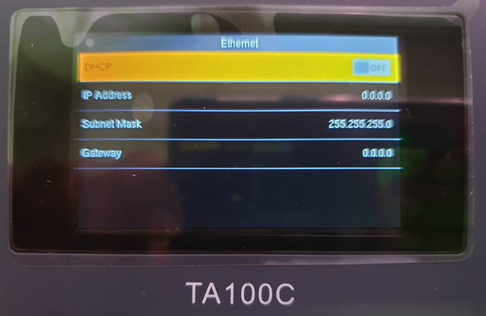
7. If you have an IP address that you wish to insert Manually at the device, you can do so by turning “Off” the DHCP feature at Menu > Comm > Wireless Network > Advanced. Next, proceed to key in your Network IP address. Note that by default the DHCP setting is turned On for all FingerTec devices.
Note: If some of the screenshots or steps viewed here are different from the ones in the current system, this is due to our continuous effort to improve our system from time to time. Please notify us at
[email protected], we will update it as soon as possible.
Introduction
FingerTec terminal such as TA100C can be customized to use MiFare card rather than RFID card as one of the verification options in the device. MiFare card is a type of smart card that can contain data and be read at the device without storing the transactions into the device’s memory. This tip will lead you to get to know the features in TA100C when you are using MiFare module starting from enrollment until the verification process.
Process
1) Enroll as ID Card:
To use this feature, first you need to ENABLE “Verify ID Card Only”. Go to IC Card > IC Card Options > Verify ID Card Only > Turn on. This option needs to be turned on because enrolling a MiFare card as an ID Card will only verify the ID Card and it’ll not verify other information stored in the card. So when a user wants to verify his identity, he just needs to wave the card at the antenna to be verified instantly.
2) Enroll as Fingerprint Card:
This process is to store fingerprint templates inside a MiFare card. Input user ID as per required and input fingerprint template based on your preferred fingers and how many template to be stored inside the card will be based on how many fingerprint count you set in IC Card > IC Card Options >Stored Fingerprint Count. After inserting the fingerprint template, you will be asked to wave your MiFare card at the antenna, then save. By enrolling it this way, when you want to verify a user, you need to wave your card, then it will ask you to place your finger on the fingerprint scanner .
Note: Turn off “Verify ID Card Only” to make sure that the device will prompt for fingerprint during verification.
3) Clean Card Data :
This option is to erase all memory and information stored in your MiFare card. After clean Card Data, you may use it to enroll new user with different information. You only need to wave the card at the antenna, and wait until it shows you Operation Successful.
Menu > IC Card > Clean Card Data > Wave your Card > If the terminal shows green circle, it means that the card information has been cleared.
4) Copy Card Data:
This option is divided to 2 types where you can choose to Copy User Data Only, or Copy User Data and Fingerprint. This option is used to copy user’s information from a MiFare card into a reader. By right, after you copied user data only or along with fingerprints, when you want to do verification, you can just place your finger on the scanner while waving your card at the antenna, because your reader has already copied user’s information that has been stored in the MiFare card.
5) IC Card Options:
i) Verify ID Card Only : Turn off if you want user to verify Card ID with Fingerprint and turn on if you only need user to verify using Card only
ii) Card Data Storage Mode :
a) Not Save in device: The user ID and user information will not be stored in the terminal.
b) Save User Data in Device: The system will save the user ID in the terminal.
c) Save user and fingerprint in Device: The system will save the user ID and FP in the terminal.
iii) IC Card Passcode :
NOTE: Please do not do any amendments on this option because it is the default passcode.
iv) Stored Fingerprint Count :
You may determine the number of fingerprint that you require to store inside a MiFare card. For MiFare 4k , if you are using Fingerprint template vx10, you can store up to 2 fingerprint templates, and if you are using Fingerprint template vx9.0, you can store up to max 4 fingerprint templates in one MiFare card.
With the new
FMM100 core board comes a few useful new features in TA100C and AC100C. One of
the features in FMM100 core board is to allow users to backup the device’s data
and configuration in the device itself. This backed up data can be restored in
the future or it can be copied to another device of the same model whenever
needed.
This new
feature eliminates the worry of data lost or corrupted after being transferred
to the software. Take advantage of this feature to better use of the system.
There are two
types of backup available in these models.
1.
Internal backup allows you to
create backup to be saved inside the terminal itself.
2.
USB backup allows you to create
backup and save it inside the USB to be downloaded on another location without
deleting the data inside the terminal.
To back up data
internally, follow these steps:
Menu
> Data Management > Backup Data > Backup to Device > Start Backup
To restore the internal
backup data, follow these steps:
Menu
> Data Management > Restore Data > Restore from Device > Start
Restore
To back up data
into a USB flash disk, follow these steps:
Menu
> Data Management > Backup Data > Backup to USB Disk > Start Backup
To restore the backup
file from a USB flash disk, follow these steps:
Menu
> Data Management > Restore Data > Restore from USB Disk > Start
Restore
** NOTE: If you backed up the data into a USB flash disk, it is
recommended that you restore the data immediately to determine the usability of
the data. If the restoration fails, you need to repeat the backup process.
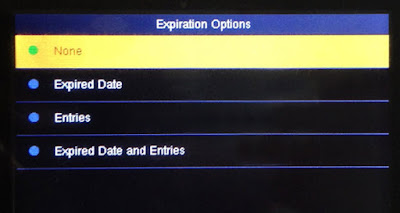
The new core board version of TA100C FMM allows adding of expiration rule to a user. This feature is important for organizations that have many temporary workers or contract workers on site(s). The administrator can set the expiration rules for each worker and the system will stop taking transactions from these staff’s credentials when the expiration rules are met. The expiration rule can be set based on date, entry or both.
To proceed, enable this option in the new TA100C terminal by following the below steps:
Enabling User Expiration on TA100C
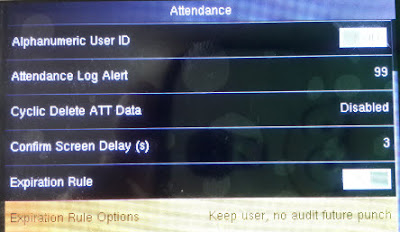
Press Menu > System > Attendance > Expiration Rule > Select “On”
Select Expiration Rule Options
Once the Expiration Rule has been enabled, select the action for the system to execute once the rule qualifies. Please refer below steps to select the expiration rule:
Press Menu > System > Attendance > Expiration Rule Options
There are several options to choose from, which are:
1. Keep user, no audit future punch - The system will continue to keep the user’s data including the fingerprints and will block future clocking activities from the specific ID.
2. Keep user and audit future punch – The system will continue to keep the user’s data including the fingerprints and as well as the future clocking activities of the specific ID.
3. Delete user – The system will delete the user once the expiration date is reached for that specific ID.
Adding Expiration Rules to A New User
After the configuration has been completed, the system is now ready to accept users for the rules, refer to the below steps on how to add expiration rule to a user:
Press Menu > User Mgt > New User > Select Expiration Rule> Expiration Rule Options > Select Rule
There are several options available to be added to a user, select one:
1. None: No expiration rule.
2. Expired date: Select a specific expired date to a user.
3. Entries: Select a number of entries provided to a user before the access expired.
4. Expired date and entries: Select a range of date and number of entries for a user.
Adding Expiration Rules to Existing User
Refer to the below steps to add expiration rule to the existing user in the terminal:
Press Menu > User Mgt > All Users > Select User > Edit> Select Expiration Rule > Expiration Rule Options > Select Rule
Once the configuration and settings are completed, users will be imposed with expiration rule which will take effect once the rules are met. Use this feature to control and manage your temporary workers, contract workers, contractors, etc.
The FMM 100 new core board is loaded with 800MHz microprocessor, 128MB
RAM and 256MB flash memory. With these new specifications, it allows the
introduction of a new firmware with enhanced features to improve our products.
For a start, we will introduce this FMM 100 core board in TA100C and AC100C
series, the other colored models will be loaded with the new core board soon
after. One major apparent change that you will see and experience will be the
freshly designed icons when you access into the operation menu.
The video guide of the new firmware is now ready. The video guide will
show you the new and existing functions of the terminal and simple ways to
configure them step-by-step.
Click the following link to watch the Video Guide.
The siren
output signal from a FingerTec device is known as a dry contact and this
basically means that the signal is not initially connected to a voltage
source. It can also be referred to as a secondary set of contacts of a relay circuit, which does not make or break the primary current that is being controlled by the relay. Selected FingerTec devices that come with a siren include TA100C, AC100C, TimeLine 100 and other time attendance systems.
Previous
installations to connect a siren with a FingerTec device could only support DC12V
sirens. Now, AC240V sirens, which emits a louder sound compared to the DC12V siren, can be used in the installation provided that the relay used to control a circuit between the FingerTec device and
siren supports the appropriate voltage. A power supply, such as
AdapTec Plus for example, is required and must also be compatible with the relay in
order for the connection to be successful.
The
following installation diagram will guide you on connecting a FingerTec
device to an AC240V siren with the use of a relay board and power supply.
With this in place, there is now an option provided for you to select the siren that suits your implementation better, be it a DC12V or AC240V siren.
With the launch of the Ingress software
just around the corner, FingerTec has released the Ingress Trial Version for
our resellers as well as end-users to test out the software before actually making a
purchase. The trial version is strictly accessible only to FingerTec’s
Authorized Resellers & Distributors and End-Users of FingerTec only.
The instructions below are intended to
help you understand the workflow, types of testing environment, and what you
need to prepare before you start the test.
Supported Models:
Multimedia Models:
AC100C, TA100C, TA100TC, TA200 Plus.
Access Control
& Time Attendance Models: Ingressus, Q2i, i-Kiosk 100 Plus, AC900, R2, H2i,
R2c.
Face Recognition
Models: Face ID 2, Face ID 3, Face ID 4, Face ID 4d.
Card Reader
Models: TimeLine 100, Kadex, m-Kadex, k-Kadex, i-Kadex.
Please make sure that the FingerTec
terminal you use for testing is listed above. Any terminals excluded from the list will not work with the Ingress Software. Next up, go to Ingress’s trial
version page to fill in the request form and submit it back to us. You are
required to insert your FingerTec terminal’s serial number for us to generate
the trial product key.
If you are not using a FingerTec terminal for testing,
you are still required to insert the testing terminal’s serial number,
and we will process it accordingly. If you do not have a terminal to test the
Ingress software, just leave the serial number text box empty and we will
provide you with an 8-digit device serial number and the trial product key. We
will email you once your Ingress trial application has been approved.
You can
access Ingress’s trial version page by clicking this link.
Once your application has been approved,
you may download the Ingress Trial Version software installer here.
Unzip the file, right click the
installation file and select Run as administrator to prompt the installation.
Follow the onscreen instructions to complete the installation.
Upon the Ingress installation, it is
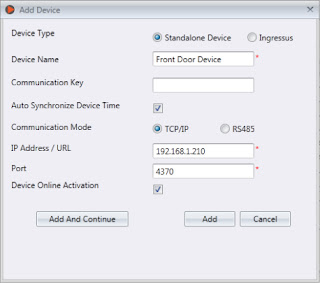
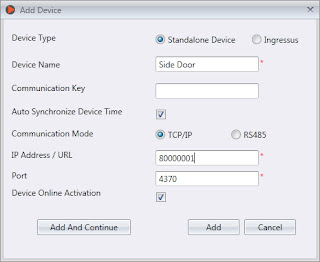
mandatory to activate the device before you can use it to perform testing. There
are 2 ways to activate the device. While adding new devices to the software, tick
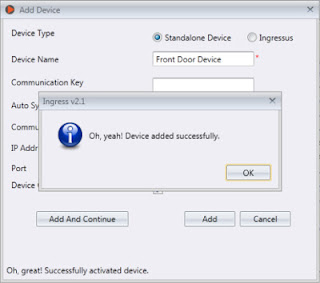
the checkbox for Device Online Activation.
Once the activation is completed, you
can see a “Successful Activation” message at the bottom left corner of the
window.
As mentioned above, if you do not have any
terminals to perform testing, please insert the given serial number at the IP
Address / URL text box and tick the checkbox for Device Online Activation. Click Add to
activate the serial number and then you may start to use the Ingress software
for testing.
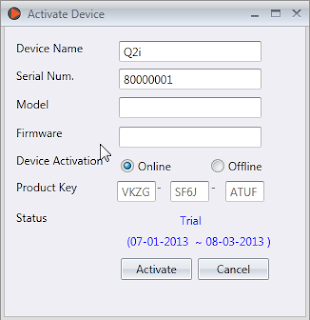
Another way to activate the terminal is in Devices.
Click on the device that you want to activate and click Activate Device.
At the Activate Device window, there are 2
methods to activate the device; either Online or Offline. If you choose
to activate the device online, select Online and click Activate. The Ingress Software
will connect to our database server to verify and activate the device
accordingly. You will see the device’s activation status as well as the expiry
date.
If you choose to activate the device offline, kindly
contact us at [email protected] to request for the trial product key. Then insert
the given product key into the text box. Select Offline and click Activate to
proceed with the activation.
Written by Vincent
You can customize your FingerTec terminal display and audio to your preferred language. All FingerTec models are preset with the English language as the standard display and audio language.
For localization of your terminals, you can remove or add in different languages into the FingerTec terminals. A terminal can support a maximum of 3 languages.
We have released 14 new languages packs for our multimedia models, the AC100C and TA100C terminal:
**Click on the preferred language above to download.
Follow the below steps to upload the language pack:
- Insert your terminal's IP Address and click Connect.
- Check the Manu Date (manufactured date)
displayed in the list upon connection.
- If you terminal's Manu Date is before July
2008, please select Customize Options, or else just select Default Options
- Click Update and wait for the process to
complete.
- The terminal will restart itself upon the
completion of the upload.
Click
here for some
additional information on what you should take note while uploading the
language pack.
If you need any additional guidance while uploading
the language pack for AC100C or TA100C, please email us at [email protected] or contact us here.
Contributed by: SF Lim
Edited by: Vincent



1.jpeg)
