Clearing FingerTec Terminal Administrator Privilege from TCMS V3

Friday, February 24, 2017 TimeTec 4 Comments


Introduction
TCMS V3 is a Time Attendance Aystem that runs on Microsoft Operating System. On top of its other functions, TCMS V3 also manages your devices’ administrator privileges.

Benefits
When an admin resigns or losses his verification information, FingerTec devices couldn’t be accessed by unauthorized personnel. This feature allows you to remove admin privilege using TCMS V3. To clear a terminal's administrator privilege, follow the steps below.

Step 1
Click Devices > Click the terminal you want to remove the administrator privilege.

Step 2
Click at Other > Click Clear Admin Privilege.

Step 3
Click Yes button to confirm.

Step 4
You will get the below message when the process is complete. Click OK button.
All users with administrator privilege in the terminal will be changed to user privilege when the process is complete.

And now you're done!

4 comments:

Have any questions or inquiries about FingerTec? Drop your input here.

R2, R3 & FaceID3 - Time Zone Setting Group Transfer from Ingress

Thursday, February 23, 2017 TimeTec 0 Comments


Introduction
Access level configuration is a function that could help clients secures their property. Clients are able to set different Access Level for each authorized user according to the time zone, with combination of verification type. With this function, you can enhance security by limiting user access to your premises with specific time zone and group verification type.

Benefits
By configuring the Access Level, the security mechanism for your premises is tightened to prevent it from being invaded by any unauthorized individuals.

Process
1. Add a door > add your R3 and FaceID3 device to the door

2. Define the start and end time applicable for this Time Set. You can configure up to 3 different time sets in a day. Access Level > Time Set > Create a time set. Take note that the time access periods need to set continuously without overlapping, as shown in picture below. Following the example below, users will be granted access from 9am to 6pm and 8pm to 10pm every day.

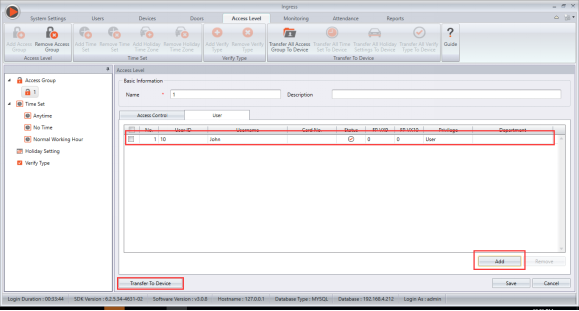
3. Access Group > Create a new access group > Add the door that which to upload the access level > Choose the time set created in step 2 > Select group verify type


4. Add user into the access group > Transfer to device
*Note that this step will transfer the access group to the terminal along with the users in the group; user(s) that are not in any access group will be deleted from the terminal.


0 comments:

Have any questions or inquiries about FingerTec? Drop your input here.

Creating Weekly Schedule with Flexible Overtime on Weekends in TimeTec TA - Suitable for company requiring overtimes on rest days

Thursday, February 23, 2017 TimeTec 1 Comments


Introduction
There are companies that allow or need their employees to take overtime on rest days using flexible schedules. This means that the staff will only be paid for overtime based on their total work hours taken of the off days or rest days.

Benefits
By creating a new schedule for this flexible overtime, you can add this schedule into the existing group duty roster later without having to create a new group duty roster to cater for this overtime work on weekend. With this additional schedule, the admin can easily calculate the work hours and the data is compatible to payroll software of your choice.

Process:
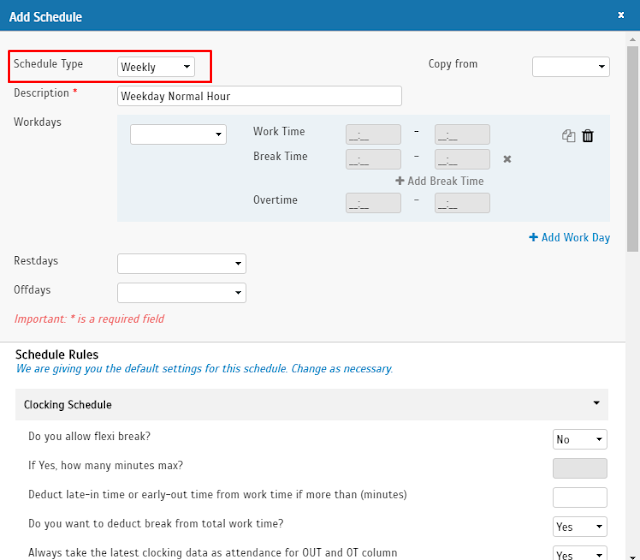
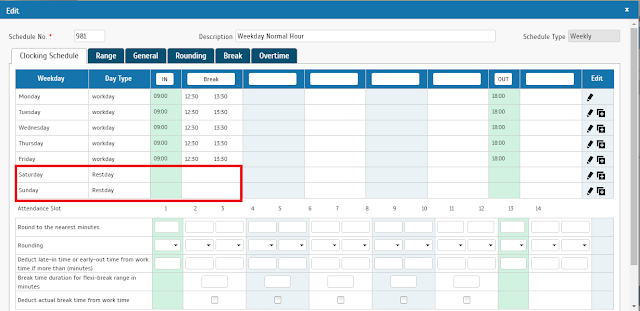
1. Create a Weekly Schedule. Key in the times for workdays only. DO NOT fill in the times for the rest days.


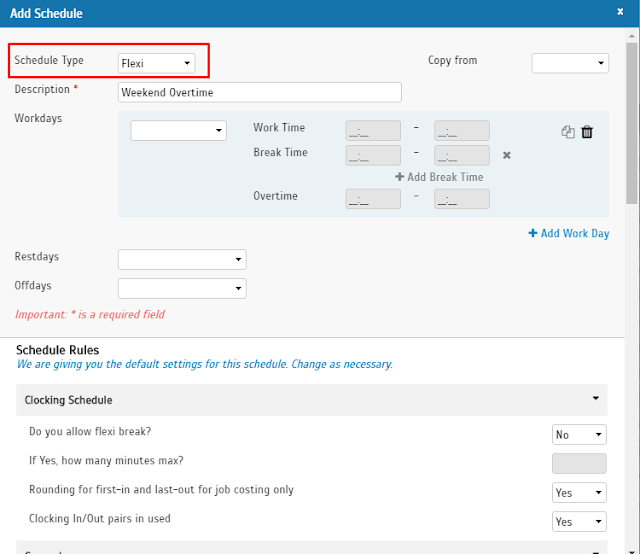
2. Create a new Flexi Schedule, select Day type as Restday for the weekend.


3. On the Flexi Schedule > Go to General tab, insert time range in Double Punch to prevent double transactions within the minutes defined here.

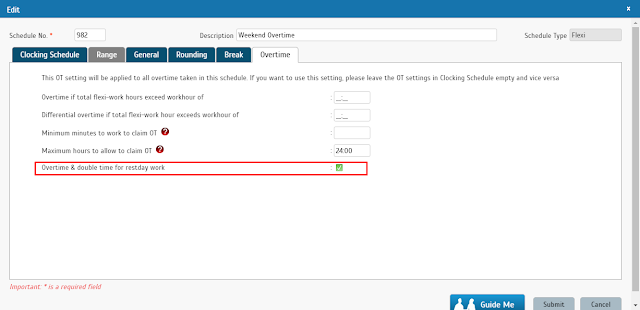
4. Go to Overtime tab > check the box for 'Overtime & double Time for restday work'.So the system will count the working hour as Overtime on Restday.

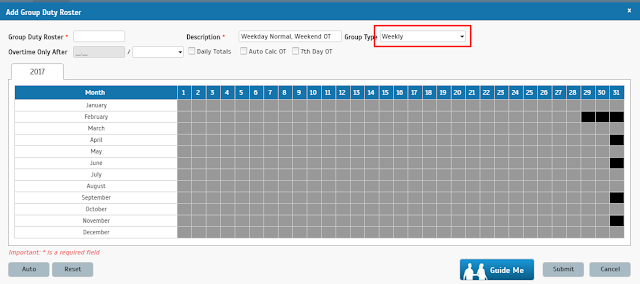
5. Go to Schedule > Assign Schedule and Users into Roster > Add > select Group Type to Weekly

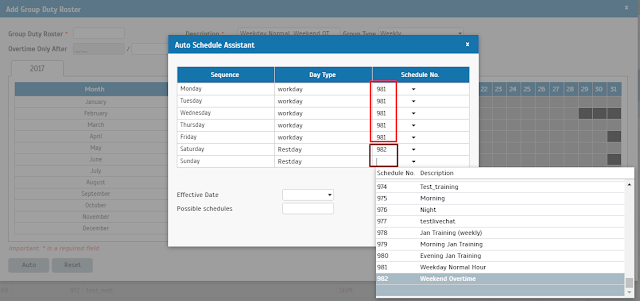
6. Insert’ Weekday Normal Hour’ schedule for Weekdays and ‘Weekend Overtime’ for Weekend.

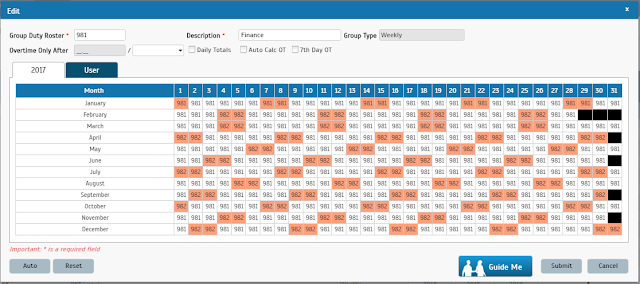
7. This is how the Roster should be after the settings.

8. With the above settings, you can see the worktime of the employee being calculated as overtime in the Attendance Sheet if they come to work on their rest days.


1 comments:

Have any questions or inquiries about FingerTec? Drop your input here.

Ingress Mobile - The Easier Way to Enroll Fingerprint

Wednesday, February 22, 2017 TimeTec 24 Comments


Introduction
Ingress Mobile is an App designed mainly for monitoring purpose, where system admin can directly view all the event logs and door statuses using mobile phone without the need to login to the Ingress installed at a PC. Another function of Ingress Mobile is for administrator to enroll fingerprint of new users. This article will demonstrate the steps in detail.

Benefits
By using Ingress mobile to enroll fingerprint, administrator can directly enroll the new user fingerprint at the device and the fingerprint information will be directly synced to Ingress Server.

Process
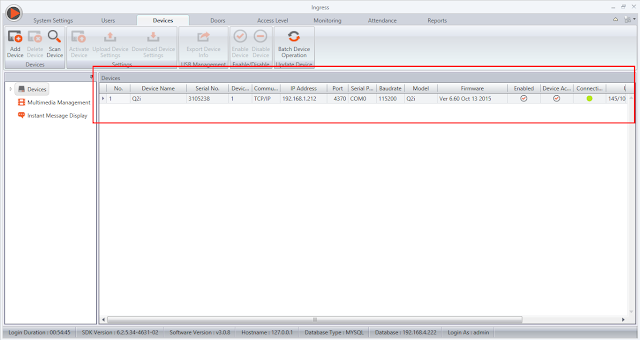
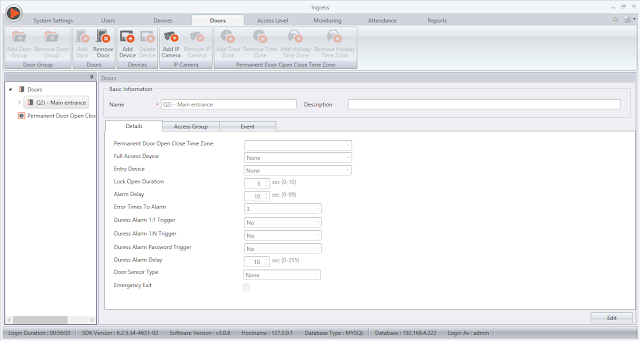
1) Login to Ingress > Add terminal > Add door.


2) Login to Ingress Mobile.
-To login, Ingress mobile must be in the same network range with Ingress Server. To check the server IP, user can open command prompt and type ipconfig.


-Insert the following details in Ingress mobile app accordingly:
Server IP: 192.168.4.222
Ingress mobile port number: 3000
 
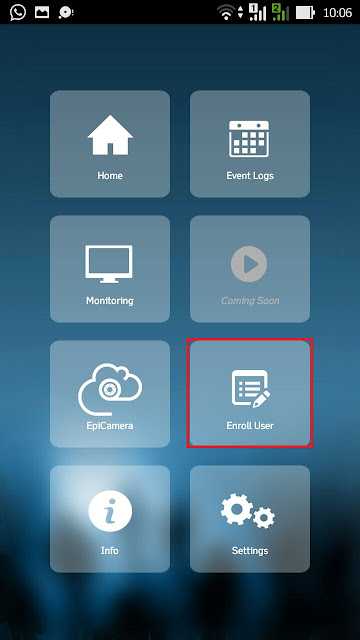
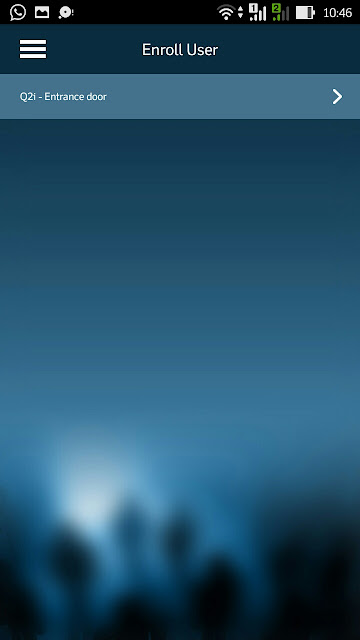
3) Select Enroll User


4) Under enroll user, please select the door created in Ingress:


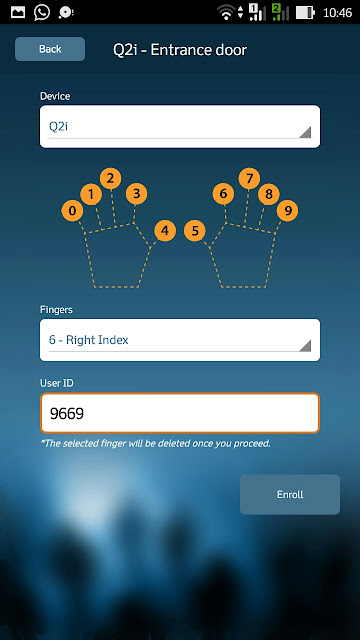
5) Select which finger to enrol and insert the user ID


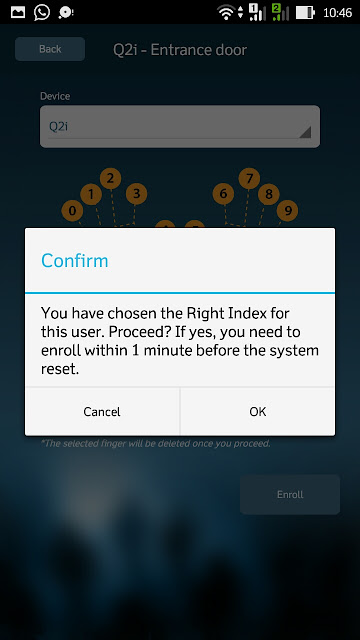
6) Click Enroll and the system will prompt user which finger is selected and enrollment must be done within 1 minute before the system resets.


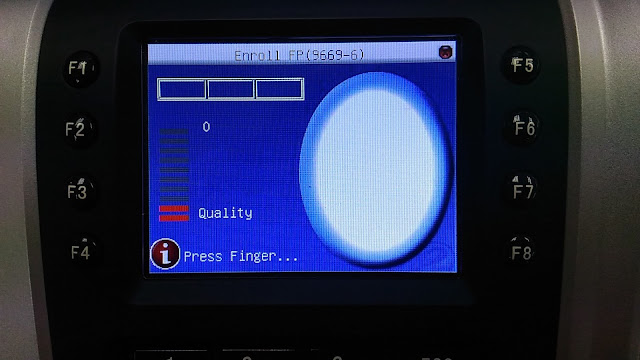
7) A message will be shown on the device screen, prompting the user to perform enrollment on the terminal.


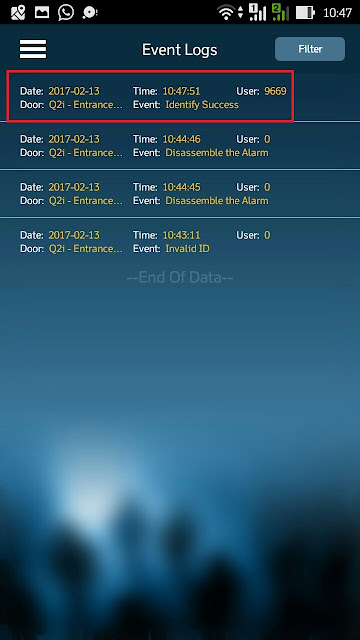
8) System will automatically save the fingerprint and the administrator can check in the Event Log to confirm the enrollment is successful.


24 comments:

Have any questions or inquiries about FingerTec? Drop your input here.

Attendance Clocking Made Simple with Time Beacon

Friday, February 17, 2017 TimeTec 7 Comments


Scenarios and Recommendations 

Time Beacon is a small, inexpensive battery-powered device that taps on Bluetooth Low Energy, BLE, a protocol that is embedded in most smartphones, tablets and other devices of today. The tiny transmitter in the Time Beacon allows users to clock their attendance easily just by using TimeTec TA App. A user just need to open the App, tap on the Beacon icon and he is good to go! All attendance record complete with location and time will be recorded on TimeTec TA immediately. 
Find out how Time Beacon could be suitable for your company. Here are a few scenarios for your reference: 

1. A Small Firm with less than 25 Staff
One (1) Time Beacon is sufficient for any office with a small group of staff around 25 people or less. The Time Beacon can be placed at the main door of the office or at the reception area where all staff can do their clocking from their smartphones.
Recommended no. of Time Beacon: 1 unit (minimum) 
In TimeTec TA, you need to create:


2. SMEs around 50 staff
Medium sized offices having around 50 staff are recommended to go for at least three (3) Time Beacons to manage the staff clocking. With more Time Beacons, the transmission range is expanded and you can create different Beacon Groups to channel users to separate beacons according to their departments for example. 
Recommended no. of Time Beacons: 3 (minimum)
In TimeTec TA, you need to create:


3. SMEs with 100 staff, double storey office building
Setting up TimeTec TA using Time Beacon for an office building with multiple storey very much depending on the location and the built-up area. If you have 3 small offices at 3 different levels, each unit should have at least one (1) Time Beacon installed. However, if the office has a wide space area, it is recommended to install 2 or 3 Time Beacons per level/office to cover the entire office area and group the staff so they know which Time Beacon is meant for them. 
Recommended no. of Time Beacons: 6 (minimum)
In TimeTec TA, you need to create:


4. Factory of approximately 300 workers
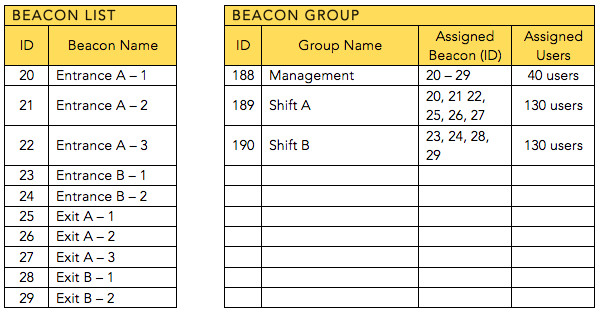
Factory workers have multiple shifts, and the production more often than not operates 24/7. To ensure daily attendance records are being recorded at all times, it is recommended to cover all entrances and exits so that workers know the location of the Time Beacon and they can access to it easily. The management can group users by department or working shift to smoothen the flow of the employee and not jamming a Time Beacon at a given time.
Recommended no. of Time Beacons: 10 (minimum)
In TimeTec TA, you need to create:


5. Office Tower of 1000 staff
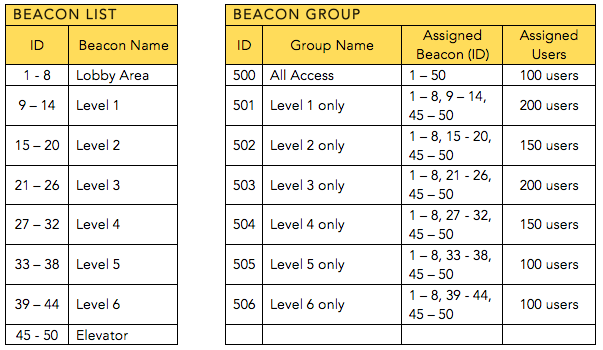
Multinational companies having their own office tower can also use Time Beacon to ease their attendance clocking. Depending on the size of the office tower, it’s recommended to install at least 5 Time Beacons or more on every level. Install the Time Beacon at open areas such as lobby halls, entrances of the office and also inside offices to ease clocking process. 
Recommended no. of Time Beacons: 50 (minimum)
In TimeTec TA, you need to create:


HOW TO SETUP
1. Create Beacon List
Go to Device > NFC | Beacon > NFC | Beacon List > Click Add > Select Beacon > Enter the Beacon ID and  Beacon name, and click Save icon. 
2. Register Time Beacon via Mobile
Login to TimeTec TA mobile app > Go to Settings > NFC | Beacon > Select the location name to register the Beacon. 
For Android, check the distance or UUID to identify the Beacon.
For iOS, insert the UUID number to register the Beacon. 
3. Create Beacon Group to group the beacons and users
In TimeTec TA, go to Device > NFC | Beacon>  NFC | Beacon Group > Click Add > Enter the Group ID and Location name.
4. Assign Time Beacon
Click Assign Checkpoints and select the Beacon to be assigned to the group.
5. Assign Users
Click Assign Users and select all users to allow users to clock through that Beacon.

As Time Beacon is an affordable BLE transmitter, place it at an open area to have smooth  transmission. Don’t block the Time Beacon because the transmission will not get through and will cause the app to keep trying. 

Get the step-by-step instructions on how to set Time Beacon with TimeTec TA here

7 comments:

Have any questions or inquiries about FingerTec? Drop your input here.

TCMS v3 Software Update (v2.0.3.2)

Thursday, February 16, 2017 TimeTec 417 Comments


For the first quarter of 2017, we have released the latest version of TCMS v3 (v2.0.3.2) that is packed with 14 extra new features. We have also fixed the errors that was found in the previous version of Ingress, as listed below:

New Features:

1. Configure Alternate Restdays in Group Duty Roster
You can now configure alternative restdays in Group Duty Roster where any days of the week can be selected as restdays and can be applied on all weeks of the month.
2. Revamp Import User From File on User Module
The layout of the Import User from File module has been improved where you can directly match more information from the USB File such as Email, Phone, Address, etc.

3. Revamp Database Backup Folder Selection UI
A newly-designed window will be prompted when selecting folder for database backup. This provides easier navigation on the folder path as compared to the previous Window.
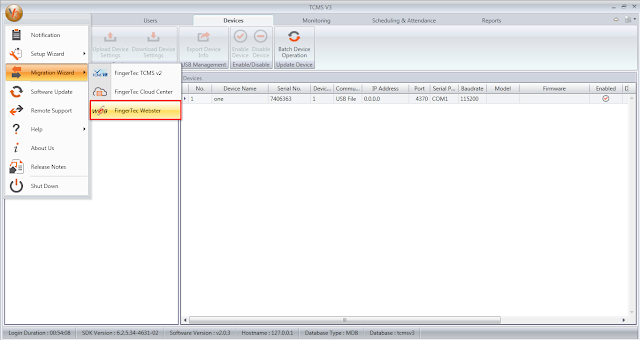
4. FingerTec Webster Migration Feature
The latest version of TCMS v3 offers a new database migration option for Webster users. By logging in into Webster database server, users can migrate the database seamlessly into TCMS v3.
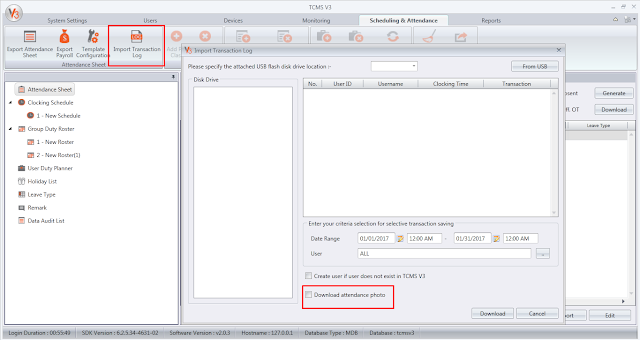
5. Import Attendance Photo from USB in Attendance Module
With this option added into Attendance Module, photos captured during verification can now be imported from USB file into the software.
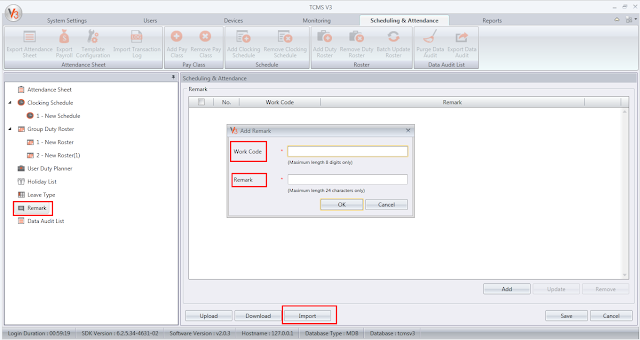
6. Import Remark/Workcode on Attendance Module
New Remark or Workcode can be imported into TCMS v3 directly from the transactions downloaded into the Data Audit List.

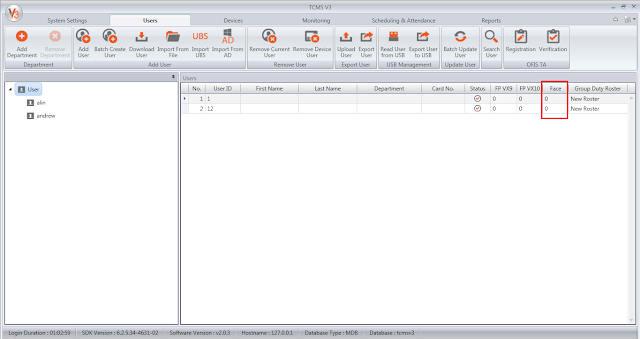
7. Display Face Template Count on User Module
Other than fingerprint count, face template count is also available in the user overview in User Module.
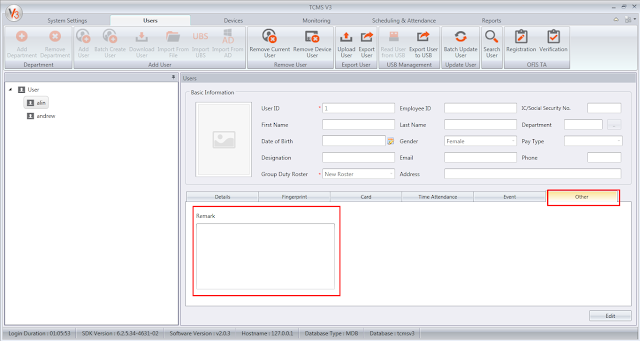
8. Display remark field on User Module
User could do Remark for employee which can be found under Event Tab in the User Module.
9. Enhancement on Add New Schedule in Attendance Module
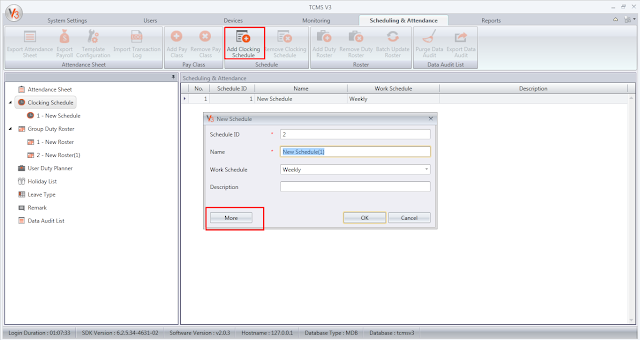
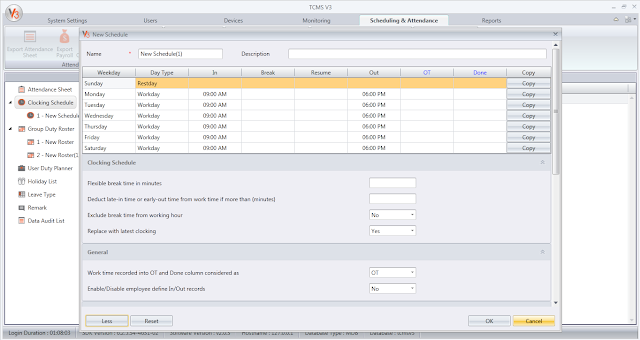
There is now a ‘wizard’ to configure the clocking schedule in Attendance Module. By clicking ‘More’ at the bottom left corner when adding a new schedule, users can directly construct a complete clocking schedule with the settings on clocking time, rounding, break, and overtime, just by answering a few questions to match your company’s attendance and clocking policy.
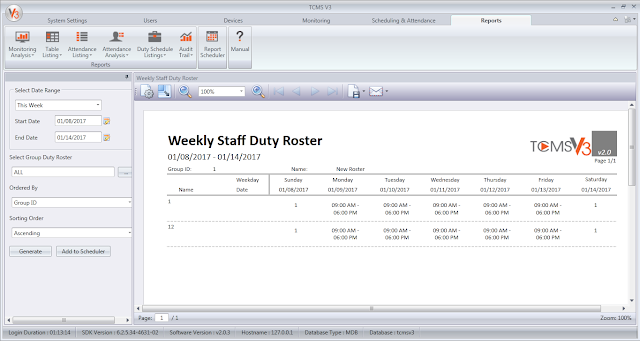
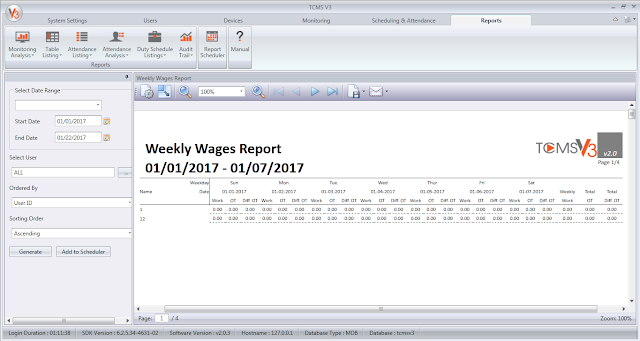
10. Enhancement on Print Multiple Weeks in Weekly Wages Report & Weekly Staff Duty Roster in Report Module
Weekly reports such as Weekly Wages Reports and Weekly Staff Duty Roster can now be printed in a new format where information is arranged in a more orderly manner.
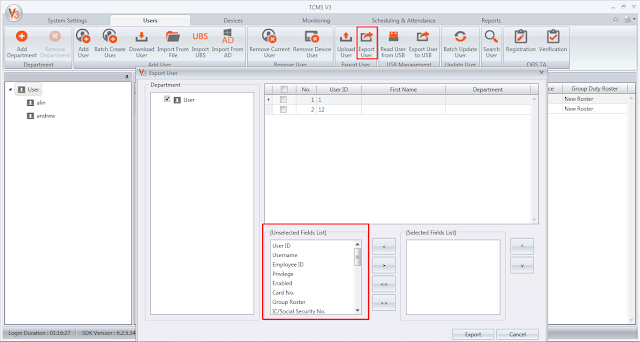
11. Enhanced Export User info Fields at Export User in User Module 
The latest TCMS v3 provides more flexibility with more User Info fields to be selected and exported to file in User Module.
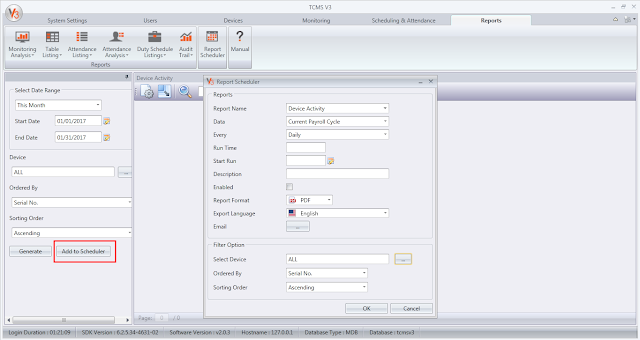
12. Add Current Report Option with Selected Options to Report Scheduler
This features offers a convenient way to set up report to be used in Report Scheduler. After selecting the desired report type and format, users can directly add it into the report list in Report Scheduler.
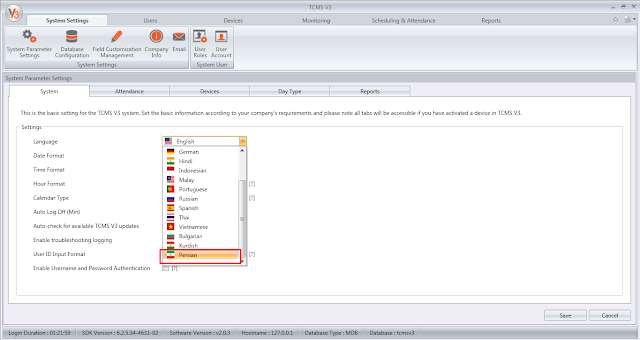
13. Persian language is available!
Persian or Farsi is a language predominantly used in Iran, Tajikistan, Afghanistan, Uzbekistan and some parts of Iraq. And now TCMS v3 is made available in Persian. If you want your language to be available in TCMS v3, let us know. Email at [email protected] to request.
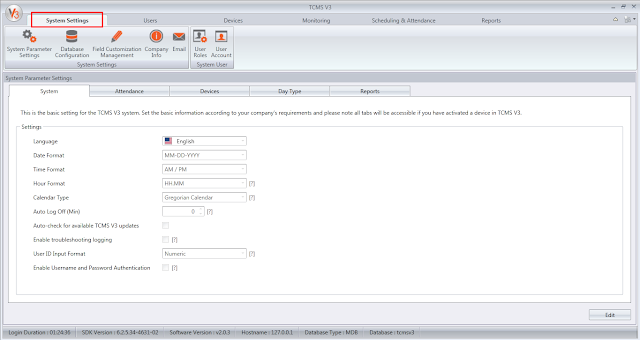
14. Configure System Settings without any Activated Terminal
Previously, you must have at least a device connected to TCMS v3 before you could configure System Settings. Not anymore! Now you can configure System Settings even without connecting any device to TCMS v3.
Fixed Errors:
15. Fixed Rounding in Clocking Schedule unable to save
16. Fixed Leave Type will not show when using Open Schedule
17. Fixed Sage UBS payroll not exported on Attendance Module
18. Fixed users not imported on User Module
19. Fixed wrong calculations of Work Hour when using HH.HH format on Report Module
20. Fixed attendance data not exported when not select User ID on Attendance Module
21. Fixed first and last rounding rules displaying incorrect results when generating attendance

417 comments:

«Oldest   ‹Older     Newer›   Newest»
«Oldest ‹Older     Newer› Newest»

Have any questions or inquiries about FingerTec? Drop your input here.