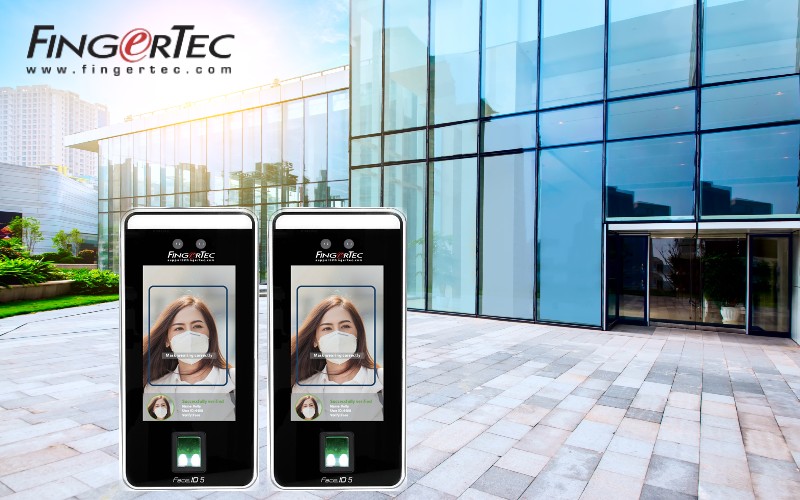
FACE ID 5 WITH FACE ID 5 (MASTER & MASTER) WIRING CONNECTION

Friday, April 29, 2022 TimeTec 0 Comments


Face ID5 has a versatility function that can cater attendant record and access control needs for an organization. It can be equipped with  temperature record and control, face recognition, mask  detection, touch-less access recognition equipment that fit its needs with the new norm era. 

With its versatility functions, many inquiries from organizations to make Face ID5 two pairs of units for one access control system. In this article, you can find the wiring diagram showing how two (2) Face ID5 can be connected.


Note: If some of the screenshots or steps viewed here are different from the ones in the current system, this is due to our continuous effort to improve our system from time to time. Please notify us at [email protected], we will update it as soon as possible.


0 comments:

Have any questions or inquiries about FingerTec? Drop your input here.

PRESET HALF DAY VALUE SCHEDULE FOR HALF DAY SCHEDULE IN TIMETEC TA

Friday, April 29, 2022 TimeTec 0 Comments


Introduction:
Timetec TA schedule allows the user to preset the specific schedule for the half day leave to avoid the user short hours. Please be informed that the feature can only be used if the user subscribes to the TimeTec Leave.

Steps:

IN TIMETEC LEAVE

In order to enable this feature, you will need to enable the preset half day value in TimeTec Leave. 
a) Go to COMPANY > System Setting


b) Go to Leave Management module > enable the preset half day value and set the value
Remark: The preset value will automatically preset the time during the leave application process. However, staff are still able to change the start time of their leave.

IN TIMETEC TA

In order to apply the feature on the schedule, you will be required to create two daily schedules for AM and PM. 

c) Go to SCHEDULE > Clocking Schedule > click on the “Add” icon to create a Daily schedule type

d) Create a half day schedule for AM and PM leave

E.g: Main schedule for user is 9:30AM - 6:30PM
AM leave schedule: 2:30PM - 6:30PM
PM leave schedule: 9:30AM -1:30PM


e) After the schedules are created, edit the main schedule and go to the leave module in the schedule setting.

f) Enable Manage Leave Hour Automatically and set the schedules for AM and PM.


Note: TimeTec TA will replace the leave hours and short hours calculation automatically when the employee is on partial day leave. This feature will only apply for the present leave application after the feature is applied. This feature will not change previous attendance records. 
 
Note: If some of the screenshots or steps viewed here are different from the ones in the current system, this is due to our continuous effort to improve our system from time to time. Please notify us at [email protected], we will update it as soon as possible.


0 comments:

Have any questions or inquiries about FingerTec? Drop your input here.

Setting up Face ID 4D External Siren (FMM220) (Siren 240VAC)

Friday, April 29, 2022 TimeTec 0 Comments


Introduction
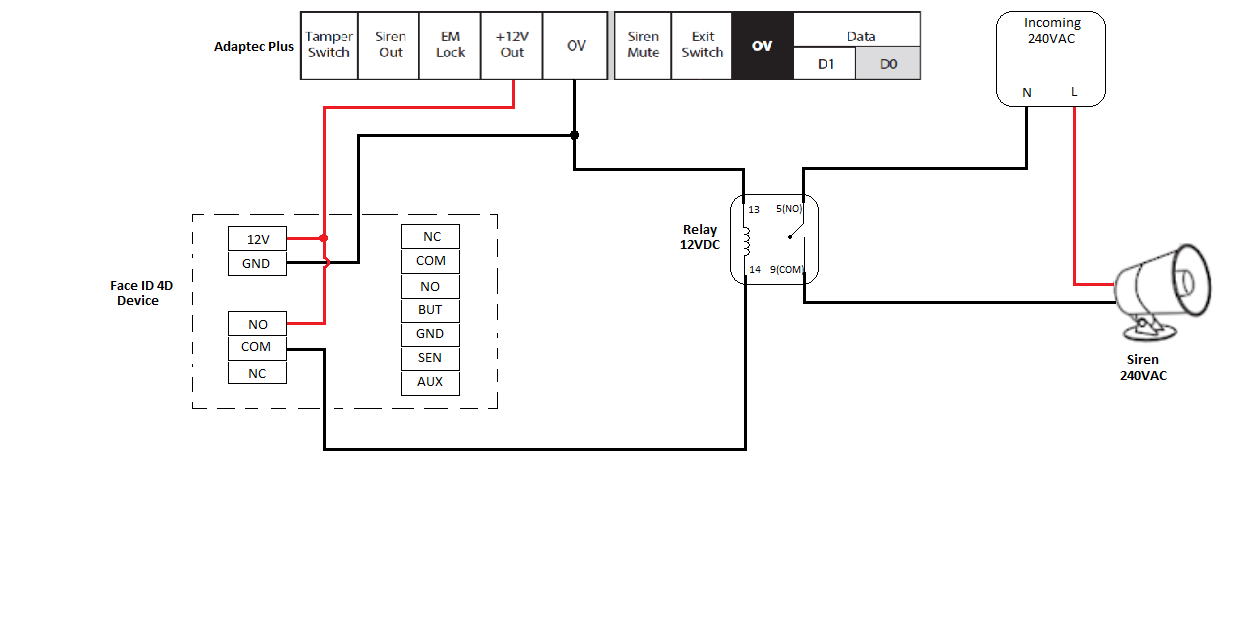
In the previous article, we have provided instructions and a wiring diagram for a 12VDC external siren. Some work environments have large spaces such as industrial industries, factories and construction sites. We recommend users install an external siren 240VAC type for use in a broad place. This article will provide a wiring diagram and steps to set up an external siren for a Face ID 4D device.

Requirements
-  Face ID 4D device
- Power supply 12VDC
- Siren 240VAC
- Power supply 240VAC
- Relay 12VDC
 
Wiring Diagram

 
Setup External Siren
-  Go to Menu – Personalize – Bell Schedules – Options.
-  Make sure to select NC2 on External Bell Relay.

- At the Bell Schedules menu, go to New Bell Schedules.
- Turn On Bell Status.

-          On New Bell Schedule Menu, go to Bell Type
-          Select External Bell
 
Setup Bell Schedule
- Go to Menu – Personalize – Bell Schedules – New Bell Schedules - Bell Time
- At New Bell Schedule menu – go to Repeat – Make sure to select at least one day that you want it to operate.

 
Note: If some of the screenshots or steps viewed here are different from the ones in the current system, this is due to our continuous effort to improve our system from time to time. Please notify us at [email protected], we will update it as soon as possible.


0 comments:

Have any questions or inquiries about FingerTec? Drop your input here.

Error 2502 and Error 2503 When Installing Ingress or TCMS V3

Friday, April 29, 2022 TimeTec 0 Comments


There are several cases where users reported receiving Error 2502 and Error 2503 while installing Ingress or TCMS V3 software. These errors are due to the system date on your computer, which set incorrectly, or you have Windows User write permission issues: Windows has denied your Login User name access to specific Windows Installation folders and permission to perform certain tasks on the computer.


Solution
1. Reset the date on your computer to the correct date. To do this, follow these steps.

- Click Start, point to Settings, and then click Control Panel.
- In Control Panel, double-click Date and Time.
- In the Date and Time Properties dialog box, edit the information so that the current date and time are displayed. 
- Click Apply, and then click OK.
- Restart Installation of the software.

NOTE: Because there are several versions of Microsoft Windows, the following steps may be different on your computer. If they are, see your product documentation to complete these steps.
 
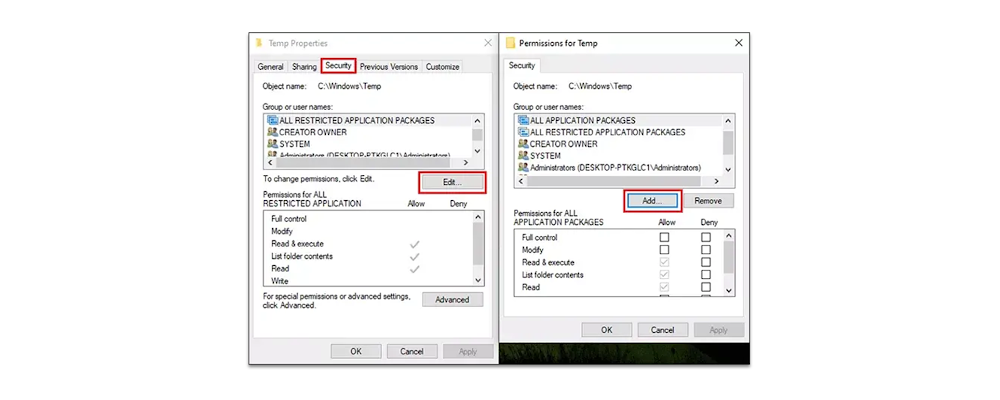
2. Check the write permissions of the installation directories such as:

- C:\Windows\Installer
- C:\Windows\Temp

These may be hidden system folders.

1. Open Windows Explorer
2. Select Organize - Folder and search options - View tab
3.  Under 'Hidden files and Folders' select 'Show hidden files, folders, and drives'
 
4. Right click on the folder (C:\Windows\Installer and C:\Windows\Temp) and select 'Properties'

 
5. Select 'Security' tab and amend permissions. The permissions given to everyone on the folder to make sure SYSTEM and Administrators have Full Control.
 
NOTE : A System Engineer with knowledge of Windows OS may be able to suggest other configurations on the computer. Please liaise with your IT personnel or person who configure your Windows OS to assist.

Note: If some of the screenshots or steps viewed here are different from the ones in the current system, this is due to our continuous effort to improve our system from time to time. Please notify us at [email protected], we will update it as soon as possible.


0 comments:

Have any questions or inquiries about FingerTec? Drop your input here.

HOW TO ASSIGN EMPLOYEE’S DESIGNATION IN INGRESS AND TCMSV3 SOFTWARE

Friday, April 29, 2022 TimeTec 0 Comments


Introduction
Assigning designations of your employees in Ingress and TCMS V3 lets you filter the attendance from the user list. Some companies prefer to filter the attendance report by designation rather than department for performance review, etc. The employer can quickly identify staff based on the designation shown on their profile, making it more efficient and systematic for allocation and arrangement. This article will guide you on the steps to assign user designation.
 
Process
1. Go to Users module > Click Users > Double click one of the users.


2. Click Edit > Go to Designation > Manually key in the user’s designation > Click Save. Please note that you must manually key in all the different designations for the first time.

 
3. Go back to user list > Select the other users > Key in or scroll down from the list and select the user’s designation.


If the users have identical designations, you just need to scroll down the designation list and select the correct designation. However, if the user has a different designation from the others, you need to manually key in their designation.
 
Note: If some of the screenshots or steps viewed here are different from the ones in the current system, this is due to our continuous effort to improve our system from time to time. Please notify us at [email protected], we will update it as soon as possible.


0 comments:

Have any questions or inquiries about FingerTec? Drop your input here.

How to Create System Roles in TimeTec Hire

Friday, April 29, 2022 TimeTec 0 Comments


Introduction
An Administrator plays a vital role in managing users in a system. TimeTec Hire offers access rights control to authorize users to manage the system roles within the organization.

By default, there are two types of User Roles in the system:
1. Master (System Administrator) has full access and is responsible for setting up and maintaining the TimeTec Hire system.
2. Normal Users can create and customize the access rights to be assigned to other admin personnel, depending on the rights given by the Admin roles.

Process
A. Add System Roles.
1. Go to TimeTec Hire > User > Manage System Roles & Admin.

2. By default there is only one system role which is Master and will be assigned to the owner account.
3. At the pop-up window, there is an option to allow users to copy the access rights from existing System Roles or edit the copied role, if necessary. This way expedites the process of creating a new yet similar system role in the system. Else, fill up the System Role Name and Description.

i - Copy Access Rights from is an option to allow users to copy the access rights from the existing System Roles or edit the copied role, if necessary, a quicker way to create a new yet similar system role.
ii - System Roles Name is usually set based on the roles assigned, admin name and organization structure.
iii - Hiring Master -  Admin can enable this option for users under this system role to oversee and monitor job posts and applicants, including remuneration offers. Assign this role to trustworthy users authorized to view confidential information, i.e., salary.

Organization Structure:
a. Full Division: allow the Admin to access all users’ information in the Organization Structure
b. Partial Division: allow Admin to access a limited amount of users’ information for selected divisions.

Full Module Rights - Set the access rights for the System Role by ticking on the Full Module Rights. This option will allow all modules access in the TimeTec Hire, while unticking it will change the accessibility of the module for the role


4. Unticking the Full Module Rights will allow the Master to select the required access they want to give to the user. By default, when enabling the access, the system will only allow access to View Only and for another access such as Add, Edit, Delete, Etc. Master needs to turn on the access manually by clicking the selected box. Finish the process by clicking the Submit button.

Remark
1. To enable the system role as a job poster, enable the ‘’Hiring Manager’’ option on Hire > Job Posting User List.
2. This section determines the user listing in the Job Posting section. Select the job roles to determine the type of users displayed in the user drop-down list.


B. Assigning Admins into the System Roles

1. After setting up the System Roles, Go to Admin Tab > Click Add.


2. Once the + is clicked, a pop-up window will appear and you can assign selected users to use the new system roles based on their email.

3. New system roles which ‘’Hiring Master’’ option enabled will appear in red star (*).


Note: If some of the screenshots or steps viewed here are different from the ones in the current system, this is due to our continuous effort to improve our system from time to time. Please notify us at [email protected], we will update it as soon as possible.


0 comments:

Have any questions or inquiries about FingerTec? Drop your input here.