Introduction
TimeTec QF Master is an access control system in the form of a mobile App in Android devices, where each QF Master is a unique access point that controls each door's IN and OUT activities when paired with a TimeTec BLE-2 via a Bluetooth connection. QF Master is the smart Android app designed to authenticate a person's face to justify the person's access permission. The face recognition algorithm can cater to up to 10,000 face templates with 1:N verification and store up to 1,000,000 transaction data inside the Face Master. QF Master is compatible with other TimeTec solutions such as TimeTec TA for attendance clocking, and TimeTec Access, TimeTec VMS and iNeighbour for door access. More information for QF Master is available at this link.
Process
1. Setup QF Master
Activate the QF Master in the TimeTec account; there is an additional charge for the QF Master. Please follow the steps to activate the application.
a) For Timetec TA (Attendance), please refer to this link b) For Timetec Access (Door Access), please refer to this link. c) For Timetec VMS (Visitor Management), please refer to this link.
2. Face Enrolment
a) To enrol a user's Face via QF Master, click on 'Settings' icon at the bottom left corner > Login to the Admin account.
b) Select Users Management > search User > click on Face’s icon to start enrolment >
Capture user’s face and click Submit to Save.
3. QF Master configuration explained
a)Tap on Language to change QF Master’s language to English or Chinese Simplified.
b)Tap on Date Format or Time Format to change QF Master date and time format.
c) You may enable the ‘Return to Home page after verification’ to set the QF Master to return to the selection page after the user is verified. You may also disable it to set the QF Master to always be in scanning mode.
d) There is a screensaver on QF Master during idle mode. By default, the screensaver will stop and start scanning when it detects any motion in front of the camera. If this feature is disabled, the user needs to tap on the screen to stop the screensaver to verify himself.
e) For network security level settings, please refer to your IT or network personnel. By default, this feature is enabled.
f) Other information:
- Connected Hardware is a BLE2 controller (MAC Address) that QF Master connected to.
- Mobile ID is a unique ID for QF Master activation
- Android version is the version of the smartphone’s firmware
- App version is QF Master app version
4. To check a user record on QF Master, tap on Access Records. Here you may filter the data by Date, Time or User Name.
Note: If some of the screenshots or steps viewed here are different from the ones in the current system, this is due to our continuous effort to improve our system from time to time. Please notify us at [email protected], we will update it as soon as possible.
Introduction
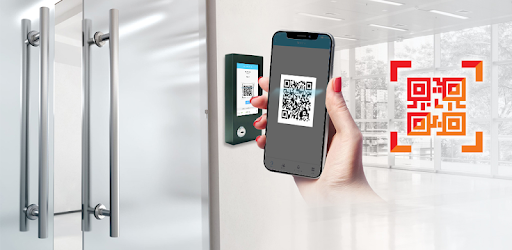
QF Master is the Android Smart App (paired with BLE-2 or BLE-5), offering two door unlocking methods: (1) Face scan and (2) QR code scan. QF Master can be used jointly with TimeTec solutions such as TimeTec TA: for attendance clocking, TimeTec Access, TimeTec VMS and i-Neighbour: for door access. For more detailed information about QF Master, click this link.
In this article, we will guide you on how to configure the QF Master in TimeTec TA. Please note that this feature is only available for QF Master version 1.6.1 and above, otherwise please update the apps version in Play Store. This feature will allow admin to configure the settings on QF Master from Timetec TA without going to QF Master door.
Process
Step 1 - In TimeTec TA, go to Device tab > QF Master and click on the Settings button.
Step 2 - There will be a popup window that shows the configuration of the QF Master.
Step 3 - Here you may change the Time Format on the QF Master.
Step 4 - Click on the Date Format to change the format of the Date that will show on the QF Master apps.
Step 5 - You may change the QF Master system language here.
Step 6 - You may set the ‘Verification Interval’ from 3 seconds to 7 seconds. This is to set the interval time of the QF Master for scanning the user’s face.
Step 7 - ‘Scan Distance’ settings is to set the distance for the QF Master to detect at what distance the device can scan the user’s face.
1.jpg)
Step 8 - Enabling ‘Full Face Scan’ setting will require the QF Master to scan the front full face of a user in order to verify.
2.jpg)
Step 9 - Enabling ‘Scan From Any Angle’ feature will allow the QF Master to scan and verify from any angle.
1.jpg)
Step 10 - Click the Submit button when the settings are done.
Note: If some of the screenshots or steps viewed here are different from the ones in the current system, this is due to our continuous effort to improve our system from time to time. Please notify us at [email protected], we will update it as soon as possible.
Introduction
QF Master is the Android smart App (paired with BLE-2 or BLE-5) offering two methods of unlocking doors: Scanning of face and scanning of QR code for verification. You can integrate the QF Master with TimeTec Access to scan an employee's face or QR Code to authenticate access permission. In TimeTec Access, you may configure the employee's access rights for each access point to acquire a higher security requirement of the building access.
Process
Step 1 - Install QF Master apps from the Playstore or AppStore.
Step 2 - Run the QF Master apps. A mobile ID will display on the apps. Ensure the Bluetooth and GPS Location has been enabled prior to proceeding to the next steps. Additional charges for QF Master license will be applied. Please follow the steps to activate the application.
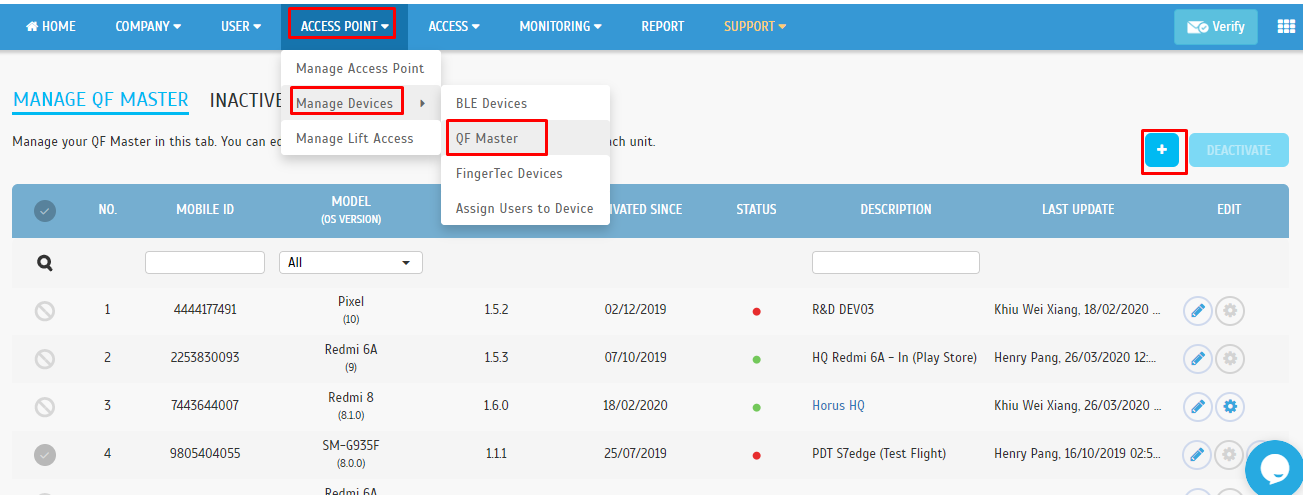
Step 3 - In TimeTec Access > Access Point tab > Manage Devices > QF Master > click on the ( + ) icon to add a new QF Master Device.
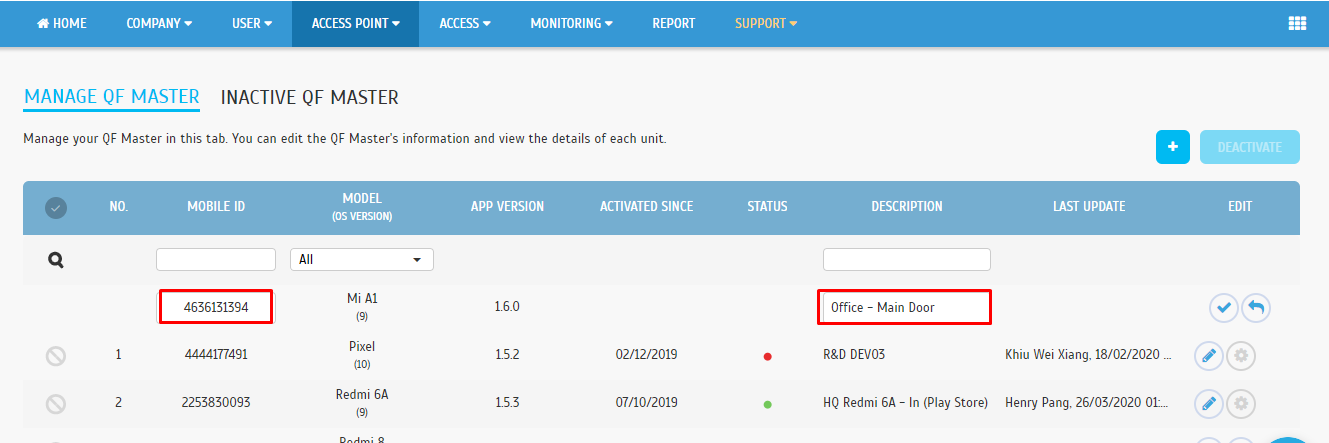
Step 4 - Insert the Mobile ID as shown in QF Master apps into the Mobile ID field. Then, key in relevant description and click the save button.
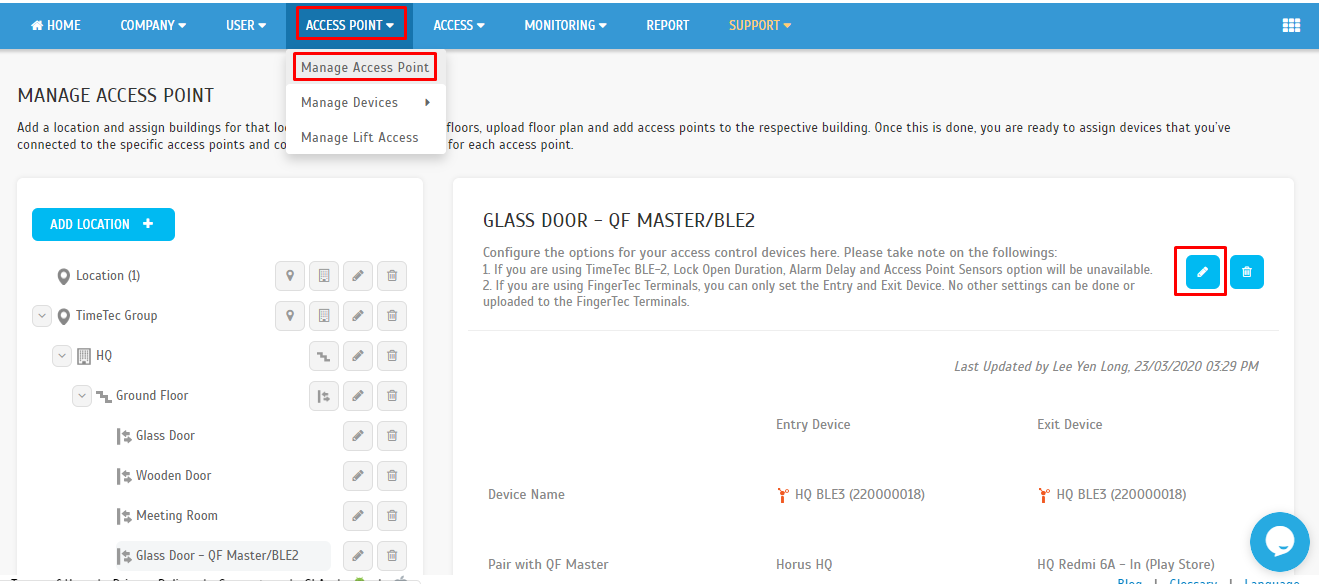
Step 5 - Next, go to the Access Point tab > Manage Access Point. Select the Access Point/Door that has been paired with BLE-2 / BLE-5. Click the Edit icon.
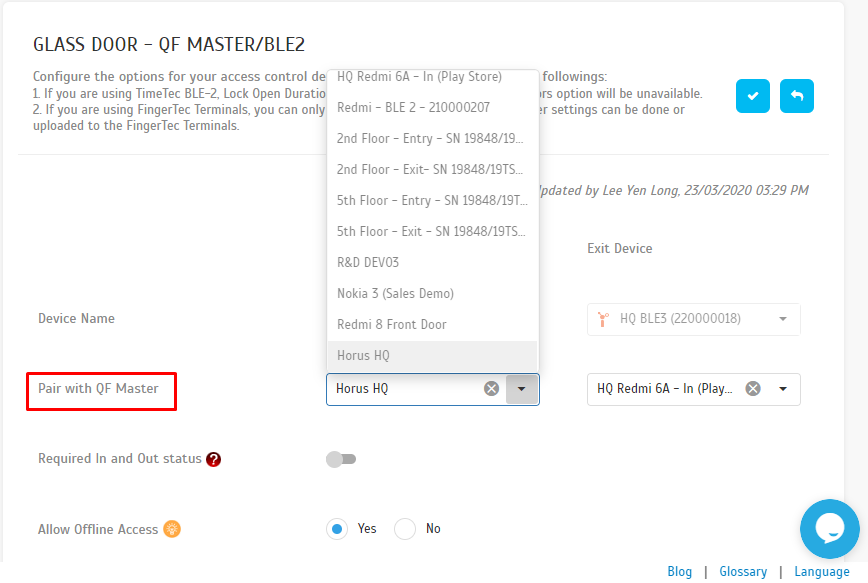
Step 6 - Select the added QF Master to be paired with that Access Point as the Entry Device or Exit Device. Click the Save button when the settings have been completed.
Step 7 - After settings are completed, go to QF Master Application mobile > Click on the setting Icon at the bottom right > and login to the admin account.
Step 8 - After settings are completed, go to QF Master Application mobile > Click on the setting Icon at the bottom right > and login to the admin account.
Step 9 -Kindly follow the instructions on the application to enrol a user’s face for verification > tap Submit. Try to verify the User’s face. In the case of verification failure, please re-enroll the user’s face.
Note: If some of the screenshots or steps viewed here are different from the ones in the current system, this is due to our continuous effort to improve our system from time to time. Please notify us at
[email protected], we will update it as soon as possible.


.jpg)
.png)
.png)
.png)
.png)
.png)
.png)
.png)
.png)
.png)
1.png)
.png)
1.png)
.png)
.png)
.png)
.png)

1.jpg)
3.jpg)
1.jpg)
1.jpg)
1.jpg)
4.jpg)
1.jpg)
1.jpg)
2.jpg)
1.jpg)
1.jpg)


1.jpg)
.jpg)
.png)
1.png)
.png)
.jpg)
.jpg)


.png)
.png)
.png)


