Introduction
For the latest version of AWDMS and Ingress Software (version 4.2.3.2), you can use TimeTec device model TC10 or TC20 with Ingress Software and AWDMS to capture the transaction log data as attendance in Ingress and AWDMS.
Process
1) If you use LAN connection, configure the IP Address, Subnet Mask and Gateway on your device
Go to Menu > COMM. > Ethernet.
2) Configure the Server Address and Server Port on your device. Go to Menu > COMM. > Cloud Server Setting.

Note: Server Address is your computer IP address where the Ingress and AWDMS are installed. You can check it using Command Prompt and type in ‘ipconfig’.

Server Port is the default port which is 8088 or you can check it in AWDMS. Go to the Attendance module in AWDMS > Device > Search Device.
3) Before you can activate your device in Ingress, you need to make sure that you are able to search it in AWDMS (Attendance). Go to Attendance module > Device > Search Device > Search.
Note: Once the device is found, DO NOT add it via AWDMS. You only need to add it in Ingress.
4) Add the device in Ingress. Go to Devices > Add Device > Set the Device Name > Select AWDMS ATT as Communication Mode > Key in Serial Number and device IP address > Click Add.
Note: If some of the screenshots or steps viewed here are different from the ones in the current system, this is due to our continuous effort to improve our system from time to time. Please notify us at [email protected], we will update it as soon as possible.
Introduction
During the installation of AWDMS, it is required to run the AWDMS setup tool once the AWDMS installation is completed. This setup tool will create a database for AWDMS which is located on your MySQL Server.
However, there will be several errors which you might find when running the setup tools. The following will explain which error you should ignore and which you will need to solve before the installation is completed.
Run the following query in your SQLyog: GRANT ALL PRIVILEGES ON AWDMS.* TO 'ingress'@'localhost' IDENTIFIED BY 'ingress';
2. Some cases will face the following error when running the AWDMS setup tools.
 Please note that this is due to the Windows Server/Windows PC set-up. Please make sure to update Windows to the latest version and install all the necessary updates required for Windows Server/Windows PC. You may also check your Windows Server/Windows PC date and time settings and make sure that Windows is using a normal date and time setting. To check this, go to the control panel > click clock and region > click change date, time, or number formats > refer to screenshot. If the issue persists then we advise you to reformat your Windows or install it on another workstation and make sure to not configure Windows with any security or access privilege so the installation proceeds accordingly.

Note: If some of the screenshots or steps viewed here are different from the ones in the current system, this is due to our continuous effort to improve our system from time to time. Please notify us at
[email protected], we will update it as soon as possible.
IntroductionFingerTec has launched the new Face ID5 device with the AWDMS program in 2020. Since then, we have distributed thousands of devices worldwide and released several versions of the AWDMS program to upgrade the system's performance to match the clients' requirements.
This article will guide how to upgrade the AWDMS program from the old version to the latest version and give the best performance when using the system.
Download Installer File
Download the latest installer files for Ingress and AWDMS program from the below links.
Ingress Server v4.1.1.0 =
https://www.fingertec.com/softwareupdate/ingress/software-ingress_download_e.htmlAWDMS Program v3.4.1 =
https://www.fingertec.com/download/AWDMS.zipAWDMS Setup Tools v1.3 =
https://s3.amazonaws.com/files.fingertec.com/Software+Releases/AWDMS/2021/AWDMS+3.3+%26+AWDMS+Setup+1.3/AWDMS+Setup+Tool+v1.3.zip Step to reinstall AWDMS program
1. Before upgrading the AWDMS or any FingerTec software, please make sure that you have backup the database file. There are two options to back up the database file.
-
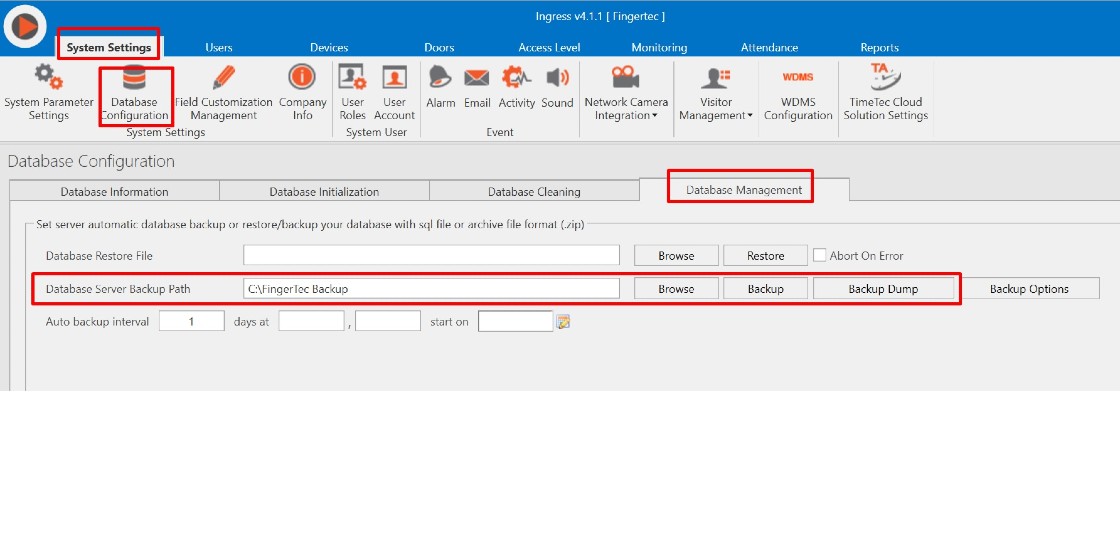
First, backup from Ingress program by going to the System Setting > Database Configuration > Database Management. If you have already used the latest Ingress software (v4.1.1.0) system will automatically backup the AWDMS database together with Ingress.
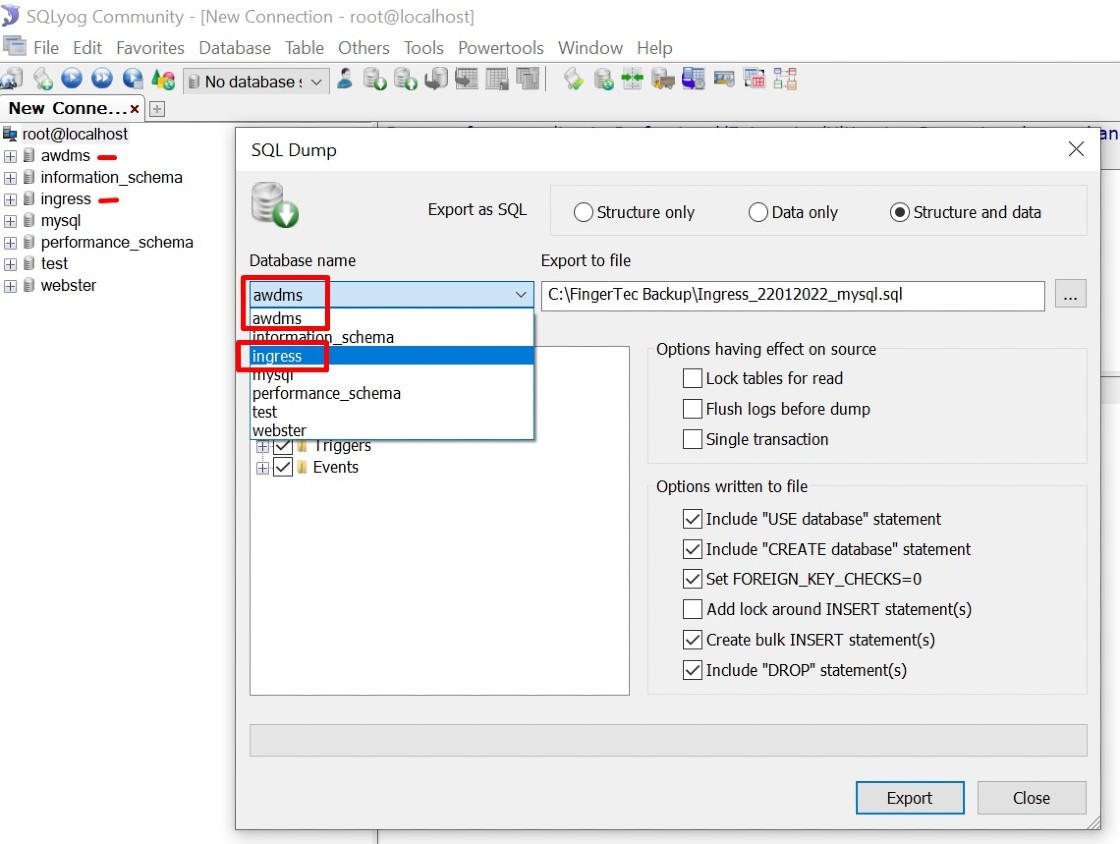
2. Please backup or copy the 'zkbiosecurity' folder to save the user photo pictures. In case the user photo was missing after the installation, and you cannot download the photos from the Face ID5 terminal, you can use this file/photo as a backup. The default location is C:\Program Files\BioSecurity\service\zkbiosecurity
3. If you have already activated the AWDMS program's license, please cancel the current program by opening AWMDS > select About (i icon) > select Cancel.
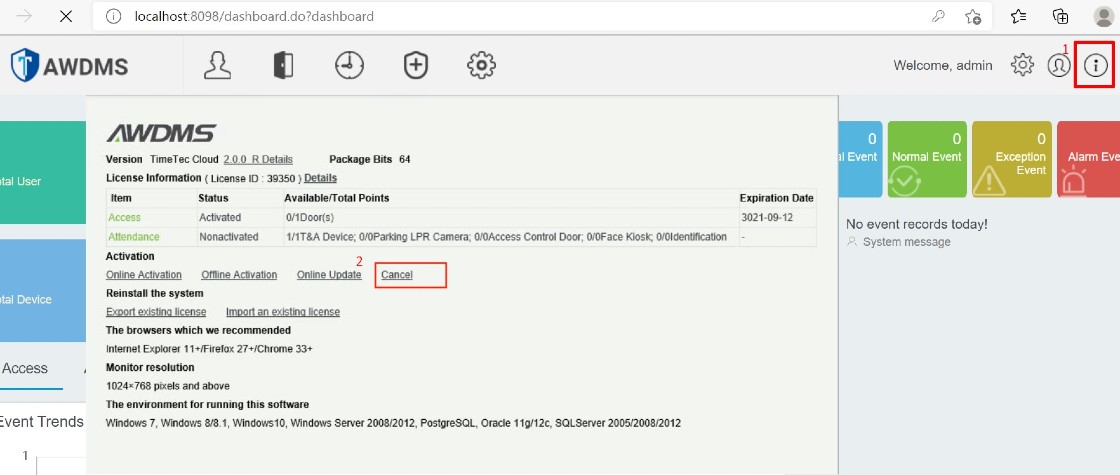
4. Uninstall TimeTec Cloud AWDMS program from the Control Panel > Program & Features > select Uninstall.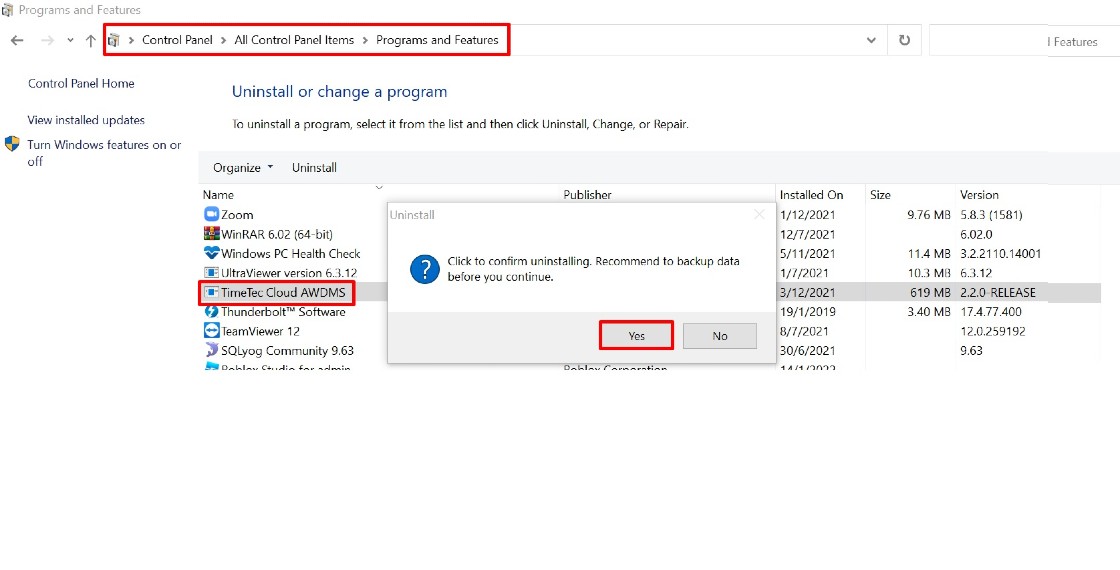
5. Restart the PC. When the PC opens, start to install the AWDMS program using the latest installer file that you have downloaded from the given link.
6. Once you have finished the AWDMS installation, please make sure to run the AWDMS Setup Tools to complete the installation. For installation guidance, you can refer to the below link.
https://s3.amazonaws.com/files.fingertec.com/Software+Releases/AWDMS/AWDMS.docx-new.pdf
7. After a moment, when you can open or run the AWDMS program together with the Ingress software, please check the WDMS Configuration in Ingress software by going to System Setting > WDMS Configuration. Please key in and update the AWDMS Information like Server IP, Port and AWDMS password. Then, make sure you can connect to the AWDMS server.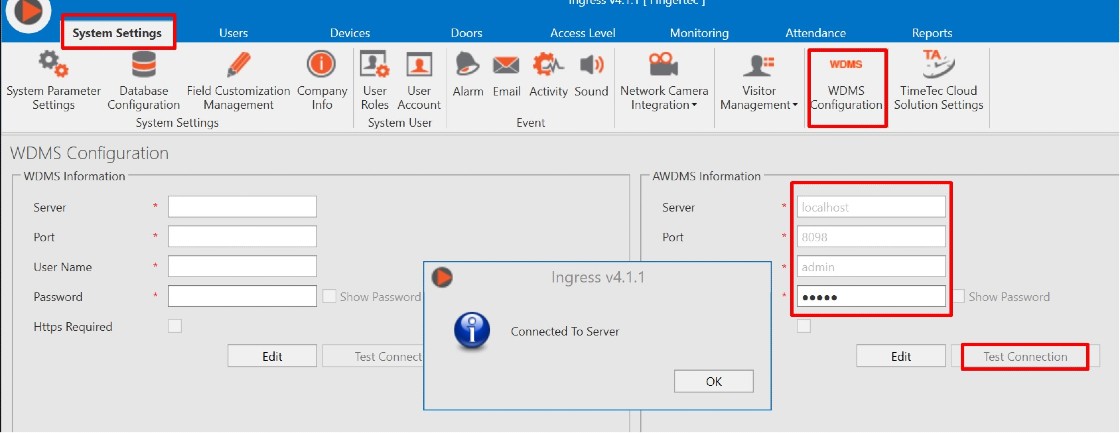
8. Open the AWDMS program and check the Device Connection status. Reactivate the device in the Ingress software to establish the connection.
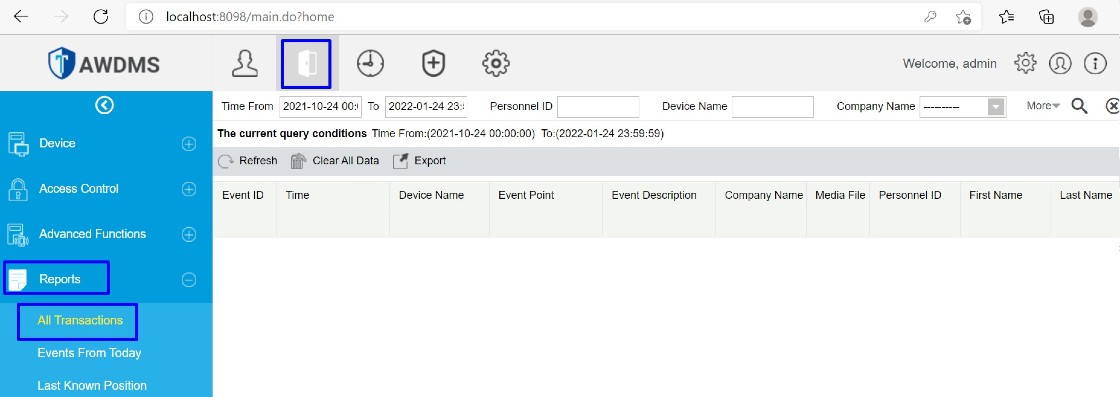
9. Inside the same AWDMS program, check the Transaction log status under Access > Report > Transaction Log and User Data status under Personal > Person. Make sure all User data are updated, especially to user face pictures.
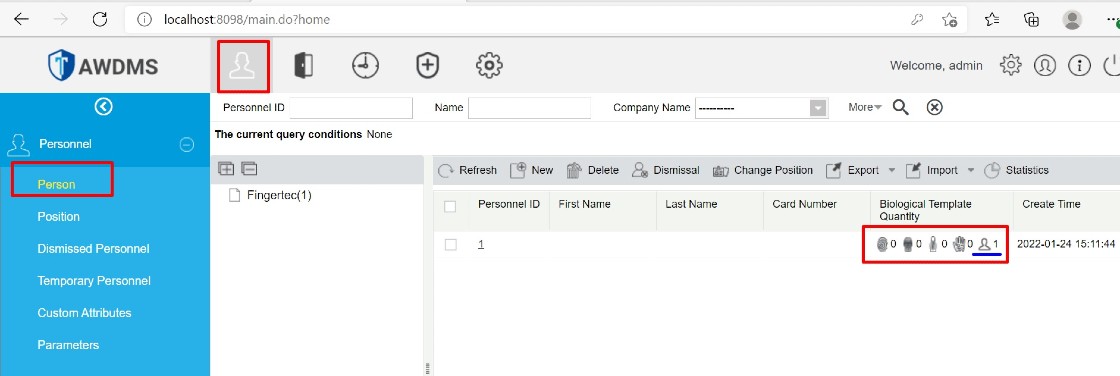
10. If you cannot find the previous and current transaction log or complete User data, you can download all the data from the Face ID5 terminal by going to AWDMS > Access > Devices > View and Get Device Info > select Get Personal Information and then Get Transaction.11. You can reactivate the AWDMS license using the same license file after updating all data. You can also start to use the system and manage the Attendance record in Ingress software. Note: If some of the screenshots or steps viewed here are different from the ones in the current system, this is due to our continuous effort to improve our system from time to time. Please notify us at
[email protected], we will update it as soon as possible.
Introduction
It is crucial to backup the database of AWDMS regularly. This backup process is necessary to avoid losing all of the software's contents and settings should the software crash or the hard disk of the computer malfunctions. Only with a backup can all the data be restored. By using any MySQL manager, admin or GUI tool, you can tremendously reduce the time needed to restore a large database. The MySQL Manager is inexpensive, you can obtain it for free by downloading it from the Internet.
Backup Process
2. After successfully installing the SQL Community, please run the software to connect with the MYSQL database. First, you need to fill the required Host address, Username and Port of the MYSQL database. Then, click on Test Connection and Connect.3. Upon connecting to the localhost database, you should see on the left panel of the window a list of the available databases. Next, right click on AWDMS and select Backup/Export and Backup database as SQL Dump.
4. Click on Structure and Data > Select ALL Object(s) > Choose folder to store the database > Now that the settings have been configured, click 'Export' to start the backup process. The program will inform you when it is completed.5. Now, you need to copy one folder that contains a user photo for backup purposes in case there is no user photo available once you restore the AWDS backup database on a different PC.
Restore Database
1. At the SQLyog Community software, connect into the localhost database. Right click on AWDMS, select Import, and then Execute SQL Script.
2. Click the “…” icon to select the backup file path. Click Execute to restore the database.
Note: If some of the screenshots or steps viewed here are different from the ones in the current system, this is due to our continuous effort to improve our system from time to time. Please notify us at [email protected], we will update it as soon as possible.
Introduction
By configuring this setting in AWDMS, you can receive notification regarding the device connection. The administrators will be notified through this feature when any of the devices lost connection and re-connected back to AWDMS software.
Steps
1) Configure the email setting
First, you need to configure your email account within AWDMS for it to send notification via email. To do so, go to System > Basic Management > Email Management > Email Parameter Settings > Insert SMTP Server, Port, Email Account, Email Password > Click Test Connection.
1.jpg)
 2) Go to Access module > Access Control > Parameters > Insert the recipient email address in the Alarm Monitoring Recipient's Mailbox.
1.jpg)
3) And if the device is disconnected, the AWDMS will send an Email Notification to the recipient email to notify them of the news. Note: If some of the screenshots or steps viewed here are different from the ones in the current system, this is due to our continuous effort to improve our system from time to time. Please notify us at [email protected], we will update it as soon as possible.
Steps to Activate AWDMS License (Offline mode)
1. At the login page, click Activate Now (as shown in the image below)
2. Click on Offline Activation
3. Input username: admin and password: admin, then click OK button.
4. Select No when asking for an existing license file. Then click the OK button.
2.jpg)
5. Input information in fields marked with red asterisk *. Then click the “Choose File” button. Please take note, at the Personnel field, just key in a number, e.g., 1.2.jpg)
6. Select the original license file with name *-SN.xml, click the Open button followed by the OK button.3.jpg)
7. Click Offline activation file download. A file with a name like *_lic_upk.xml will be downloaded, sent this file, together with the original *-SN.xml file to Timetec Computing Sdn Bhd’s Sales Team to get an Offline activation license file. The filename of an offline activation is xxxxx-License.xml.2.jpg)
8. After receiving the offline license file. Click Offline activation on the About page again, and select Yes when asked “Do you have an existing license file whose format is *-License*.xml’, then followed by clicking on the OK button.4.jpg)
9. Click “Choose File”, then select the license file, click Open, followed by the OK button. The activation should be completed by now.4.jpg)
Note: If some of the screenshots or steps viewed here are different from the ones in the current system, this is due to our continuous effort to improve our system from time to time. Please notify us at [email protected], we will update it as soon as possible.
IntroductionFor the latest version of AWDMS and Ingress Software (version 4.1.0.4), you can add QF Plus Device in Ingress Software and AWDMS and this device will capture the transaction log data as attendance in Ingress and AWDMS.
Note: Upon purchase of QF Plus, please ensure to request the firmware that will be used with Ingress software.
Process
Before connecting your devices to the TimeTec AWDMS and Ingress software, kindly check the following:
1. Please check your PC server IP address using Windows Command Prompt. Run CMD > Type ipconfig > Press Enter. You can see from the picture below that the PC IP address is 192.168.4.214. (Wireless LAN)
2. Go to the device. Press Menu > System Settings > Cloud Service Setting > Insert your PC IP address > Set Server Port to 8088.
IMPORTANT NOTE: If you are using a Wireless network (WIFI), please make sure you connect the device with the same wireless network. Menu > Wireless Network > Turn ON WIFI > Select the same network with your server PC.
3. Then, run TimeTec Cloud AWDMS > Click on Attendance > Device > Search Device > Search. After completed, the device details will be listed as per screenshot below.
.jpg)
1.jpg)
4. After you manage to get the device listed in AWDMS, please run your Ingress software. Go to Devices > Add Device > Set the Device Name > Select AWDMS ATT as Communication Mode > Key in Serial Number and device IP address > Click ADD.
5. Once added the device, you may proceed to use the device to download the user and the user clocking data accordingly.
Note: If some of the screenshots or steps viewed here are different from the ones in the current system, this is due to our continuous effort to improve our system from time to time. Please notify us at [email protected], we will update it as soon as possible.


1.jpg)







1.jpg)
1.jpg)
.jpg)
.jpg)
.jpg)
.jpg)


1.jpg)

1.jpg)
.jpg)

1.jpg)
1.jpg)
1.jpg)
2.jpg)
2.jpg)
3.jpg)
2.jpg)
4.jpg)
4.jpg)
.jpg)
.jpg)
.jpg)
.jpg)
1.jpg)
1.jpg)
1.jpg)
1.jpg)
1.jpg)
.jpg)


