How to Connect EpiCamera with i-Neighbour
EpiCamera’s cloud-based system eases the setup towards numbers of compatible IP cameras and/or webcams for storing the data online.
Linked Epicamera system with i-Neighbour helps to enhance the security of a neighbourhood with its cloud surveillance system. By installing IP Cameras at the perimeters of a neighbourhood, guard houses and common areas would help to capture any suspicious identities that could be used as evidence in the case of house break-in, kidnapping, vandalism and etc.
For example, all house owners will be given by the management with the access to the IP Cameras which are fixed at a playground. Therefore, when the residents’ children are playing at the playground with or without any supervision, parents or guardians will still be able to observe their loved ones by connecting to live camera footage of the playground via their smartphones or laptops.
Step 1 - Sign up EpiCamera account and add a camera.
Guide on how to connect camera into EpiCamera can be referred to this link : https://www.epicamera.com/connect_to_camera2
For more information on supported camera, you can refer to this link : https://www.epicamera.com/supportedcamera
Step 2 - Login i-Neighbour account > IOT > EpiCamera > Camera Setting > Add Camera

Step 3 - Insert EpiCamera username and password
Step 4 - All the cameras that have been added into the EpiCamera account will appear accordingly. Select the preferred camera to be linked with the i-Neighbour account.
Tick on the boxes > Click +ADD
Step 5 - By clicking the +Add button will add the selected camera(s) into the i-Neighbour account
Step 6 - Click on the “Access Right” tab to allow unit owner to view the camera footages
Step 6.1 - Select roles and click on the pencil icon
Step 6.2 - For example to enable roles “Owner” to view camera
Step 6.3 - Click on owner and double click to grant accessible camera right to the selected role
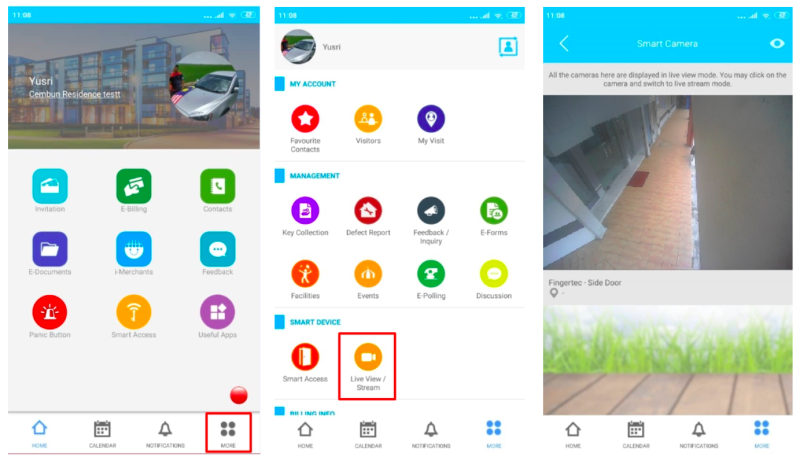
Steps 7 - Unit owner can view the camera footages from his/her i-Neighbour mobile app
Sign into the i-Neighbour app > More > Smart device category > Live View / Stream
Note: If some of the screenshots or steps viewed here are different from the ones in the current system, this is due to our continuous effort to improve our system from time to time. Please notify us at [email protected], we will update it as soon as possible.




.png)
.png)

1.png)
1.png)
.png)










1 comments:
Have any questions or inquiries about FingerTec? Drop your input here.