Backup and Clean your Database in the Ingress Software (v3.2.2.15)

Friday, September 27, 2019 TimeTec 9 Comments


Introduction
Backup is an essential process in many ways, especially concerning storing data in a database. MySQL is database software that is widely used today and has several backup mechanisms. As most of our client knows, Ingress Software has 2 types of database (MySQL and MDB) and the most commonly used is the Ingress Software with MySQL.

1. Backup Database
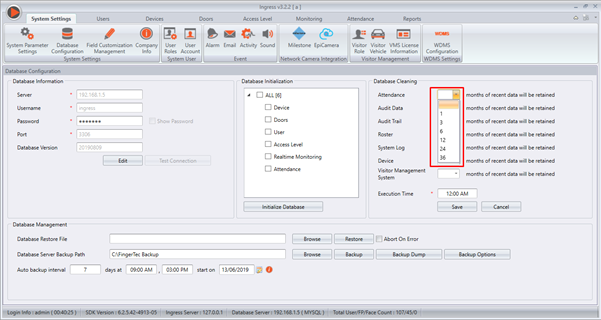
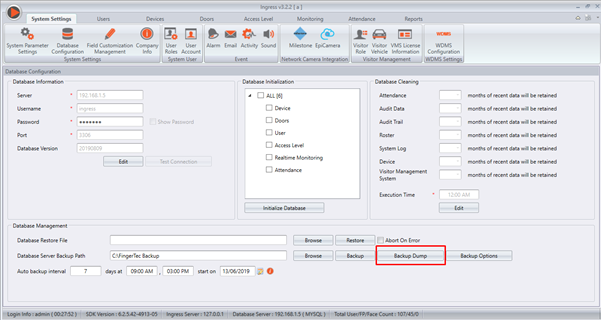
With the latest version of Ingress Software, we have improved the database management option and provided the option to backup the database using a backup dump. Typically, the MySQL backup database might cause a backup problem if there are too many data and if the database is quite complicated.

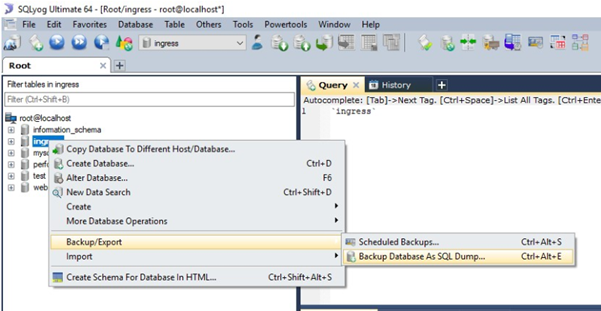
This latest development means that not only objects in the form of tables that want to be backed up, but database objects such as views, triggers and stored procedures also need to be backed up which causing the backup database to take a long time and sometimes might not even back up the data correctly. Previously, the alternative solution is to make a backup database using third-party MySQL management software such as SQLyog. However, now you may backup as dump using Ingress Software as we already provide this under database management module and this saves so much time for the backup process.


2. Database Cleaning

The database cleaning also highlights the new features provided in the Ingress Software. You may set the number of months for the recent data to stay retained in the database. This duration definition helps to maintain and manage the large database size.


Note: If some of the screenshots or steps viewed here are different from the ones in the current system, this is due to our continuous effort to improve our system from time to time. Please notify us at [email protected], we will update it as soon as possible.

9 comments:

Have any questions or inquiries about FingerTec? Drop your input here.

TimeTec Profile - Manage Users in TimeTec Applications Effectively

Friday, September 27, 2019 TimeTec 0 Comments


Introduction
Through TimeTec Profile, you can deactivate and assign users into some TimeTec applications more effectively. TimeTec Profile offers Inactive User option to filter users who are no longer valid in your TimeTec TA and TimeTec Leave due to termination, suspension or resignation. The system allows you to delete users entirely from the system, but we advise a few cautions whenever you want to delete any users.

Process
1. To perform this process, the login user must be a master account or the user must be assigned as a master role in TimeTec Profile. Please refer to step 2 on how to assign the user to master role. If you want to skip to assign any user as master role, proceed with step 5. First of all, you need to login into your TimeTec Profile account.

2. If you are logged in as a master account or master role, you can assign any user to master role as well. Go to User > Manage System Roles & Admin

3. Click ‘Add’ to add the user as admin

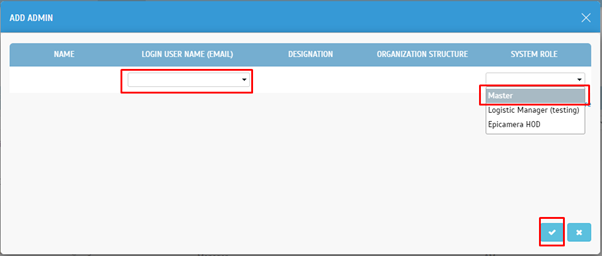
4. Select Login User Name (Email) and set the System Role as ‘Master’. Click the ‘tick’ button to submit

5. Next, move to User > Manage User

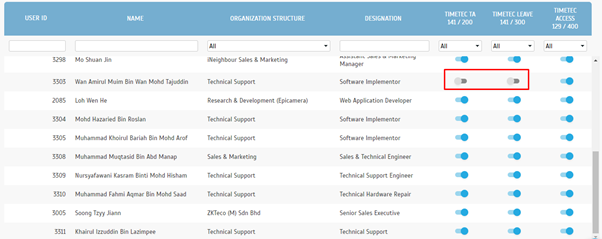
6. Click ‘Assign User to Application’ to Assign or remove a user from TimeTec Application

7. On this page, you are able to manage access for the user’s application. Click the toggle button to assign or remove access from TimeTec Application. Changes you made will be saved instantly.

8.    Once, you have unassigned user to any TimeTec Application, the user is no longer able to  access their TimeTec application

Note: If some of the screenshots or steps viewed here are different from the ones in the current system, this is due to our continuous effort to improve our system from time to time. Please notify us at [email protected], we will update it as soon as possible.

0 comments:

Have any questions or inquiries about FingerTec? Drop your input here.

Combined Verification for Face ID 2

Friday, September 27, 2019 TimeTec 0 Comments


Combined Verification is an access control function that requires verifications by a combination of different users. This function is suitable for highly-secured rooms or vaults that need more than one senior-level employees from different departments to verify their identities before they can access the door. This tip explains how to set up this function.

Steps and Procedures
To set up Combined Verification for two persons.
Assign each person to a different or Same Access group and create an Access Group before assigning a person to an access group.

1) Create Access Group
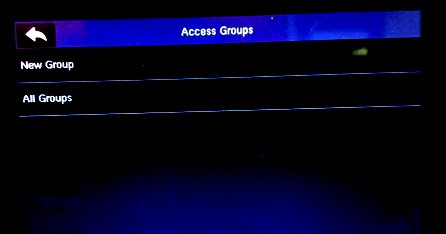
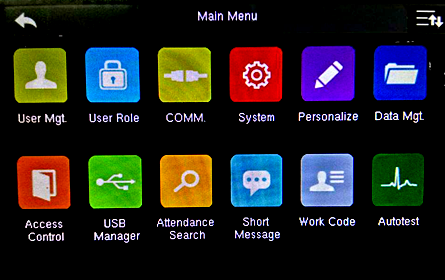
Main Menu > Access Control

Access Control > Access Group

Access Group > New Group

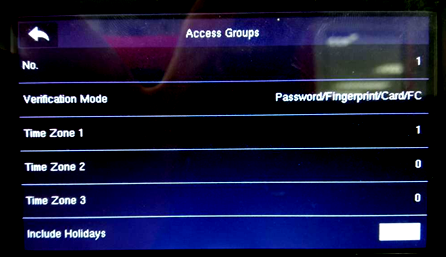
Change the Time Zone Accordingly for this group

For this Example,
Group 1 Time Zone 1 been set to 1 and
Group 2 Time Zone 1 Been set to 1
(which time zone 1 been set to 24hour access for the whole week)

2) Assign User for group
Main Menu > User Mgt

Use Mgmt > New User@ All Users
*Depends if the New Enrollment Or Existing user, if Existing just go to > Edit

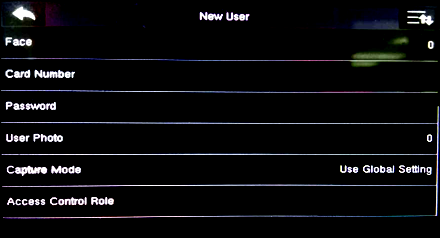
New User > Access Control Role

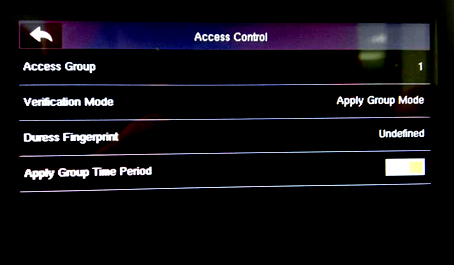
Access Control > Access Group > (Assign Any Number 1~99 for group Number)

3) Create Combined Verification
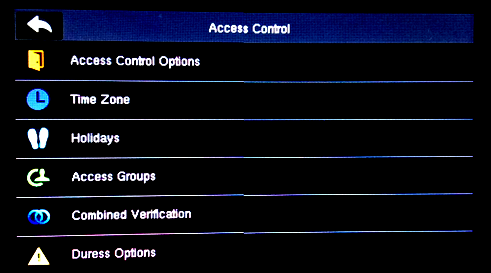
Main Menu > Access Control

Access Control > Combined Verification

Combined Verification > 1

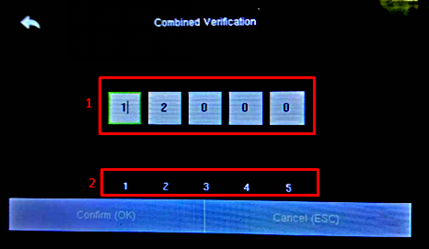
1 - Access Groups for Combined Verification
   - Set to 1 and 2
2 - Number of personal for Combined Verification
   - (Max Personals are 5)

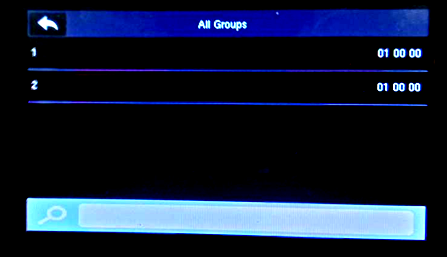
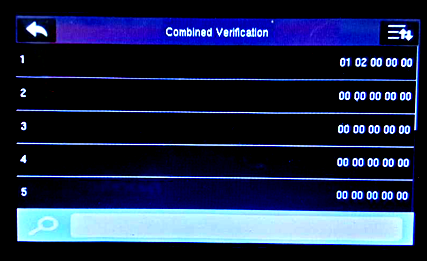
Combine Verification After Group Combined Been set Group 1 & Group 2 will be shown below

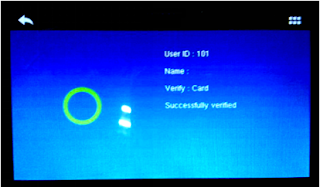
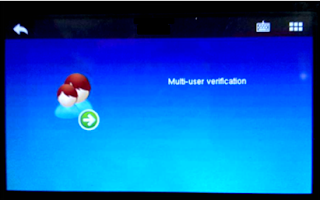
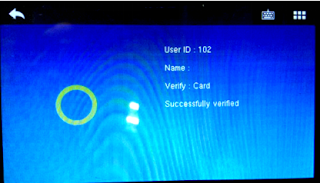
After Combine Verification set as above, when the First User for Group 1 wants to access the door, the Multi-user verification pops up to show that second User for Group 2 needs to verify for users to gain access.


Note: If some of the screenshots or steps viewed here are different from the ones in the current system, this is due to our continuous effort to improve our system from time to time. Please notify us at [email protected], we will update it as soon as possible.

0 comments:

Have any questions or inquiries about FingerTec? Drop your input here.

TimeTec Leave - Using Prorated Leave Balance for New Hire

Friday, September 27, 2019 TimeTec 0 Comments


Introduction
Prorated balance is a feature available in both leave policies and length of service accruals, where the number of leave days is divided based on service duration.

Take this scenario for an example. If your company's leave policy allocates 12 annual leaves a year in January, and you hired a new employee in October, you can use the prorated balance to allocate a percentage of his yearly allowance to the remainder of the calendar year.

*Prorated Balances are calculated using the user's Joined Date. If there is no available Joined Date, the current date is the Joined Date.

Hence, the new hire prorated leave balance can be set to four types of rounding on top of the standard.
1.   Standard prorated
2.   Rounding up to a full day
3.   Rounding up to a half-day
4.   Rounding down to a full day
5.   Rounding down to a half-day

A.   Default Standard Prorated
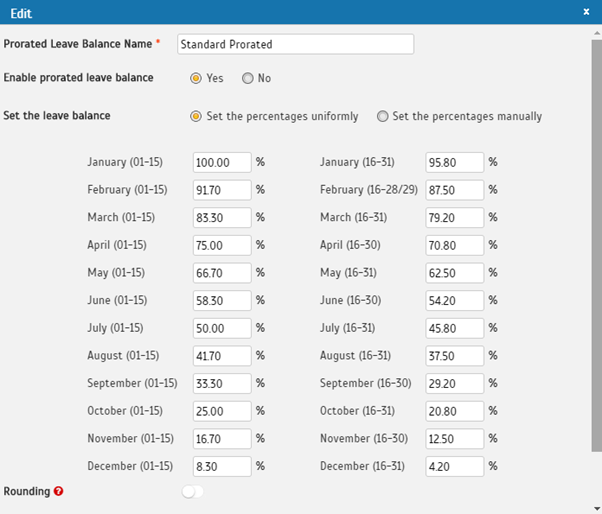
By default, the calculation for percentage Standard Prorated given by TimeTec explained as per below:


B.  Prorated leave setup
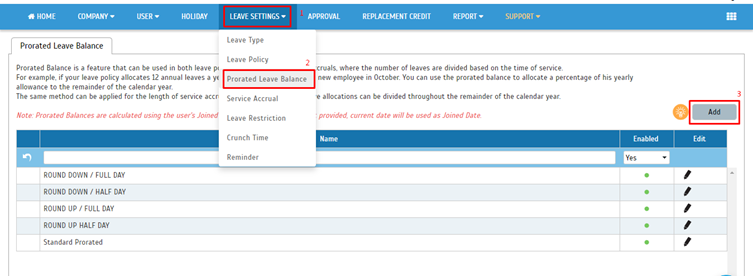
1.  Go to TimeTec Leave > Leave Settings > Prorated Leave Balance > Add

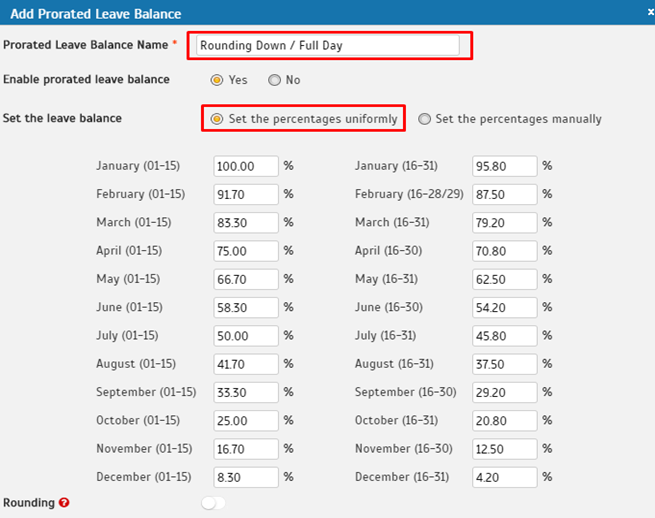
2.  Set the “Prorated Leave Balance Name” > click on “Set the percentages uniformly”

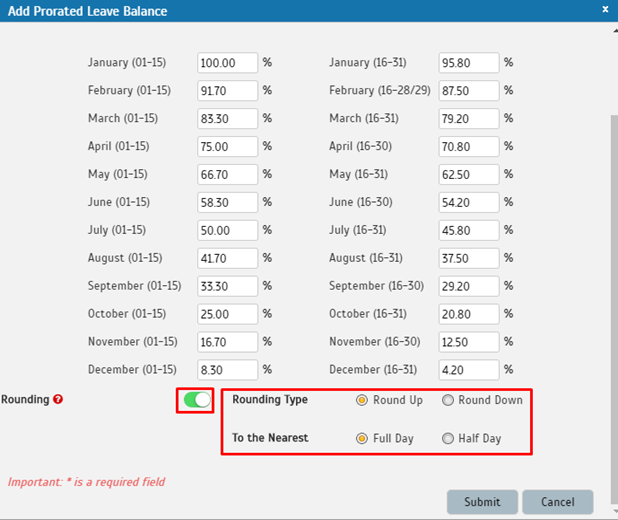
3.  On the bottom of the page, click on “Rounding” icon > Choose “Rounding Type” Round up or Round down and “To the Nearest” Full day or Half Day > Submit.

Round up to the nearest half: will add a half-day to your latest leave balance.
E.g.: Full working Hours: 8, Leave balance: 5 days 2 hours and 30 minutes.
Round up to the nearest half day = 5 days 4 hours

Round up to the nearest full day: will add one day to your latest leave balance.
E.g.: Full working Hours: 8, Leave balance: 5 days 2 hours and 30 minutes.
Round up to the nearest full day = 6 days


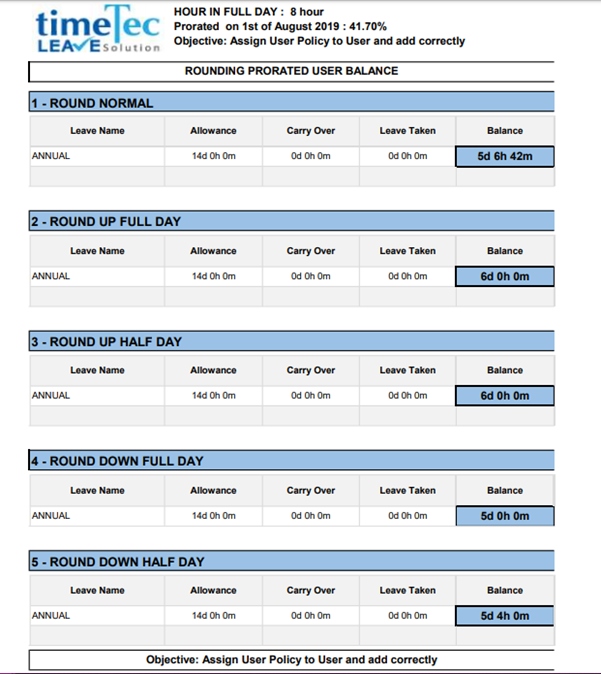
C.  Rounding Example:
You can refer to the picture below for Rounding examples:


D.  How to apply Standard prorated into Leave Policy

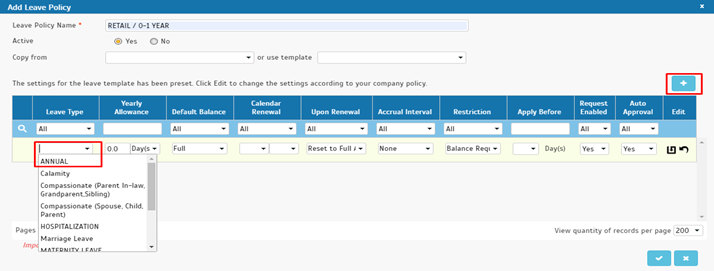
1.    Go to TimeTec Leave > Leave Setting > Leave Policy > click on (+) icon.

2.      Click on (+) to add new leave type into policy.

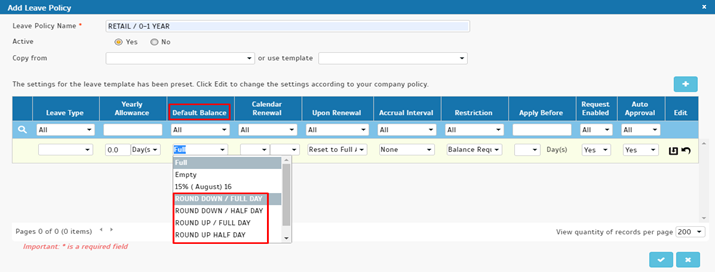
3.      On the Default Balance tab you can choose all the Prorated rounding that has been set before


Note: If some of the screenshots or steps viewed here are different from the ones in the current system, this is due to our continuous effort to improve our system from time to time. Please notify us at [email protected], we will update it as soon as possible.
0 comments:

Have any questions or inquiries about FingerTec? Drop your input here.

How to configure master-slave setup between Face ID 2 FMM220 and R2c

Thursday, September 26, 2019 TimeTec 0 Comments


Introduction
This post is intended to those who may face problem in setting up Face ID 2 FMM220 with R2c combination.

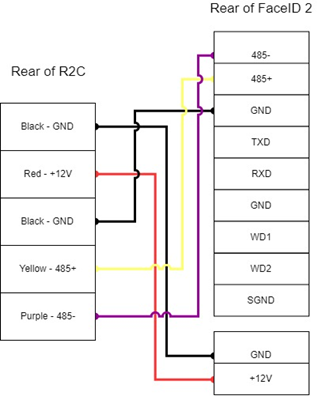
Wiring installation


Settings in Face ID 2 FMM220
Other than the proper wiring setup, there is a setting to configure in Face ID 2 (Master) for master-slave setup to work correctly.

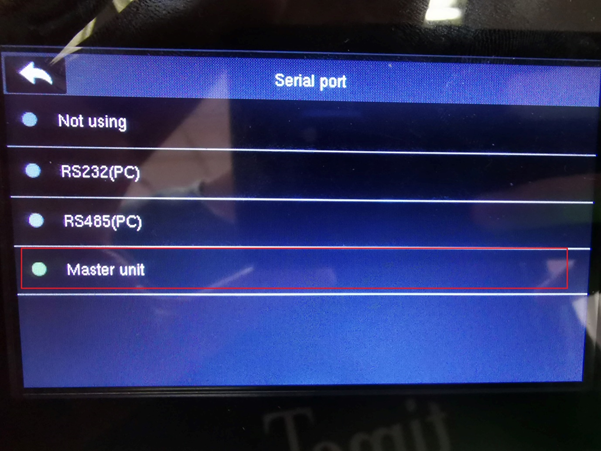
Go to Face ID 2 terminal, enter Menu > Comm. > Serial Port > Master Unit. Tick ‘Master Unit’ to complete the setup.


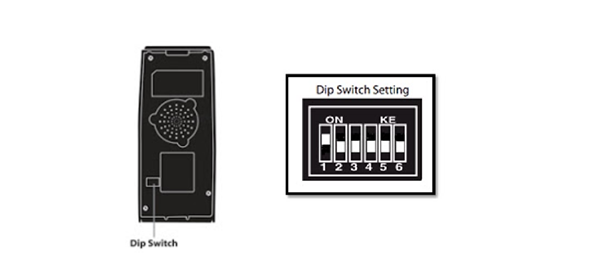
**Do not adjust the dip switch unless you are connecting the R2c with the Ingressus controller. If your R2c is unable to send any fingerprint or card data to the master terminal, please check the dip switch. Make sure it is set to the default settings as highlighted.

Note: If some of the screenshots or steps viewed here are different from the ones in the current system, this is due to our continuous effort to improve our system from time to time. Please notify us at [email protected], we will update it as soon as possible.
0 comments:

Have any questions or inquiries about FingerTec? Drop your input here.

How to remove short hours for half day leave in TimeTec TA

Thursday, September 26, 2019 TimeTec 0 Comments


TimeTec TA is a solution that manages attendance, including leave information. Previously, employees taking half day leave would have short working hours in their attendance, and admin needs to remove the short hour information manually. However, we have made new enhancement in TimeTec TA to rectify this, so employees won’t have short hours recorded when they are on half-day leave. Please refer to the steps below for the configurations.

FOR COMPANY USING TIMETEC TA ONLY
Steps
1. At TimeTec TA, go to Schedule > Clocking schedule
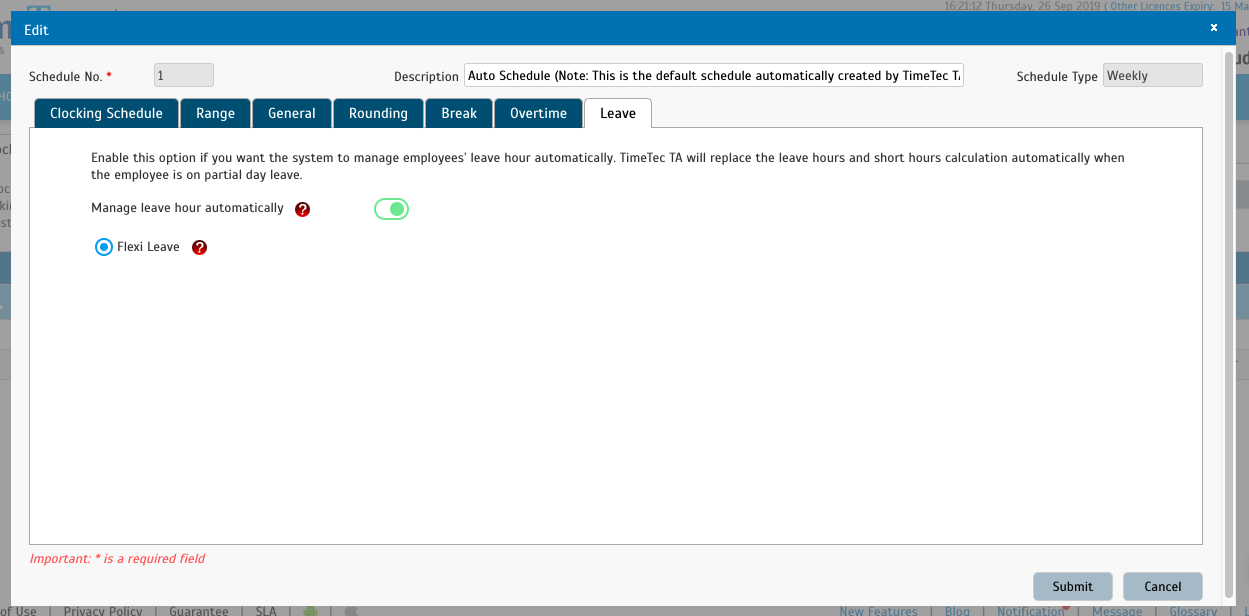
2. Select the existing schedule, click Edit. Go to Leave tab, enable “Manage leave hour automatically” and choose Flexi Leave.
3. Click Submit to save the changes.

Figure 1 - Leave option in Edit schedule mode


The Flexi Leave option deducts the short hour with leave hours. For example, an employee has taken half day leave for 4 hours, so the system checks for his short hours (e.g., 4 hours) and deduct them with his leave hours.

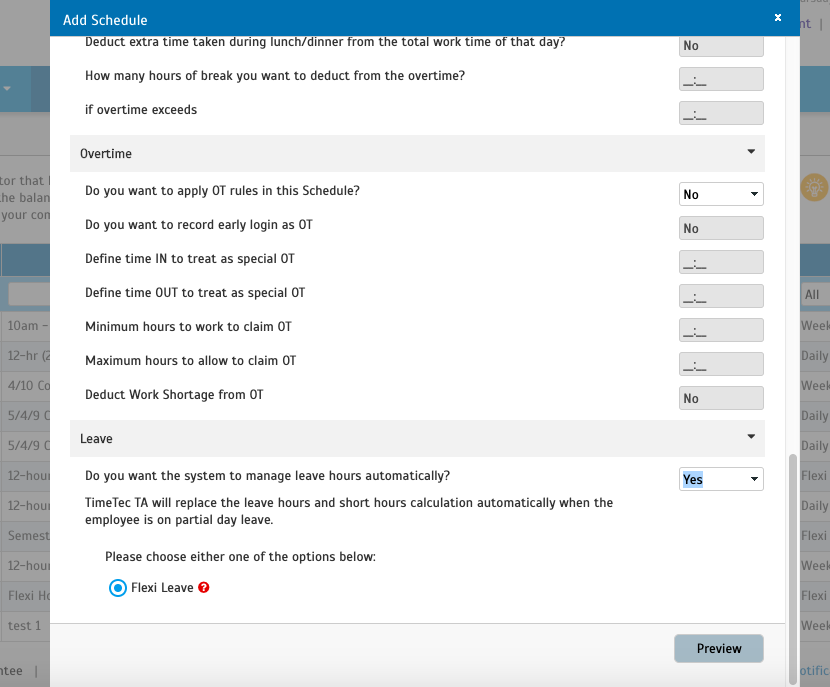
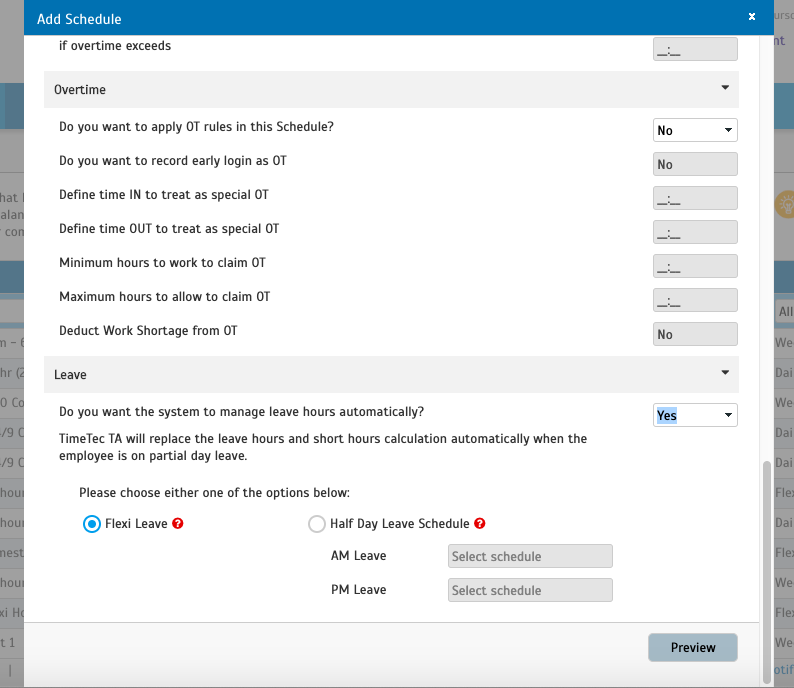
4. The same applies when creating a new schedule. At the Leave section, select Yes for the system to manage leave hour automatically and choose Flexi Leave.

Figure 2 - Leave option in Add Schedule mode

FOR COMPANY USING TIMETEC TA AND TIMETEC LEAVE

Steps
1. At TimeTec Leave, please enable the Preset Half Day Value at Company > System Settings > Leave Management and set the half day time as Figure 3 below.

Figure 3 - Enable Preset Half Day Value in TimeTec Leave


This action is necessary for the system to identify the half-day start time to be used with TimeTec TA schedule later.

In TimeTec TA, you can choose to manage the leave hours by:
A - Flexi Leave - system will deduct the short hours with leave hours automatically.
B - Half Day Leave Schedule - system will switch to the specific half-day schedule when the employee is on half-day leave.

A - FLEXI LEAVE
1. Go to Schedule > Clocking Schedule. Select an existing schedule, click Edit. Go to Leave tab, enable “Manage leave hour automatically” and choose Flexi Leave.
2. Click Submit to save the changes.


The same applies when creating a new schedule. At the Leave section, select Yes for the system to manage leave hour automatically and choose Flexi Leave.


B - HALF DAY LEAVE SCHEDULE  
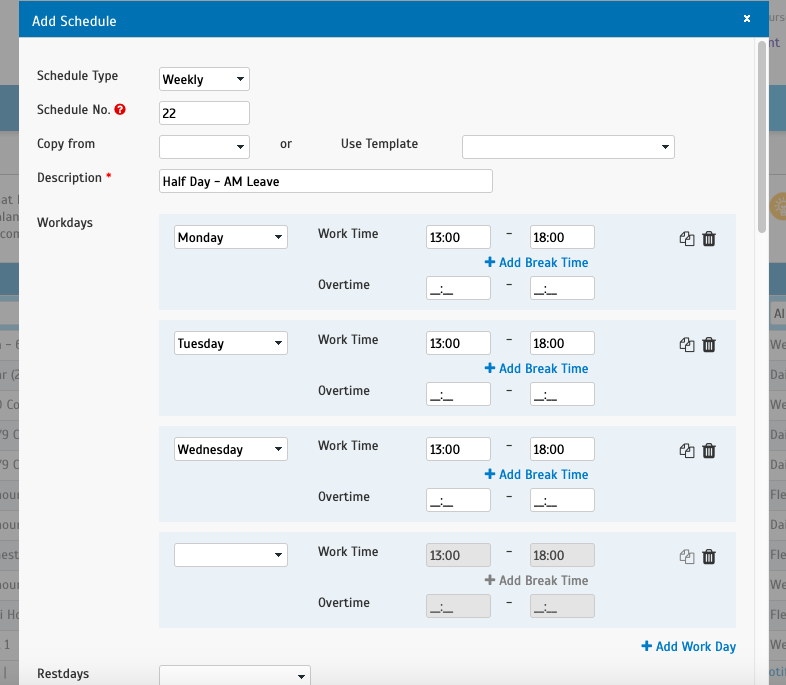
1. To use the Half Day Leave Schedule option, the Admin will first need to create half-day schedules in TimeTec TA. Go to Schedule > Clocking Schedule and add a new schedule. Create a half-day schedule, for example, AM half-day, as Figure 4 and save.

Figure 4 - Create AM half-day schedule


2. Create another half-day schedule for evening half-day, name PM half-day, refer to step 2 to create.
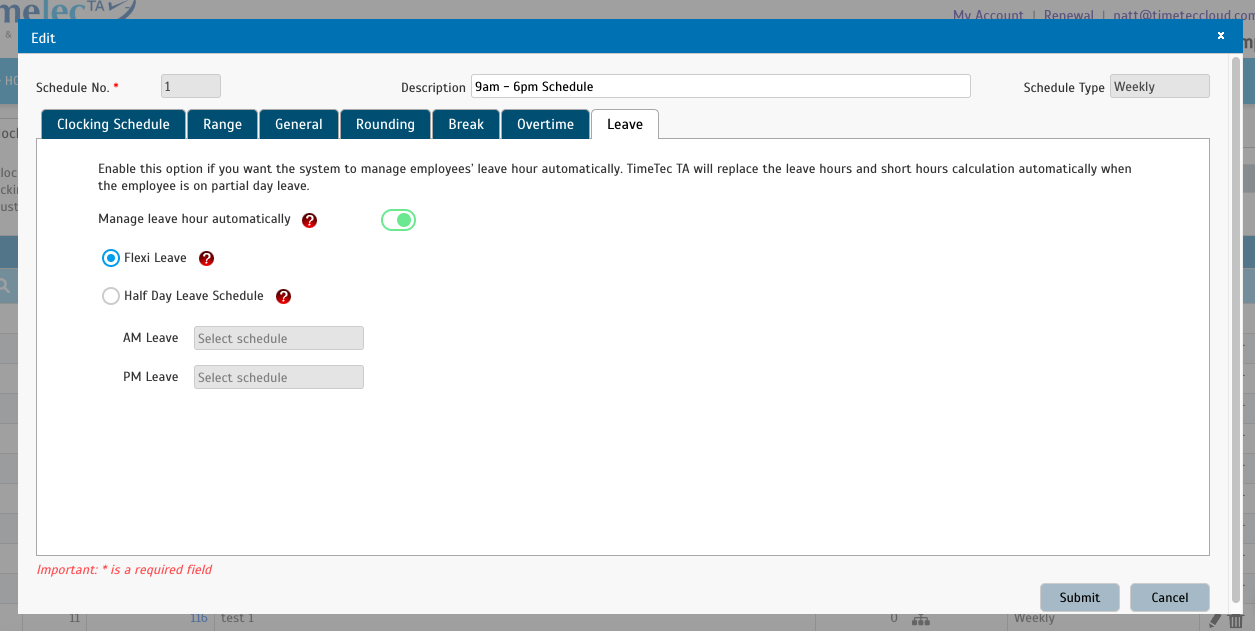
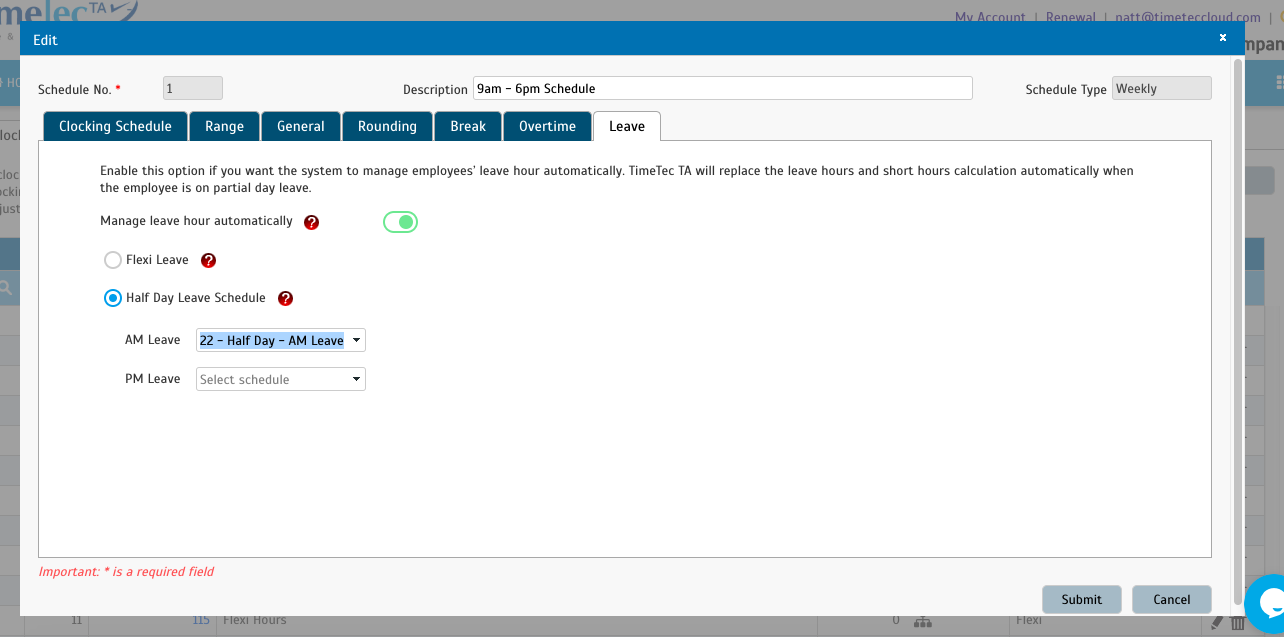
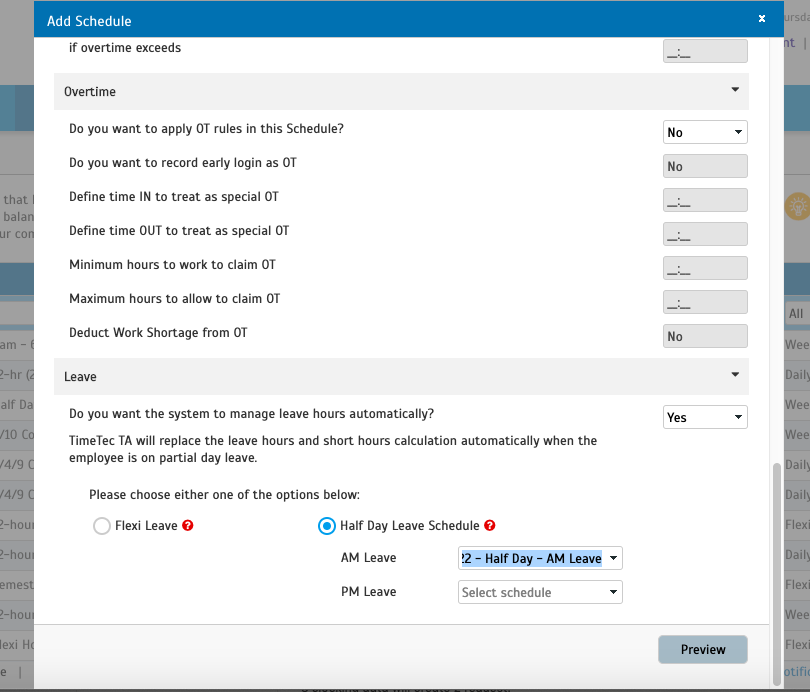
3. Next, select a full day schedule, e.g: 9 AM - 6 PM and click Edit. Go to Leave tab and enable “Manage leave hour automatically”. Choose Half Day Leave Schedule and select the half-day schedule accordingly. Click Submit to save the changes.

Figure 5 - Set the Leave options in Schedule


The same applies when you are creating a new schedule. At the Leave section, select Yes for the system to manage leave hours automatically and select the half-day schedules accordingly.


With the new settings, the system automatically checks the employee’s leave type and automatically switch the user’s clocking schedule to the half-day schedule if he’s on half-day leave.

Note: If some of the screenshots or steps viewed here are different from the ones in the current system, this is due to our continuous effort to improve our system from time to time. Please notify us at [email protected], we updates it as soon as possible.

0 comments:

Have any questions or inquiries about FingerTec? Drop your input here.