IntroductionIt is compulsory for the user to verify their email address in order to receive an email notification from TimeTec. The email validation is a process for the system to validate the email for the security of the system.
TimeTec TA Verification Process
There are two ways to validate email for the TimeTec system, one from the solution website which is TimeTec TA, TimeTec Leave, TimeTec Claim etc. For this guideline, we will use TimeTec TA and TimeTec Cloud as examples to validate user email addresses.
Step 2: Next, click on the verify icon to Verify your email address for the solution.
Step 2: Next, click on the “CLICK HERE TO VERIFY YOUR EMAIL” to verify your email address in the TimeTec Cloud system.
After the process is completed, the user will be able to receive an email or update from the TimeTec site without having any errors. If an issue occurs where the user is unable to receive any emails from TimeTec after email validation, you may contact the TimeTec support team at [email protected].
Introduction
TimeTec TA is cloud-based software; therefore, changing the user ID option is not easily available. This article demonstrates steps to change a User ID in TimeTec TA without having to add an additional user license.
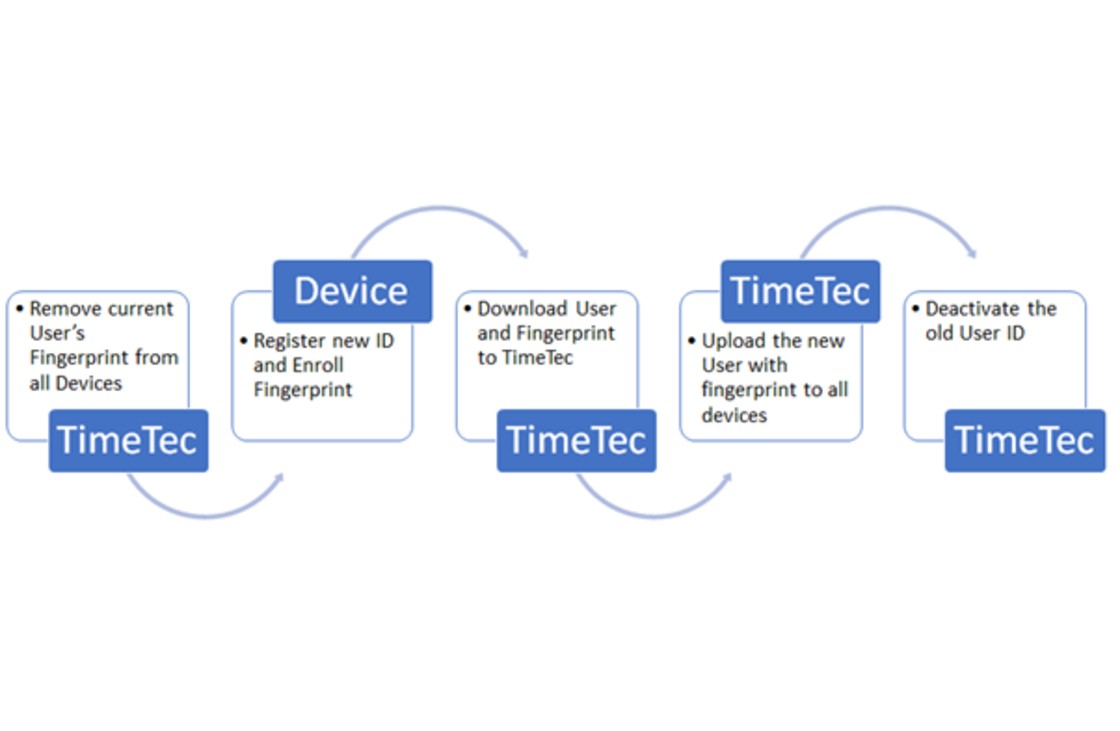
The Main Process as illustrated below:
Remove Current User’s Fingerprints from All Devices
1. Go to Device > Assign Users to Device
2. Search for the old user ID. Click the ‘X’ icon on the ‘Fingerprint Count’ column to remove the fingerprint.3. Click the check symbol to confirm
4. Go to ‘Device’ > ‘Terminal’
5. Select all terminals > Manage > Upload User
6. Select the user and please make sure there is no fingerprint count displayed on that particular user. Unselect ‘Do not overwrite user's information if no fingerprint is uploaded’. Click the check button to submit
7. Go to ‘Support’ > ‘Terminal Command Queue’ to check the upload status
8. The Delete Fingerprint process takes around 5-15 minutes to be completed on an online device. Once completed, you may proceed with registration of a new ID and enroll of fingerprint on the device.
Register New ID and Enroll Fingerprint
1. Register the new user ID in TimeTec and upload it to all devices.
2. Once the uploading process is complete, go to the device to proceed with the fingerprint enrolment of the new user ID.
Download User and Fingerprint to TimeTec
1. Go to ‘Device’ > Terminal
2. Select the device that you have enrolled the fingerprint to > Manage > Download User
3. Unselect ‘Display new users only’ > Select the new user ID (please make sure the fingerprint count is stated. Otherwise you need to click the ‘sync’ button to refresh the data) > click select button to submit
Upload the New User with Fingerprint to All Devices
1. Select all terminals > Manage Terminal > Upload User2. Select the new User ID > click ‘select’ to submit
Deactivate the Old User ID
1. Go to User > Manage User > search the old User ID > Click ‘Pencil’ icon > Click ‘Deactivate User’
2. Select the Employment status > Submit
Note: If some of the screenshots or steps viewed here are different from the ones in the current system, this is due to our continuous effort to improve our system from time to time. Please notify us at [email protected], we will update it as soon as possible.
Introduction
Hierarchy charts are the visual tools used by the management to help illustrate the roles and an organization’s hierarchy. Whether you’re in a business, a nonprofit, or a government organization, a chart can help your employees to understand the chain of command, with clear information on who the people should report to. A clear Hierarchy chart can also lay out the inefficiencies at your workplace.
Construct your own company Hierarchy chart with TimeTec TA or TimeTec Leave. By constructing a Hierarchy chart, you are able to determine who is the immediate supervisor of the staff and as a staff, they also would be able to view their position or role in the Hierarchy chart. This also benefits the manager or superior role since they are authorized to decide on the Clocking Monitoring and Tardiness monitoring of the staff who are assigned as their sub-coordinates in the Hierarchy charts within the system.
Process
1. Go to USER > Hierarchy Chart
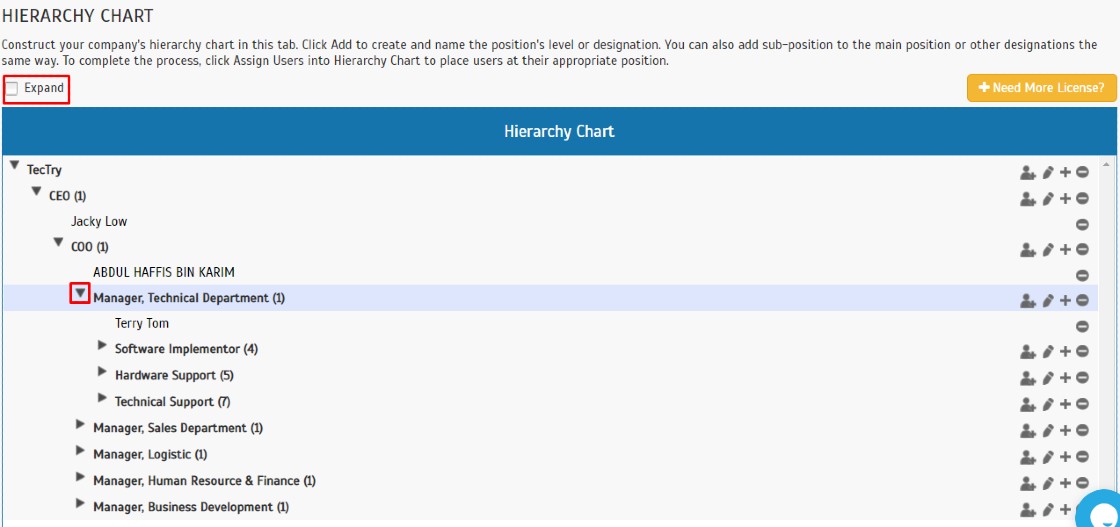
2. Construct your company's hierarchy chart in this tab. Click Add to create and name the position's level or designation. You can also add a sub-position to the main position or other designations in the same way. To complete the process, click Assign Users to add into the Hierarchy Chart in order to place users at their appropriate position.
3. Click ▼ to expand the selected chart or ‘tick’ the ‘Expand’ button to expand all the Hierarchy Chart.
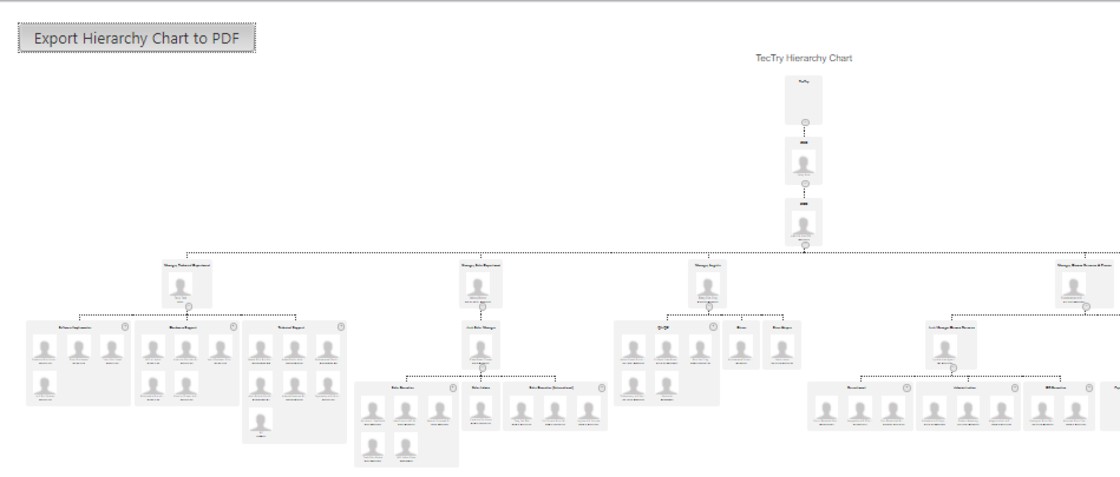
4. Once you have finished constructing the Hierarchy Chart, you can view and export the Hierarchy Chart into PDF format by clicking on ‘Generate Names & Photos’ or ‘Generate Names Only’
5. Below is an example of a constructed Hierarchy Chart which was generated by Names & Photos. Click ‘Export Hierarchy Chart to PDF’ to save the file as PDF format. Users are able to view this chart through the Website Portal (PROFILE > Hierarchy Chart) too.
Hierarchy Chart sync with User Profile
1. Based on the constructed Hierarchy chart in the system, the field ‘Immediate Superior’ will be automatically filled in in each staff profile..jpg)
Superior / Manager able to prefix the Clocking Monitoring & Tardiness Monitoring of a Sub-Coordinate
1. Login into TimeTec TA account and go to ‘Monitoring’2. Click the ‘+’ Button to add a new Clocking Monitoring setting.
3. Click the ‘Add User Icon’ and select ‘Others’4. Now, as a superior or manager, you can select the users which have been assigned under your sub-coordinate to be added into the clocking monitoring setting.
Note: If some of the screenshots or steps viewed here are different from the ones in the current system, this is due to our continuous effort to improve our system from time to time. Please notify us at [email protected], we will update it as soon as possible.
Introduction
Now, with TimeTec, you can import a maximum of 1000 users at a time. You can also use this feature to update existing users’ information such as Alias, Date of Birth, Gender, Nationality, and etc, easily and in bulk. The Import User feature is available in TimeTec TA, TimeTec Leave, TimeTec Access, TimeTec Patrol and TimeTec Profile.
Process
Go to USER > Manage User
Click on Manage > Import User
Click on “Download .xlsx sample here “ to download sample for users import template file
Before you upload the file, it is better to separate your user lists into different sheets, according to your Organization Structure
These are the compulsory data to have:
1. Name
2. User
3. Account Issuance date
4. Group Duty Roster
5. Login username [email] (Only applicable for users allowed for web or mobile app access)
To import the file, click on Manage > Import User > browse and select the import file.
Match the header to the data fields available in the User Profile section. This action will tie-up the data from each column to the correct data fields. Repeat the same steps if you have separated the user information into different sheets. Ignore sheet that is not relevant/applicable. You can update users organization structure later at Company > Organization Structure
Before finishing the steps, please check the validity of your user information before you import them into the system to avoid future problems.Account Activation
TimeTec Account Activation can be done either by Email or Manual Activation. Please select the preferred method of activation as listed below:
Email Activation (Recommended)
The system will send Account Activation Email to all new users’ email addresses. Users will have to access their email, click Activate Account and set a new password to access TimeTec. The system will send the Activation Emails to new users only and will not affect the existing users.
Manual Activation Sample file
For this option, the system will generate a random password for the first time login. This applies to new users only, it will not affect existing users and it will not replace the password of the existing users. The generated file can be downloaded ONLY ONCE. To set a temporary password again, go to User > Manage User > click Edit > and go to User Information section > set new temporary password.
After confirming > click on “Import” and Generate users attendance.
Note: If some of the screenshots or steps viewed here are different from the ones in the current system, this is due to our continuous effort to improve our system from time to time. Please notify us at [email protected], we will update it as soon as possible.
Introduction
This feature calculates the leave balance accurately for resigned users. By using the prorated leave calculator, the HR will be able to get hold of the last employment date of a user.
Process
1. Go to User > Manage User > Leave setting > Option
2. Click on the Prorated Button to apply the Prorated Leave Calculator for Resignation
3. Setup
The admin needs to fill in the resigned user information
4. Preview
- Click to proceed to the next step
- Click to download a preview PDF report
5. Confirmation
Save changes button - Click to save and replace the preview changes, a PDF summary report will be printed.
No button – Click to only save the PDF summary report without making any changes.
6. You can still access the report's attachment after completing the calculation
7. Report of Resigned Staff Balance Annual Leave Calculation sample:
Note: If some of the screenshots or steps viewed here are different from the ones in the current system, this is due to our continuous effort to improve our system from time to time. Please notify us at
[email protected], we will update it as soon as possible.


.jpg)


1.jpg)
1.jpg)
2.jpg)
2.jpg)
3.jpg)
3.jpg)
1.jpg)
1.jpg)
2.jpg)
.jpg)
1.jpg)
2.jpg)
1.jpg)
.jpg)
2.jpg)

4.jpg)
.jpg)

1.png)

.jpg)
.png)
1.jpg)
2.jpg)
.jpg)

2.jpg)
2.jpg)
.png)
.png)
2.jpg)
2.jpg)
1.jpg)
1.jpg)
.png)
3.jpg)

.png)
.png)
.png)
.png)
.png)
.png)
.png)
.png)


