Some companies look for full control of their own premises. Requirements such as having just one way in and out with two doors to control the access movement within the building. This can be done by setting in our R3 device using the anti-passback feature. This setting will not have any problem with our current device and can be done easily with our Master-slave connection. Due to the distinct requirements raised by certain customers, the Master-Slave setup for door access solution using the Master-Master setup is still valid. In this tips we provide, we are using two R3 devices as an example for this Master-slave Anti-passback setting configuration and connection, please follow the instructions below:
1) Configure both R3 to change its function to support the Master slave setting by following the previous tip “Modifying Setup from Master-Master to Master-Slave”
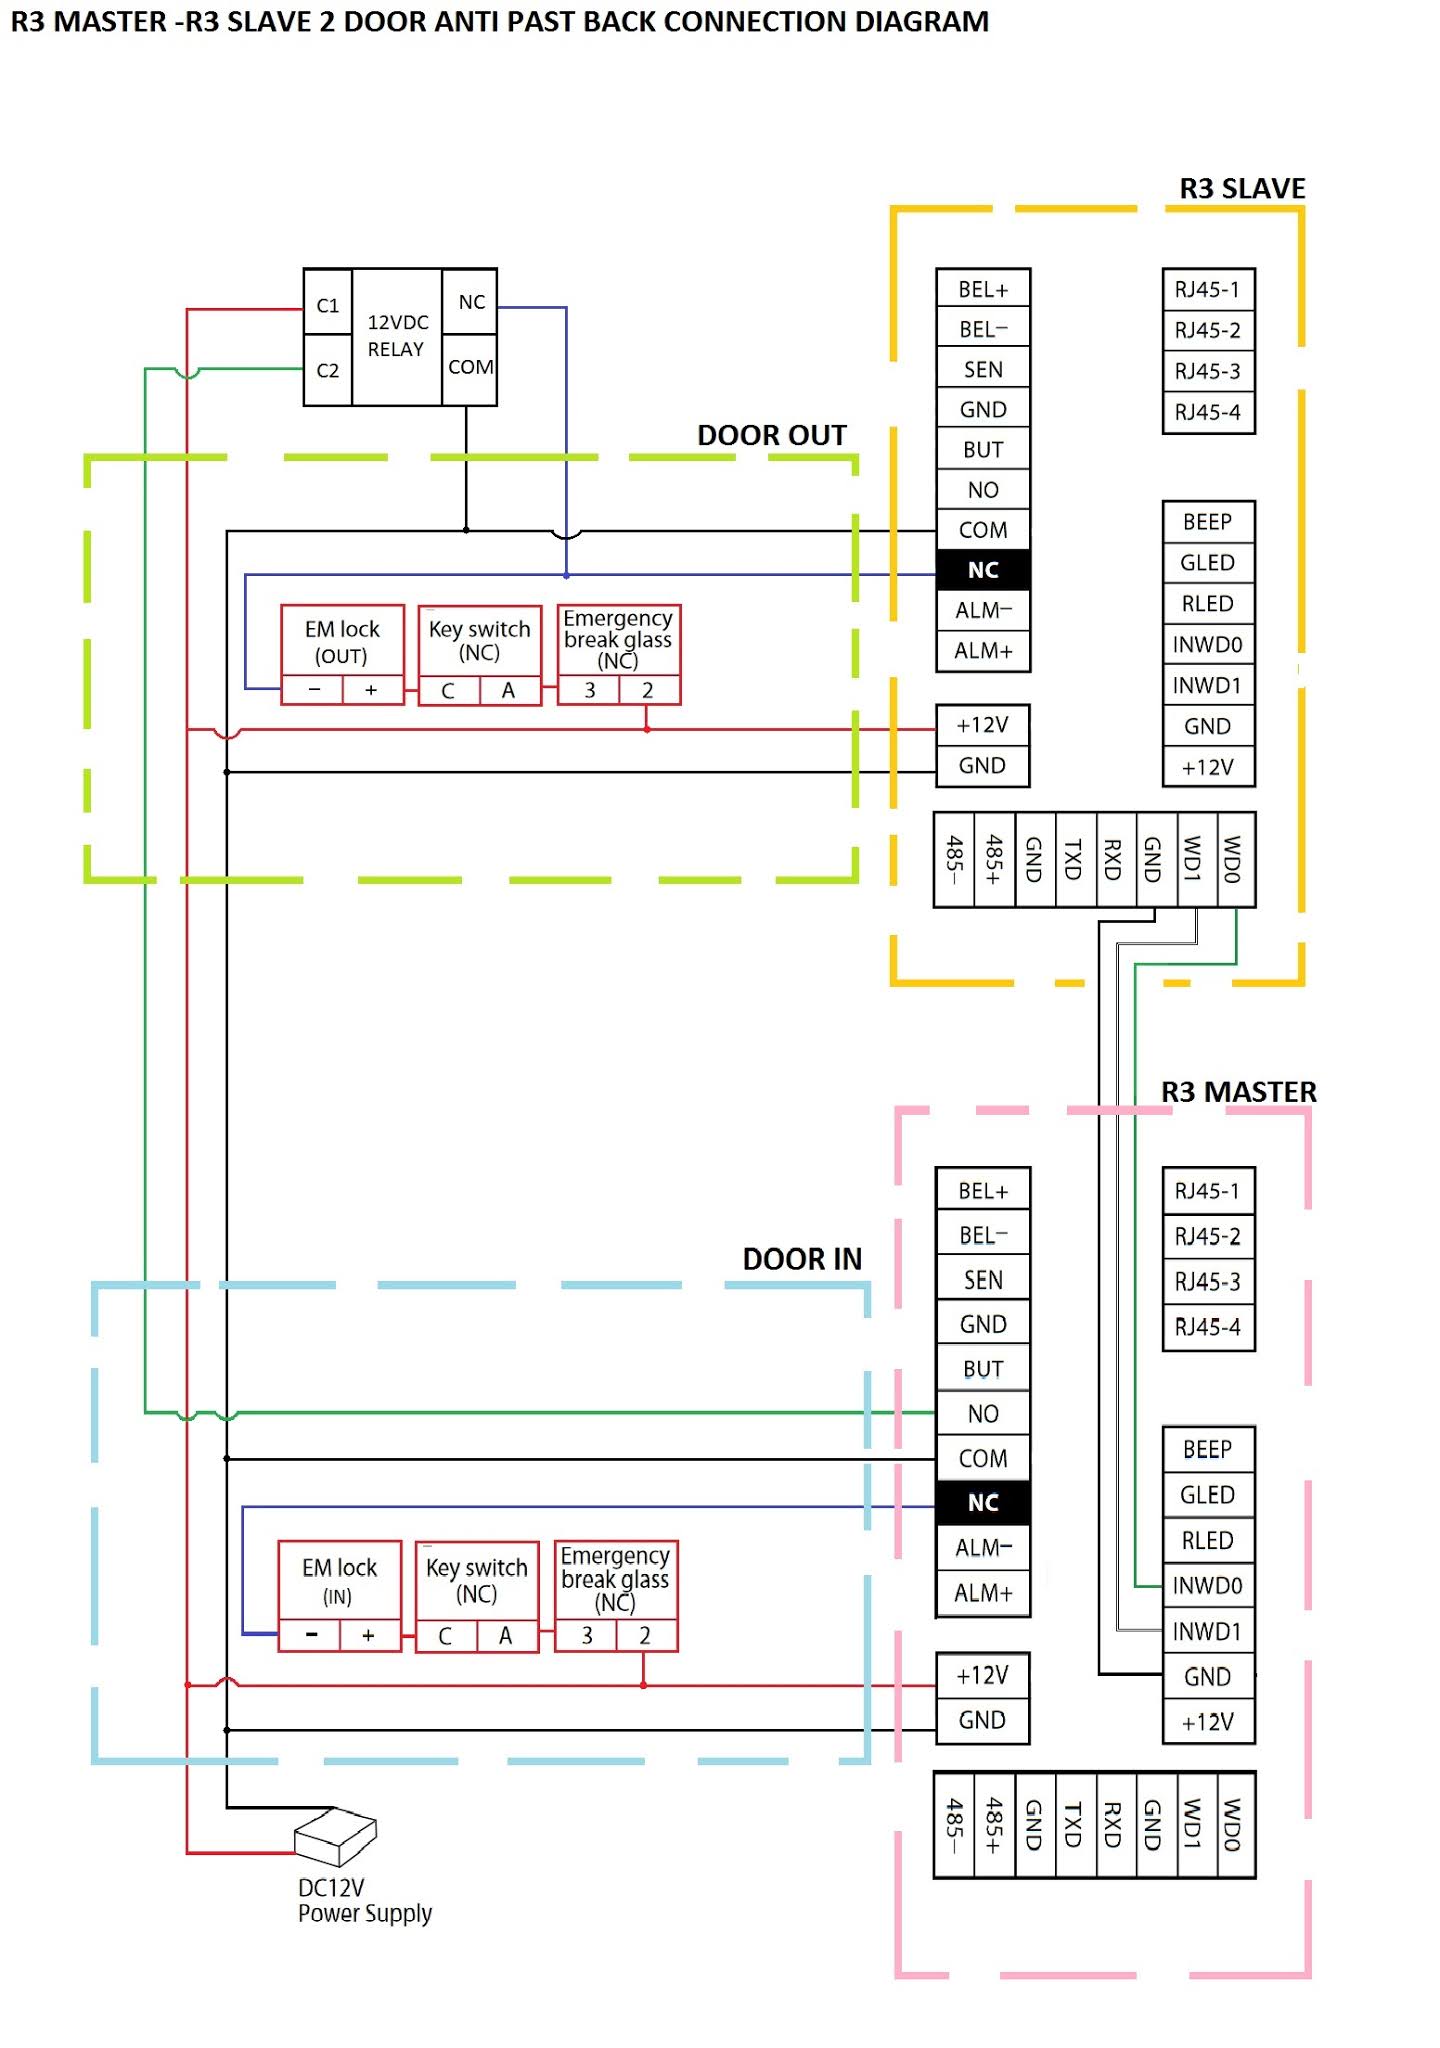
2) Connect the R3 ( MASTER) - R3 (SLAVE) follow the connection diagram below:
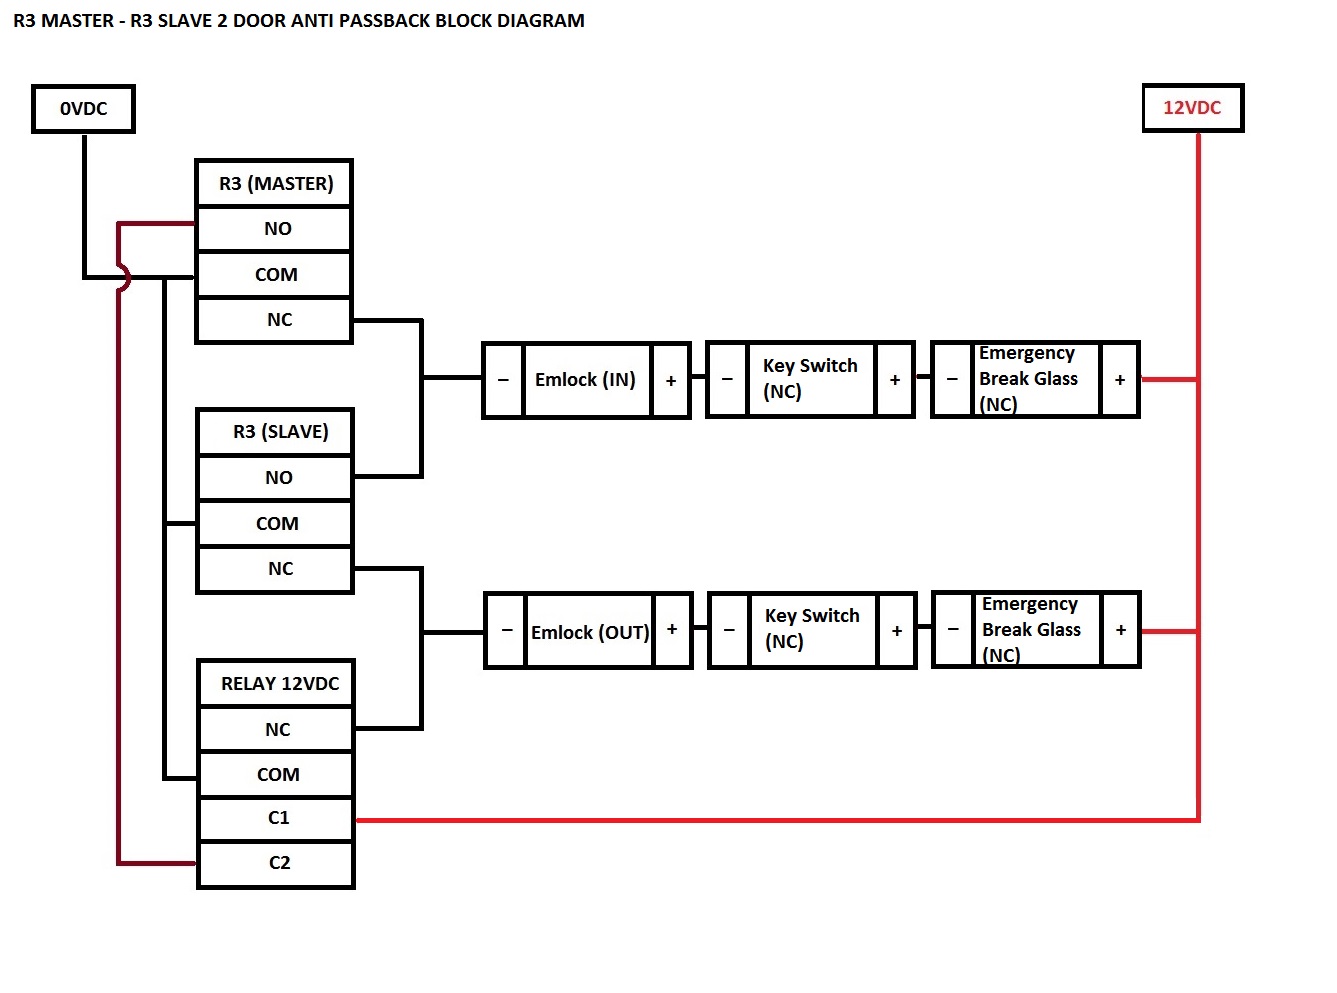
For your better understanding, here is the connection block diagram:
3) For this connection, the External Relay 12VDC required for controlling the EM lock only opens accordingly with an anti-passback setting.
Note: If some of the screenshots or steps viewed here are different from the ones in the current system, this is due to our continuous effort to improve our system from time to time. Please notify us at
[email protected], we will update it as soon as possible.
Introduction
FingerTec QR110 is a slave QR code reader for door access, and recently this model has been designed to also read MiFare card. This is a quick guide on how to pair QR110 (MiFare) with FingerTec Master Readers.
For information on QR110 (RFID) please refer to this post:
How to pair FingerTec QR110 Slave Reader with FingerTec Master Readers
QR110 (MiFare) Compatible Device -
Below are the list of FingerTec device models that are compatible with QR110 (MiFare):
1. R2
2. R3
3. Q2i (FEM 800 only)
4. Kadex
5. M-Kadex
6. Ingressus Controller
Note that QR110 (MiFare) is using 34-bit Wiegand signal to communicate with the master readers.
Requirement -
The main requirements needed for pairing QR110 (MiFare) with the master readers are:
1. Wiegand-In Port
2. Wiegand 34-bit Communication
3. MiFare Card
Connection between QR110 and FingerTec Master Readers -
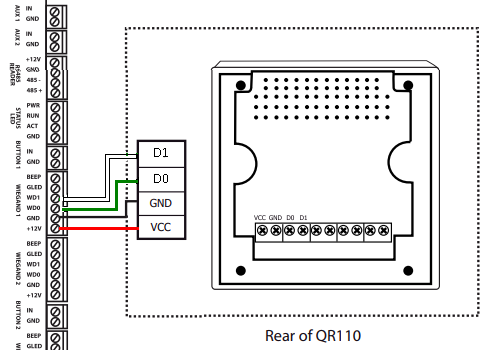
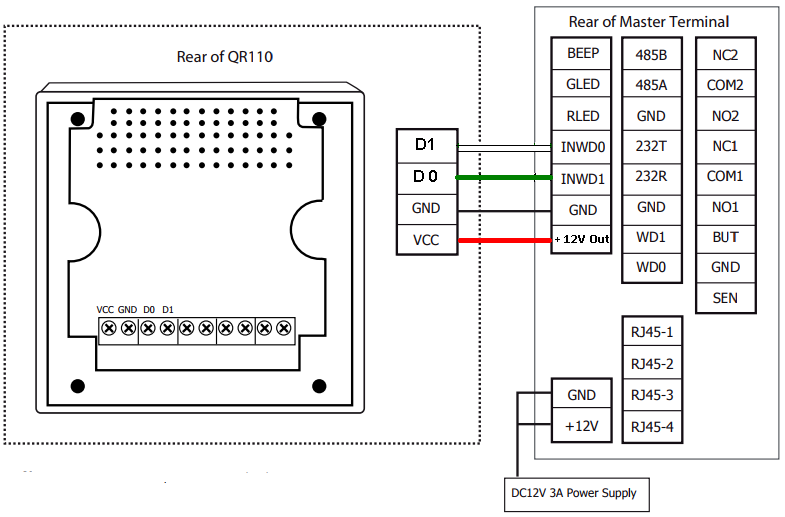
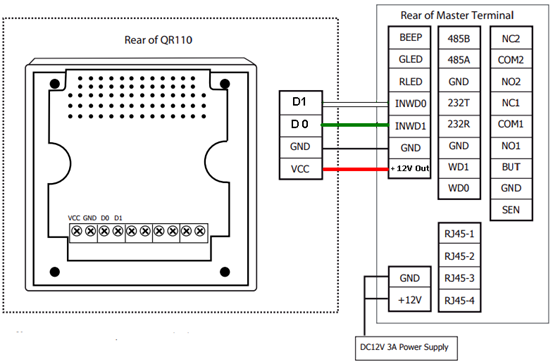
The connection for QR110 (MiFare) with the Master Readers is the same with QR110 (RFID). You may find the connection details as shown in the diagram below:
1. Pairing With Ingressus Controller
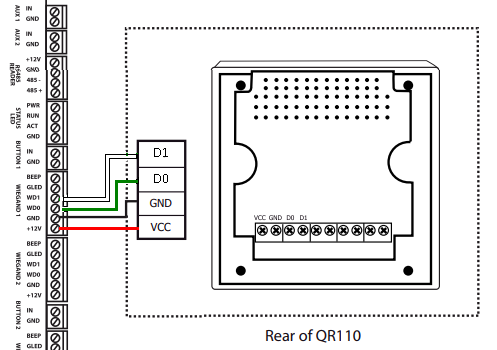
2. Pairing With FingerTec Master Readers.
QR110 MiFare Setting -
As QR110 MiFare reader is a very simple and convenient reader to begin with, no configuration or setting is required from the device. All users need to do is just plug in the device and the process is complete.
Master Readers Setting -
Before pairing the Master Readers with QR110, the devices on the other hand, will first need to be enabled in Wiegand 34-bit format as per the setting below:
1. R2 and Kadex:
Menu > option > system option > Wiegand input setting > FP device > Input format = WG34 Without ID > Restart.
2. R3 and Q2i:
Menu > Comm > Wiegand > input option > Define = 34 > Bit counts = 34 > Input = NO. > Restart.
3. Face ID 3:
Menu > comm > Wiegand input > Wiegand Format = Wiegand 34 > Input = Card No. > Save > Restart.
4. m-Kadex:
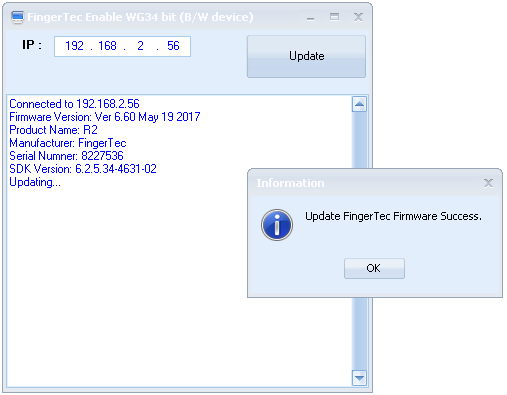
Requires a tool update as provided below (also works with R2 and Kadex):
https://s3.amazonaws.com/files.fingertec.com/Azim+Tools/Tools/FTEnableWG34_BWdevice.exe
5. Ingressus:
Connect 3 Wiegand cables between QR110 (MiFare) reader and Ingressus (no other settings required).
Once done, FingerTec Master Readers will thus be paired up with the QR110 (MiFare) reader.
Note: If some of the screenshots or steps viewed here are different from the ones in the current system, this is due to our continuous effort to improve our system from time to time. Please notify us at [email protected], we will update it as soon as possible.
Introduction
QR110 QR Code Scanner is FingerTec latest product that comes with a new verification method: QR Code along with the capabilities to scan RFID/MiFare access cards as well. As a slave reader, QR110 will need to be paired with FingerTec Ingressus controllers and master readers such as R3, R2, Q2i and etc before the whole system works.
Supported model:
Q2i, R3, R2, Face ID 3, Kadex, m-Kadex, Ingressus I/II/IV
QR110 is built with a 26-bit Wiegand communication. Even though FingerTec master devices comes with 34-bit and 26-bit Wiegand, by default all FingerTec Master Devices is set with 26-bit Wiegand Communication.
For information on QR110 (MiFare), please refer to this post:
How To Pair QR110 (MiFare) With FingerTec Master Readers
Please follow the steps below for QR110 (RFID) installation:
Process:
1) Connect the wirings between QR110 and FingerTec Controller and Biometrics Devices
For Ingressus I,II, and IV, please connect the respective devices to the following QR110 ports (D1, D0, GND, VCC) as shown in the circuit diagram below:
QR 110 to Ingressus
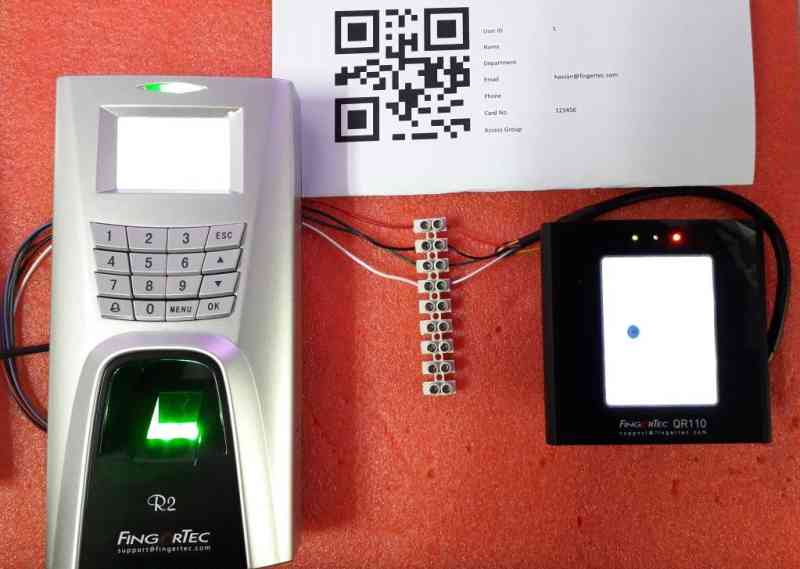
For Master Readers (R2, R3, Kadex, m-Kadex, Q2i, Face ID 3), please connect the respective
devices to the following QR110 ports (D1, D0, GND, VCC) as shown in the circuit diagram below:
Example : R2 Connection to QR110
2) If there is no response on Master device when you wave card or scan QR code on QR110, please check the Wiegand bit Format in FingerTec Device
*QR110 is not compatible with Q2i (FEM 510)
and proceed to input the IP address of m-Kadex into the software tool. Once updated, the
m-Kadex device will now accept 26-bit Wiegand Connection. (This method can also be applied
to R2 and Kadex) Please refer to the screenshot below for more information:
In Ingressus I, II, and IV, the devices will automatically detect and configure its Wiegand Connection once connected to QR110. Therefore, removing the need for any manual setting.
After the configuration is done, the FingerTec devices will then be paired with QR110.
Introduction
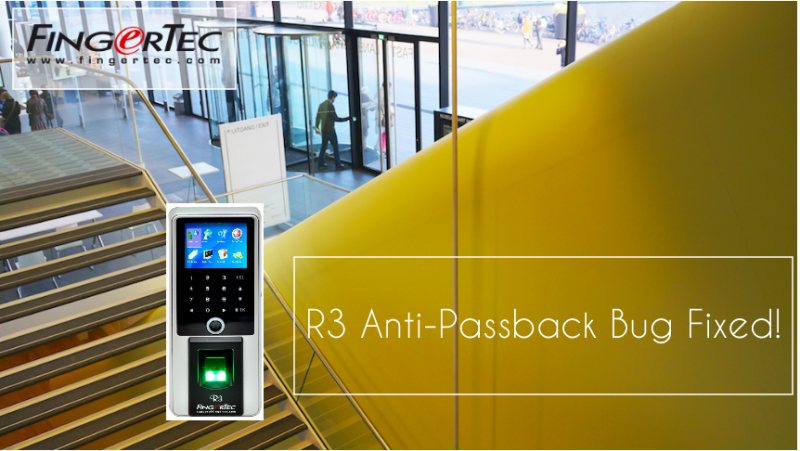
As per our customers’ feedback, users would fail to verify at R3 after using the terminal for some time. Our technical team has run a series of tests on the device and found the bug, which is related to anti-pass back feature.
Bug Description R3 with anti-pass back feature turned on, after an anti-pass back verification is recorded, the device can not verify user anymore.
Solution
To solve the bug, please update device’s firmware to latest version.
Please contact your local reseller or Fingertec Support team to retrieve latest firmware update.
Benefits of Anti-Pass Back Feature in R3The anti-pass back feature of the R3 device allows the admin to prevent users from tailgating behind other people. It does this by denying access to users that verify at the same terminal consecutively. For example, if the user enters a zone without verifying at the entrance terminal, they will not be able to leave that zone when they verify themselves at the exit terminal. This feature requires a slave device (usually R2c) in conjunction with R3 to function. Both will control the same door, one for the entrance and one for the exit.
Introduction
Access level configuration is a function that could help clients secures their property. Clients are able to set different Access Level for each authorized user according to the time zone, with combination of verification type. With this function, you can enhance security by limiting user access to your premises with specific time zone and group verification type.
Benefits
By configuring the Access Level, the security mechanism for your premises is tightened to prevent it from being invaded by any unauthorized individuals.
Process
1. Add a door > add your R3 and FaceID3 device to the door
2. Define the start and end time applicable for this Time Set. You can configure up to 3 different time sets in a day. Access Level > Time Set > Create a time set. Take note that the time access periods need to set continuously without overlapping, as shown in picture below. Following the example below, users will be granted access from 9am to 6pm and 8pm to 10pm every day.
3. Access Group > Create a new access group > Add the door that which to upload the access level > Choose the time set created in step 2 > Select group verify type
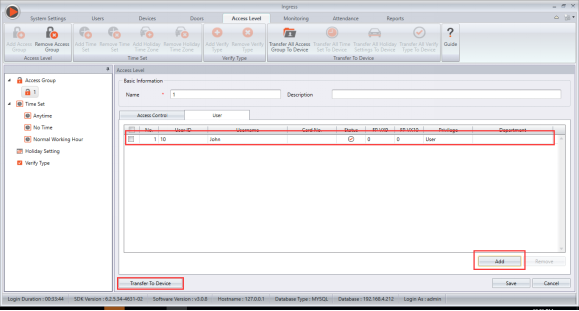
4. Add user into the access group > Transfer to device
*Note that this step will transfer the access group to the terminal along with the users in the group; user(s) that are not in any access group will be deleted from the terminal.
All the FingerTec terminals are equipped with a flash memory to store
transaction data, fingerprint templates, face templates, etc. The flash memory
is a permanent (non-volatile) storage and it can store data even without the
power supply. The FingerTec terminals’ memory capacity varies for each model.
Time attendance only terminals have far less transaction storage capacity
compared to the multimedia models.
When you perform a successful verification, the
terminal will store a transaction log into its memory. The transaction will be
stored in the terminal until it is downloaded into our TCMSv2 software, or
manually deleted. If you do not download or delete the transaction data after a
period of time, the memory’s storage will reach its maximum capacity and the
terminal will cease to work or function properly. If you are using a USB flash
disk to manage the transaction records, click here for further instructions. If you are only using the FingerTec terminal
for door access purposes and do not need the transaction data, it is
recommended that you perform a housekeeping to ensure that the terminals to
continue to work in a tip top condition.
You can set a reminder at the terminal before
its memory reaches the maximum capacity. If the configured figure is 99, the
terminal will alert users when it reaches its last 99 transaction
storage.
Fo terminals AC100, TA100, AC900, R2,
Kadex: Press Menu
> Options > Log Opt > Alm SuperLog / Alm Attlog
Alm SuperLog: to
notify users if the operational log storage is less than the configured figure.
The default figure is 99.
Alm AttLog: to
notify users if the transaction storage is less than the configured figure. The
default figure is 99.
For AC100C, TA100C, TA200 Plus, Q2i,
I-Kiosk 100, R3, and TA500: Press Menu > System > System > Log
Alert
For AC100C, TA100C (FMM100): Press Menu > System > Attendance
> Attendance Log Alert
For Face ID Series (Face ID2, Face ID3, Face ID4, Face ID4d): Press Menu > System > Log Setting > Log Alert
For I-kiosk 100 Plus: Press Menu > System > Param Setup
> Log Alert
Log Alert: To
instruct the terminal to alert user if the transaction storage is less than the
configured figure. The default figure is 99.
Introduction
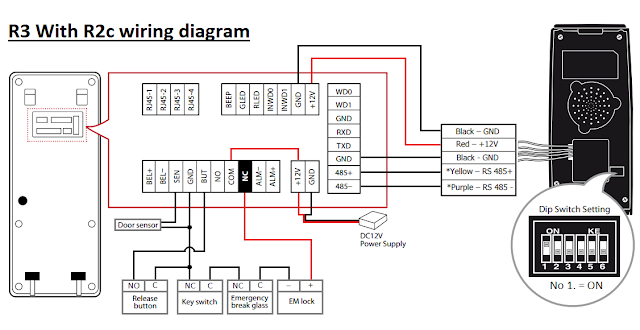
With the new release of our latest products, some terminal installations are different from our previous guides and diagrams. Below is the full installation wiring diagram and settings to connect R3 with R2c.
Benefits
By pairing R3 with R2c, you can have a totally secured biometrics with having to invest in two master terminals. All verifications and data storage are managed by the master terminal. You can also control the employee movements by implementing the Anti-PassBack settings when you pair the R3 with R2c.
Process
Settings at R3:
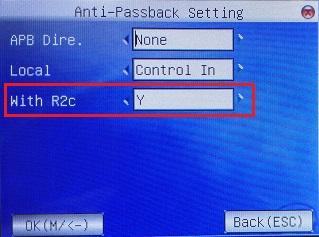
Enable the R2c setting at the R3: Press Menu > User Management > Access > Anti-Passback Setting > With R2c > Set to Y
If the R2c does not respond during installation:
Check on the below R3 settings:
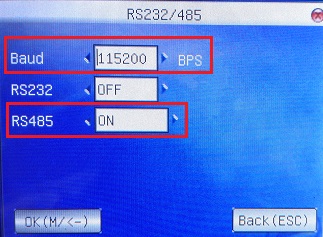
1. Make sure the settings in R3 are set as below.
Baud : 115200 BPS
RS232 : OFF
RS485: ON
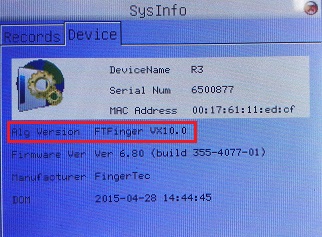
2. Make sure the R3 Fingerprint algorithm is BioBridge VX 10.0: Press Menu > System Info
> Device > Alg Version FTFinger VX10.0
**If you found that the Alg Version is FTFinger VX9.0, you need to change it to
VX10.0: Press Menu > System > System > Alg Version > FTFinger VX10.0
Check on the R2c settings:
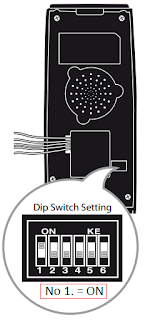
1. Check the Dip Switch settings below:
To refer to R3 and R2c manuals, click here for R3 and click this link here for R2c.
FingerTec Worldwide Technical Tips website are meant solely
for our resellers. In this website, advanced information such as firmware,
training, hardware repair guide, tools and etc. are readily available for
registered resellers who have access to our website.
We are always uploading the latest information, tools and
even software onto this page. We have also recently added the TA500 and R3 into
the repair video guide archive. If you need more info regarding the
repairing/changing of spare parts for TA500 and R3, please login here and look for the repair video under
the hardware section.
All the FingerTec terminals are equipped with a
flash memory to store transaction data, fingerprint templates, face templates, etc.
The flash memory is a permanent (non-volatile) storage and it can store data
even without the power supply. The FingerTec terminals’ memory capacity varies for
each model. Time attendance only terminals have far less transaction storage
capacity compared to the multimedia models.
When you perform a successful verification, the
terminal will store a transaction log into its memory. The transaction will be
stored in the terminal until it is downloaded into our TCMSv2 software, or
manually deleted. If you do not download or delete the transaction data after a
period of time, the memory’s storage will reach its maximum capacity and the
terminal will cease to work or function properly. If you are using a USB flash
disk to manage the transaction records, click here for further instructions. If you are only using the
FingerTec terminal for door access purposes and do not need the transaction
data, it is recommended that you perform a housekeeping to ensure that the
terminals to continue to work in a tip top condition.
You can set a reminder at the terminal before
its memory reaches the maximum capacity. If the configured figure is 99, the
terminal will alert users when it reaches its last 99 transaction
storage.
For terminals AC100, TA100, AC900, R2,
Kadex : Press Menu >
Options > Log Opt > Alm SuperLog / Alm Attlog
Alm SuperLog: to instruct
the terminal to alert user if the transaction storage of administrator login is
less than the configured figure. The default figure is 99.
Alm AttLog: to instruct
the terminal to alert user if the transaction storage is less than the
configured figure. The default figure is 99.
For terminals AC100C, TA100C, TA200 Plus,
Q2i, I-Kiosk 100, R3, and TA500: Press
Menu > System > System > Log Alert
For terminals Face ID 2, Face ID 3: Press Menu > System > Log Setting > Log
Alert
For terminal I-kiosk 100 Plus: Press Menu > System > Param Setup > Log Alert
Log Alert: To instruct the terminal to alert user if the transaction storage
is less than the configured figure. The default figure is 99.


