Shift Data From TCMS V2 to TimeTec TA Easily Via Migration Wizard

Friday, September 23, 2016 TimeTec 0 Comments


INTRODUCTION

TImeTec TA and TCMS V2 software are two difference application with the nearly similar functions where you can centralize, store and manage all transactions data. Both applications enable you to download and process attendance records to help organizations better manage their dynamic workforce.

Here we will discuss and explain about Migration and Rollback Wizard that available is in TimeTec TA application. In computing term, Migration is the process of transferring data between one operating environment to another operating environment. In the meantime Rollback is the process of restoring a database or program to a previously defined state, typically to recover from an error. In simpler term, to Undo.

BENEFIT
This feature provides a simple backup and restoration process for users who are sceptical about moving to a new software without experiencing data lost, where there can use both TimeTec and TCMS software as an easy one-way to store employee data. In this wizard it will ease the admin’s job and give them the flexibility to either keep the existing data such as Company information and hierarchy, User or employee data, Devices, Schedules & Rosters, Leaves and Holidays between this two application (TimeTec TA and TCMS V2).

Migration from TCMS V2 to TimeTec TA
1) It’s important that you backup the database file from TCMS V2 software by going to System Setting > Backup/Restore database > select Backup command to migrate to TimeTec > Apply.
2) Copy the file and save in one folder for easy tracking.
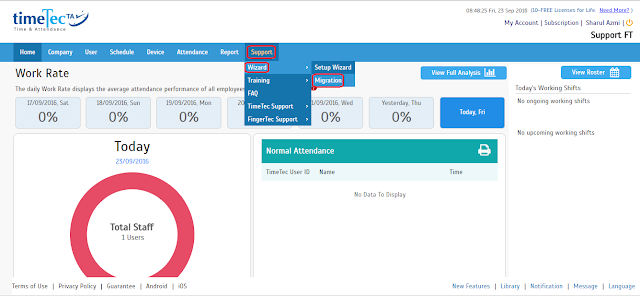
3) Login to your TimeTec TA account and go to Support > Wizard > select Migration.


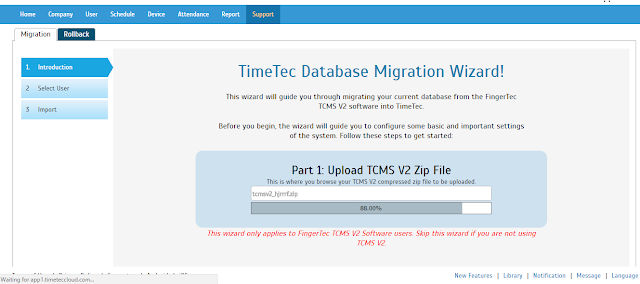
4) Inside the Migration wizard, click on Browser, select the TCMSv2 backup file, then press Upload.

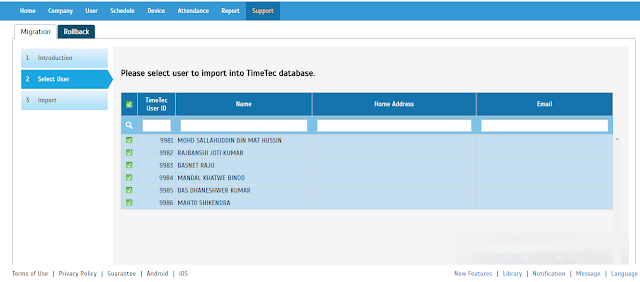
5) Select the employees to migrate into TimeTec TA (You can ignore those who are suspended or have resigned.) > Click Import Selected. System will process and a successful message will appear once completed. 
6) Now you can see all the Company Info, User data, Schedule, Roster and other info that have been updated into your TimeTec account.  
7) For details step, you can also refer to the following link /2014/02/migrating-data-from-tcms-v2-to-timetec.html


TimeTec TA is a better choice for your time attendance needs because it is on cloud, it’s effective, accessible, scalable and affordable. Find out more at www.timetecta.com

0 comments:

Have any questions or inquiries about FingerTec? Drop your input here.

Replacing R2i with H2i to Solve Fingerprint Incompatibility Problem in FingerTec R2 version 565

Friday, September 23, 2016 TimeTec 0 Comments


INTRODUCTION
Previously FingerTec R2 was paired with the slave device R2i.  Due to major improvements carried out on the slave, R2c was introduced as a replacement to R2i. However, with the improvements, the new R2c can only support R2 with Biobridge VX10.0 algorithm and incompatible to R2 version 565 with Biobridge VX9.0 algorithm. The differences in algorithm versions disallow transfer of fingerprint templates between the previous R2 and the latest R2. And to use the new R2, users need to reenroll all user fingerprint templates again, a very impractical solution for organizations that have a large number of employees. As an alternative solution, we suggest the pairing of the old R2 unit (565) with H2i unit to work as master-slave in-out readers. This combination can be configured to work with Biobridge VX9.0 algorithm smoothly.

BENEFITS 
By choosing this method, you can skip the reenrollment of users’ fingerprint templates and use the existing fingerprint templates (BioBridge VX9.0) from the old device to be transferred into the new units.

PROCESS
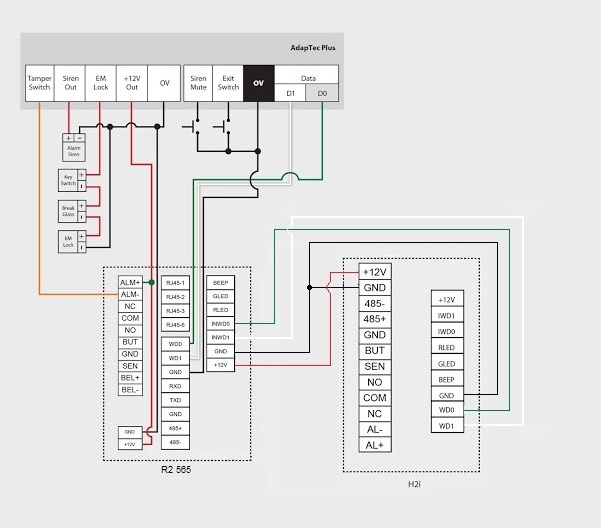
To set up this R2-H2i combination, you need to connect these 2 terminals according to the connection diagram below.


Terminal configurations: 

AT R2 (565) MASTER

Change BioBridge Algorithm Version from Vx10 to Vx9.0
Press Menu > Option > System Option > Adv Option > Alg Ver > 9.0 > Ok > Esc & Save

Setting For Wiegand Input For R2.
Press Menu > Option > System Option > Wiegand > Input setting > FP device > Input format = WG26 with ID > Esc > Input = User > Esc & Save

AT H2i SLAVE

Download the FingerTec Terminal Function Tools at http://www.fingertec.com/download/terminal-func.zip

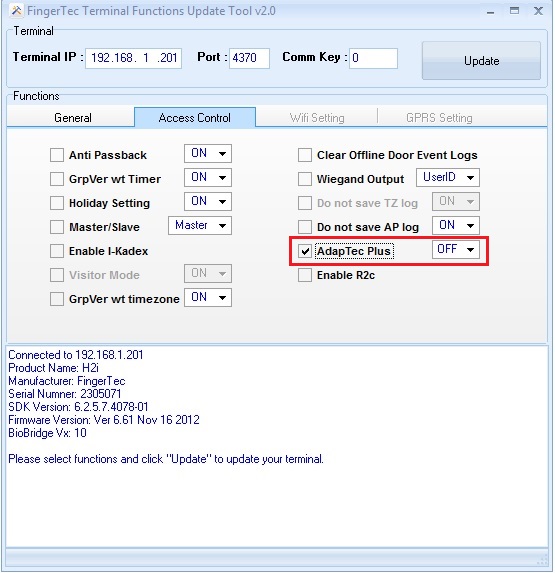
Change AdapTec Plus to Off
Start up the FingerTec Terminal Function Tool and connect to the H2i terminal and change the AdapTec Plus to OFF at Access Control menu.


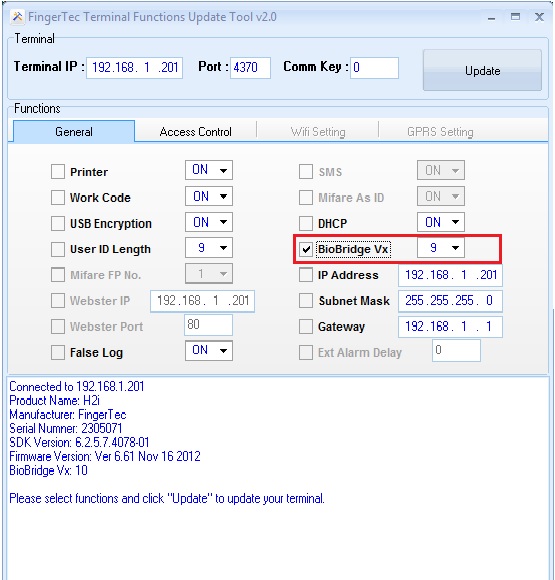
Change BioBridge Algorithm Version to Vx 9.0
Start up the FingerTec Terminal Function Tool and connect to the H2i terminal and change the BioBridge Algorithm to Vx 9.0 at General Menu.


And now you’re done. By pairing old R2 565 version with the latest H2i, it could save you tonnes of time enrolling the new templates for all users. If you found yourself stumbled upon this predicament, give this suggestion a serious consideration. Contact us at [email protected] for further information.

0 comments:

Have any questions or inquiries about FingerTec? Drop your input here.

Learn to Activate OFIS TA Scanner in Ingress and TCMS V3 for Fingerprint Registration via PC and more.

Thursday, September 22, 2016 TimeTec 0 Comments


INTRODUCTION
Integration of OFIS TA with FingerTec's latest software solutions, Ingress and TCMS V3, provides a highly secured, yet simple and affordable solution for fingerprint enrollment as well as for user verification. With OFIS scanners, users can perform template registrations from an enrolment station PC for attendance verification purposes or for fingerprint template transference to other remote FingerTec biometric devices .  

BENEFIT
OFIS TA integration to Ingress and TCMS V3 software offers a precise template enrolment, in addition to its fast verification execution. The OFIS TA scanners are capable of handling both 1:1 (verification where your stored fingerprint template is called first to match with the live fingerprint template) and 1:N verification (verification where the device searches for the  fingerprint template that matches the live fingerprint template) methods. The integration of OFIS scanners are facilitated with real-time monitoring feature upon every single user verification and it allows an unlimited number of enrolments and verifications based on the PC's capacity.

PROCESS
A: OFIS Scanner Drivers Installation
1) Close all the FingerTec Programs and Unplug the OFIS Scanner from the PC.
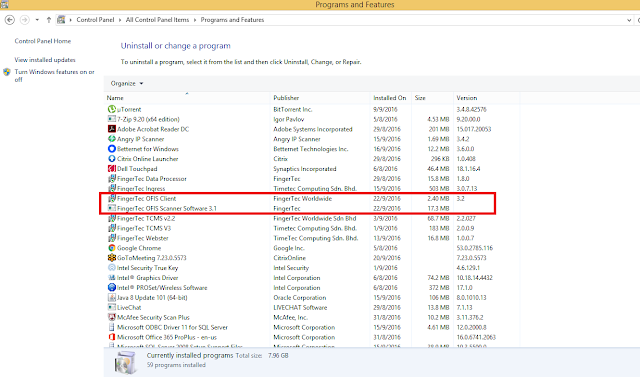
2) Uninstall all the existing OFIS scanner drivers from Control Panel> Programs and Features


3) Restart the PC and Login to your PC with Administrator account.

4) Download and install the OFIS Scanner latest drivers from the following links at:
http://www.fingertec.com/ofis_download/ofisclient3.2setup.exe
http://www.fingertec.com/ofis_download/FingerTec_OFIS_Scanner_Driver_3.1_Setup.exe
The installation process has to be completed by following the steps accordingly
Note: No modification is required in the installation steps

5) When the installations of both driver files are completed, restart the PC.

6) Plug in the OFIS scanner until you hear a short “Beep” sound from the scanner, as a sign of successful activation. Download the OFIS Test tool from the following link at:
https://s3.amazonaws.com/files.fingertec.com/Arsalan.M/Tools/OfisTest(1).exe

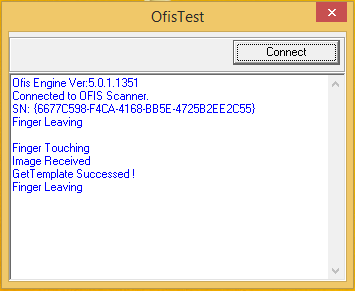
7) To test the scanner function with your PC, run the OFIS Test tool >  Press connect to receive the “Connected to OFIS Scanner” then touch the scanner sensor to receive the “Image Received” plus “GetTemplate Succeeded!” Message on the tool:


Note: For OFIS scanner installation of drivers in Windows 8 and 8.1, refer and complete the steps in the links below before proceeding to the steps 1-7 above. 
/2012/12/how-to-install-ofis-scanner-in-windows-8.html
/2015/10/how-to-install-ofis-scanner-in-windows_1.html

B: How to Obtain Your OFIS TA Product Key for Activation in Ingress and TCMS V3
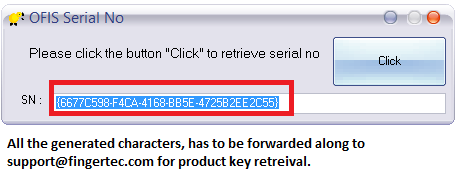
1) Once the scanner drivers are successfully installed, download the OFIS scanner SerialNO tool from the following link: https://s3.amazonaws.com/files.fingertec.com/Arsalan.M/Tools/Ofis_SerialNo.exe

2) Run the downloaded SerialNO tool, and press click to retrieve the OFIS scanner serial number.


3) Forward the serial number to [email protected] to claim the Serial Number and Product Key for Activation of OFIS TA in Ingress or TCMS V3 software. 

C: Ingress and TCMS V3 Activation Process
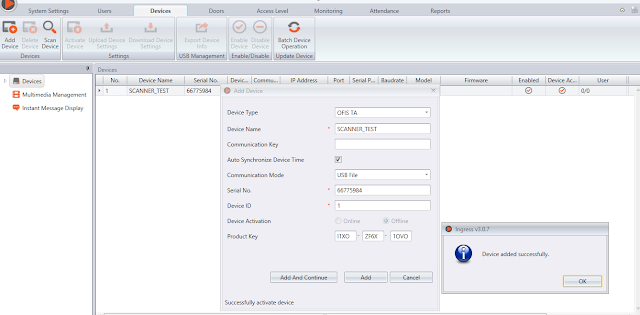
1) Run Ingress and TCMS V3 software, go to the devices tab > Add device > Enter the following information> Press Add. 
Device Type: OFIS TA
Device Name: Enter your preferred name (e.g. Scanner_TEST)
Serial Number: Enter the serial number retrieved from FingerTec
Product Key: Enter the Product Key forwarded retrieved from FingerTec 


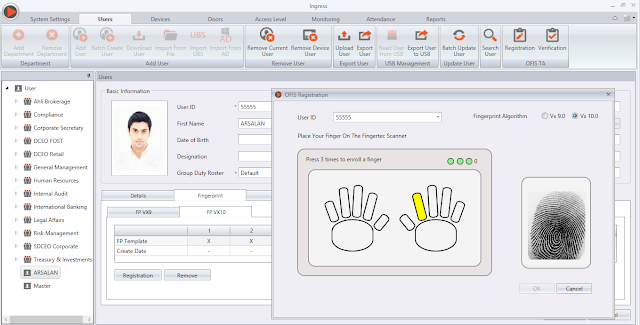
2) To register user fingerprint templates with OFIS scanner, go to Users tab > Select the user > Fingerprint > Registration > Select the verification finger > Select the correct Fingerprint Algorithm (Vx 9.0 or Vx 10.0) > Press the finger 3 times > Then Press OK to save.  


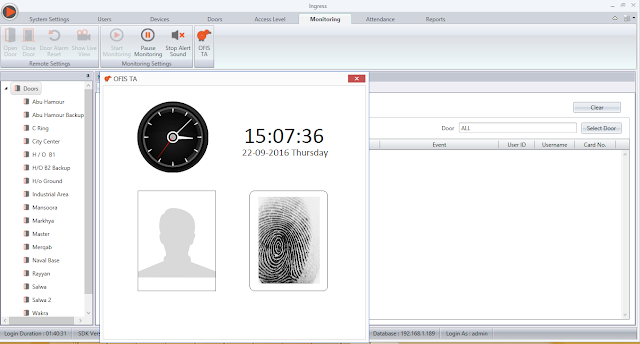
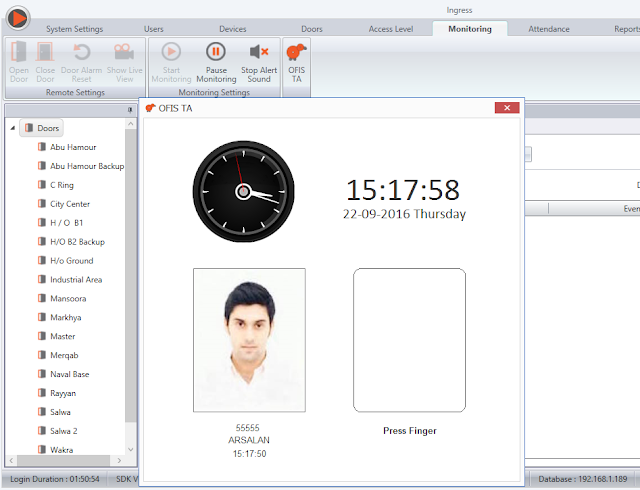
3) Go to Monitoring Tab> Click On OFIS TA> Press the Finger on the scanner for the verification.


4) Once the verification is successful, User photo, User ID, Name, and time of the transaction will be displayed, and saved in the data audit list of the software. 


0 comments:

Have any questions or inquiries about FingerTec? Drop your input here.

Forget to Clock your Time? Deal with it the Correct Way in TimeTec TA

Thursday, September 22, 2016 TimeTec 4 Comments


INTRODUCTION
Attendance system is implemented in a company for a reason. At the most basic level, the system must be able to let the management know the level of staff compliance with the company’s attendance rules and policy. By having genuine clocking data at all times, the  management can view tardiness, absences or  any discrepancies in attendance clocking activities, and these data will be calculated to determine on payroll and disciplinary actions for a certain payroll cycle. When employees are not able to meet company’s attendance expectations on certain dates, he/she must request to change the schedule and the approval must be obtained from the superior in advance. Employees can request the company to correct their missing clocking activities in TimeTec TA with valid reasons.

BENEFIT 
This feature provides satisfaction to both parties, the company and the employee. Mismatch data can cause disappointment that can cause low morale in the workplace. By having a medium to correct those data with both parties consent, TimeTec TA would be a favorable system for handling workforce management

PROCESS
1) Login to your own personal TimeTec TA account
2) Go to Attendance tab > Click Request for Change

3) Select either you want to change request for Work Code or Missed Punch


FOR WORK CODE
Type: Work Code
Mail To: Select your Supervisor/Superior from the drop down box.
Affected date: The date of the missed or incorrect punches 
Clocking time: Select the clocking time that you wish to change the work code
Amended Work Code: Choose the correct work code
Don’t forget to provide a valid reason to the management.


FOR MISSED PUNCH/CLOCKING
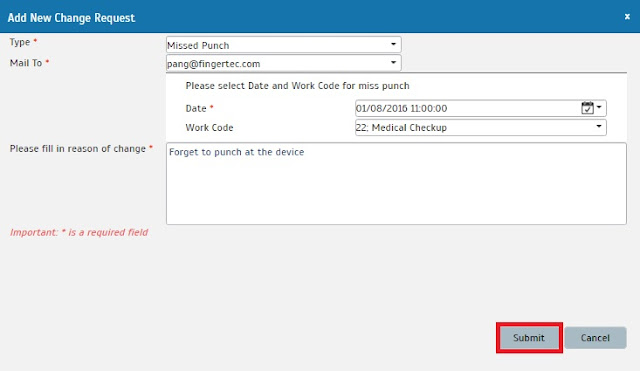
Type: Missed Punch
Mail To: Select your Supervisor/Superior from the drop down box.
Select the date with the corresponding time for your miss punches. Select the work code for miss punches too. Make sure that you provide a valid reason for the management to approve the request


4) Once done, click the Submit button. Check your TimeTec TA account to see whether your request has been approved or otherwise. 


4 comments:

Have any questions or inquiries about FingerTec? Drop your input here.