Introduction
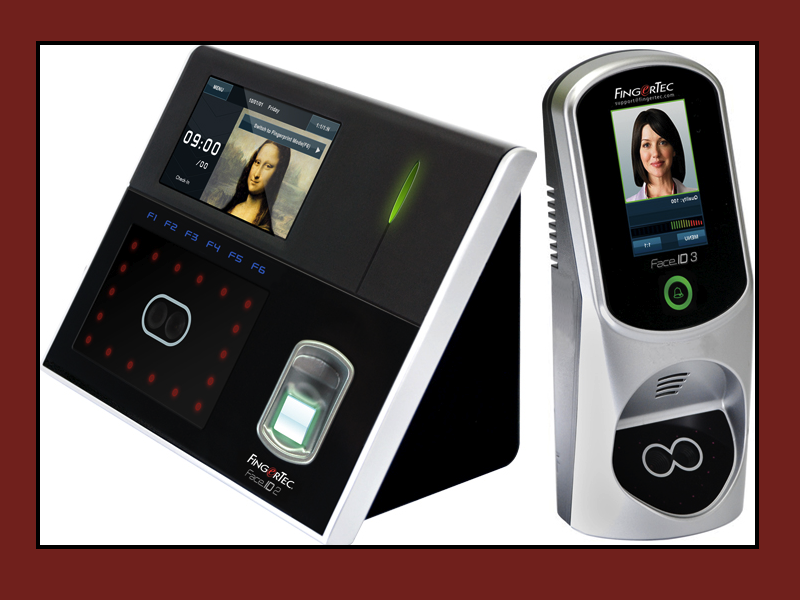
FingerTec Face ID2 and Face IDX are contactless biometrics face recognition door access devices. Typically, for those using fingerprint devices or card devices for exits, these devices are paired with slave units such as FingerTec R2c or R3c. However, for those who want to use both face recognition devices for in and out purposes, FingerTec Face ID 5 is recommended for installation without additional wiring requirements because two Face ID 5 devices can communicate with each other with Wiegand signal.
Face ID 2 or Face IDX don't have a Wiegand signal to communicate with each other. Therefore, to pair these devices for in and out access would require extra relay and wiring. However, this pairing is suitable for existing customers who want to upgrade their door access to a complete face recognition system. This setup needs two extra external 12Vdc Relays to function.
Process
This tip explains how to install two Face ID2 or Face IDX as door access devices with Door Force Open Verification Siren Clear.
Device Functionality
Access
- Door will open when the Face, Card, Fingerprint or Password has been verified, and the door will open according to the Door Lock Delay set at AdapTec Plus (refer to AdapTec Plus manual).
Door Open Duration
- Door open duration is a situation where you can set a certain amount of time before the alarm is off after the user has been verified and the door has been opened. Usually, when the alarm is triggered, the user needs to close the door and verify the Face, Card, Fingerprint or Password to silence the alarm. However, after the user has verified the identity, the alarm will go off quite a while depending on the Door Lock Delay time settings.
(MENU > Access Control > Access Control Options > Door Lock Delay)
Door Force Open
- Door Force Open is when the system triggers the alarm caused by the door being opened without a verification or broken into. Usually, when the alarm is triggered, the user needs to close the door and verify the Face, Card, Fingerprint or Password to silence the alarm. However, after the user has verified the identity, the alarm will go off quite a while depending on the Door Lock Delay time settings.
(MENU > Access Control > Access Control Options > Door Lock Delay)
System Broken
-System Broken is when the device has been dismantled or taken out from the wall without permission. If the alarm is triggered, the user needs to put back the device and verify Face, Card, Fingerprint or Password to silence the alarm.
Note: If some of the screenshots or steps viewed here are different from the ones in the current system, this is due to our continuous effort to improve our system from time to time. Please notify us at [email protected], we will update it as soon as possible.
Combined Verification is an access control function that requires verifications by a combination of different users. This function is suitable for highly-secured rooms or vaults that need more than one senior-level employees from different departments to verify their identities before they can access the door. This tip explains how to set up this function.
Steps and Procedures
To set up Combined Verification for two persons.
Assign each person to a different or Same Access group and create an Access Group before assigning a person to an access group.
1) Create Access Group
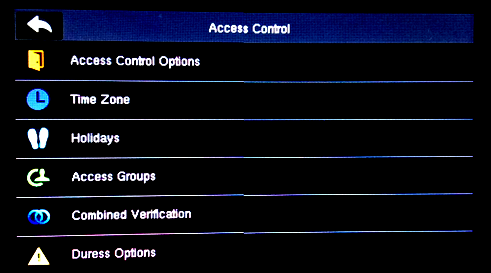
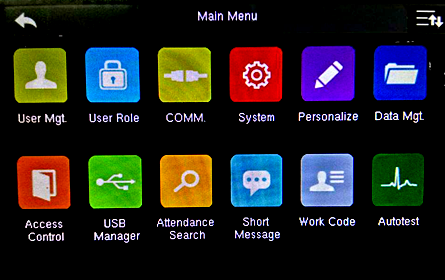
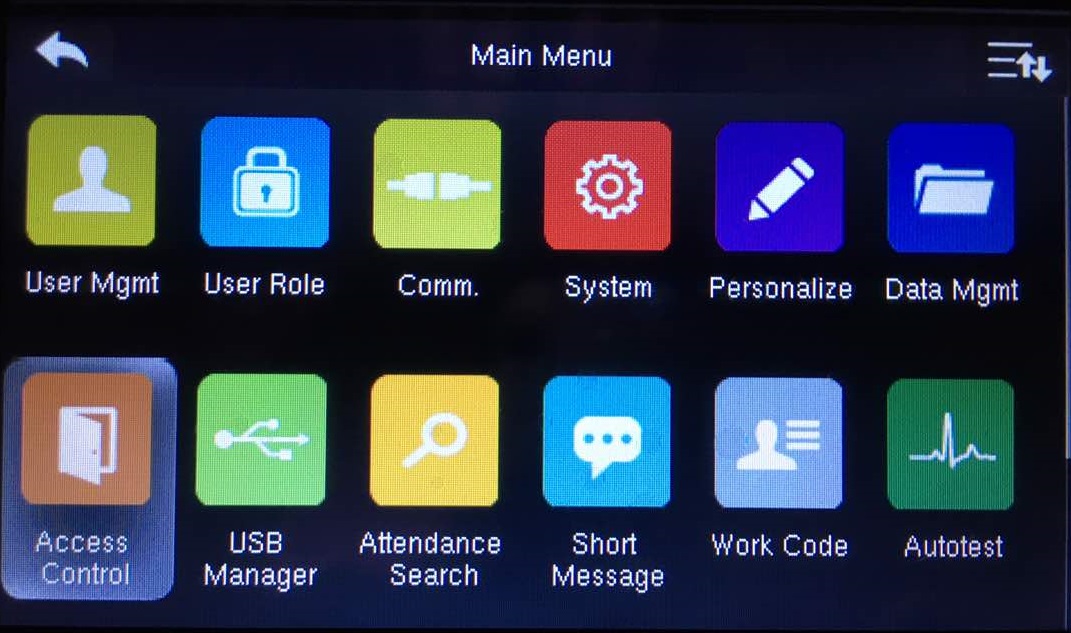
Main Menu > Access Control
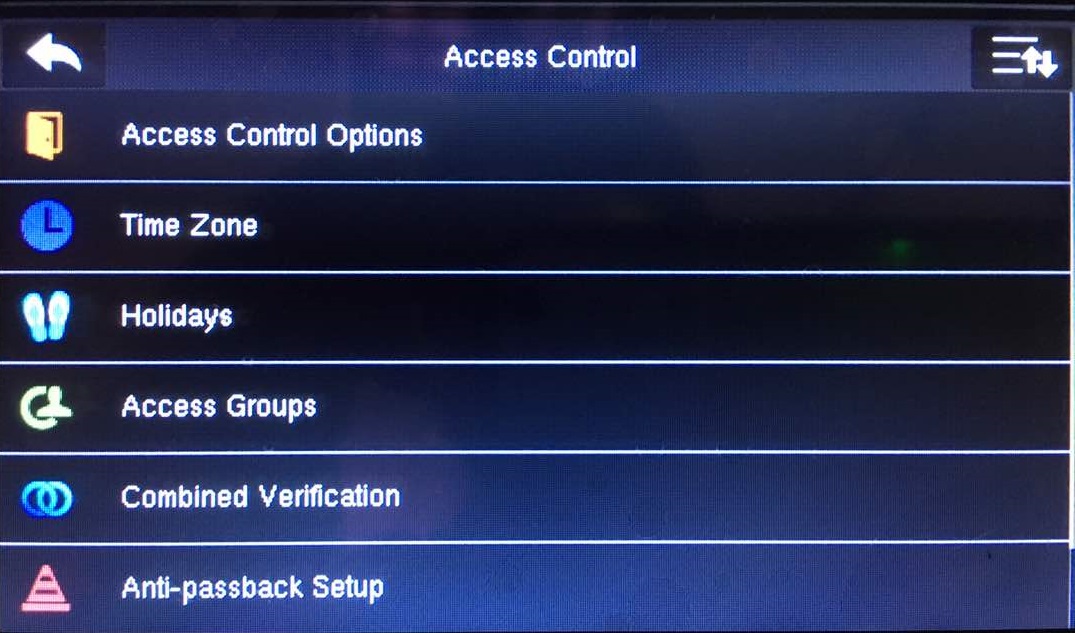
Access Control > Access Group
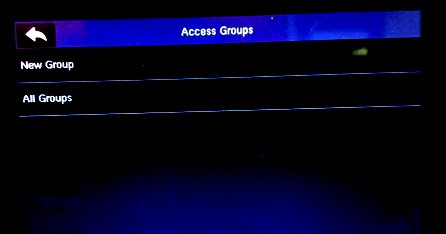
Access Group > New Group
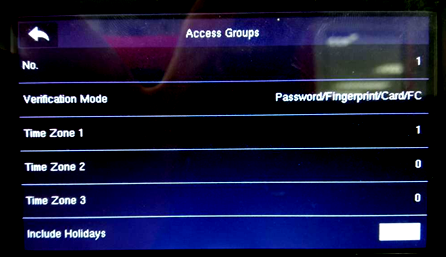
Change the Time Zone Accordingly for this group
For this Example,
Group 1 Time Zone 1 been set to 1 and
Group 2 Time Zone 1 Been set to 1
(which time zone 1 been set to 24hour access for the whole week)
2) Assign User for group
Main Menu > User Mgt
Use Mgmt > New User@ All Users
*Depends if the New Enrollment Or Existing user, if Existing just go to > Edit
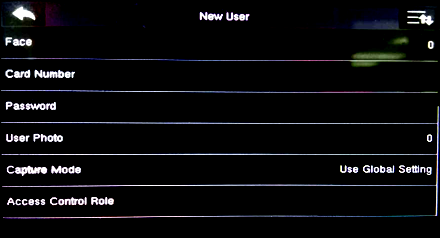
New User > Access Control Role
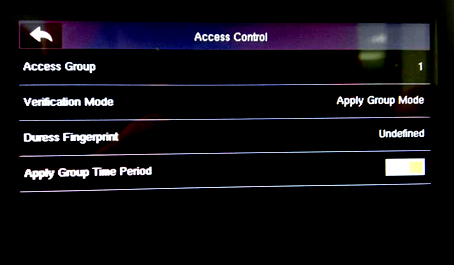
Access Control > Access Group > (Assign Any Number 1~99 for group Number)
3) Create Combined Verification
Main Menu > Access Control
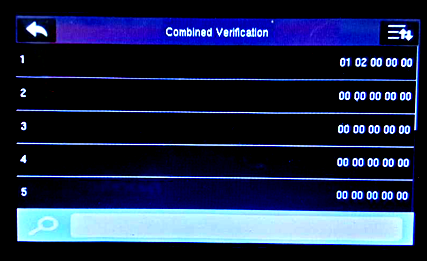
Access Control > Combined Verification
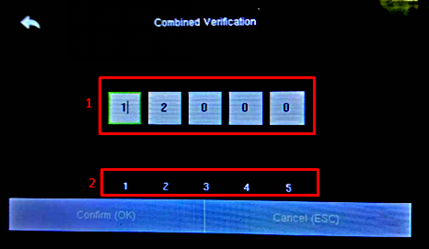
Combined Verification > 1
1 - Access Groups for Combined Verification
- Set to 1 and 2
2 - Number of personal for Combined Verification
- (Max Personals are 5)
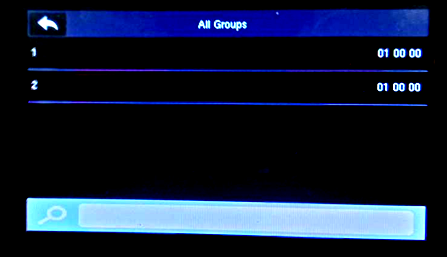
Combine Verification After Group Combined Been set Group 1 & Group 2 will be shown below
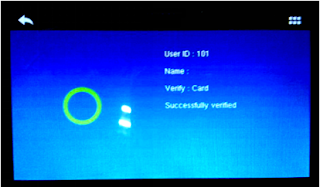
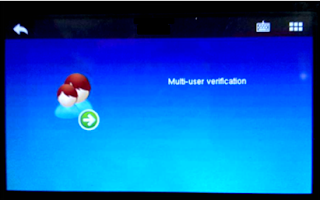
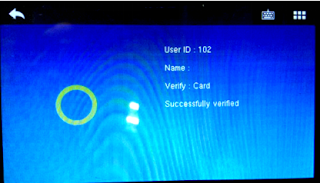
After Combine Verification set as above, when the First User for Group 1 wants to access the door, the Multi-user verification pops up to show that second User for Group 2 needs to verify for users to gain access.
Note: If some of the screenshots or steps viewed here are different from the ones in the current system, this is due to our continuous effort to improve our system from time to time. Please notify us at
[email protected], we will update it as soon as possible.
Introduction
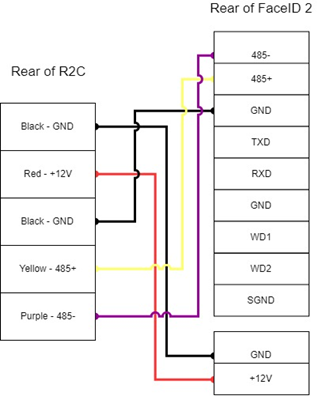
This post is intended to those who may face problem in setting up Face ID 2 FMM220 with R2c combination.
Wiring installation
Settings in Face ID 2 FMM220
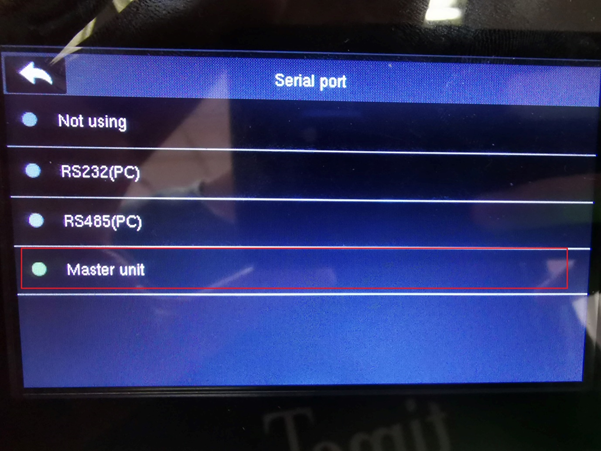
Other than the proper wiring setup, there is a setting to configure in Face ID 2 (Master) for master-slave setup to work correctly.
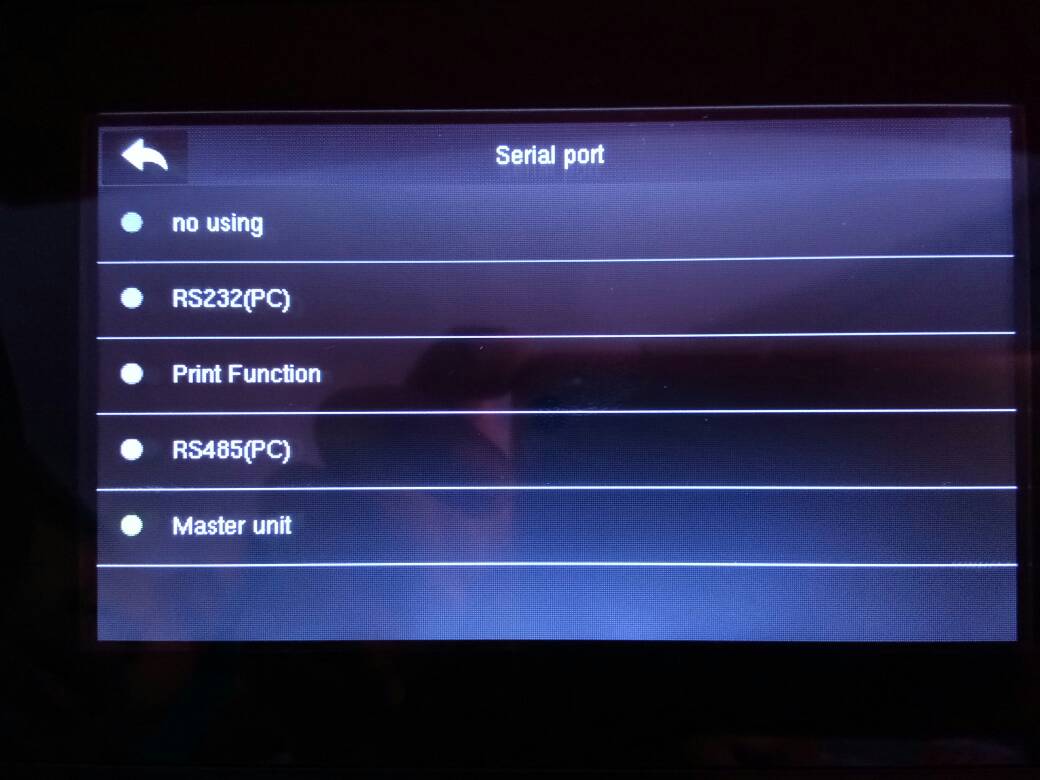
Go to Face ID 2 terminal, enter Menu > Comm. > Serial Port > Master Unit. Tick ‘Master Unit’ to complete the setup.
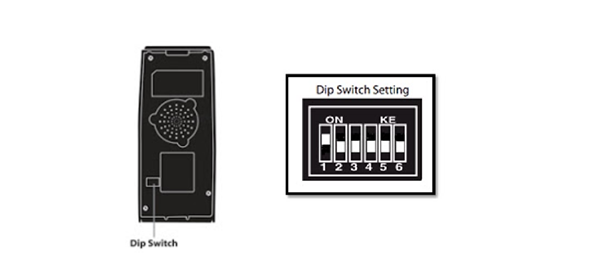
**Do not adjust the dip switch unless you are connecting the R2c with the Ingressus controller. If your R2c is unable to send any fingerprint or card data to the master terminal, please check the dip switch. Make sure it is set to the default settings as highlighted.
Note: If some of the screenshots or steps viewed here are different from the ones in the current system, this is due to our continuous effort to improve our system from time to time. Please notify us at
[email protected], we will update it as soon as possible.
Introduction
Face recognition reader, such as Face ID 2, detects its users by matching the face templates stored in the device
with the live human face.
The face verification works on normal face templates except on these two occasions:
User who enrolls without glasses, verifies with glasses.
The glasses are considered as obstacle during verification, hence the reader will not be able to detect theface.
User who enrolls with glasses, verifies without glasses.
The reader will not be able to detect the glasses that have been previously enrolled, so the matching process fails.
The solution to this problem has been solved in the FingerTec Face ID 2 where users will need to perform two
face enrollments; one with glasses and another without glasses. Through this process, the system will be able to recognize the user in any circumstances, with or without glasses.
Face ID 2 FMM is using Gabor and Linear Discriminant Analysis (LDA) for face recognition method. LDA is
used to determine discriminant pixels related to intuitive local features. Since the number of discriminant pixels is less than the whole image, the amount of computed Gabor-wavelet coefficient is decreased, and that is
how a face template is captured. Face ID 2 is loaded with 2 cameras, daylight and night (infrared) cameras.
The day camera functions to make sure that the face is captured for enrollment and verification purposes and
user’s face will be saved and verified by using the infrared camera view.
In the latest Face ID 2, the face enrollment process has been simplified by merging both face registrations into
one instead of having to do double registration for one user.
Benefit
This new feature in Face ID 2 FMM is beneficial to the users because they don’t have to waste one template to
register the same user and another is, they don’t need to do the registration two times, what a time saver! So
users with glasses, you don’t need to worry to come to work with contact lenses or a big giant glasses, you’ll
be alright when you use Face ID 2 FMM.
Process
Face Enrollment
Note: There are two stages of enrollment, one is wearing glasses and another is taking them off. It doesn’t matter which one goes first but user must know that he/she must need to take off the glasses on one stage.
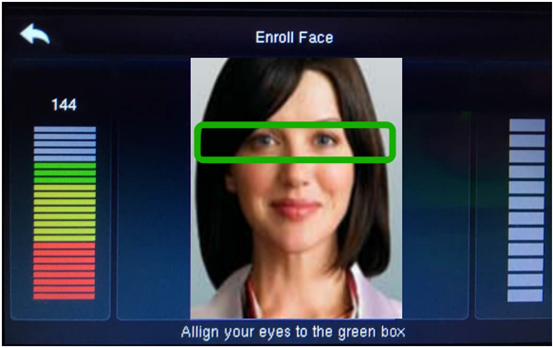
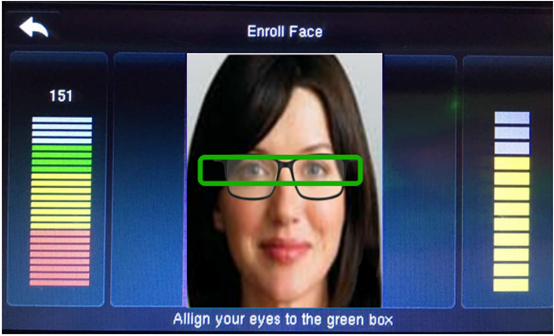
During the first face enrollment stage, align your eyes as usual until the second enrollment stage is shown. Refer Figure 1.
Figure 1: First stage face enrollment.
At the second face enrollment stage, wear your glasses and finish your enrollment. Subsequently, the device will save two different face templates; with glasses and without.
Refer Figure 2.
Figure 2: The Second Step of Enrollment.
Continue the enrollment process as usual and save. Once the enrollment process is done, the device will be able to verify the user with or without glasses.
Contact our technical team at [email protected] for more information on the new Face ID 2 FMM.
Introduction
Permanent door open is a type of door operation whereby the door will stay open and anybody can access it without verification. Usually this feature is applicable to premises that need to accept many non-staff into their space such as shops, building receptions, and banks. With this option, the door will stay open for your visitors’ convenience but the staff can still verify their daily work attendance without any problems.
Operation
Here are some examples for shop operations that can use permanent door open feature.
1. The shop opens at 9.00 am, hence the staff will start to arrive starting at 8.30 am
i) Verification needs to open the door before 9.00 am
ii) Attendance will be recorded.
2. The door will operate with Permanent Door Open feature during work hour from 9.00 am to 5.30 pm.
i) The door will stay open during this period
ii) Verification of staff’s attendance will work as normal
Wiring configuration
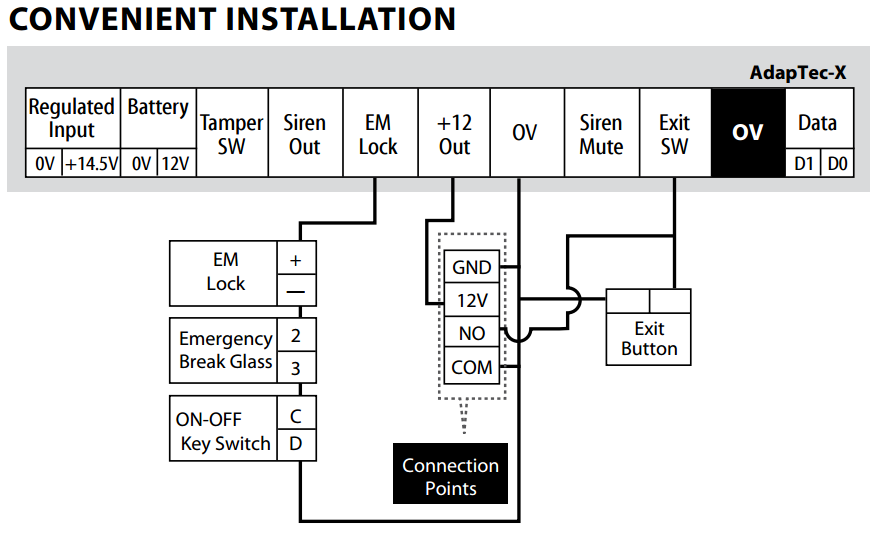
The wiring for the device is still the same, which is using NC COM connection directly to the device. If you are using our Adaptec Plus or Adaptec-X please use this convenient installation. This is not applicable on Weigand connection.
Option Settings
There are some settings you need to do on the device. Please refer below for further information.
Menu > Access Control
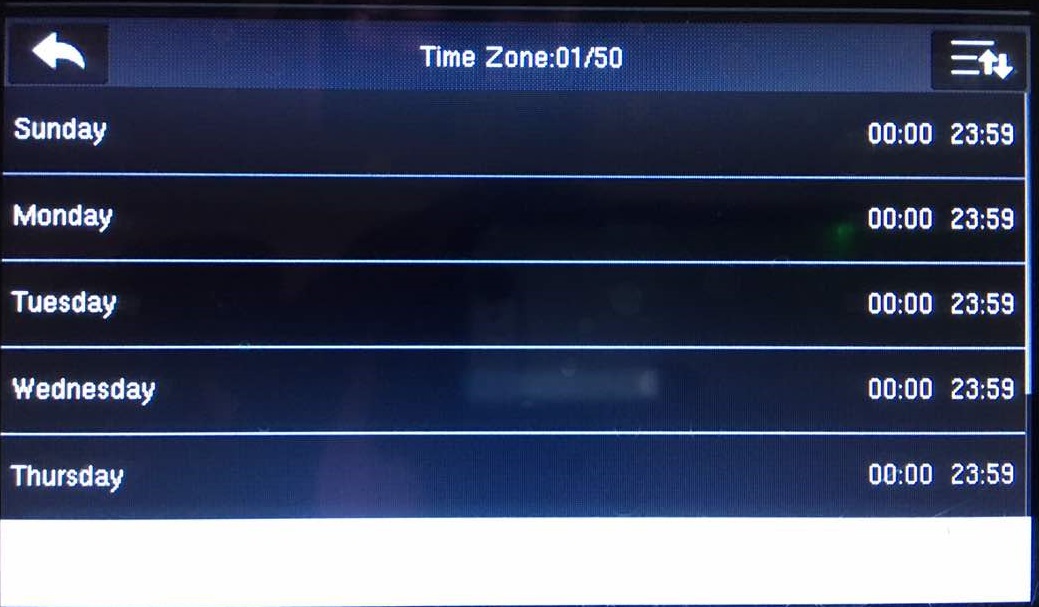
2. Set the Time Zone. To set the duration time lock to open.
3. Time Zone option view
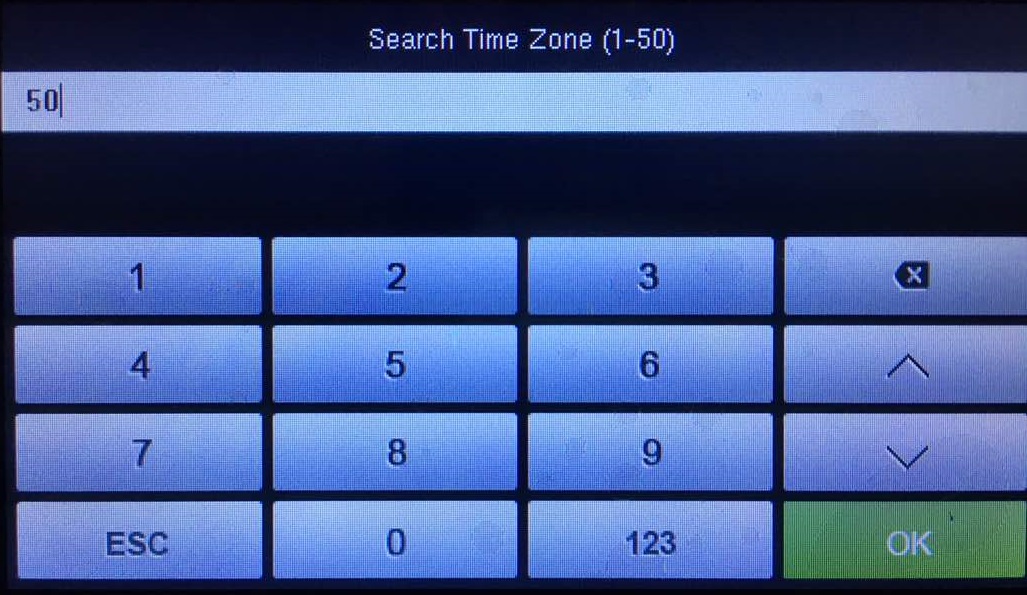
4. Faceid 2 FMM has 50 different time zones that can be used to control a premise’s user access. For Permanent Door Open function, we strongly recommend you to use Time Zone number 50 to avoid mix up with other Time Zones.
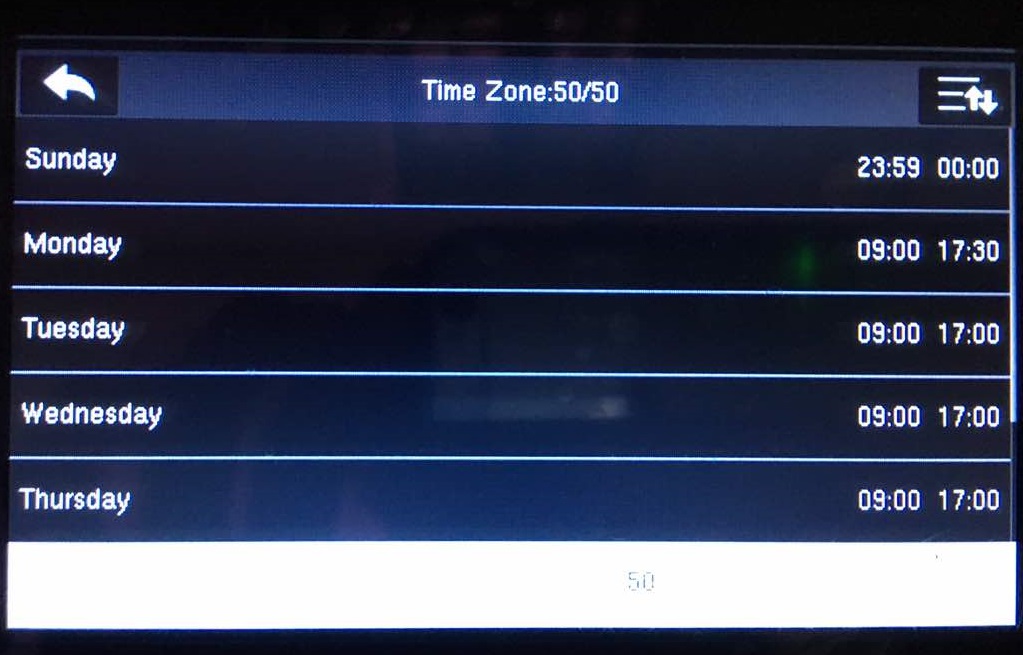
5. Set the duration time for lock to open on Time Zone 50.
Refer to the diagram below, the time for permanent door open feature will operate from 9:00 am to 5:30 pm every day. Except for Sundays when the shop is closed, so the permanent door open feature will not operate.
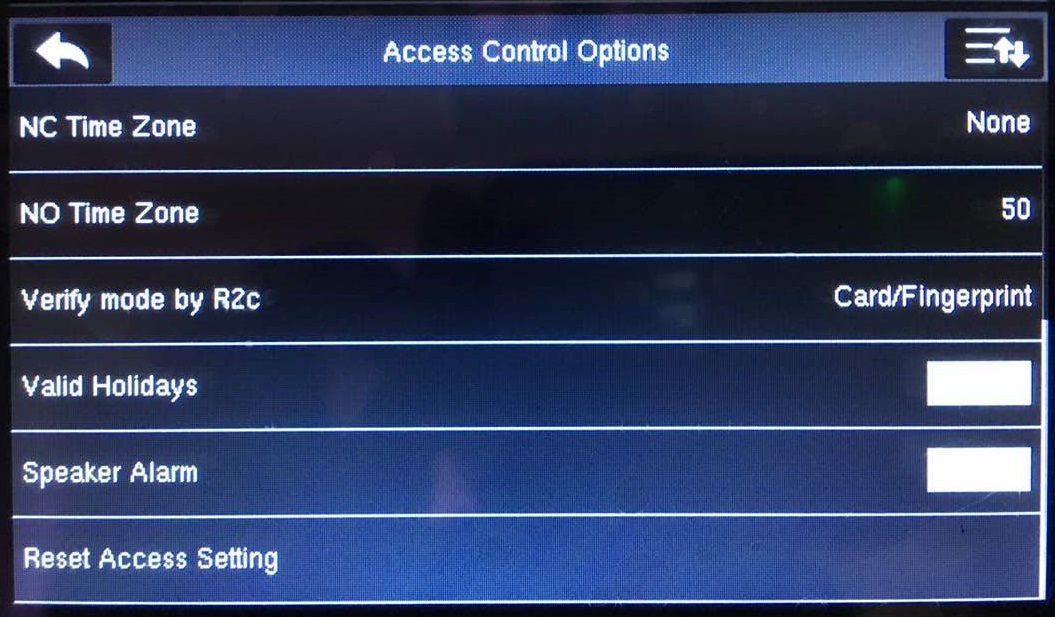
6. Press Back and go to Access Control Option
7. Go to “NO Time Zone” and select Time Zone 50.
Now, it’s all set! But, don’t forget to check that everything works properly.
Introduction
The new Face ID 2 has recently been
updated
to
FMM 220 firmware. With it’s improved, up-to-date and much-friendlier user interface, Face ID 2 offers a few new and enhanced features that will definitely benefit its users. However, this new firmware also comes with a few errors that you might encounter and the good news is, we have a quick fix for you if you encountered these errors while running your Face ID 2.
1. AdapTec Plus is Not Working Properly
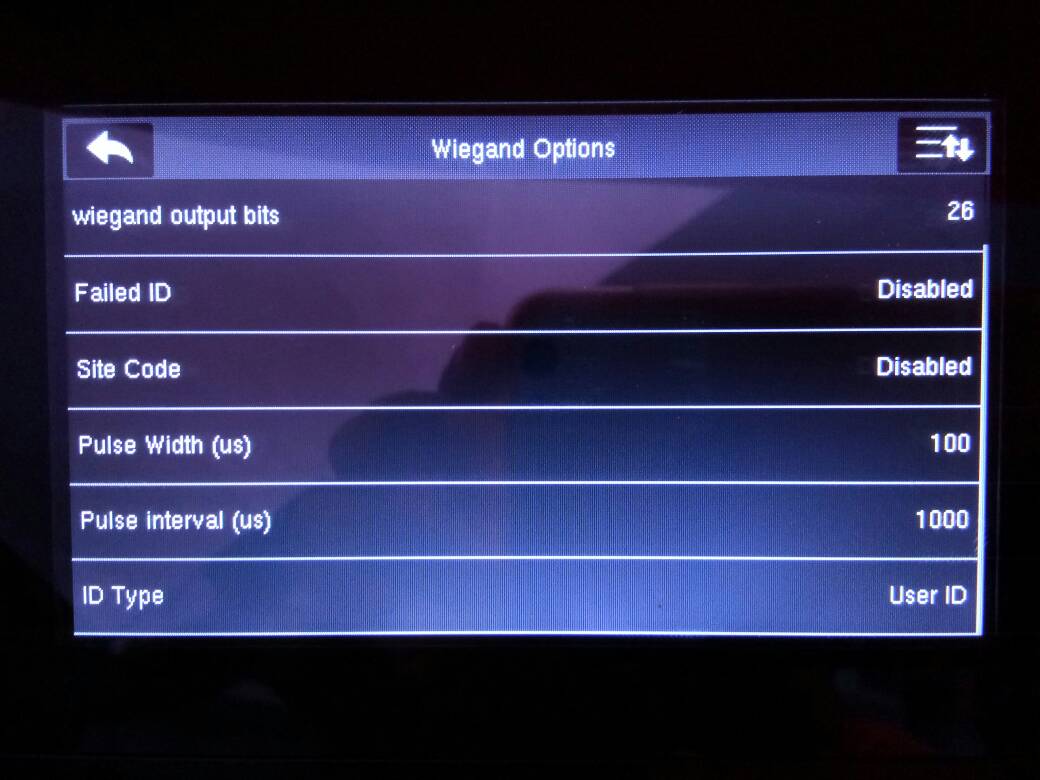
You have connected a Face ID 2 with AdapTec Plus and the AdapTec Plus is not properly working. Bear in mind that the default settings for AdapTec Plus or AdapTec X is to emit a beeping sound whenever a verification is done. However, if there is no beeps emitted from Face ID 2, you can check the settings as below:-
Menu > Comm > Wiegand Setup > Wiegand Output > ID Type = User ID (Please use “User ID” because The term “Card ID” wouldn’t work on AdapTec Plus).
Note: You need to set this settings again if you reset the device to factory settings.
 2. The Face is Not Detected
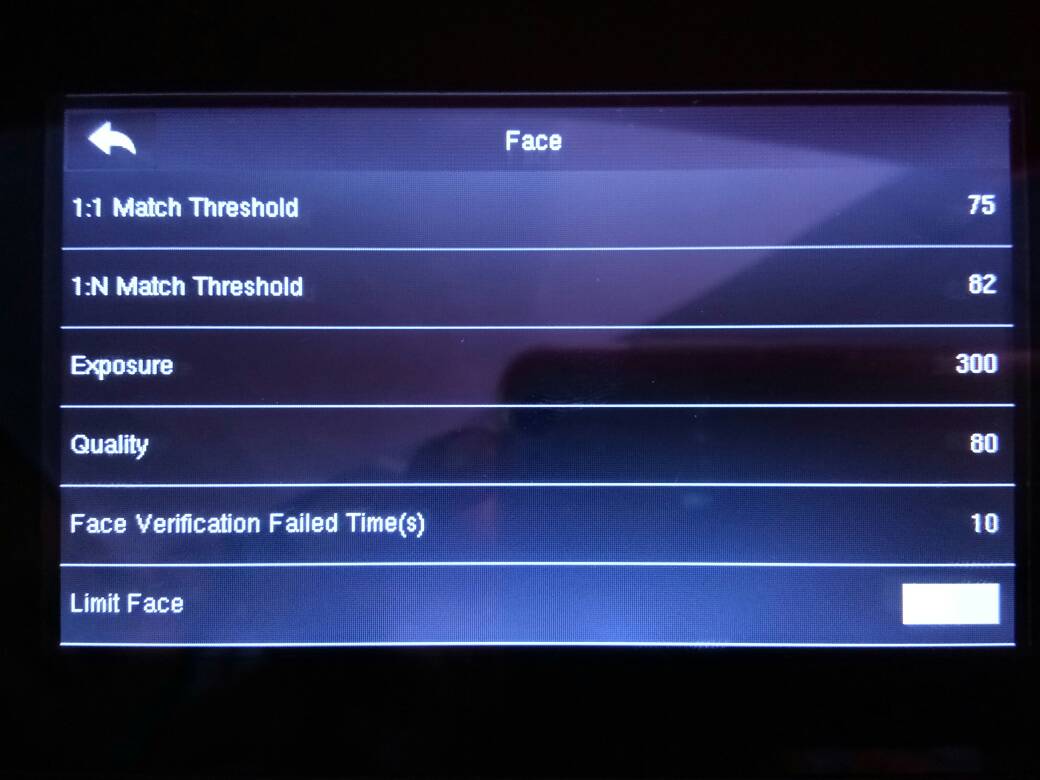
“Limit Face” is a setting to let the machine automatically detect facial features when a user is facing Face ID. By default, the “Limit Face” will be disabled which means whenever a user is facing Face ID, the machine will detect his/her face. By enabling “Limit Face”, a user needs to select his/her clocking type such as Clock In or Clock Out before the machine will detect facial features. By using this method, the clocking type will remain the same if the next person didn’t change the clocking type when he/she clocks if the next person is using other verification method other than face (fingerprint/password). To always get the right Clocking Type, users need to select his/her own clocking type before using Face ID 2. Follow the steps below to set “Limit Face” feature:
Menu > System > Face > Limit Face = disable/enable
Note: We strongly recommend you to disable this feature to provide convenience to users.
 3. Verification Successful but the Screen is Showing Duplicate Punch
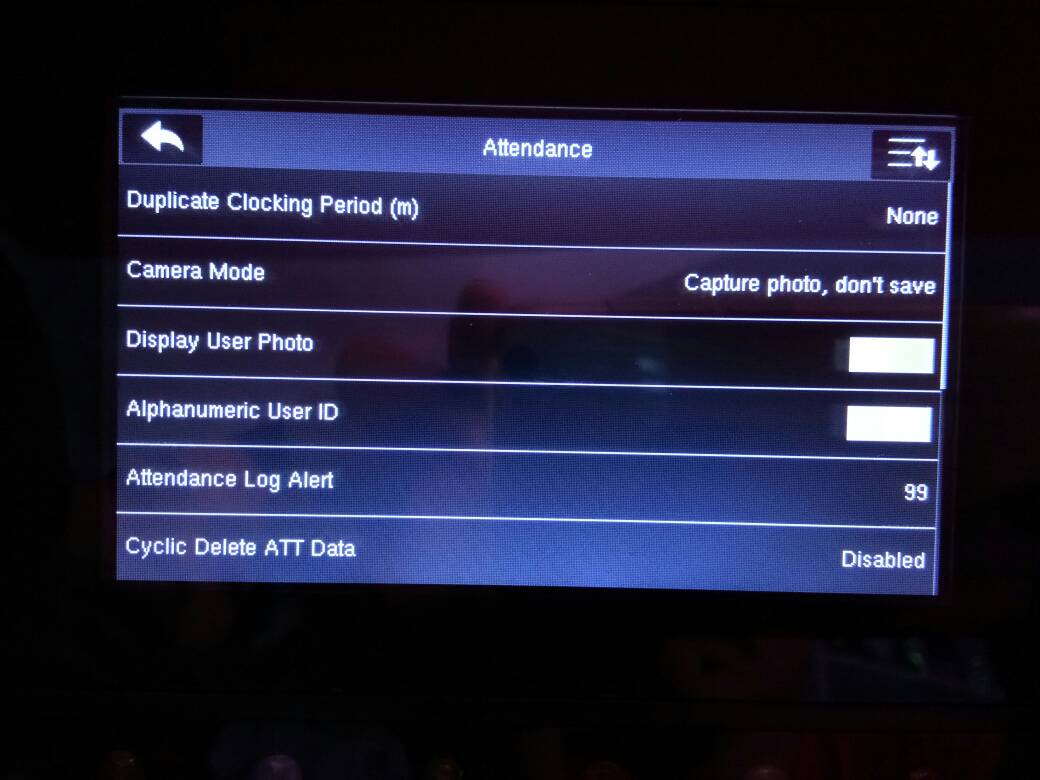
“Duplicate Punch” message will appear whenever a user verifies more than once after his/her initial verification. This is caused by the amount of time you set in the settings to avoid duplicate punches. You can set the amount of time in which the message will appear or just shut it off altogether.
To shut off the message, please follow the settings below :
Menu > System > Attendance > Duplicate Clocking Period (m) = None
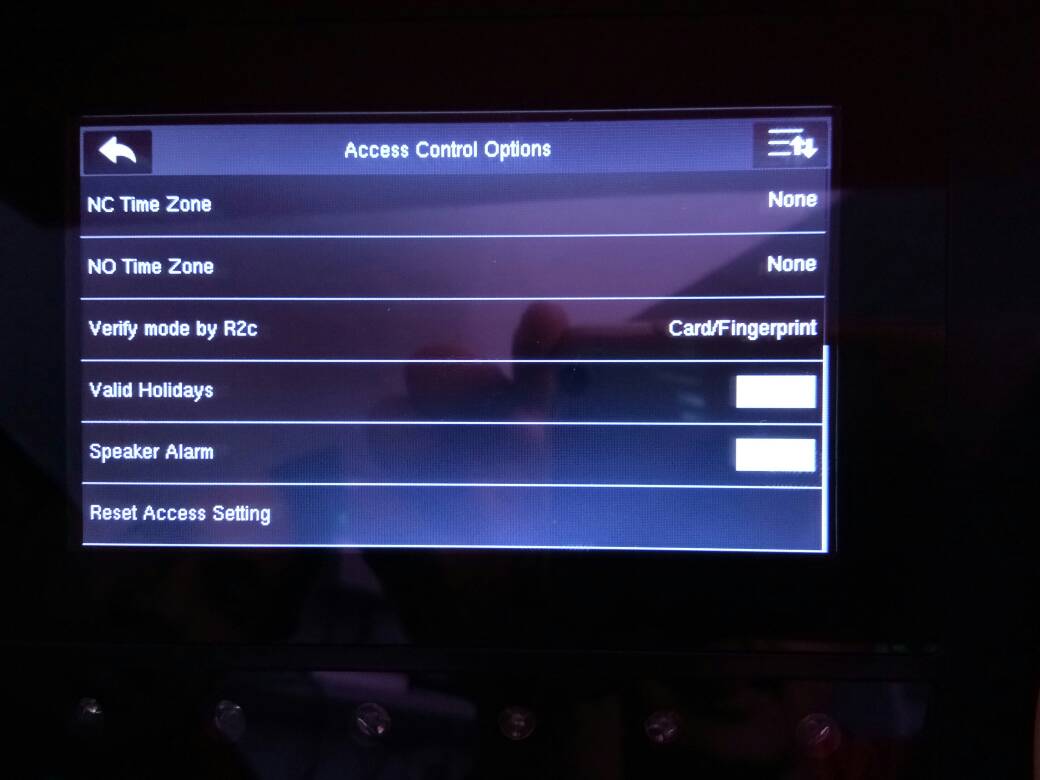
 4. Alarm Sound Activating on Speaker
This alarm is triggered whenever the tamper switch at the back of device is released. This feature is important for door access use since the device is usually attached to a wall. Therefore, the alarm will go off if someone tampers or decides to remove the device. If you happen to use the device for the purpose of time attendance only, please follow the steps below to disable the speaker alarm
Note: the alarm sign will still be showing on the device
If you want to disable the alarm sound on the speaker
Menu > Access > Access Control Option > Speaker Alarm = Disable
If the Tamper Switch is released, the alarm will be muted on the speaker, but the alarm icon will still be showing on the Desktop Screen and this will in turn trigger the External Alarm.
To turn off the alarm sound when triggered, press the Tamper Switch and restart the device. Once you have done this, there will be no “Turn Off Alarm” pop up message will appear on Face ID 2 FMM.
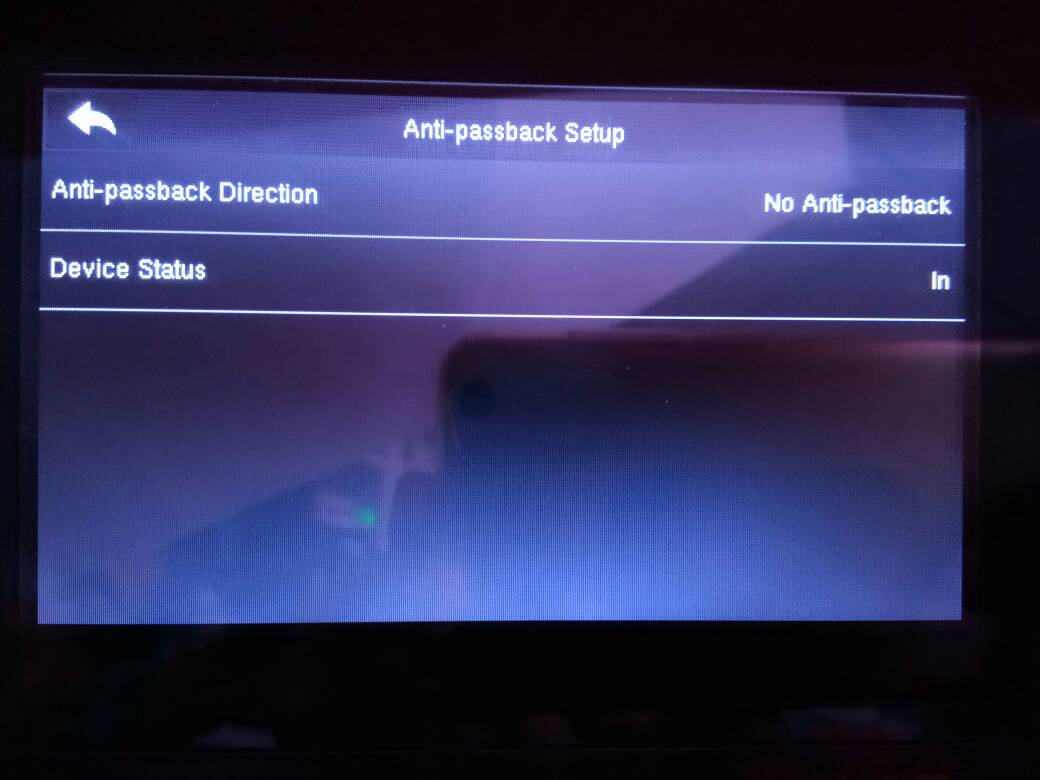
 5. Registered User is Given an “Illegal Access” Message during Verification
This situation usually happened if the anti-passback settings are enabled.
Follow this simple step to turn off or disable the settings :-
Menu > Access > Anti-passback Setup > Anti-passback Direction = No Anti-passback
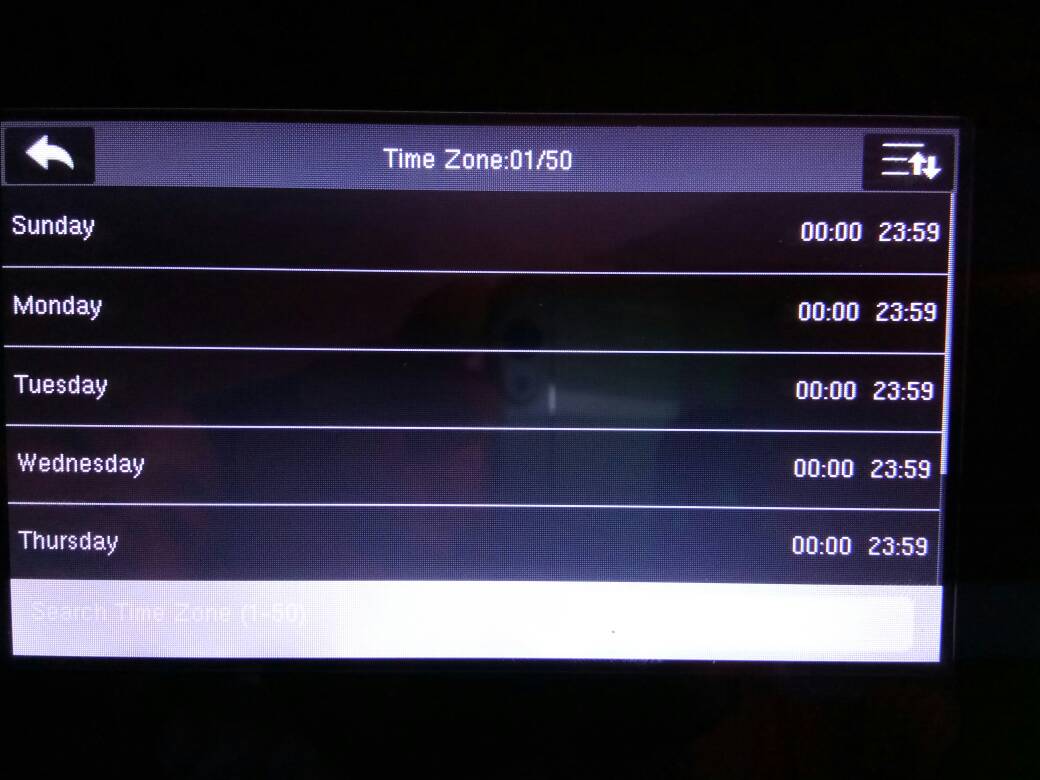
 6. Registered User is Given “Invalid Time Period” message during verification
To overcome this issue, first you need to check your device’s time zone settings and ensure that it is YOUR Time Zone. Below is how you check your Time Zone:
Menu > Access > Time Zone
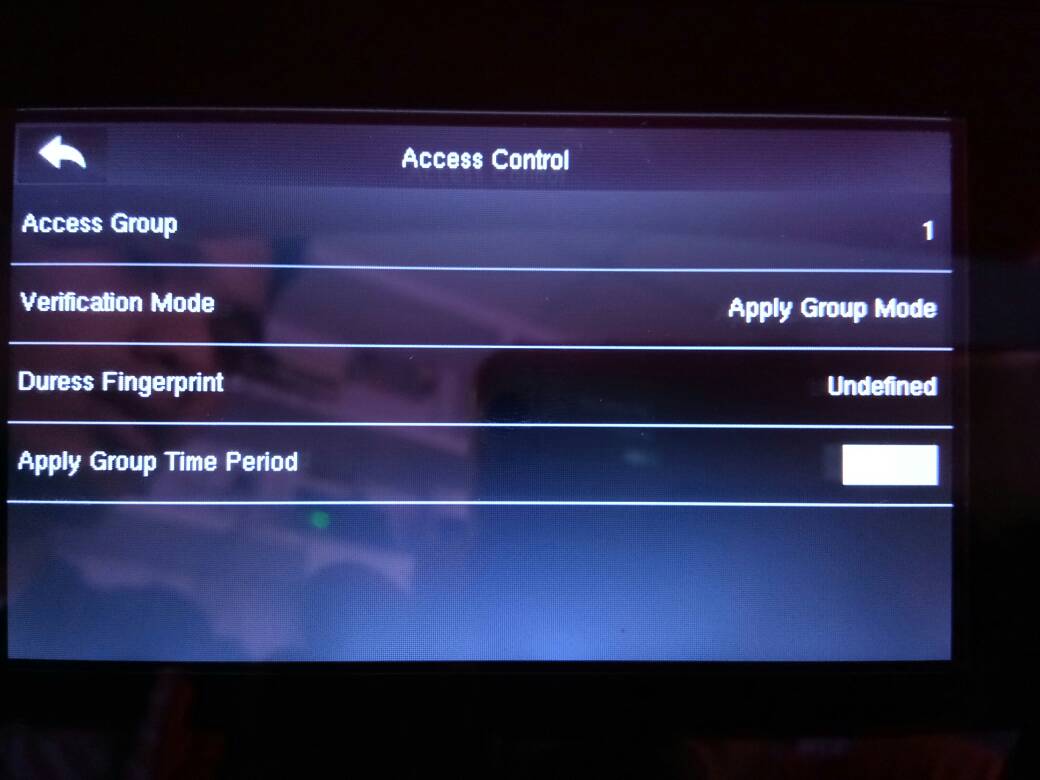
If you are already within your Time Zone, please check the user's access Group settings:
You must make sure that it is configured as below :-
Menu > User Management > All User > select User ID > Edit > Access Control Role > Access Group
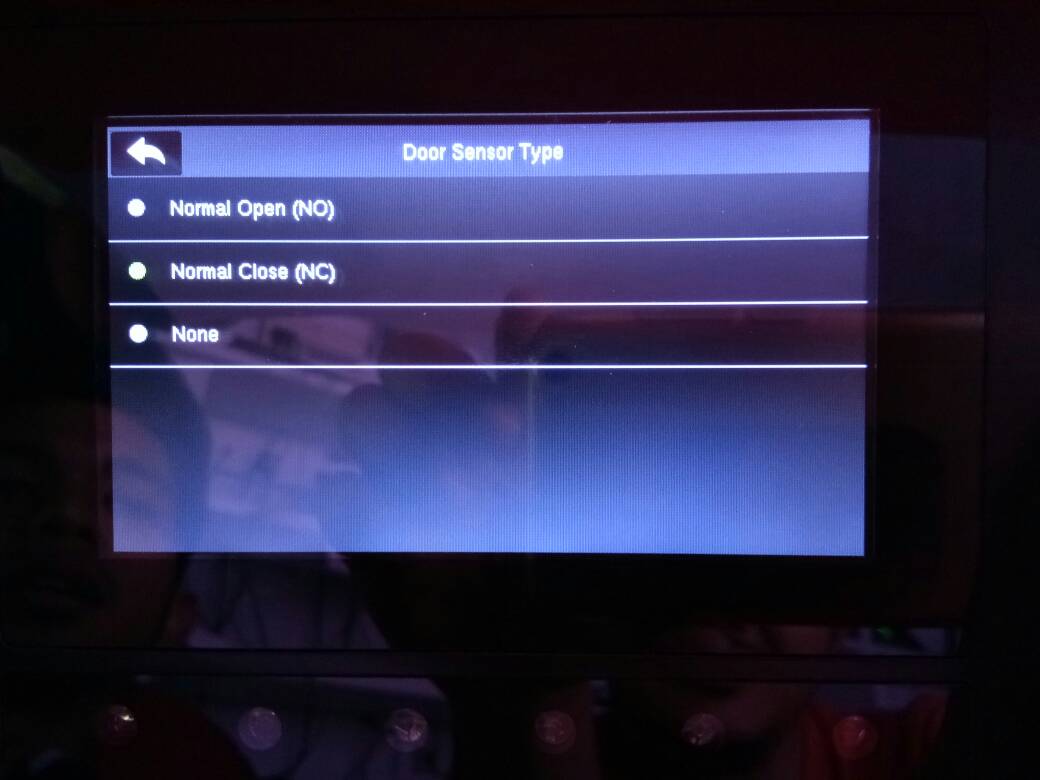
 7. Door Sensor Settings
When you are using the door access terminal, you can choose the Door Type option for the door to be used as normally open or normally close. When it is normally close, the door will be closed again after a successful access.
- Enable Door Sensor on Menu > Access > Access Control Options > Door Sensor Type = NC
 8. Using R2c on Face ID 2 / FMM 220
If you want to use R2c as slave devices for Face ID 2 with FM 220; besides having a proper wiring diagram, you need to also enable the feature below :-
- Menu > Comm. > Serial Port > Master Unit/R2c
Face ID 2 & Face ID 3 (FEM 800) from FingerTec now supports External Schedule Bell with a minimum of 5 seconds for trigger time. Read more for the latest Face ID firmware download link and steps to upgrade for the feature.
The automatic sliding door can be opened by activating control methods such as motion
detectors, push buttons, key switches and access control readers.
There
are three types of input that can be used by the automatic sliding door controller/motor
if you want to implement access control as the activating control method. Read more to see the three inputs.


6.jpg)
6.jpg)


