Configure Roster for Ramadhan

Tuesday, June 23, 2015 TimeTec 0 Comments


Introduction
TCMSV2, TCMSV3 and Ingress softwares are adaptable to the changing work schedule in tandem with the seasons’ needs. For example, during the Islamic month of Ramadhan, Muslim employees are not taking any lunch break and complete their work period an hour earlier than the usual work hour. By using the group duty roster in any one of the 3 softwares, you can configure the clocking schedule for Ramadhan easily.

Benefits
Having this flexibility in an application is advantageous to HR department to differentiate the different roster observed during the fasting month without affecting the attendance records before and after Ramadhan. After the configuration, switch the roster when Ramadhan comes and you are good to go, and don’t forget to switch it back to normal when Ramadhan ends.

Process
Step 1:
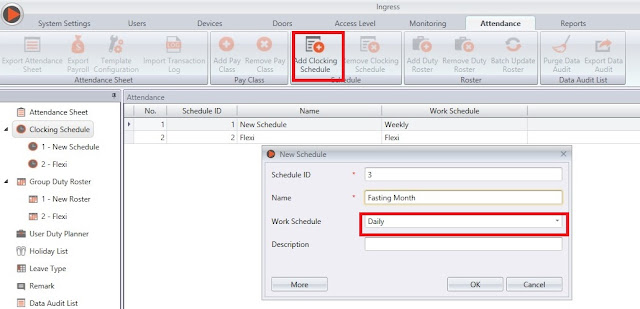
Create daily schedule for Ramadhan
  TCMS V2
  TCMS V3/Ingress
  Note: Same steps are applicable for TCMS V3 and Ingress, with slightly different interface.

Step 2:
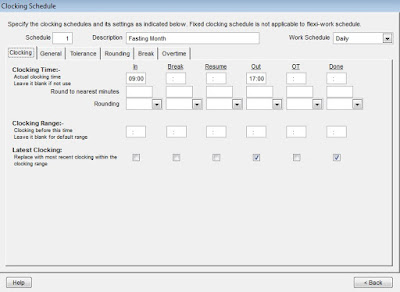
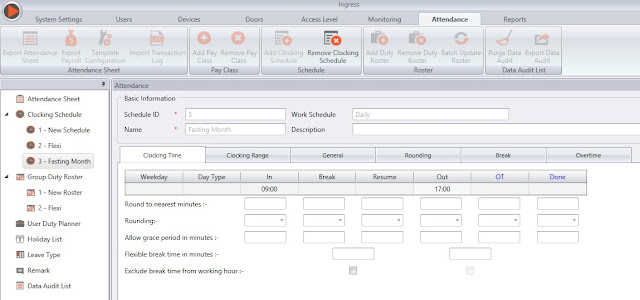
Configure the IN and OUT time for the month. Example : IN = 0900 and OUT = 1700.
  TCMS V2
TCMS V3/Ingress
Step 3:
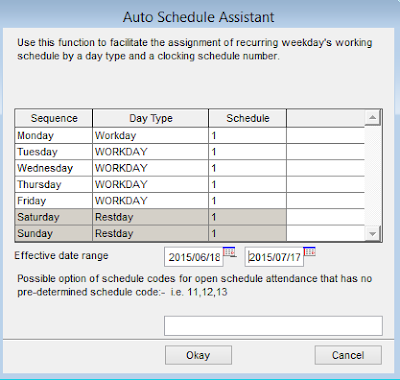
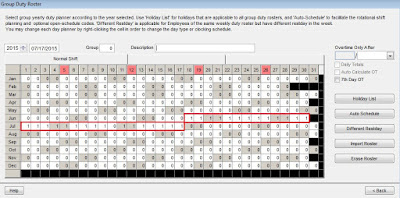
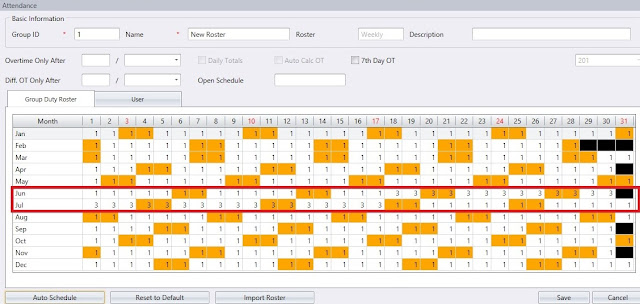
Go to the group duty roster, for example Ramadhan in 2015 is from 18 June 2015 until 17 July 2015. Click On Auto Schedule. Change the Schedule to Ramadan Schedule and choose the Effective Date from 18th June to 17th July.
  TCMS V2

  TCMS V3/Ingress

Step 4:
Once changes are done, please proceed to the Attendance Sheet > Generate for All User > from 1 January 2015 until 31 December 2015. Other dates will remain as default schedule except from 18 June 2015 until 17 July 2015, which will change to Fasting Month schedule. 
  TCMS V2
  TCMS V3/Ingress

Use this feature if your company or your country has special schedules for any seasons or festivities.

0 comments:

Have any questions or inquiries about FingerTec? Drop your input here.

Exporting Attendance Data in Ingress & TCMSv3 for Better Data Management

Friday, June 19, 2015 TimeTec 17 Comments


Introduction
FingerTec Ingress and TCMSv3 can export attendance data into several formats including .xls, .xlsx, .txt and .csv.

There are 2 types of Export in Ingress: 
  1. Export Details provides you with clocking details such as the In, Out, Break, Resume, OT and Done times of each user per day.
  2. Export Summary simplifies clocking data such as Total Workday, Total Present,  Total Short time, etc for a specific date range.

Benefits
This function lets users export their attendance data to other software or payroll system for further analysis and augmentation with just a few clicks. You can also retrieve your data from the software anytime to prevent you being stuck in one system, providing you options to shift to a better system if need be.

Process
You can export the attendance data by going to the Attendance module in Ingress. To export the data, you need to follow these instructions:
Click the Export button > configure the template for the export > Click on the Template Configuration button.

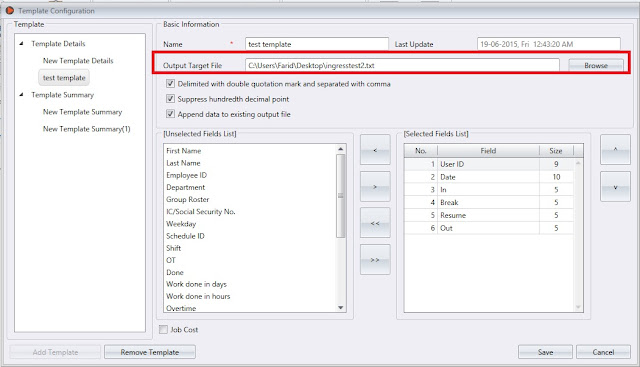
Right click at Template Details, and click Add Template Details. Rename the template according to your preferences. Click the Edit button, and specify all the related fields.

The most important part here is for you to specify the Output Target file. You can choose the format of file to be saved, whether in .txt, .xls, .xlsx, or .csv format.
If you choose .txt format, the 3 parameters below the Output Target File will be enabled, while other formats do not support these features. Please select the data on the left-side table, and use the left or right arrow to select the fields you want to export. The up and down arrow on the right side is for you to sort the columns of your output file.
If you are using Flexi schedule with job-costing function, you need to check the “Job Cost” check-box at the bottom of the window, so that the output file will show the job-costing data correctly.
After you are done with the template configuration, click Save and Close. You will be reverted back to the Export page. Here, you need to first select the Template, and make sure the Output Target File name appears on screen. Once done, please select the users which you want to export the data to, and select the date range. Click on the Export button, and your file will be ready.

17 comments:

Have any questions or inquiries about FingerTec? Drop your input here.

Connect FingerTec Terminal to TimeTec Easily Using Webserver IP and Port Number

Friday, June 19, 2015 TimeTec 2 Comments

Introduction
TimeTec is FingerTec's cloud service, providing effective staff scheduling and  workforce management online. To connect FingerTec terminals to TimeTec Cloud, you need to key in the Webserver IP and Port Number.  


Benefits
With the guide below, you will be able to connect your terminals to TimeTec in no time at all without having to configure difficult settings and wirings.

Process
Below are the settings for TimeTec;


Webserver IP: 50.18.154.243
Port Number:  80 / 90


Webserver IP in all FingerTec devices is the same but for the port number it is different for certain models as explained below.

Port 80 - For all FEM Coreboard version.
Port 90 - For all FMM Coreboard version (New TA100C and AC100C), All Face ID series (Face ID2, Face ID3 and Face ID4) and all devices using which are using GPRS to connect to TimeTec Cloud.

To check your device platform whether it is FEM or FMM models (AC100C and TA100C), use the device Info tools available here.

You can also refer to this article regarding the functionality of Device Info tools: /2014/01/how-to-use-fingertec-device-info-tool.html

To check your device whether it is already been successfully connected to TimeTec, 2 items below must shown in the Setup terminal page.
-          Device model
-          Last connection time in seconds.

2 comments:

Have any questions or inquiries about FingerTec? Drop your input here.

Get Installation Wiring Diagram and Settings for R3 and R2c Pairing

Friday, June 19, 2015 TimeTec 1 Comments

Introduction
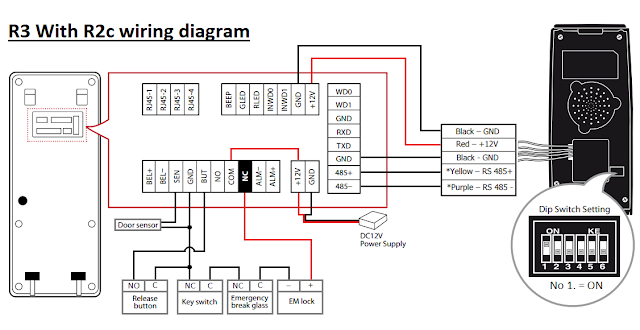
With the new release of our latest products, some terminal installations are different from our previous guides and diagrams. Below is the full installation wiring diagram and settings to connect R3 with R2c.

Benefits
By pairing R3 with R2c, you can have a totally secured biometrics with having to invest in two master terminals. All verifications and data storage are managed by the master terminal. You can also control the employee movements by implementing the Anti-PassBack settings when you pair the R3 with R2c.

Process
Settings at R3:

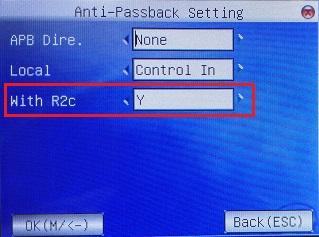
Enable the R2c setting at the R3: Press Menu > User Management > Access > Anti-Passback Setting > With R2c > Set to Y


If the R2c does not respond during installation:

Check on the below R3 settings:

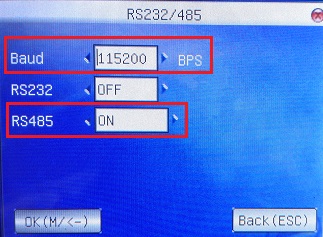
1.     Make sure the settings in R3 are set as below.
Baud : 115200 BPS
            RS232 : OFF
            RS485: ON

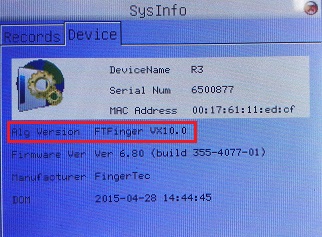
      2.      Make sure the R3 Fingerprint algorithm is BioBridge VX 10.0: Press Menu > System Info
             > Device > Alg Version FTFinger VX10.0


**If you found that the Alg Version is FTFinger VX9.0, you need to change it to  
    VX10.0: Press Menu > System > System > Alg Version > FTFinger VX10.0


 Check on the R2c settings:

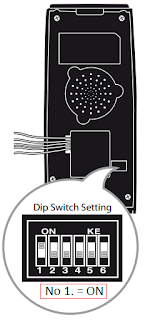
1.       Check the Dip Switch settings below:


To refer to R3 and R2c manuals, click here for R3 and click this link here for R2c.  

1 comments:

Have any questions or inquiries about FingerTec? Drop your input here.

Ingress Report Scheduler Delivers Reports Automatically to Your Email

Thursday, June 18, 2015 TimeTec 20 Comments


Introduction
Report Report Scheduler is an automated interface that gives you the option to email the reports on periodic basis. This feature is available in Ingress Software and you can set the file to be sent in a variety of formats using Simple Mail Transfer Protocol (SMTP).

Benefits
Report Scheduler helps streamline the delivery of reports and optimizes the running of many reports on your network. By using the Report Scheduler in Ingress, you can create a weekly schedule, whereby the system can email you the collected data even though your Ingress server is turned off.
Process
To set the Report Scheduler in your Ingress software, please follow procedure below:  


1. Log in to Ingress Software and go to System Settings tab > Email > Configure the SMTP Server, SMTP Port, SMTP Email and SMTP Password.

*We strongly recommend you to use your own company mail server as SMTP domain rather than using Gmail service provider to avoid server blocking the software from sending the email on behalf of the account owner.


2. Add the recipient email and click Ok and save the settings.


3.     Next, configure the Report Scheduler format by selecting the Report tab > Report Scheduler > Add Report.

4.    Here you can select the type and date of report. You can also set the Report Scheduler run time, recipient email address, subject of email and message.

5.      Click Save once you are done with your settings.


6.    List of reports will appear in Report Scheduler table. Select Run to test run your Report Scheduler features in your Ingress Software.


 7.    System will automatically send the report via email based on the scheduling timing that you have set.

Troubleshooting Tips
Report Scheduler is not working as per settings? Follow the steps below to troubleshoot.

a) Main configuration: It’s important to ensure that all services; database, attendance service, etc, are running smoothly. If the Report Schedule is not working, it’s recommended that you restart all the services again to trigger the scheduler process properly.

Ingress MySQL:
To restart MySQL, Ingress service and Attendance service: Start > Control Panel > Administrative Tools > Services > restart MySQL, Ingress Services and Attendance Service

Ingress MDB:
To restart Ingress service and Attendance service: Start > Control Panel > Administrative Tools > Services > restart Ingress Services and Attendance Service

b) Once restarted, click Run in the Report Scheduler settings to trigger the scheduling process again.


Related Post:

20 comments:

Have any questions or inquiries about FingerTec? Drop your input here.