Introduction
There are cases in which clients have not downloaded new transaction logs from their device yet, but the system shows a ‘Total 0 new transaction log(s) downloaded’ message as shown below after they completed the download process.
Many possibilities can cause this, such as:
· Intermittent connection of the device
· The software (TCMSv3 / Ingress) database
· The software (TCMSv3 / Ingress) version
Process
To troubleshoot the issue, follow the steps below:
1) Go to Attendance module > Data Audit List > Select the date range > Search to confirm that the latest transaction logs have not been downloaded to the software yet.
Once confirmed that the latest transaction logs are available in the device but not in the software, proceed with Step 3.
3)
i) For TCMSv3 / Ingress MDB
a) Close the software
b) Repair its database by following the tips from the link below
/2016/10/resolve-failed-to-initialize-database.html
c) Run the software > Delete the device from the software and re-add it. Once the device is successfully added, try to download the transaction logs from the device again..jpg)
ii) For Ingress MySQL a) Close Ingress application and shut down Ingress Server
b) Go to Control Panel > Administrative Tools > Services > Restart MySQL, Ingress service and Attendance Service
c) Go to Start > All Program > FingerTec Ingress > Ingress DB Installer > Key in MySQL password > Test Connection > Update Connection > Upgrade Database
d) Run Ingress > Delete the device from the software and re-add it. Once the device is successfully added, try to download the transaction logs from the device again..jpg)
4) If the issue persists, reinstall the software by following the steps below:
i) For TCMSv3 / Ingress MDB
a) Backup your database in System Settings > Database Configuration > Database
Note: If some of the screenshots or steps viewed here are different from the ones in the current system, this is due to our continuous effort to improve our system from time to time. Please notify us at [email protected], we will update it as soon as possible.
Introduction
For the latest version of TCMS v3 software (version 3.1.02) and Ingress Software (version 4.1.0.4), you can now replace the default software logo in Report with your own company logo. This feature enables you to customize your report with your official company logo.
.jpg)
Process
1) Go to System Setting > System Parameter Settings > Reports > Click on Edit
Note: Recommended logo size: 400 x 125 pixels, less than 100 KB
2) Click on the image box > Select the image that you want to upload > Click on Save
3) Next, you can generate a report to check the logo. For example, go to the Reports tab > Attendance Listing > Electronic Time Card > Set the Date Range > Select User > Select Option > Click on Generate. You will be able to see the report logo has been changed to your own company logo.
Note: If some of the screenshots or steps viewed here are different from the ones in the current system, this is due to our continuous effort to improve our system from time to time. Please notify us at [email protected], we will update it as soon as possible.
Introduction
In some cases, even though you have correctly configured a Clocking Schedule and that transaction log was already captured in the Data Audit List, there are still certain factors and issues that might lead to the failure of generating and getting the correct or actual record in the Attendance Sheet. This article will be guiding you on the steps to troubleshoot this problem by checking on the possible causes of this issue.
Benefit
By reading and following the instructions according to these tips, we hope to successfully address your Attendance record issue before you need to even reach out to our support team for further assistance.
Problem and step to solve
1. Attendance sheet remains blank after Generate
1. Check the validation of the Issuance and Expiry date for the mentioned user at User tab > select User > Details. Please make sure the Issuance date is earlier than the date of the Attendance record that you want to generate.
** If the Attendance Sheet is still blank after this step, you can attempt with the following step
2. Check the availability of the transaction log under the Data Audit List by going to Attendance tab > select Data Audit List > search the log by User ID, Date Range.
3. If there is no transaction log captured inside the Data Audit List, please re-download the log from the terminal by choosing the Download button (if you use TCP/IP connection) or go to the Attendance tab > select Import Transaction Log (if you use USB flash disk).
** If the Attendance Sheet is still blank, you can attempt with the next step
4. Check the Day Type setting under System Setting > System Parameter Setting > select the Attendance tab. Please make sure the Day Type Name, Range, and Wages setting are not left in blank.
** If the Attendance Sheet is still blank. you can try to do the next step
5. Check the Clocking Schedule setting. Please make sure you have configured your clocking schedule correctly. If you already configure the Clocking Time correctly, the Attendance record with employee name and date should appear in the Attendance Sheet after you Generate the record.
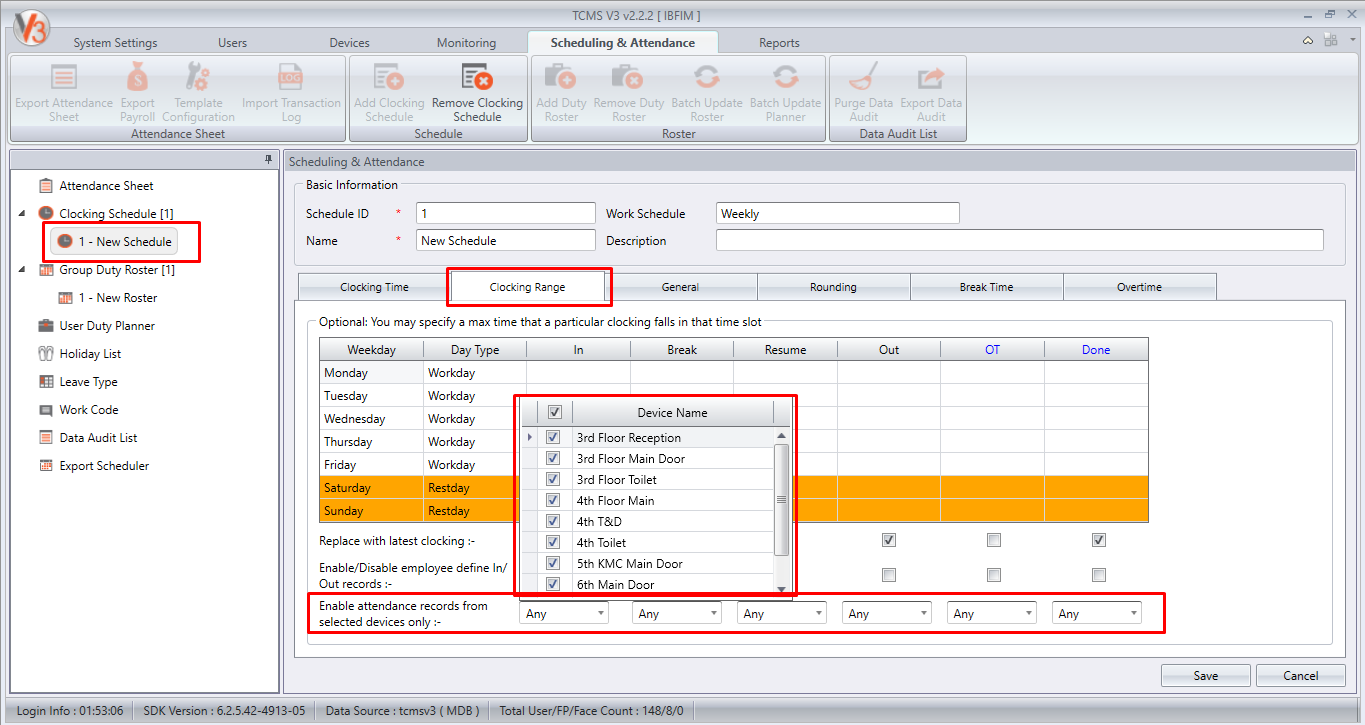
6. However, if the Attendance Sheet is still blank (no name and date appear), please check under Clocking Schedule > Clocking Range > check the option Enable Attendance Record from the selected device. Please make sure you have selected all devices that you have already connected and activated on your software.
** If the Attendance Sheet is still blank, you attempt with the subsequent step.
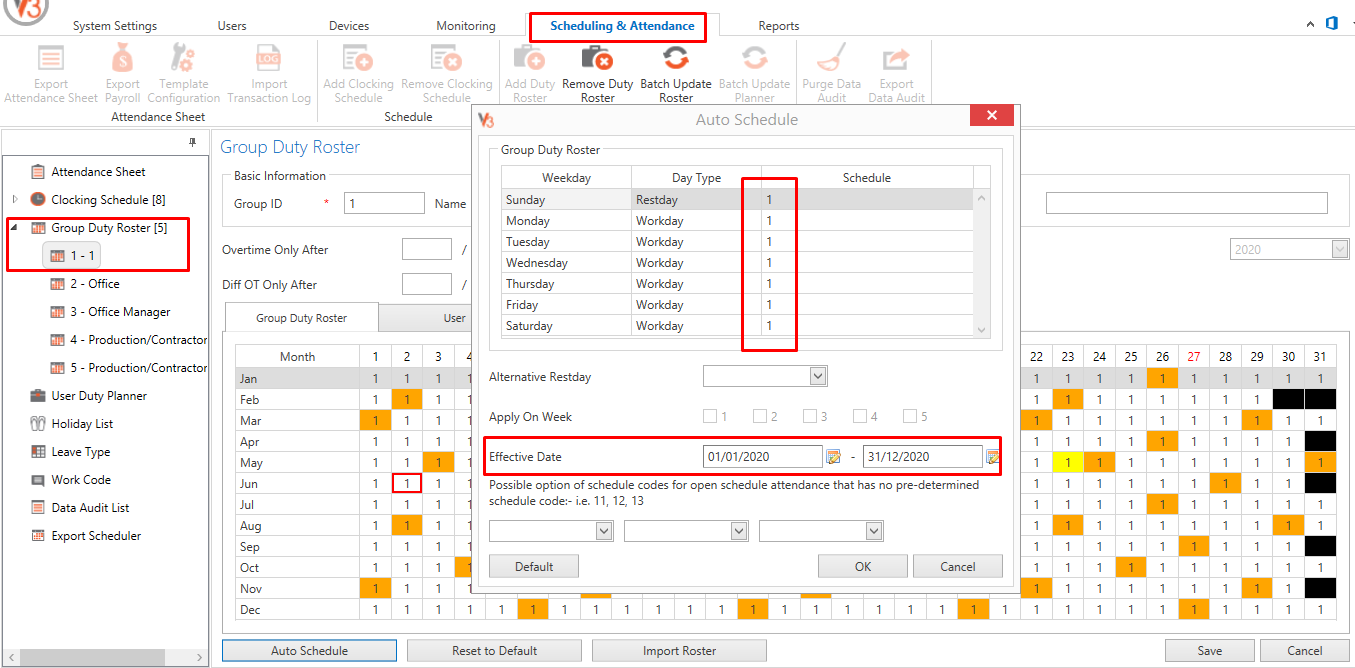
7. Finally, here is the last option and setting which you can attempt with. Please make sure the Group Duty Roster that you have used is not blank. Otherwise, you can try to reschedule your roster by selecting Group Duty Roster > select Roster > Edit > Auto Schedule > select dedicated schedule and Date range > Ok.
If you have already followed all of the above steps and still unable to resolve this matter, we recommend that you contact your local reseller or email us at
[email protected] to get further assistance.
Introduction
Due to the coronavirus COVID-19 outbreak in our country and the world, the subsequent course of action - Movement Control Order (MCO) has been implemented in almost every country. Relating closely to this pandemic issue, we have updated a new feature known as Health Screening in our Ingress and TCMSv3 software. This allows you to record and monitor your employees' body temperature data and keep track of their health statuses.
In this article, we will guide you on activating and using this feature. Plus, to generate a comprehensive health report for the company or for authorities reference. This record of staff body temperature complies with Regulation 11 of the Prevention and Control of Infectious Diseases (No.3) Regulations 2020 in Malaysia. Even though this is not a requirement from the government in other countries, it is a good practise for a company to prevent the spread of coronavirus.
Enable and Activate the Features
1. First of all, to enable this feature you will need to update your Ingress or TCMSv3 software to the latest version ‘Ingress v4.0.0.17’ and ‘TCMSv3 3.0.1.6’. You can download the latest installer file from our FingerTec website using the following link
www.fingertec.com/software
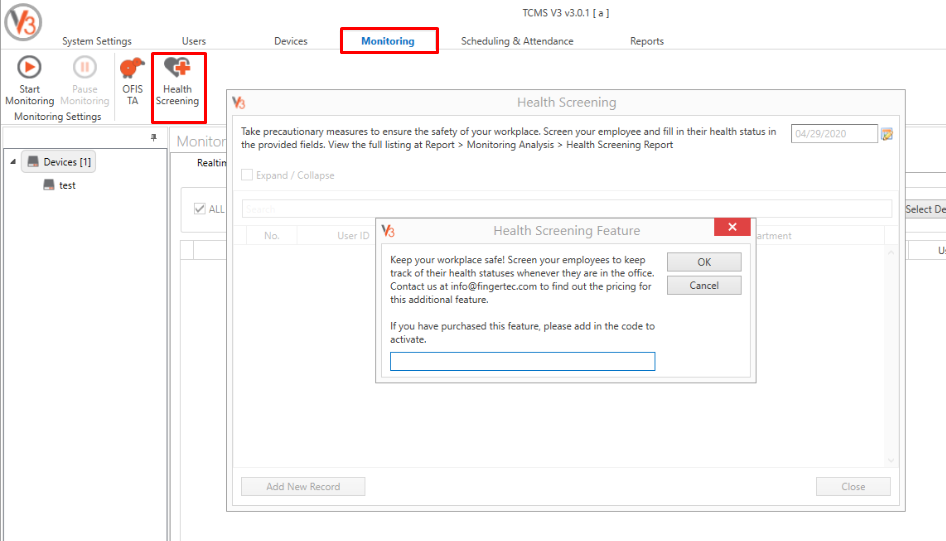
2. Once you have updated the software, you can find this new feature under the Monitoring tab > Health Screening. To activate this new feature you will need to get the Licence key by contacting our sales or your local reseller.
How to use the Health Screening Features
1. First, you will need to assign one staff member to perform a body temperature screening before the employee enters the premises.
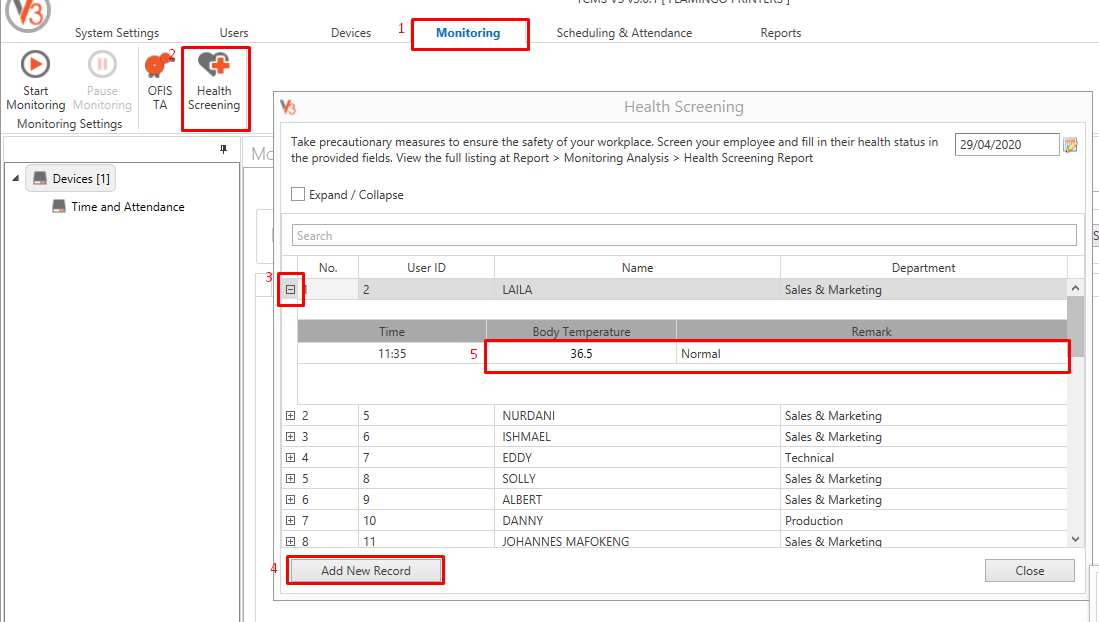
2. Then, she/he can record all the info in the Ingress or TCMSv3 software by going to Monitoring tab > select Health Screening > Add New Record > select and expand User > Key In the Body Temperature and Remark.
Reporting
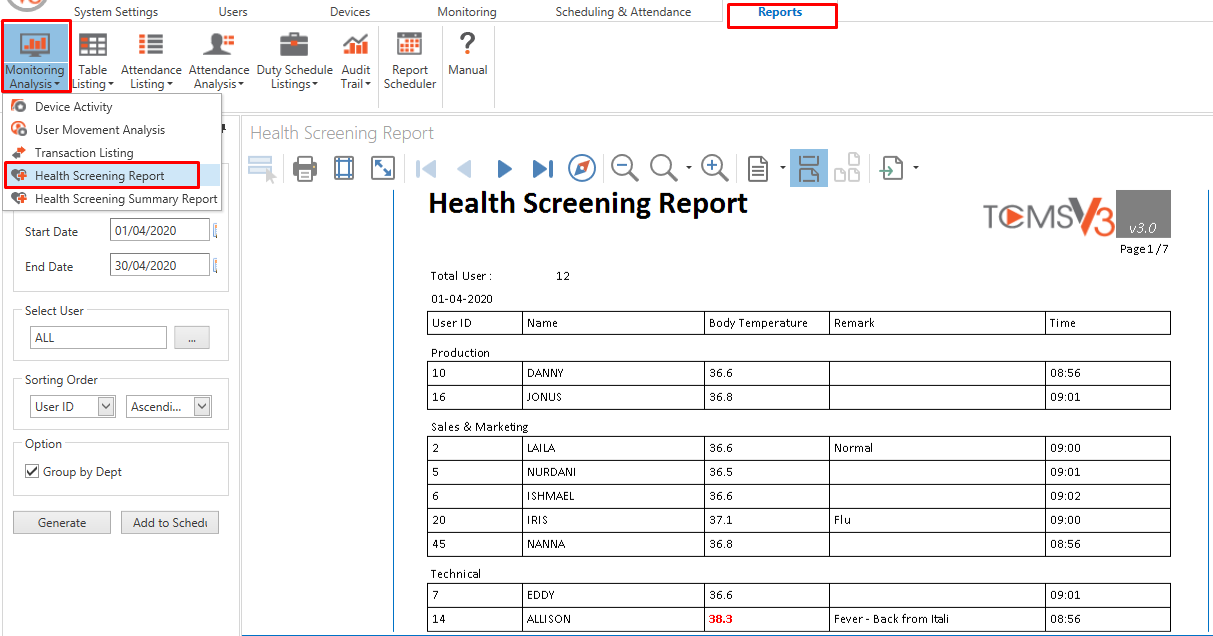
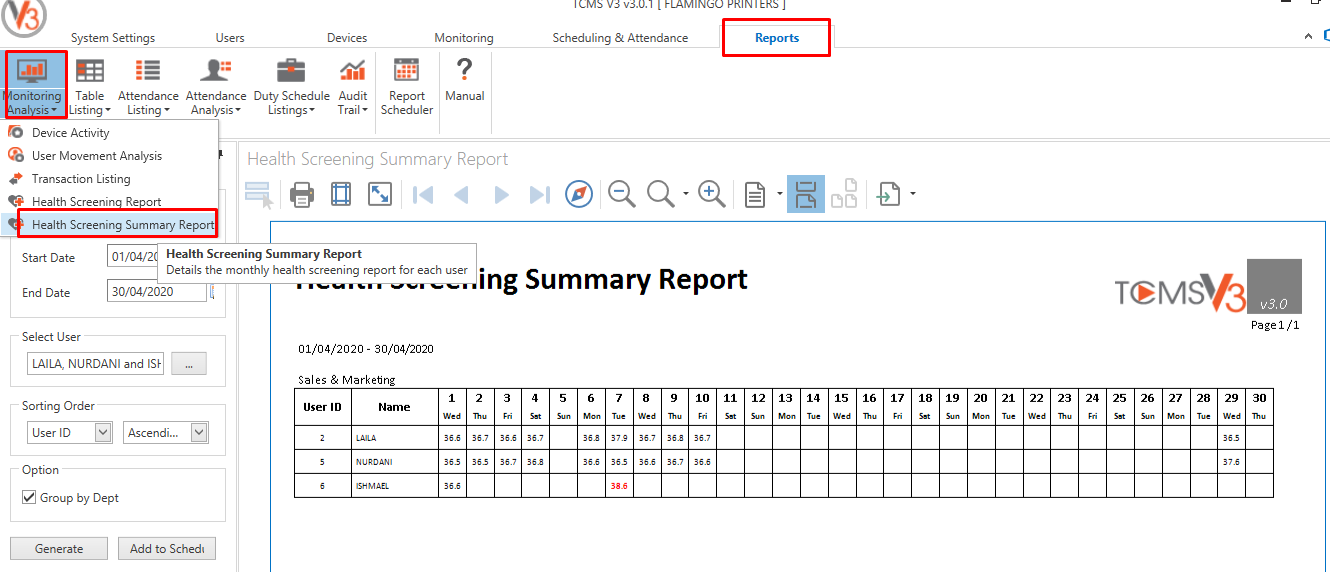
There are two types of reports that you can generate from the software. The first type of reports is the Health Screening Report whereas the second type of reports is the Health Screening Summary Report. You can find both reports under the Report tab > Monitoring Analysis.
1. Health Screening Report
2. Health Screening Summary Report
Note: If some of the screenshots or steps viewed here are different from the ones in the current system, this is due to our continuous effort to improve our system from time to time. Please notify us at
[email protected], we will update it as soon as possible.
Introduction
When dealing with many devices such as Time Attendance and Door Access, TCMS V3/ Ingress software will record every clocking activity of the staff involved. But certain companies want the system to capture the clocking time for attendance from certain devices only.
In order to accomplish that, TCMS V3/ Ingress software provides an option for users to take no account of the clocking activities from other devices that are not set up as the time attendance devices. When you set this option, the attendance sheet will only capture the clocking activities from the selected devices and store in the attendance record.
Process
Therefore, we have prepared a guide for users to enable the attendance record from the selected device. Please follow the quick steps below:
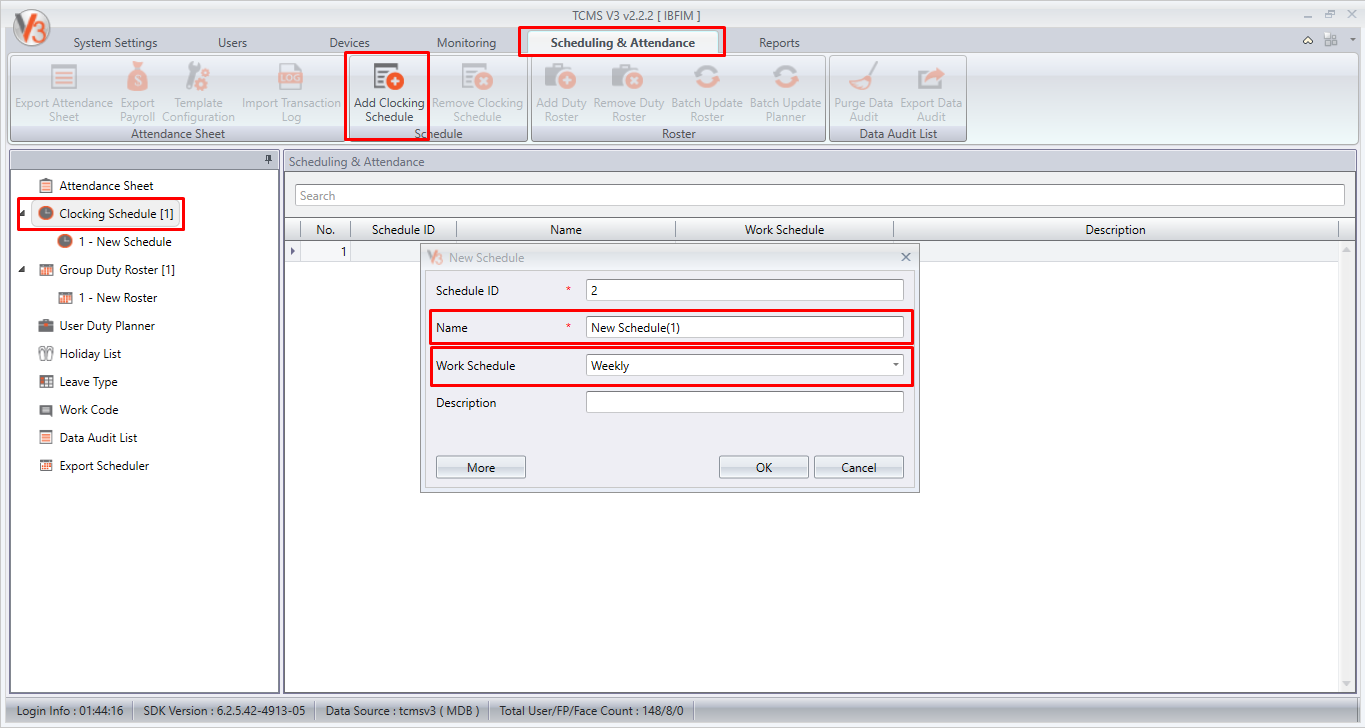
1) Go to Scheduling & Attendance > Clocking Schedule > Add Clocking Schedule > Key in the Schedule ID > Name > Select Work Schedule (Weekly/Flexi/Daily).
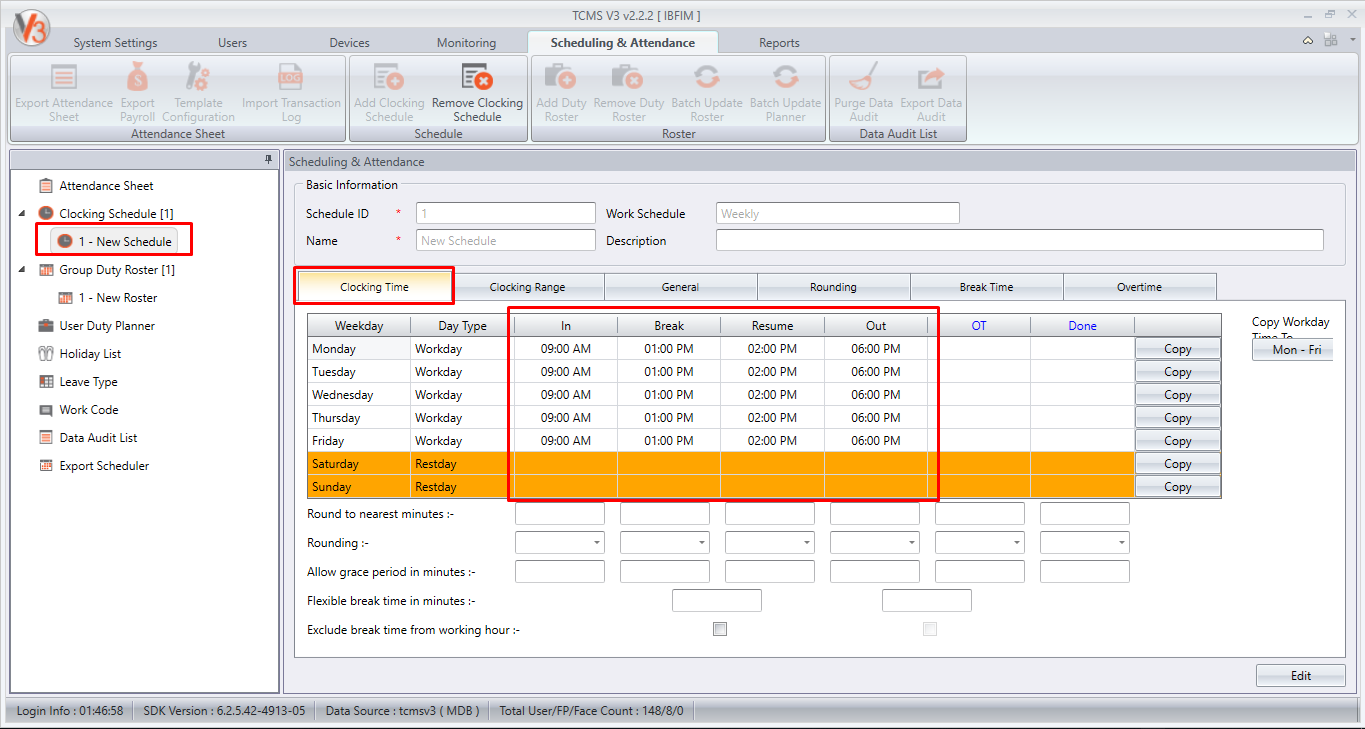
2) Set the clocking time for the schedule (In, Break, Resume, Out, OT and Done).
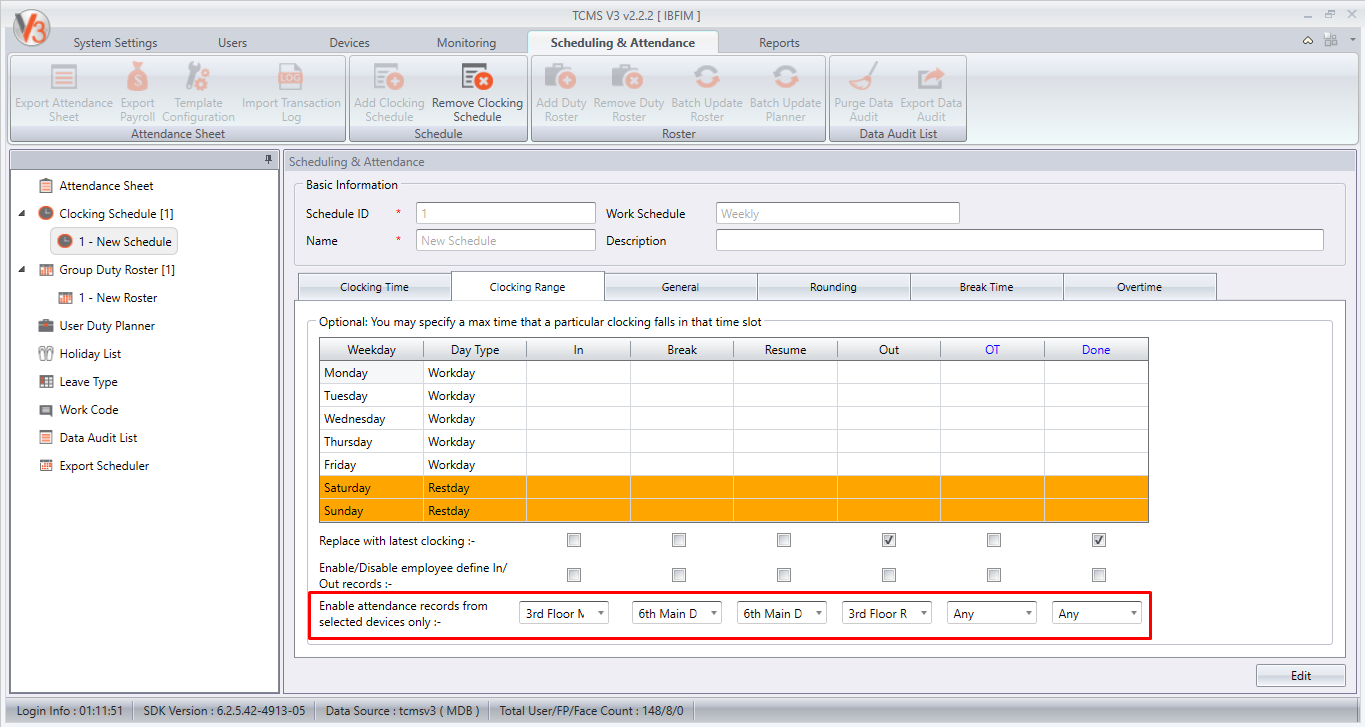
3) Go to Clocking Range > Enable the attendance record from selected devices only > Tick the device name that you want the attendance record to be captured for each column. Please make sure you already add and activate the device in order for the device to appear in the list.
Note: If some of the screenshots or steps viewed here are different from the ones in the current system, this is due to our continuous effort to improve our system from time to time. Please notify us at
[email protected], we will update it as soon as possible.
Introduction
There are many companies that practice double break time and some of their administrators are not familiar on how to configure this schedule in Ingress or TCMSv3. So in this tips, we will provide you the steps that are required to configure it.
Note: For this configuration, the system will begin to calculate overtime immediately after the OUT time. You won’t be able to set the OT to start at a specific time.
Process
1) In the weekly clocking schedule, go to General tab > Edit > Set the “Work time recorded into OT and Done column considered as” option as Work Time > Save.
2) Create the clocking schedule in the Clocking Time tab. If you want to exclude the break time from working hours, tick the “Exclude break time from working hour” option.
Example:
IN - 8:00 AM
1st BREAK - 12:00 PM to 12:45 PM
2nd BREAK - 3:30 PM to 3:45 PM
OUT - 5:30 PM
3) Generate the Attendance Sheet to apply the setting.
Note: If some of the screenshots or steps viewed here are different from the ones in the current system, this is due to our continuous effort to improve our system from time to time. Please notify us at
[email protected], we will update it as soon as possible.
Introduction
Running multiple systems usually costs too much to the organization. However if you can have the opportunity to run two Time Attendance management system with only 1 cost, you should not miss this.
Depending on the individual purpose, some prefer to use the common way, which is to manage the door access control via Windows PC using Ingress software, and some users would love to experience new technology, accessing time attendance management from cloud based software, TimeTec TA.
Having said that, in this article, we will share on how to utilize TimeTec TA application along with the software Ingress/TCMSv3 concurrently.
Steps
A: Registration TimeTec TA account and installing Ingress/TCMSv3 software
TimeTec TA is the cloud application where user can access it via web browser or mobile apps to capture time attendance and retrieve real-time information from anywhere across the world as long as there is an internet connection. To use it, you must first register your own account and subscribe with minimum cost from below address :
https://www.timetecta.com
Meanwhile, Ingress or TCMSv3 software is a Windows based software that is designed to centralize, store and manage all data extracted from FingerTec terminals. It is free and you can download the Installer file from our Fingertec website below.
https://www.fingertec.com/software/index.html
So once you register TimeTec TA account and installing Ingress/TCMSv3 software, you can follow below process and rule on how to manage these two system on your environment.
Process and Configuration
1.
Add and activate the device - First of all please add your FingerTec device on both TimeTec TA application and Ingress/TCMSv3 software. You can refer below guide on how to add your device on both systems.
TimeTec TA
/2015/06/connect-fingertec-terminal-to-timetec.html
Ingress/TCMSv3: Refer page 14-16
../../static/file/SUM-TCMSV3-E.pdf
2.
Register User - Once you add the device, you can start to register the user information such as the User ID, Name and verification type (fingerprint, card or password) from the FingerTec terminal. Once complete, you can download all the user information into TimeTec TA and Ingress/TCMSv3 software.
Note: You can also register the User data from TimeTec TA and Ingress/TCMSv3 software, then upload back into the FingerTec terminal.
3.
Configure Schedule and Roster – Inside both systems you can start to configure and setup the Clocking Schedule and Group Duty roster for each staff based on your requirement.
4.
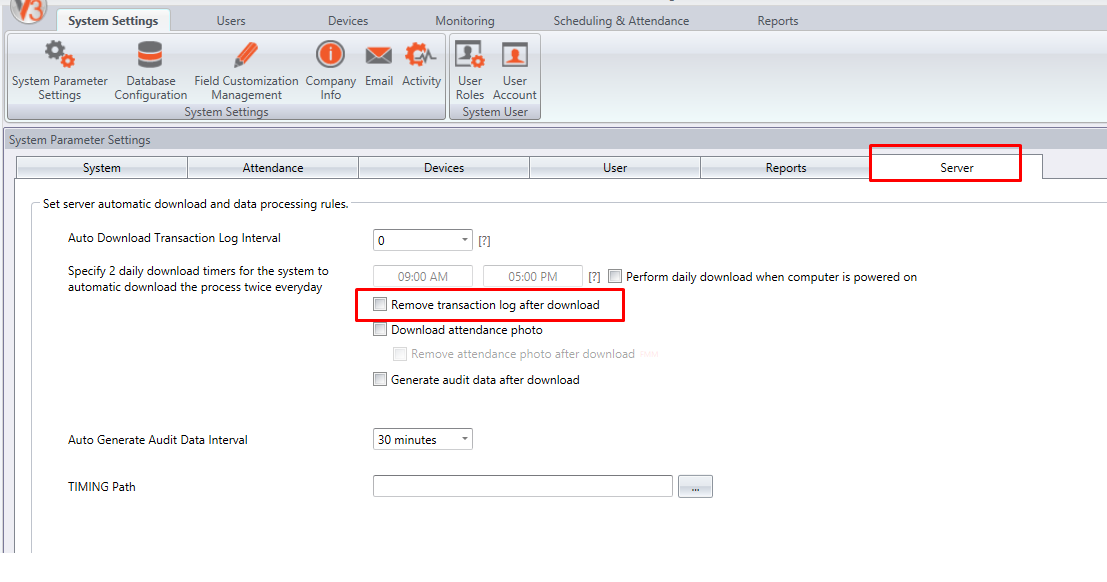
Download Transaction Log – This is an important step that you need to pay attention. By right, TimeTec TA application will automatically download the transaction log from the terminal in real time basis while for Ingress/TCMSv3 software, you can download the log manually or automatically by configuring the auto download setting (
System Setting > System Parameter Setting > Server).
So to ensure you can get all the original log from the terminal on both system, please make sure you do not remove or delete the transaction log inside the terminal unless you have confirmed all the log have been downloaded successfully on both systems.
For TimeTec TA application,
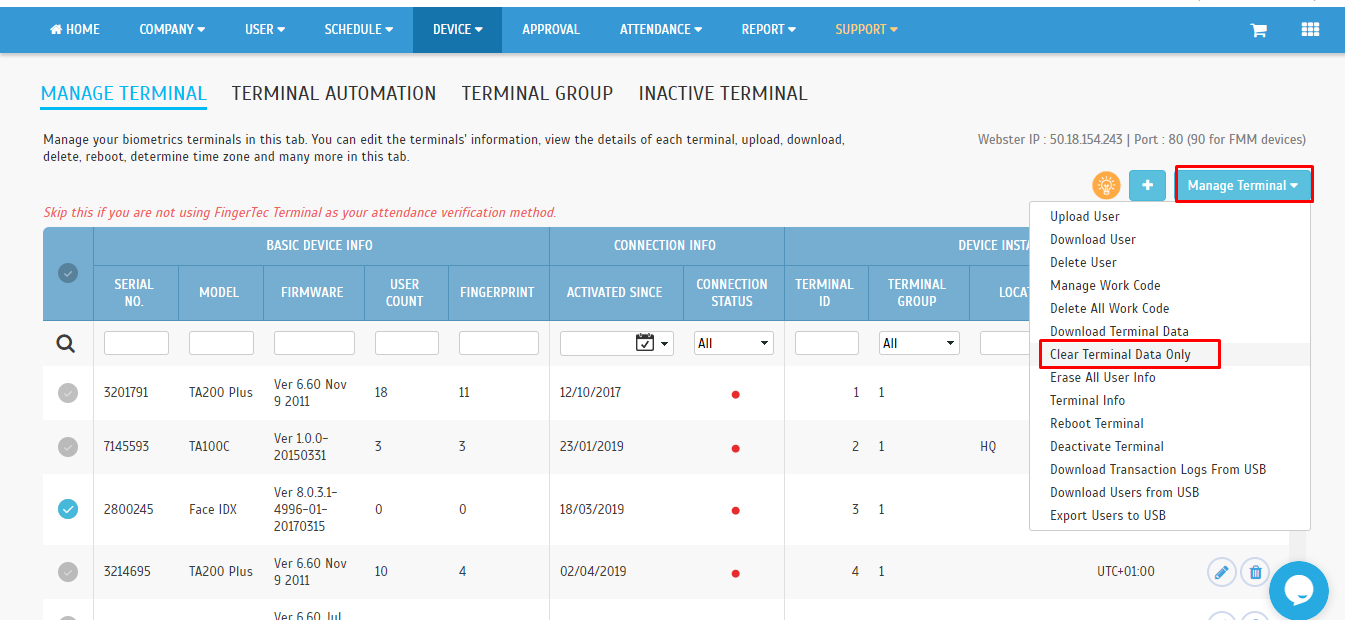
DO NOT select option ‘Clear terminal data only’ under Device > Manage Terminal. Refer below picture.
For Ingress/TCMSv3 software
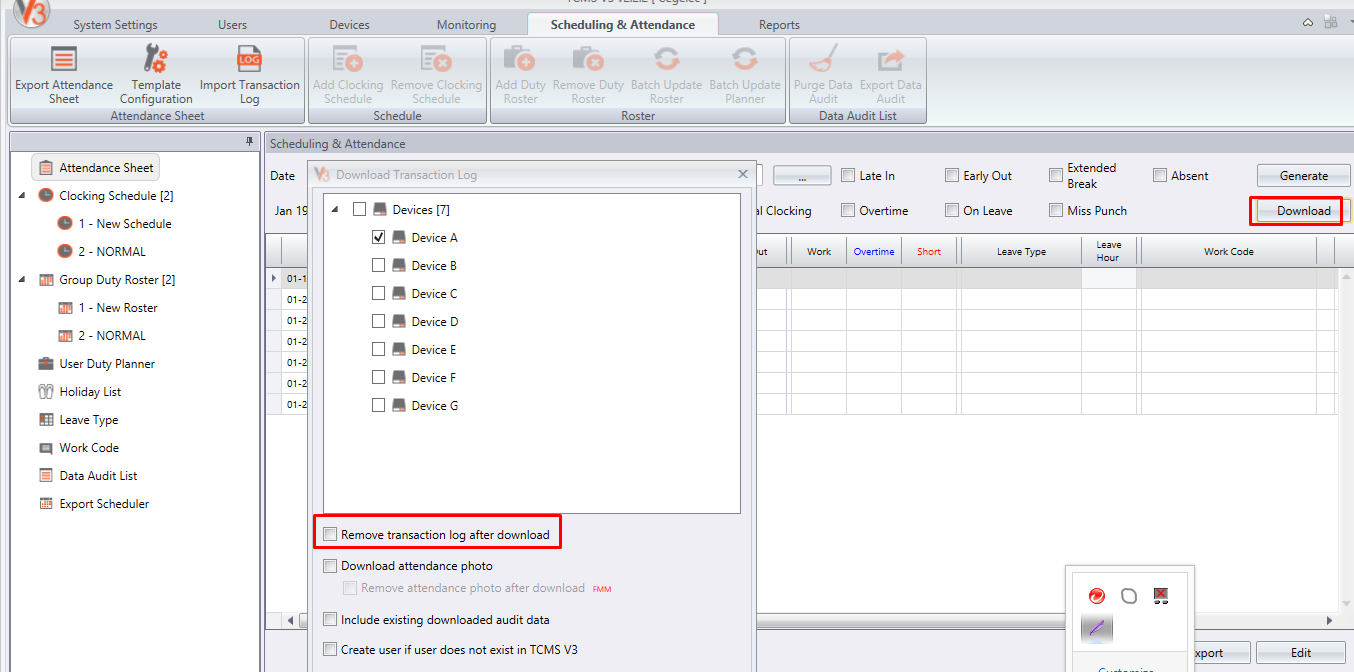
DO NOT select option ‘Remove transaction log after download’ when you download the log manually. Refer below picture
If you configure the Ingress/TCMSv3 software with auto download, please
DO NOT select option ‘Remove transaction log after download’. Refer below picture.
5. Finally, if you already download all data and transaction log on both system successfully, you can manage your Time Attendance record and generate the Report needed accordingly.
Note: If some of the screenshots or steps viewed here are different from the ones in the current system, this is due to our continuous effort to improve our system from time to time. Please notify us at
[email protected], we will update it as soon as possible.
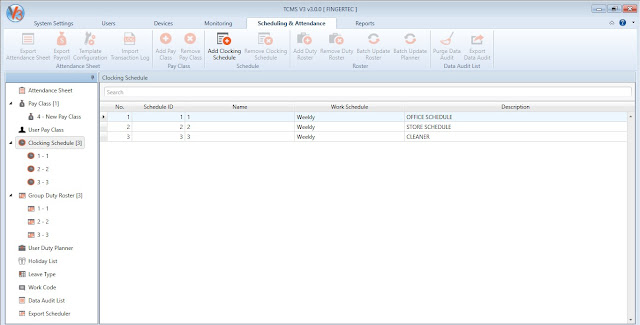
For this month, FingerTec has released TCMSv3 software v3.0.0.11 which adds 22 new features and
6 bugs fix to enhance the user experience when using TCMSv3 Software.
New Release
1. Upgraded DevExpress v19.2
2. Added new themes and remove obsolete themes
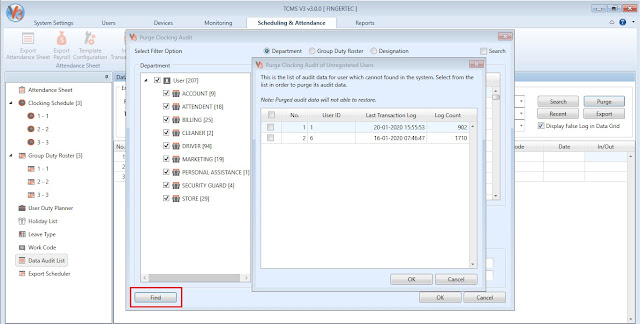
3. Added Delete audit data log from user which have been removed
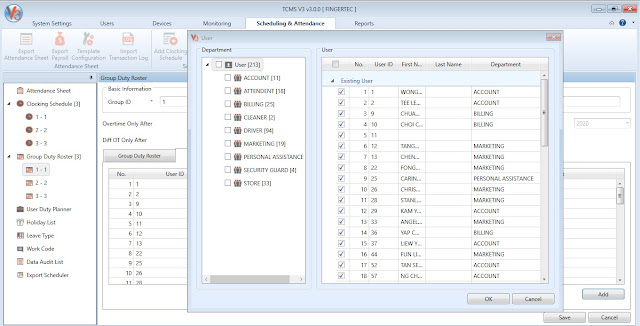
4. Revamp UI Roster assign user into Roster
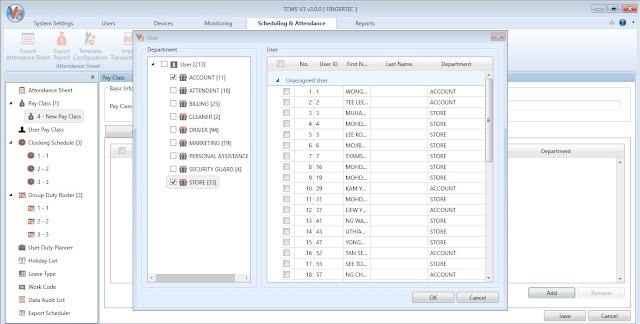
5. Revamp UI Payclass add user into Payclass
6. Revamp Database Configuration in System Settings
i) Revamp UI display in tab form
ii) Added Compact & Repair in Database Management
iii) Added Diagnostic in Database Management
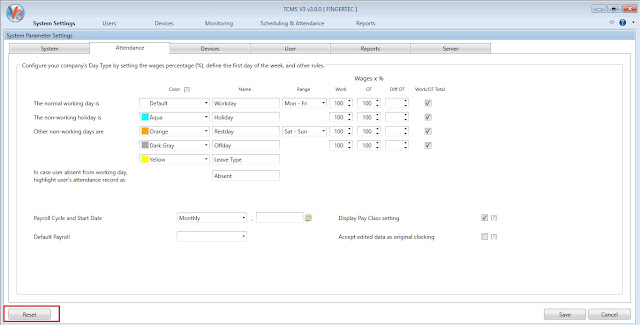
7. Added Reset button for reset default settings Attendance Tab in System Settings
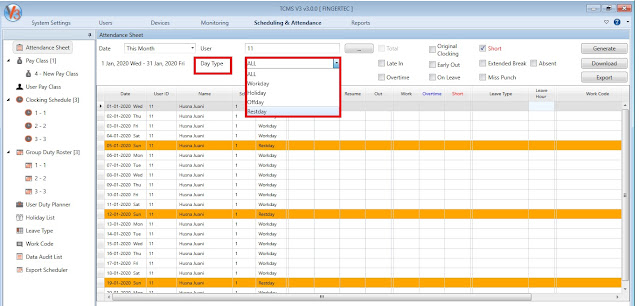
8. Added new filter option "Day Type" in Attendance Sheet
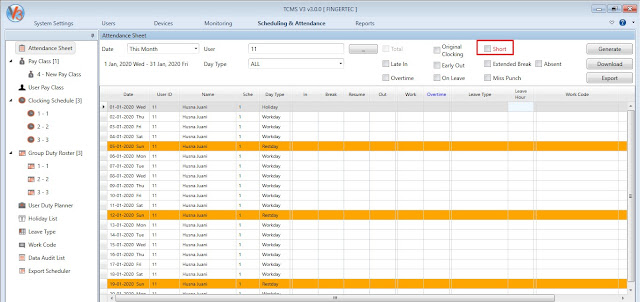
9. Added option to hide "Short" in Attendance Sheet
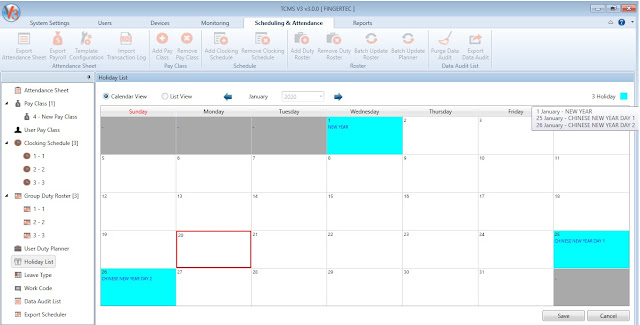
10. Added list for holiday details for Calendar View when mouse over total holiday
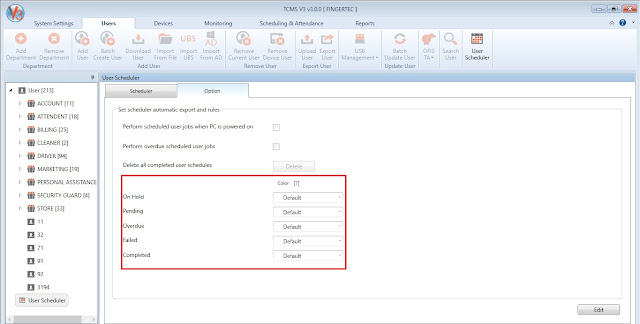
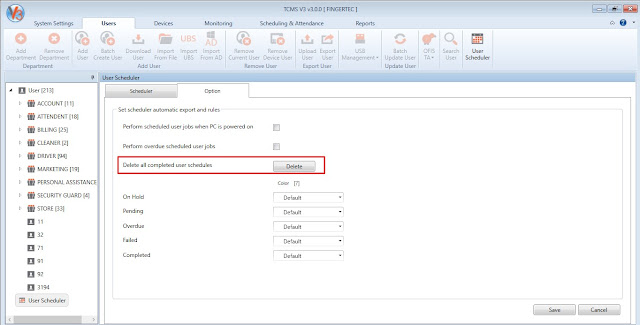
11. Added option to configure color each status for User Scheduler
12. Added option to Duplicate User Scheduler Task which completed
13. Revamp Data Audit List
i) Added Recent button in Data Audit List which display recent 100 logs
ii) Added filter option for Display False Log (User ID = 0) in Data Grid
iii) Enhance No Record message in Data Audit List which always display last record information
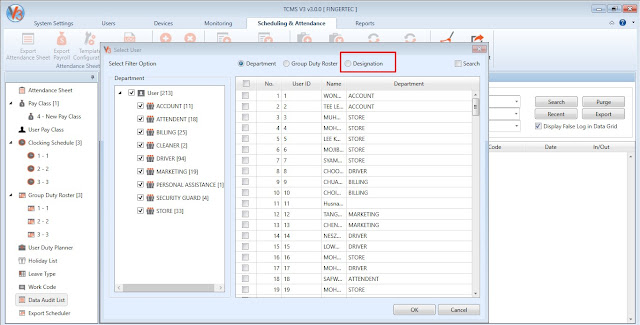
14. Added filter option "Designation" when Select User from list
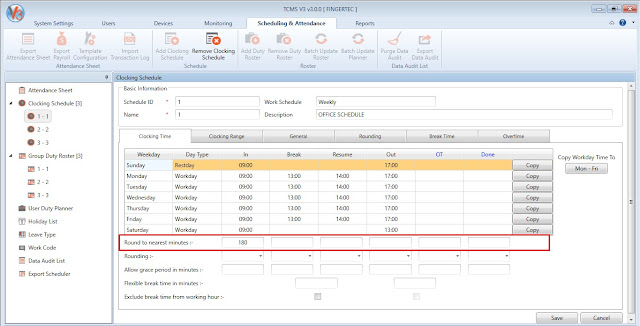
15. Enhance Schedule Rounding which can support up to 3 digits
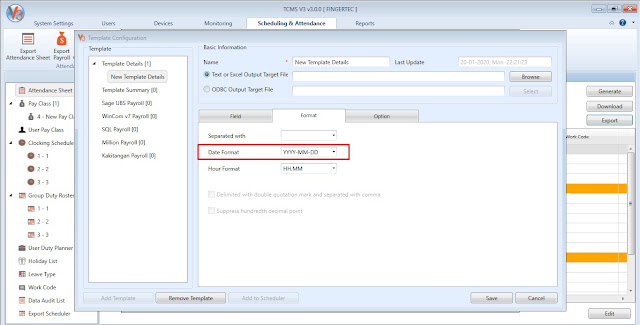
16. Added Date Format in Option for Export Attendance Details
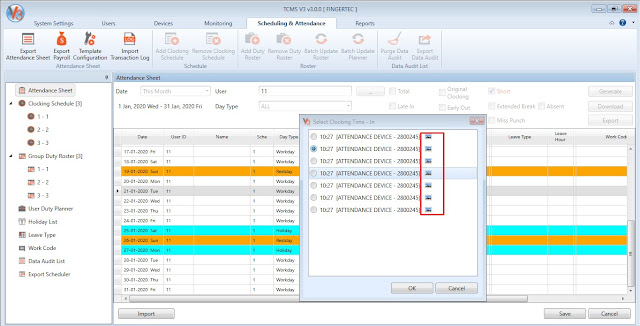
17. Enhance Attendance Photo display next if current minute have multiple photos
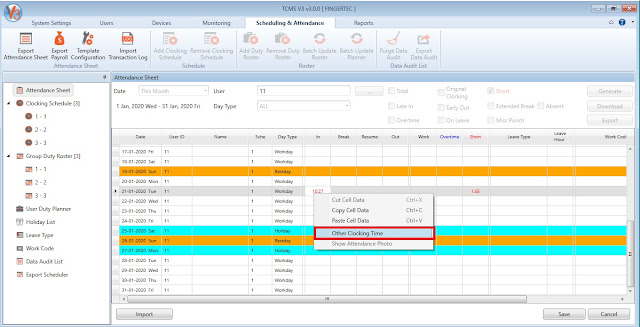
18. Display Attendance Photo when right click Other Clocking Time in Attendance Sheet
19. Added Rename for Schedule & Roster in Tree View Item
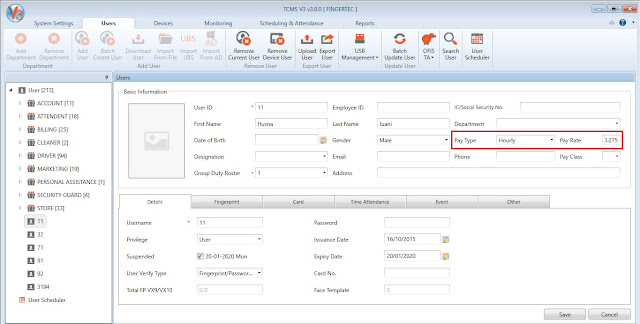
20. Added Pay Rate to 3 decimal places in System Settings
21. Revamp Report
i) Added Group by Group Duty Roster in Attendance Summary Report, Attendance Analysis Report
and Attendance Sheet Report
ii) Added Total Late In and Total Early Out in Tardiness Report
iii) Added conditions and filters for tardiness options in Tardiness Report
iv) Added Designation selection filter in Monthly Staff Duty Roster Report
v) Added support for 3 decimal places pay rate in Gross Wages Report
22.Added Pay Type and Rate Hour in TCMSv2 Migration
Bug Fixed
1. Fixed incorrect display for Summary when applied comma
2. Fixed overly small font size of date column when generate report in Arabic language
3. Fixed failed to display Total Work Hour in Detailed ETC report if the schedule is overnight
4. Fixed email text field unable to insert "-" symbol after "@" of email format
5. Fixed failed to import fingerprint of user from Webster through Webster Migration Wizard
6. Fixed incorrect department added to TCMSv3 when import users through TCMSv2 Migration
Wizard
.jpg)



.jpg)
.jpg)
.jpg)
.jpg)


.jpg)
1.jpg)
.jpg)
1.jpg)
1.jpg)
1.jpg)






.jpg)
.jpg)
.jpg)
.jpg)
.jpg)
.jpg)

.jpg)
.jpg)
.jpg)
.jpg)
.jpg)
