Introduction
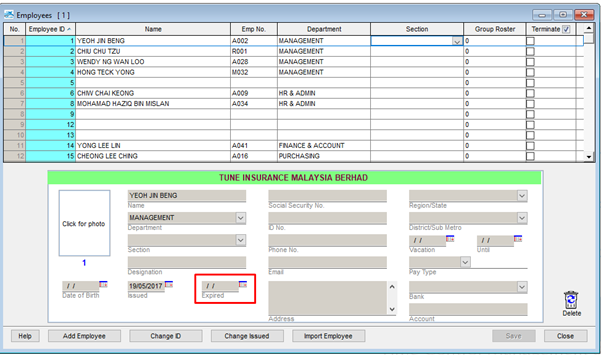
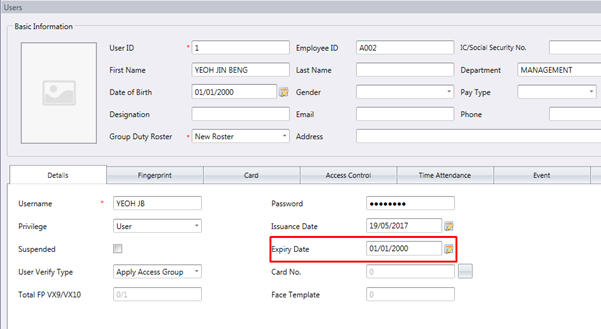
Recently, there are several issues related to database migration from TCMS V2 to TCMS V3 and Ingress software. First, user details migrated without the issuance date, wrong issuance date, or expiry date auto-configured to 1/1/2000.
Solutions
Make sure the backup database made with the latest version of TCMS V2 software. Please be informed that the final version of TCMS V2 software is version 2.2.027 with patch date 24-05-2017.
1. If you are using an old version of TCMS V2 software, please update the TCMS Vv2 software to version 2.2.027 by downloading the software installer at the following link.
https://www.fingertec.com/softwareupdate/software-tcmsv2_download_e.html
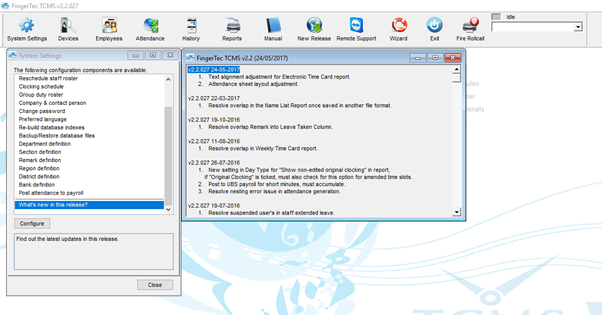
2. Also, if you are already using TCMS V2 version 2.2.027, please check the patch date version you are using. Go to System Settings > What’s new in this release? And check the patch date.
3. If the software patch date is older than 24-05-2017, please follow the steps below to update the software patch date.
1) Download the latest ft.exe file from this link:
https://s3.amazonaws.com/files.fingertec.com/Faiz+Tools/TCMSv2+Software+FT+Setup/ft-75+22027+240517.exe
2) Rename the downloaded file to "ft.exe" (remove all the numbers in the file name, and leave it as ft.exe)
3) Copy the above file, and paste it in TCMS v2 folder (Local Disk C > Program Files (x86) >Fingertec Worldwide > TCMSv2) to replace the existing ft.exe file
4) Relaunch TCMSv2 software - Run as administrator [go to System Settings > What's new in the release > Make sure the version is updated: v2.2.027 24-05-2017
Secondly, please make sure you have installed the latest version of TCMS V3 and Ingress Software before proceeding with the migration process. You are also required to install minimum Microsoft .Net Framework 4.6.2 in your workstation PC. You may refer to the following link for Microsoft .Net Framework 4.6.2 installer.
https://dotnet.microsoft.com/download/dotnet-framework
Lastly, you also required to install Microsoft OLE DB Provider for Visual FoxPro 9.0 in your workstation. The TCMS V2 is using FoxPro database type so, this installer allows the OLE DB in the workstation to give access for Visual FoxPro database and tables for migration purpose. You may download the installer from the following link.
https://www.microsoft.com/en-my/download/details.aspx?id=14839
Note: If some of the screenshots or steps viewed here are different from the ones in the current system, this is due to our continuous effort to improve our system from time to time. Please notify us at
[email protected], we update it as soon as possible.
Ingress is FingerTec’s bundled software with every purchase of FingerTec door access hardware. Over time, we have compiled common mistakes users made while using Ingress that have caused unnecessary frustration and wrong outcomes. Let’s watch out for those 5 errors and avoid them at any cost.
One - On Setup and Software
Installation
·
Please bare in mind that Ingress software and MySQL are two
different platforms. Ingress is the application; MySQL is its database. Therefore,
it is extremely important for you to run Ingress DBInstaller to confirm database
successful connection and prevent any errors such as “Failed to Initialize
Database”. All the 3 steps of DBInstaller have to be completed successfully for
you to be able to run the software.
·
Ingress Server and Client have to be installed using the exact same version of installer or
chances are, you are going to get unsuccessful server-client connection.
·
And to form a successful connection between
Ingress Server and Client, it is necessary to open the firewall port number
3306, 3000 in both server and client pc. Please refer to the following link for
more information regarding the port setup: /2013/12/step-to-setup-ingress-server-and.html
Two
- On Missing Files
·
Please make sure that your PC’s antivirus has been disabled
before you attempt to install Ingress
software. Once the installation is complete, add Ingress software to your
antivirus whitelist/exception list save and enable back the antivirus. This step
is very important to guarantee that no antivirus could block Ingress files and
would cause errors and software crashes.
·
Don’t freak out, Ingress
installer files are neither virus nor Trojan files. Therefore, installing Ingress while the
antivirus is disabled will not cause any harm to your computer.
Three - On Activation
·
Before adding your terminals to Ingress, please make sure that
the terminal can communicate with the PC by pinging the IP address of your
terminal. To check this, open the command prompt window> Ping the IP address
of your terminal (e.g. “ping 192.168.1.201”)> Press Enter, to receive the
response and check the stability of the connection between device and pc from
the responses shown.
·
When adding a terminal into the software, please make sure that
the Comm key, or the security key in both terminal and the software are set to
0 (or to the same value), for the terminal to be activated in the software. Caution: Many have
done this error by setting the comm key and security keys differently. Set them
with the same value please to avoid complications.
·
The FingerTec terminals by default are using UDP port number
4370. Therefore, during Ingress
activation you need to select the same
port number in Ingress for a successful activation.
·
Online activation refers to retrieving the license of your FingerTec
Terminals in Ingress using a PC with Internet connection. In case your PC is
not connected, select Offline mode, enter the 12-digit product key provided for
your terminal and press Activate.
·
If you need to use ‘port forwarding’ for terminal connection
from a different location, while activating FingerTec terminal, you need to tick
“Quick Connect” option. Caution: Port-forwarding setup has to be discussed with
the network engineer available onsite. FingerTec support does not have this
information.
Four
- On Upgrade and Migrate
·
Migration Wizard lets users migrate from TCMS V2 to Ingress effortlessly.
·
Migration of database can only be performed from TCMS V2 Version
v2.2.027 onwards (Most recent version dated: 11/08/2016)
·
To migrate the database from TCMS V2, go to Ingress Icon>
Migration Wizard> FingerTec TCMS V2> At Intro browse the Path of your
TCMS v2 backup file (.zip file)> Upload> Select Upload > At select
Users> select the user and the information you want to migrate> import
selected database.
·
For those who migrated data structure in a different language
e.g. Arabic from TCMS V2 to Ingress without any gibberish characters, you have
to ensure that the Language Locale of your PC has to be set as English (USA) during
the migration of the DB. To change the Language Locale of your pc, go to
Control Panel> Clock, Language, Region> Region> Administrative>
Change System Locale> Select English (USA)> save and restart your pc.
·
In case you are facing Migration Issues with Ingress, you need
to update the version of your Ingress to the latest, i.e. dated Dec 2016
onwards. You can refer the release notes in Ingress to check the version of
your software and the date of release, as well as the debugged remarks of each
update. The Release Notes is provided at: Ingress Menu Icon> Release Notes
Five - On Missing transactions
·
All the transactions downloaded from the terminals into Ingress
are listed in the data Audit List. This is how you get there. Attendance tab> Data Audit List.
·
The Attendance sheet is generated based on the data from the
data audit list and the clocking schedule setup, hence in case any data is
missing from the attendance tab;
o Check whether the data
already exists in the data audit list of the software
o If the data is not
downloaded, confirm whether the data originally exists inside your terminal by
using the Device info tool. Download the tool at: https://s3.amazonaws.com/files.fingertec.com/Arsalan.M/Tools/FTDevInfo.exe Once you have downloaded the device info
tool, run the .exe file> enter the IP address> connect> Download transactions>
to check if the transactions exist inside the terminals
o If there is data in the
terminal and has not been downloaded into Ingress, try downloading the data
manually at the Attendance
tab> Attendance sheet> Download> Select terminal and download.
o If the data is not
downloaded manually, for a possible solution, try downloading the data using
Automatic Run Time. To set the download run time, go to System Setting> System Parameter Setting>
Attendance> Specify 2 Daily Download Intervals…> Set the time
accordingly> save and let the Ingress server run within the set time.
o If there are any
changes made in the Clocking Schedule, the Group Duty Roster or certain user
IDs are changed in the Group Duty Roster, to make sure that the data enters
attendance sheet accordingly, you need to generate
the attendance at the Ingress software> Attendance> Attendance Sheet>
Generate> Select User ID and Date range> Ok.
o Data enters the
Attendance Listing & Attendance Analysis Reports are based on the
Attendance sheet generated in the software. Therefore, in case of any data missing
from the reports, the first step to do is to check the data and information in
the Attendance sheet.
If you encountered
any other problems with Ingress, we are here to support you. Email us at [email protected] for fast reply.
INTRODUCTION
TCMS V2 is FingerTec’s bundled software since 14 years ago and over the years we have made progress on the software front. Earlier this year we have introduced the latest and more powerful bundled software TCMS V3 designed for time attendance purpose. Now, you can migrate your data from TCMS V2 to TCMS V3 software easily. Learn how.
BENEFITS
You neither need to redo the clocking schedule setup, nor do you need to insert employee biodata into the TCMS V3 software. The types of data to migrate are as follow:
1. Company hierarchy (names of departments and sections)
2. Attendance rules and calculations (clocking schedules, group duty roster, holiday, leave types)
3. Employees’ biodata (name, address, phone, designation etc.)
4. Employees’ verification credentials (ID, fingerprints, password, card ID)
However, please note that the manually edited data in your TCMS V2’s attendance will not be migrated because the data migration only takes the raw clocking in your Audit list, and generate a new attendance sheet in TCMS V3.
Note : We are strongly recommending user to do housekeeping before migration process for large scale database so that it can decrease migration time and enhance migration process.You can refer
here on how to do housekeeping in TCMS V2.
PROCESS
1) Backup your TCMS V2 software database at TCMSv2 > System Settings > Backup/Restore Database > Backup Database.
Note: You must make sure that you are using TCMS v2.2.027 to make the backup. If you are using an older version of TCMS v2, please first update your software to v2.2.027. The installer of TCMS v2.2.027 can be downloaded
here
2) Now, go to the TCMS V3 software > Click v3 icon > Migration Wizard > FingerTec TCMSv2.
3) Click browse and choose your TCMSv2 backup database and click upload.
4) Select all employees and tick all options that you want to migrate such as devices / user / schedule & roster / leave,holiday,remark. After done, click import selected.
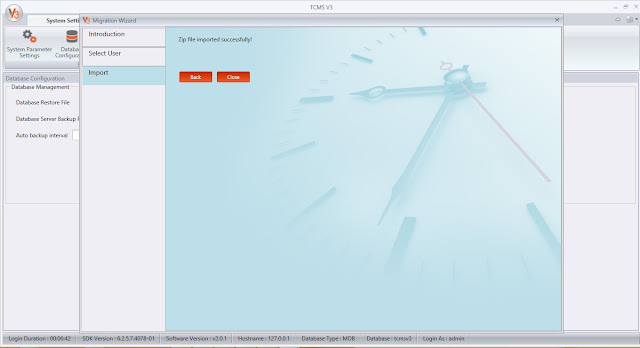
5) The migration process is finished when the zip file has been imported successfully.
AFTER MIGRATION
1. Please ensure you activate your device in
TCMS V3 so that you will have full access to all tabs. Before activating any
device, only these selected tabs: System Settings, Users and Devices are accessible. Monitoring, Scheduling & Attendance and Reports are initially disabled.
2. Go to Devices, select the device > click Activate Device.
System will automatically activate the old device with the TCMS V3 software
through online activation.
3. However, if you need to activate the
device manually (Activate
Device >
select Offline) you can always retrieve the TCMS V3 key from the following link:
4. TCMS V2's and TCMS V3's license keys are
different, so you will not be able to use the previous activation key.
5. It is
advisable for users to disconnect device from TCMS V2 once you successfully
connect device to TCMS V3 software. Once you have downloaded data into TCMS V2
software, it will automatically delete transaction data from the device and you
will not be able to download that data into TCMS V3.
6. If you are
testing attendance and reports after the migration, firstly, please generate
attendance for all users to ensure relevant data enters the attendance sheet (Scheduling
& Attendance > Attendance Sheet > Generate > Select User ID and Date Range> Ok). Also, check user Issuance Date and
ensure that it is prior to the date selected for generating attendance.
For more guidance on TCMS V3 such as user manual, video guides and training slides, please visit our website at www.fingertec.com/software/ and select TCMS V3 or click here.
You can also find links to other tips available for TCMS V3 at the following page:
http://user.fingertec.com/technical-tips-software-tcmsv3.html
Related Posts:
Common Issues in TCMS V3 / Ingress Software After Database Migration
15 TCMS V3 Most Common Technical Questions Answered
Introduction
Setting up of a new system can be cumbersome when it involves a lot of staff, departments, different working hours and conditions, and other variables. In view of this, FingerTec has created a wizard that can migrate database from TCMSv2 into Ingress without any hitch. This process will definitely simplify system admin work because they don’t need to set up Ingress from scratch.
This Migration wizard in Ingress will ease the admin’s job and give them the flexibility to either keep the existing data such as User, Devices, Schedules & Rosters, Leaves & Holidays, etc, or replace it with the data from TCMSv2.
Process:
Important note : Kindly make sure to use the latest version software of TCMSv2 (v2.2.027) and Ingress to enable a successful migration process! Get latest version of TCMSv2 and Ingress software here.
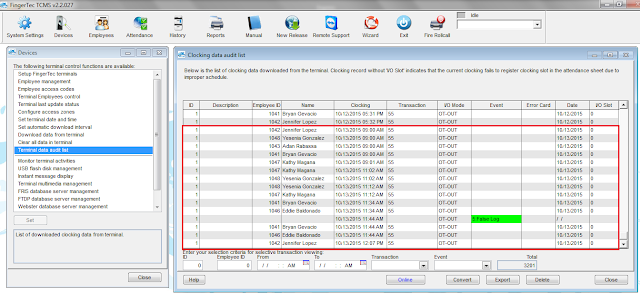
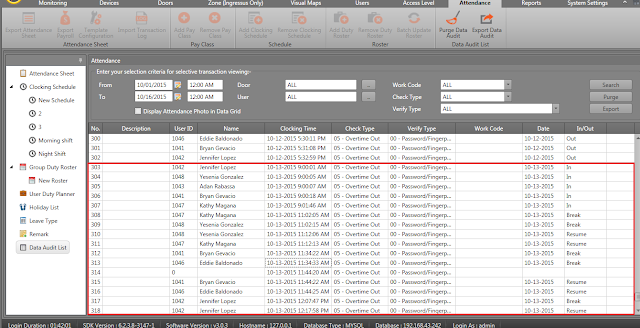
The screenshot below shows the data that has been downloaded into TCMSv2 on 13th October 2015, causing the Ingress software to only have data up to 12th October 2015.
TCMSv2 data audit list
Ingress Data Audit List
To solve the issue, you can re-migrate the TCMSv2 database into Ingress Software by following the steps below:
1. Backup the database for both TCMSv2 Software and Ingress Software.
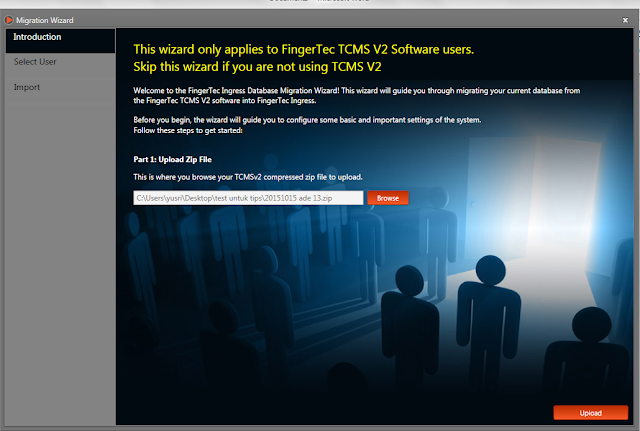
2. In Ingress Software > Click on the Ingress Icon > Select Migration Wizard > Select TCMSv2 backup > Click Upload
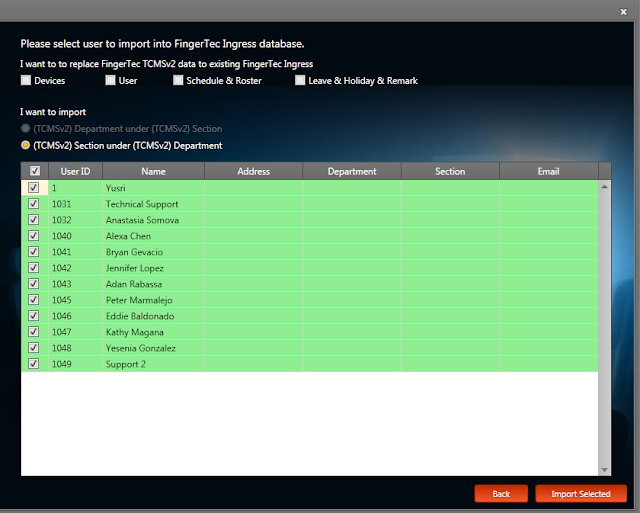
3. Un-tick "I want to replace FingerTec TCMSv2 data to existing FingerTec Ingress” > Select all users > Click "Import Selected" to proceed with data migration.
4. After the migration process is completed, click on the Attendance tab > Data Audit List and you can check that the clocking data on 13/10/2015 has been successfully migrated from TCMSv2 into Ingress without replacing the existing data in Ingress.
5. Re-generate the attendance sheet for all users and the attendance sheet is complete without any missing data.
After Newly Migrating to Ingress
1. Please ensure you activate your device in Ingress
so that you will have full access to all tabs. Before activating any device,
only these selected tabs: System Settings, Users and Devices are accessible. Doors, Access Levels, Monitoring, Attendance and Reports are initially disabled.
2. Go to Devices, select the device > click Activate Device. System will automatically activate the old device with the
Ingress software through online activation.
3. However, if you need to activate the device
manually (Activate
Device > select Offline) you can always retrieve the
Ingress key from the following link:
4. TCMS V2’s and Ingress’s license keys are
different, so you will not be able to use the previous activation key.
5. It is advisable for users to disconnect device
from TCMS v2 once you successfully migrate database and connect device to
Ingress software. Once you have downloaded data into TCMS v2 software, it will
automatically delete transaction data from the device and you will not be able
to download that data into Ingress.
6. If you are testing attendance and reports after
the migration, firstly, please generate attendance for all users to ensure
relevant data enters the attendance sheet (Attendance > Attendance Sheet > Generate > Select User ID and Date range> Ok). Also, check user Issuance
Date and ensure that it is prior to the date selected for generating
attendance.
Related Post:


