Introduction
Sometimes there are staff who need to go outstation as company representatives and need to make sure their superior is aware of their attendance status at the office on certain dates. Using the Timetec HR app, the outstation application process will be more convenient for both normal users and approvers. Here we will be discussing how to request and approve outstation via the Timetec HR app.
Process
A. Request Outstation
1. Login to the Timetec HR app > Click on the Feature button.
2. You need to click on the My Request icon.

3. On the new pop-up notification, you need to select Outstation.
4. Click on the + symbol to add a new request on Outstation.
5. You need to fill up all the required information in the request module and click Send button once the information is completed.
6. Once the request is successfully submitted, a new pending request will appear under the Outstation request.
B. Approve Outstation
1. Users who are set as an Outstation approver will receive a notification on their mobile for each request done by their staff.
2. The approver is also able to check any request done by their staff under the notification tab.

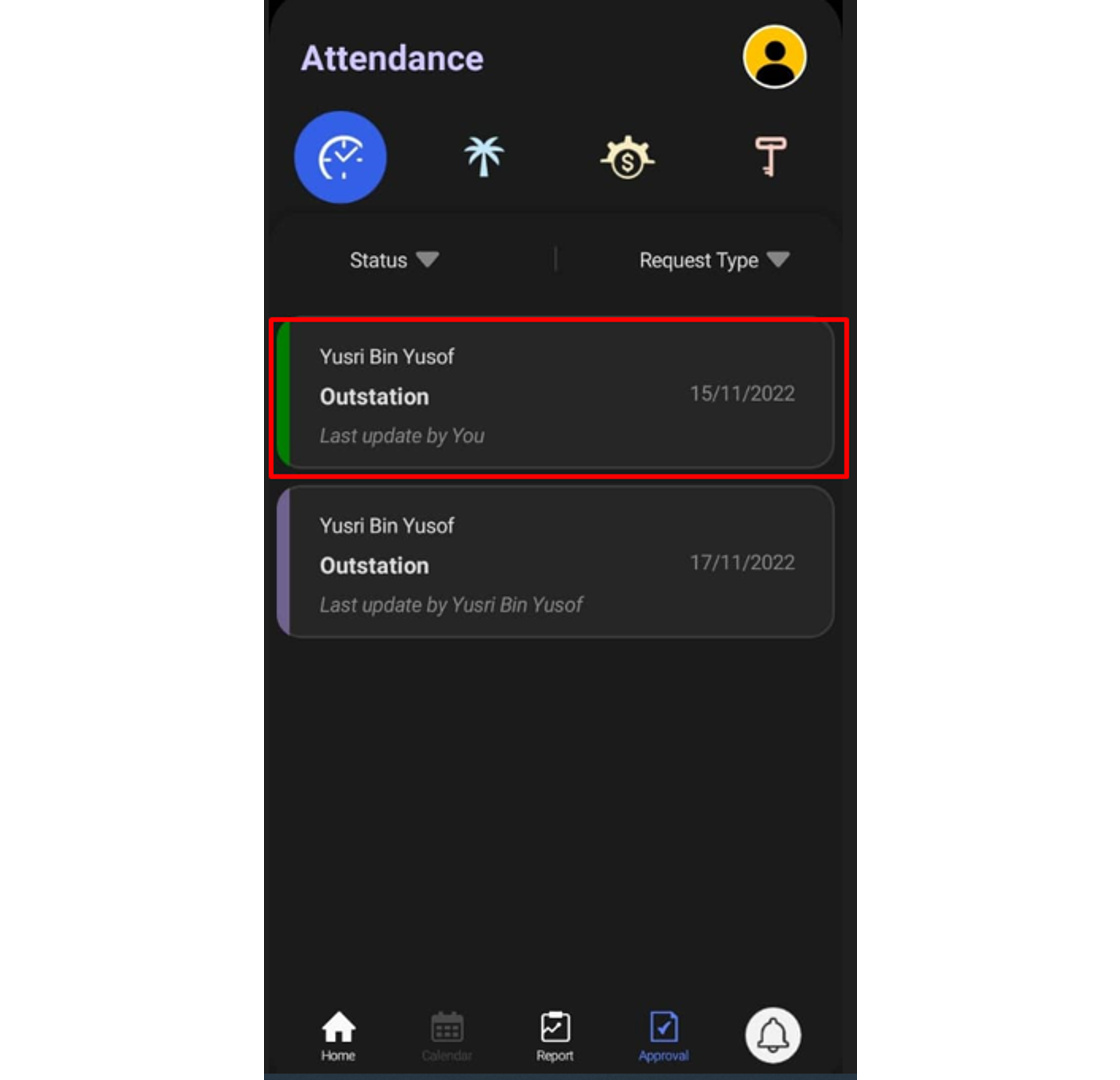
3. The approver may click the Approval tab to view all staff requests and the status of each request done by the staff. Click on the pending request (blue tab) which needs the approver's response.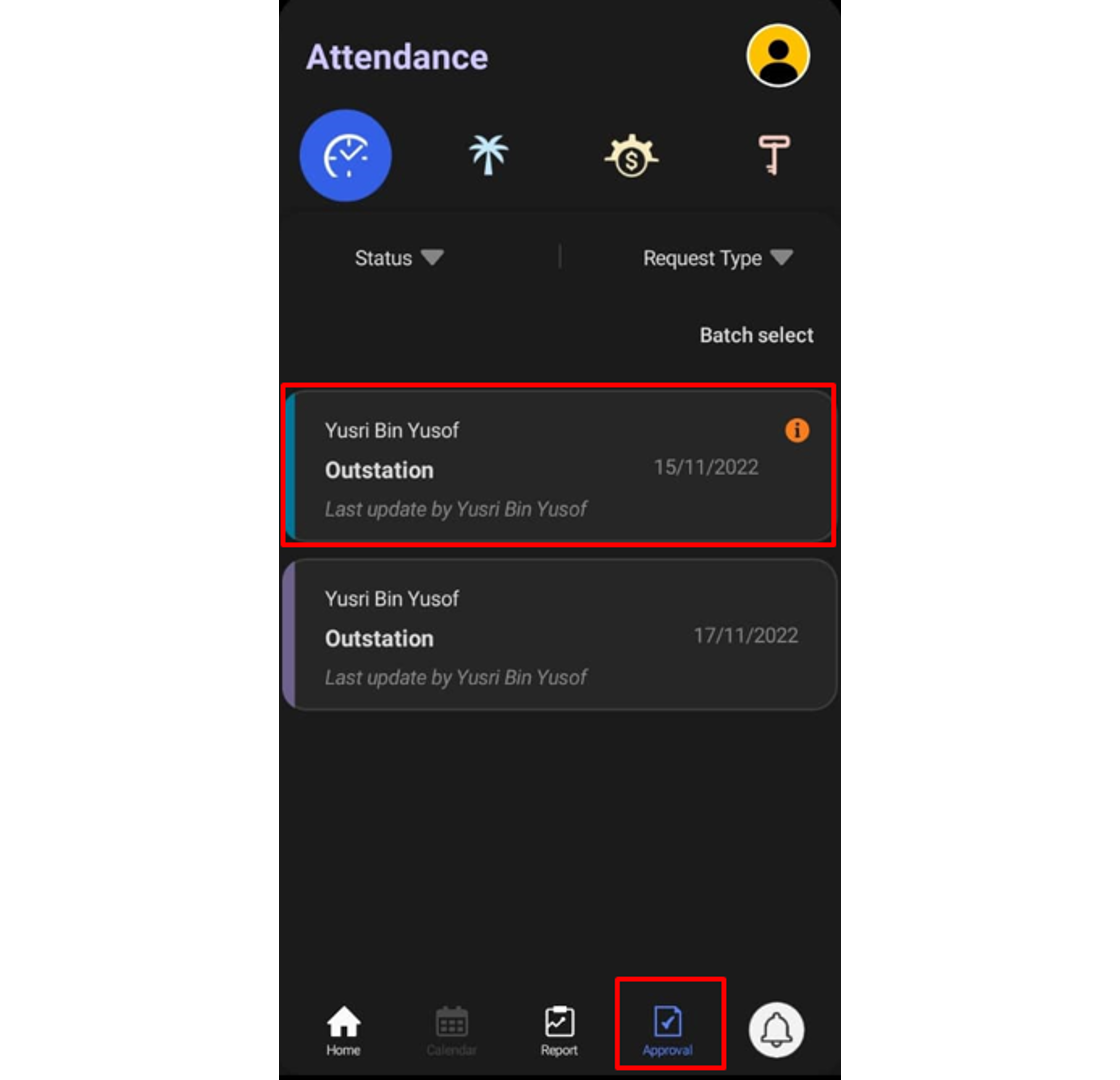
4. The approver can fill up the comment section and respond to the request (Approve or Reject).
 5. Once the Approve button is clicked, the request tab will change to green.
6. The user will also receive a notification upon the request being updated to Approved or Rejected.
Note: If some of the screenshots or steps viewed here are different from the ones in the current system, this is due to our continuous effort to improve our system from time to time. Please notify us at [email protected], we will update it as soon as possible.
Introduction:TimeTec Attendance conveniently allows the admin the option to add or change user card ID remotely from the system. This article will guide you on how to add or change your user card ID from TimeTec Attendance.
Steps:
A: Manage User Module
Go to User > Manage User > User setting (gear icon)

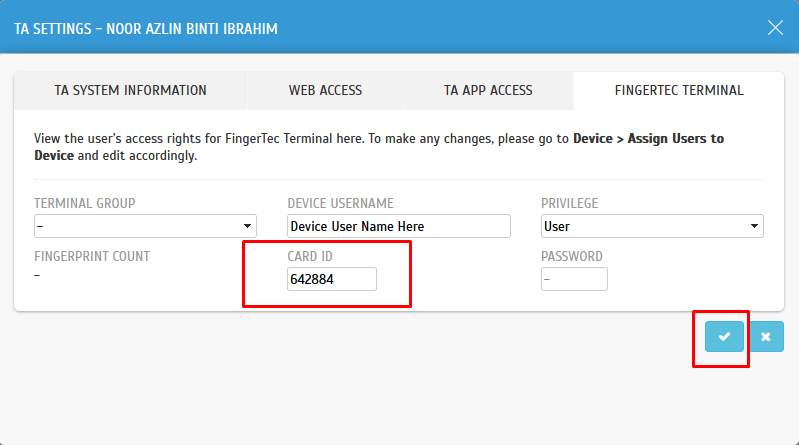
Select the FingerTec Terminal module to set or do the Card ID changes and select submit button once the changes are done.
Note: After the changes are done, you may proceed with step C to re-upload the user to the device to apply the changes. The step is compulsory because the terminal data won't be automatically updated based on changes in TimeTec Attendance.
B: Assign User to Device Module
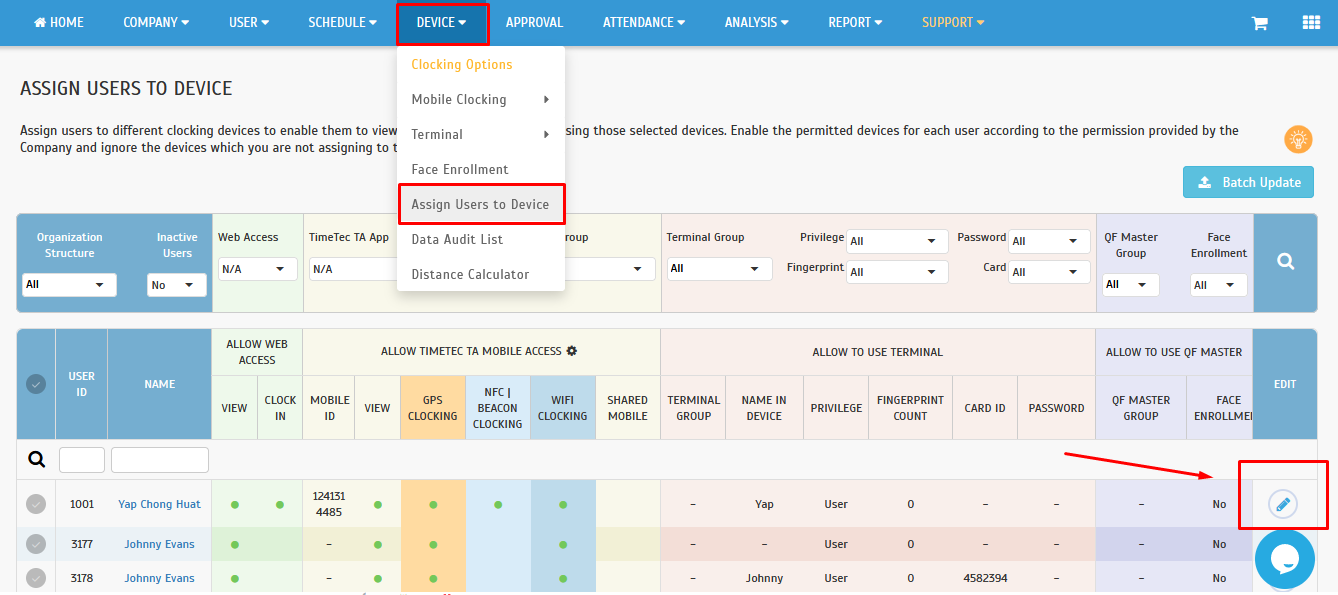
Go to DEVICE > Assign user to device > Click on the edit button
Go to Card ID > Fill in the Card ID > Select submit button to apply the changes on TimeTec Attendance.
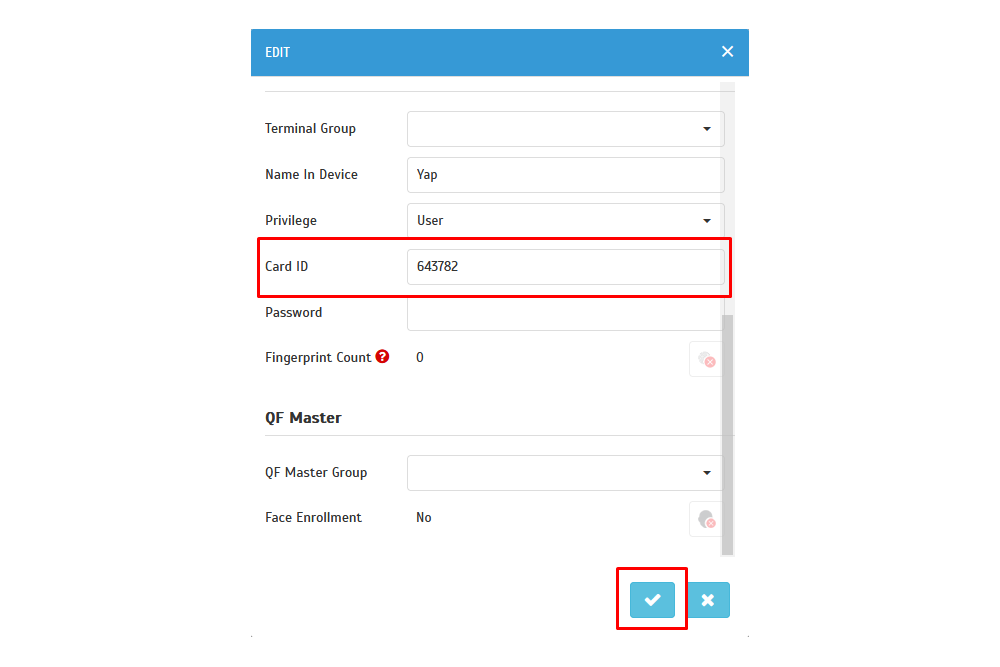
Note: After the changes are done, you may proceed with step C to re-upload the user to the device to apply the changes. The step is compulsory because the terminal data won't be automatically updated based on changes in TimeTec Attendance.
C: Re-upload the user to the device to apply the changes on the user card ID
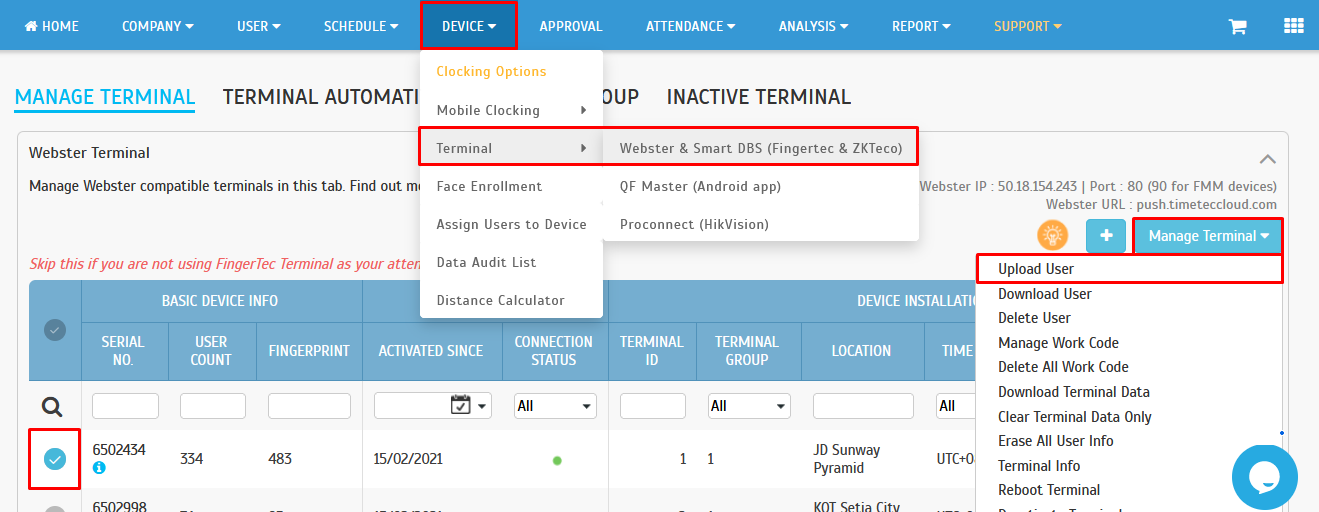
1. Go to DEVICE > Terminal > Webster & Smart DBS (FingerTec & ZK Teco)
2. Select the device you want to replace the user's information > Select Manage Terminal > Upload User.
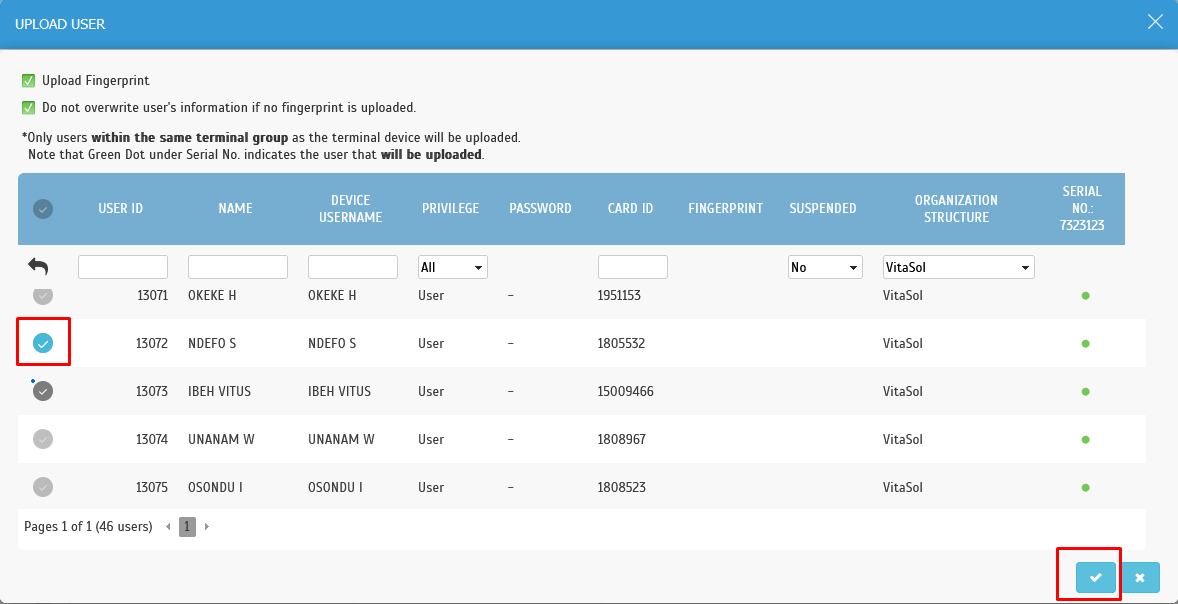
3. Select the user > Click on Submit button to proceed with the process.
Note: If some of the screenshots or steps viewed here are different from the ones in the current system, this is due to our continuous effort to improve our system from time to time. Please notify us at
[email protected], we will update it as soon as possible.

Introduction
Timetec HR is the latest mobile application that Timetec just launched which we called the “Super App”. This newest application combines 4 modules (TA, Leave, Claim and Access) under one application which will reduce the hassle for the user to view multiple modules. Here, we will guide you on the steps to view your own attendance data.
Process
A. Dashboard
1. You may login to the Timetec HR application using the login credential set in the system. Once you log in to the mobile application, you will automatically be set to the Timetec TA application homepage and under clocking tab.
2. To view the Dashboard information, you need to click on the Dashboard tab which is set beside the Clocking tab. Under Dashboard information, you can view your total working time, remaining working time and overtime which is depending on your working schedule.
B. Attendance
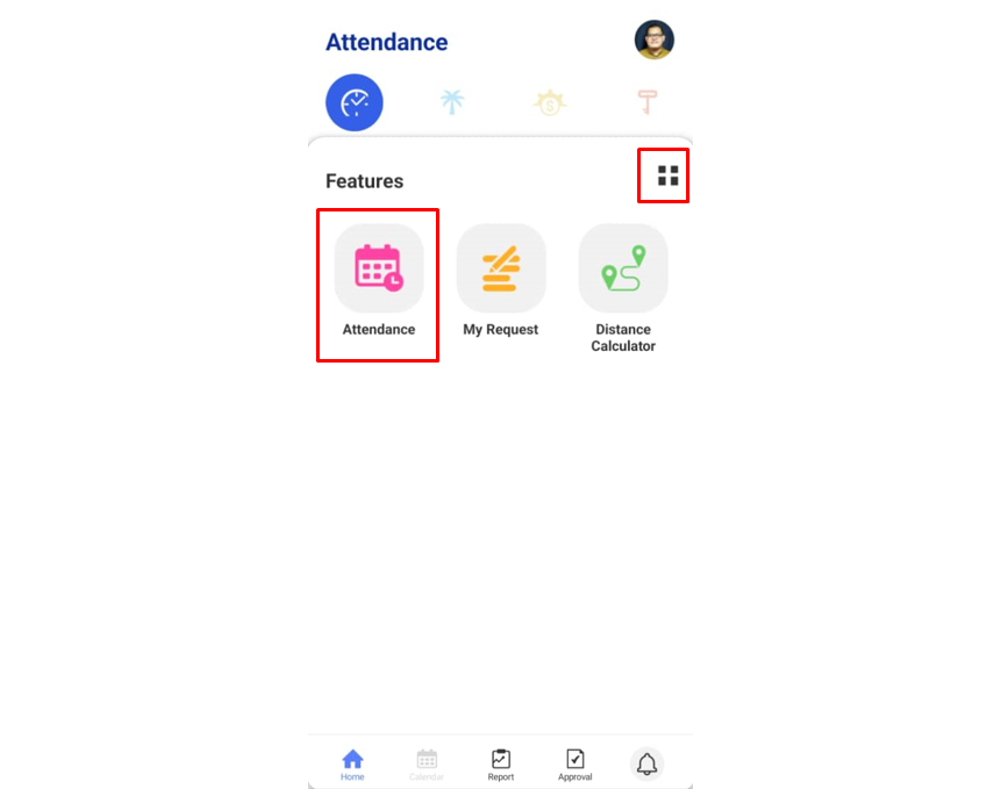
To view the Attendance data, you need to click the 4 small box symbols on the top right corner of the homepage and click on the Attendance icon.
1. Under the Attendance tab, you can view your clocking attendance based on the filtered date range.
2. You can filter the attendance range date by clicking the Today icon (Default).
C. Clocking History
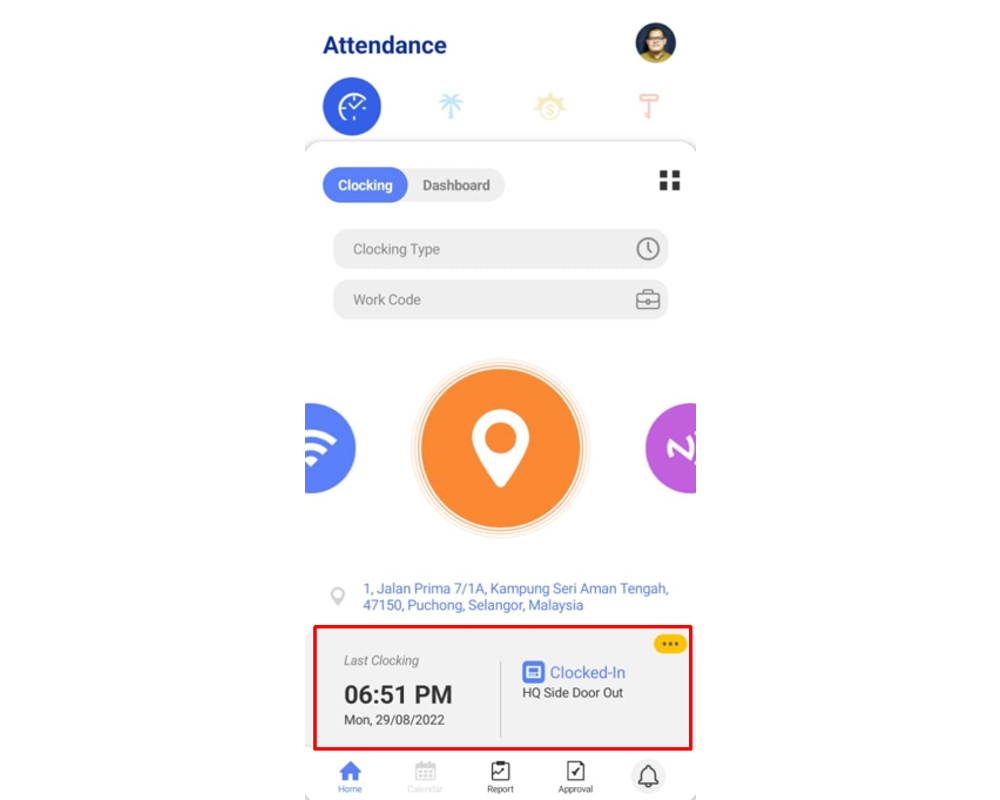
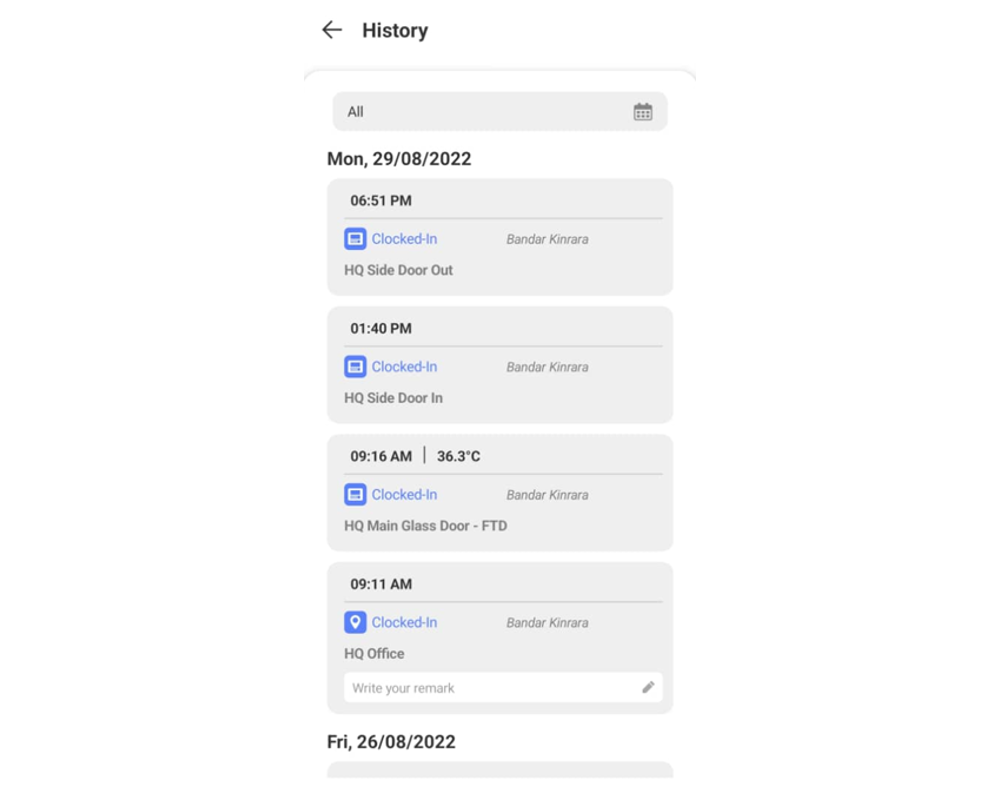
1. From the homepage, you can view your Last Clocking data including the date, time, clocking type and clocking option. You are also able to view your previous clocking data by clicking on the Last Clocking tab at the bottom of the homepage.
Remark: Only successful clocking will appear under the clocking history.
Note: If some of the screenshots or steps viewed here are different from the ones in the current system, this is due to our continuous effort to improve our system from time to time. Please notify us at
[email protected], we will update it as soon as possible.

Introduction
Management is always interested in knowing employees' recent attendance trends without looking at each employee's attendance report. Hence, for a quick look at the employee's attendance, the admin can navigate the Analysis tab for the attendance chart. In this article, we will demonstrate how the Management / Head of Department / Supervisor can monitor their subordinates' attendance chart based on their attendance categories (Normal / Tardiness / Absent / On Leave, etc.) or the Work Location analysis with ease through their TimeTec HR mobile application.
Process
1. Open TimeTec HR mobile app. Switch to the TA module and then tap on the Menu grids button.
2. Click on the Analysis option.
3. Default view will be for All Division (If provided with Full Division viewing) and the date will be today. You may select the date to view a different date and select any specific division where applicable for the monitoring purpose.
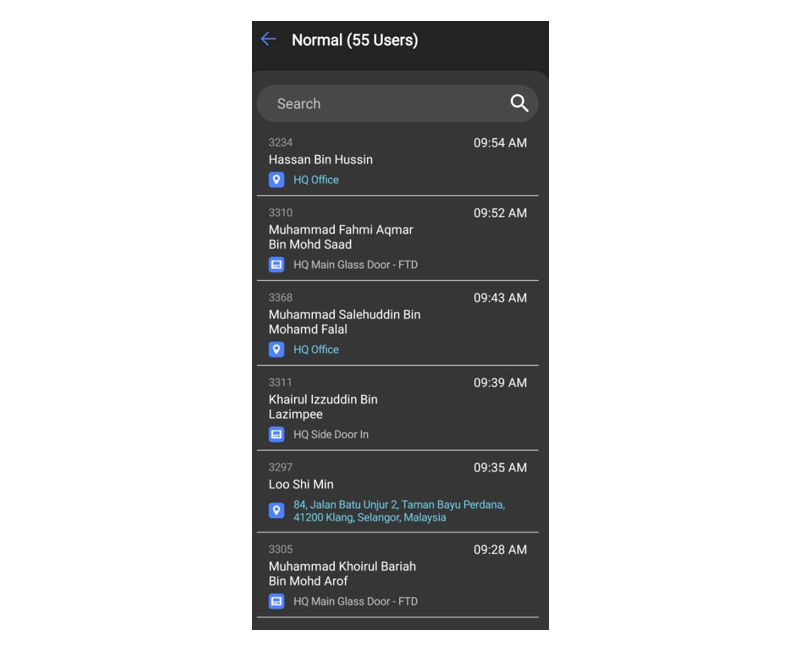
The displayed chart will be colour coded based on the attendance categories which can be identified by the detailed list below. You may click on each segment on the pie chart or the category listing below the chart to further show the detailed user listing.
4. The user listing for each of the selected categories will appear accordingly for the supervisor to monitor.
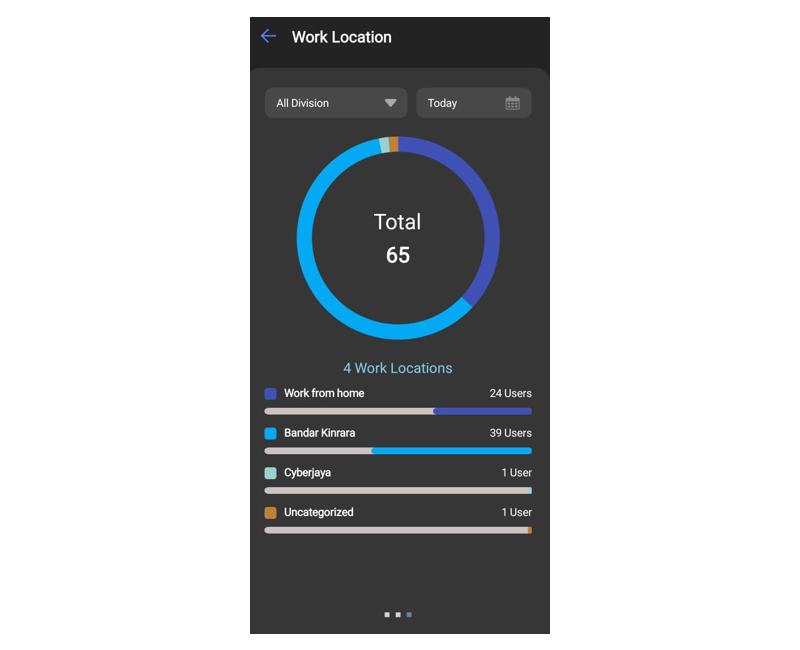
5. From the Attendance Analysis chart, you may swipe the screen to the left to display the Work Location analysis chart. Similarly, you may tap on each segment on the chart or tap on the detailed location list below to show the user listing for each work location.
Note: If some of the screenshots or steps viewed here are different from the ones in the current system, this is due to our continuous effort to improve our system from time to time. Please notify us at [email protected], we will update it as soon as possible.
Introduction
TimeTec TA comes with an import OT feature that minimises the Admin / Human Resources workload from keying in the OT data in the Attendance Sheet manually. This feature accommodates the management with the quicker collection of the OT data and tabulates all data in our Xlsx file.
To use import approval overtime requests, you need to set up the Overtime Approval in TimeTec TA.Steps
A. To set the company library application, login into your TimeTec account.
www.timetecta.com
B. Next, go to APPROVAL module tab and click on “Import Overtime Request”
C. Click on “Download .xlsx sample here” to download the sample template

Guide
1. Please ensure the OT hour format used in this file is the SAME as you have set in the System Settings: (hh. mm or hh. hh)
2. The system will not save information in the “Name” column; it is used for reference only.
3. The default value of Overtime Type is Normal. You can view or add Overtime Type at Company > Profile Field > Manage Data Field.
4. Please ensure the date format used in this file is the same as you have previously set in the System Settings: (DD/MM/YYYY or MM/DD/YYYY or YYYY/MM/DD)

5. The default value of Shift Number is 1. Shift number is a setting for Shift group type in Schedule>Assign Schedules and Users into Roster. This setting is used to set multiple working shifts (maximum 3 shifts) in a workday. (Only apply to Daily Schedule)
6. The Remark field is limited to 250 characters.
i. Fill up the user overtime request approval field in the .Xlsx file and save.
ii. Browse the file > Submit
iii. Once the request is submitted, it will go to the approver's approval module to be approved.

Note: If some of the screenshots or steps viewed here are different from the ones in the current system, this is due to our continuous effort to improve our system from time to time. Please notify us at
[email protected], we will update it as soon as possible.
Introduction
An application programming interface (API) enables interaction between data, applications, and devices. It delivers data and facilitates connectivity between devices and programs. API enables access to services by adding codes to applications. It further enhances connectivity and bolsters functionality. TimeTec TA is a cloud-based time and attendance system suitable for small-medium enterprises up to large multinational companies. Its automated attendance database can be used to integrate with payroll or HR software to increase staff efficiency.
Process
1. Go to Company > System Settings.
2. Go to General Settings Tab > Click Edit (Pencil Icon).
3. Click to Enable Timetec API Login.
4. Click Submit for acknowledgement on the developer Agreement.
Remark: You may click on the Developer Agreement highlighted in blue on the pop-up notification to learn more about the acknowledgement.
5. After that, you need to make sure the option is enabled > Click Save for setup done.
6. A new API login detail will appear once the setting is saved > Click on the Login URL.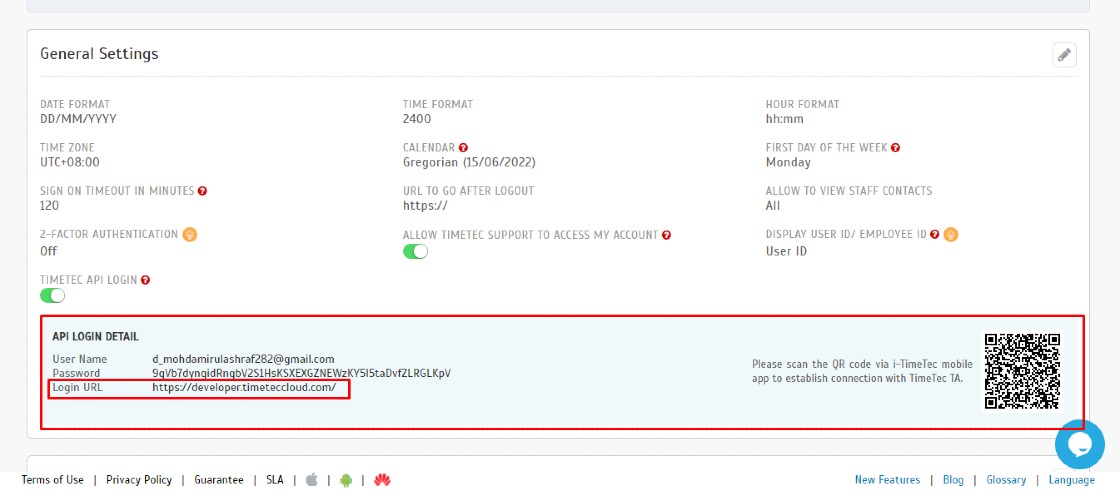
7. You will directly go to the Timetec Developer Program website. You need to click on the Developer Login tab and fill up the Username and Password based on the new API login credential.Note: If some of the screenshots or steps viewed here are different from the ones in the current system, this is due to our continuous effort to improve our system from time to time. Please notify us at [email protected], we will update it as soon as possible.


