IntroductionFor big companies or manufacturing that have large premises and noisy environments, they require a Public Address system that can deliver loud sound to indicate the transition of shift or break time to the employees. Taking this factor into account, FingerTec provides an external schedule bell option to fulfill this need. To enable this function in Face ID 5 you will need an update tool.
View the wiring setup at the link below:
/2022/07/face-id-5-external-alarm-wiring-diagram.html
For the first time setup, please download the tools for External Schedule Bell Setup, available at this
link.
Step to setup External Schedule Bell
1. Select Menu > Select Personalize > Select Bell Schedules
2. Select Options > choose External Bell or Internal and External Bell > select back for the next settings
3. Select New Bell Schedule > Turn ON Bell Status
4. Select Bell Time > Set time accordingly > select Confirm (OK)
5. Select Repeat > Select the days you want the bell want to repeat > select back for the next settings
6. Select Bell Type > choose External Bell or Internal and External Bell 
7. Select Ringtone > Choose Ringtone type > select back for the next settings
*Only for Internal Bell, sound of External Bell depends on what type of External Bell is used.
8. Select Internal bell delay(s) > Choose the duration of sound (in second) for Face ID 5 
9. Select External bell delay(s) > Choose the duration of sound (in second) for External Bell or siren
Introduction
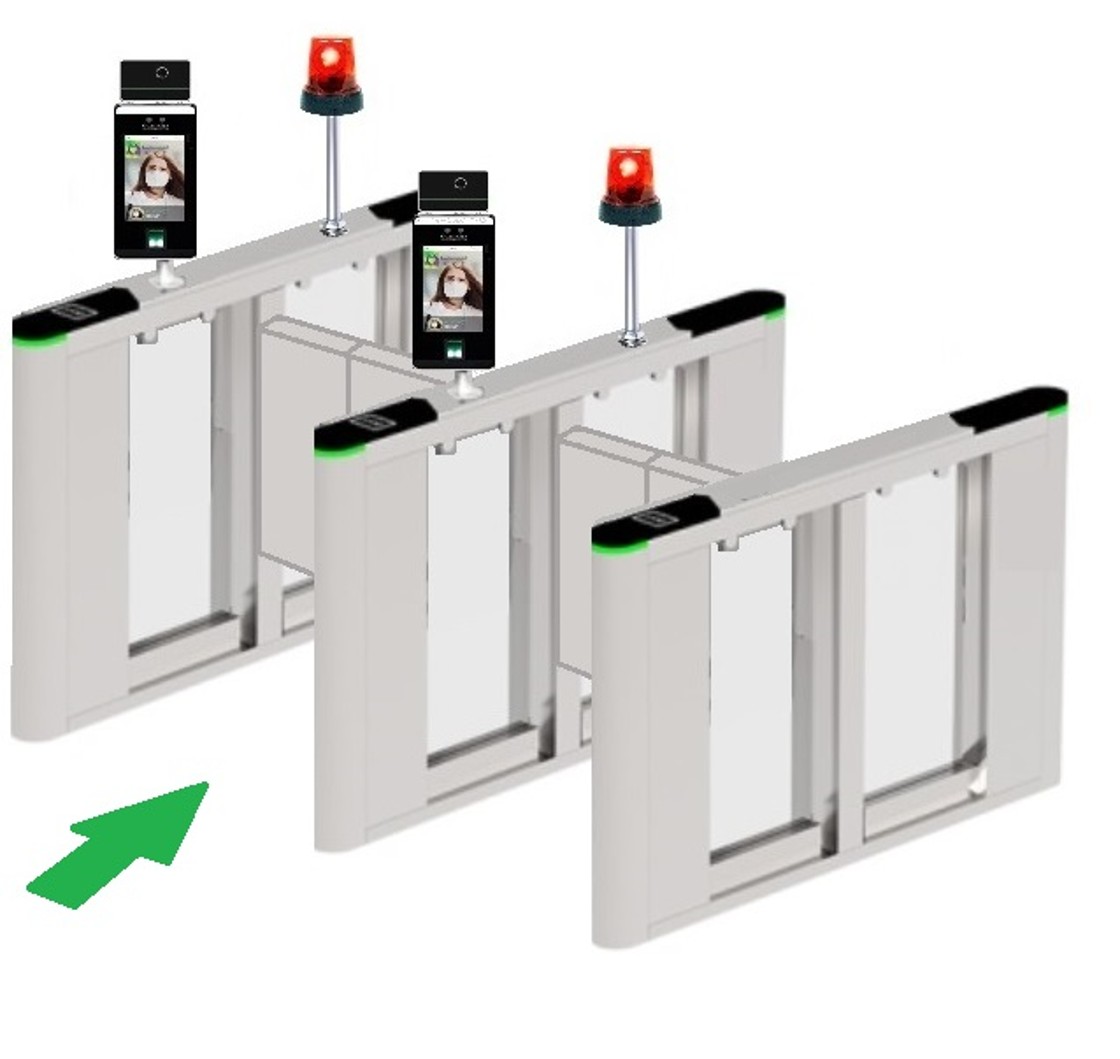
Turnstiles are access gates for controlling traffic, allowing one person a time to control traffic flow for in and out. Face ID 5 TD/FTD with a Temperature Sensor can detect and alert a person with a high body temperature. Adding an external alarm to work with the temperature sensor makes it easy to manage the traffic. When a person with a high temperature is detected, the system will notify the security team, reducing the need for constant human supervision. The use of turnstiles is suitable for industrial use such as in big factories, transportations use such as at train stations, and commercial use such as in big mall complexes, and more.
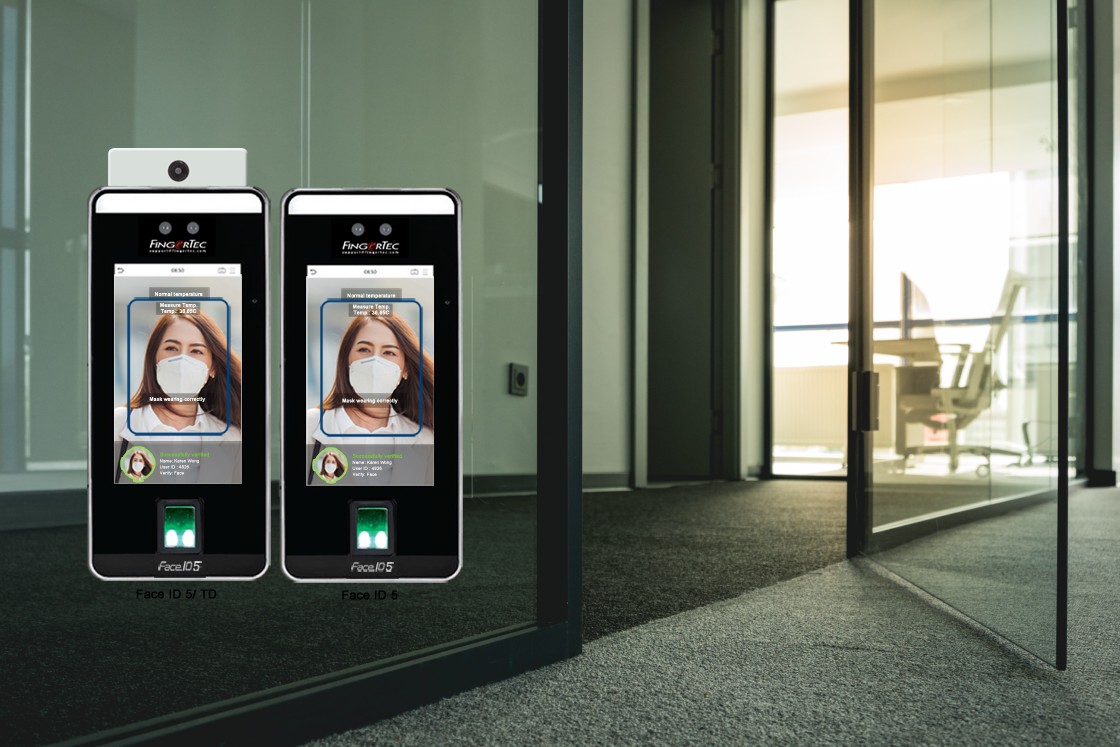
Figure 1: Example of An External High Temperature Alarm Installation
Authorized building managers can decide to allow only personnel and visitors with normal body temperature to access the turnstile and disallow those who exceed the temperature limit to pass the turnstiles. Building management needs to enrol each user's face and ID and store the information inside the Face ID 5 TD/FTD to set this permission by using TimeTec AWDMS for local servers. Please find the information on how to do it at the following link:
(/2020/12/how-to-add-new-device-smart-ac1-series.html )
Similarly, for visitor access, Face ID 5 TD / FTD can screen body temperature and block visitors with high body temperature from entering the premises. Below is an example of a wiring schematic diagram for the Face ID 5 turnstile with an external temperature alarm.
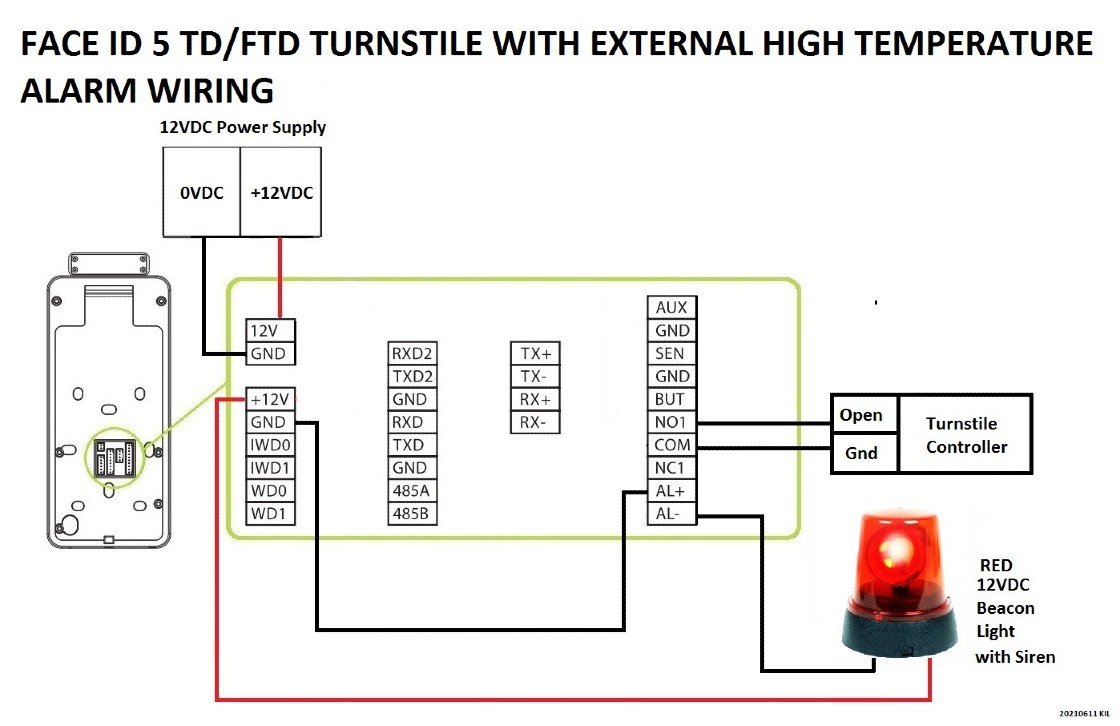
Figure 2: Example of Face ID 5 TD /FTD Turnstile Connection With An External Temperature Alarm
Each turnstile controller has a different input signal; please check the controller device schematic before installing.
Note: If some of the screenshots or steps viewed here are different from the ones in the current system, this is due to our continuous effort to improve our system from time to time. Please notify us at [email protected], we will update it as soon as possible.
Introduction
The Face ID 5 or Smart AC1/TD is a visible light facial recognition access control device for modern office access. It supports multiple verification methods, including Face, Fingerprint, Palm & Password. In addition, it is embedded with a mask reading and fever detection features that can authenticate a person’s identity with a face mask on and read the body temperature before giving access to those with healthy reading. Furthermore, the extra wide-angle recognition with up to 2 meters recognition distance made this device one of the fastest and contactless verification methods that significantly reduce the potential risk of cross-contamination in premises.
This article explains how to add the Face ID 5 and Smart AC1/TD in TimeTec Access, the cloud-based access security management solution. With the integration of face recognition device in TimeTec Access, it provides tight security with the most accurate biometrics authentication, and TimeTec Access also provides the convenience of data access and data management directly from the web browsers mobile applications.
Process
1. Adding devices to TimeTec Access
a) Configure the device Server address. Go to Menu > Comm > Cloud Server Setting and add the server address https://sg-best.zkclouds.com
1.png)
b) On Timetec Access , Click Device > Terminalc) Scroll down on Smart DBS Terminal page, click on “Add” button and fill in the device information.
2. To upload all users' information into the device, click on the "Sync Info" button. Next, you may enroll the user's face or other biometric on the device.3. After you are done with the enrollment, you can download all users' face templates into TimeTec Access, ready for transfer to another device.To download, select device > Manage terminal > download user to TimeTec TA > “Reload Data”
Note: If some of the screenshots or steps viewed here are different from the ones in the current system, this is due to our continuous effort to improve our system from time to time. Please notify us at [email protected], we will update it as soon as possible.
Introduction
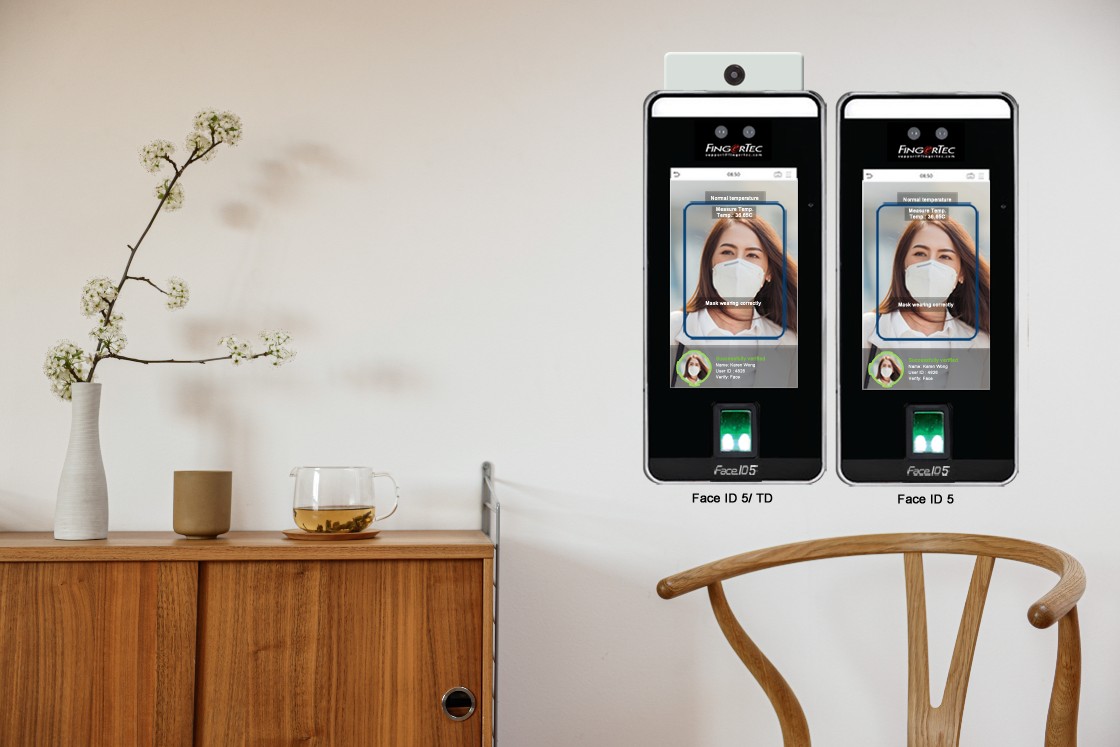
Good news, FingerTec has launched Face ID 5 recently, and the two new models that are equipped with temperature readers are Face ID 5 TD and Face ID 5 FTD that also can be used for building access control.
*Please state in your inquiries before purchasing the Face ID 5 with Access Push to be compatible with our software. This tip will show how the Face ID 5 can function as an access control system for in and out and pair with our R3c device.
Process
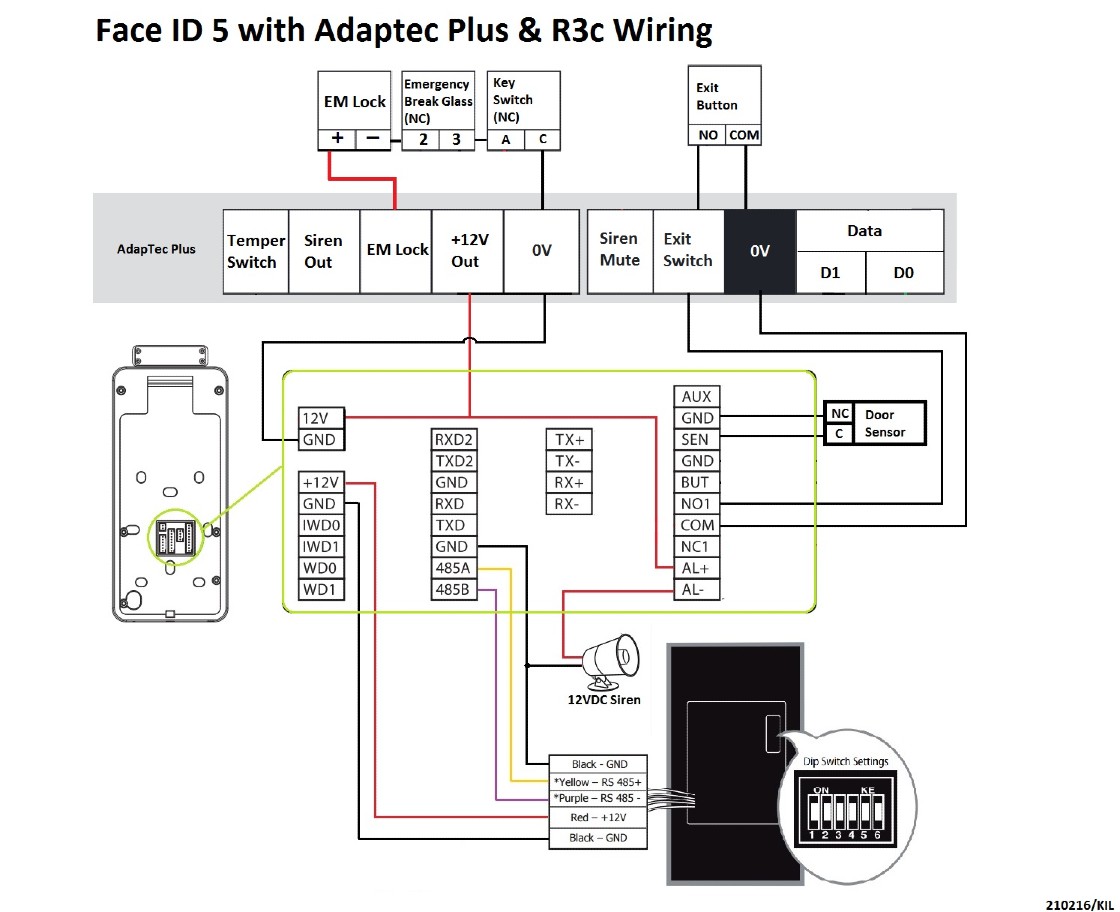
Diagram 1 : Connection of Face ID 5 with AdapTec Plus & R3c
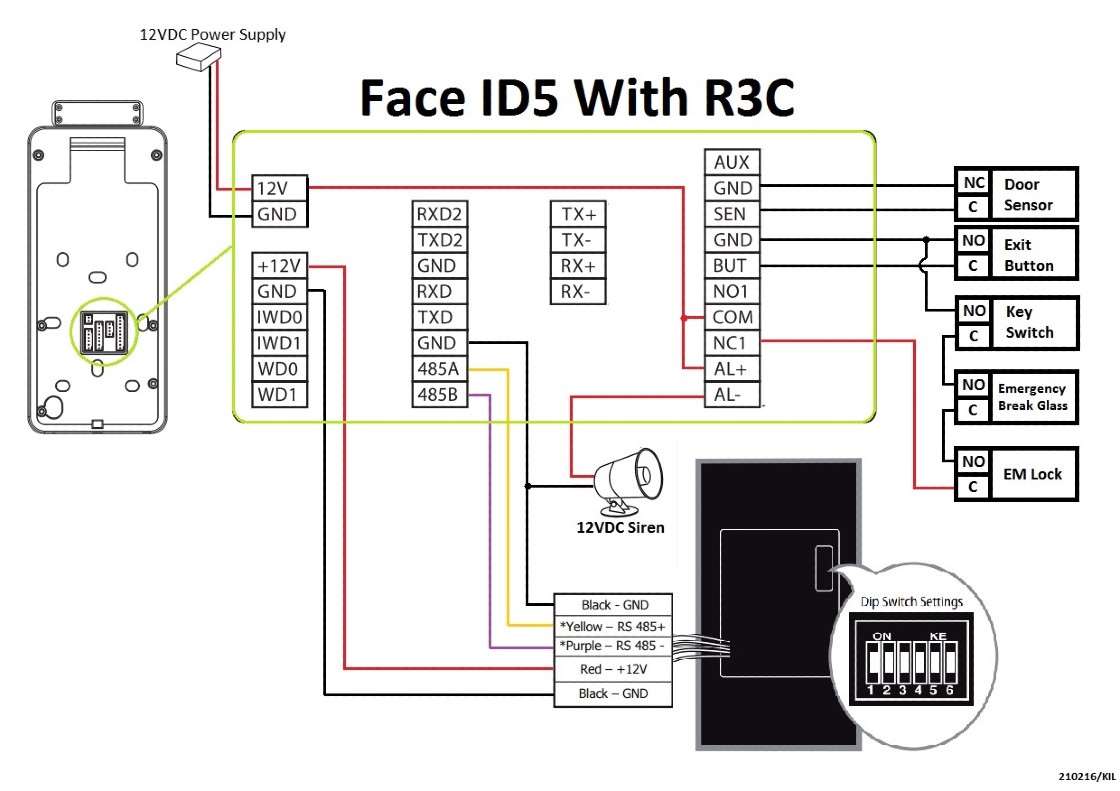
Diagram 2 : Connection of Face ID 5 with R3c
Face ID 5 settings at the device for Access control
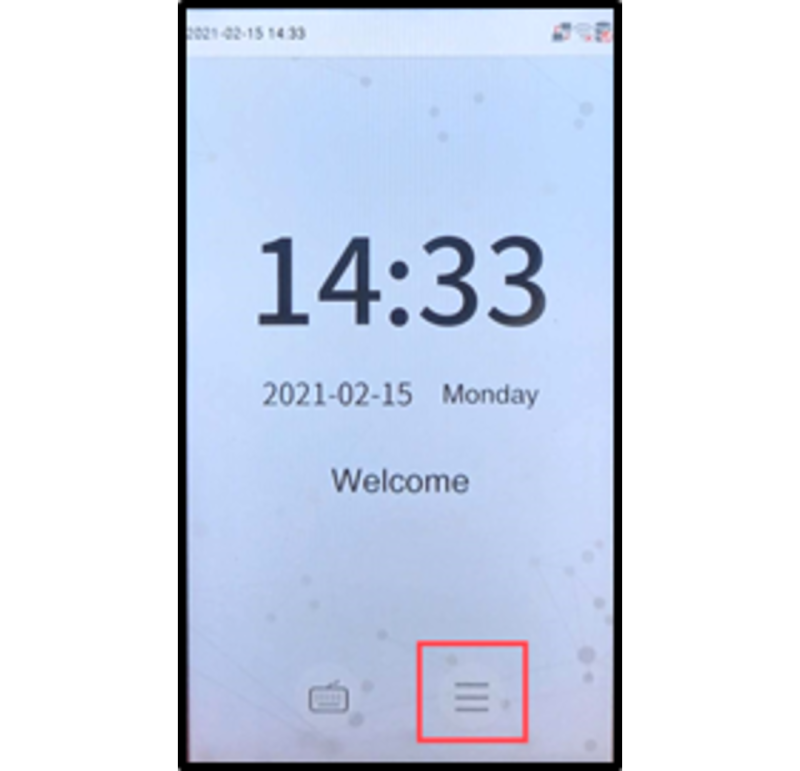
Picture 1 : Press Menu Icon
Picture 2 : Select COMM icon
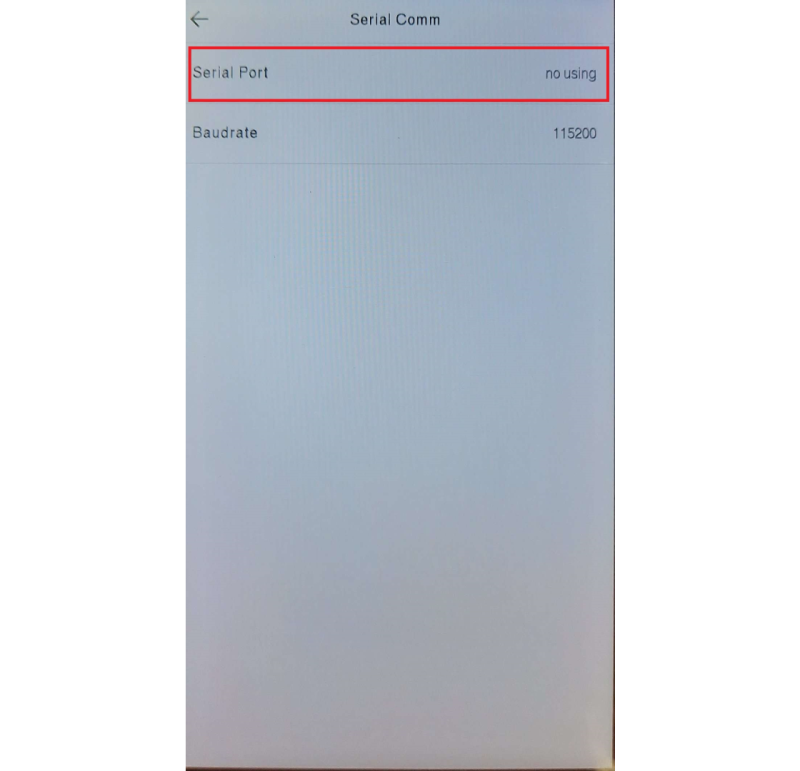
Picture 3 : Select Serial Comm
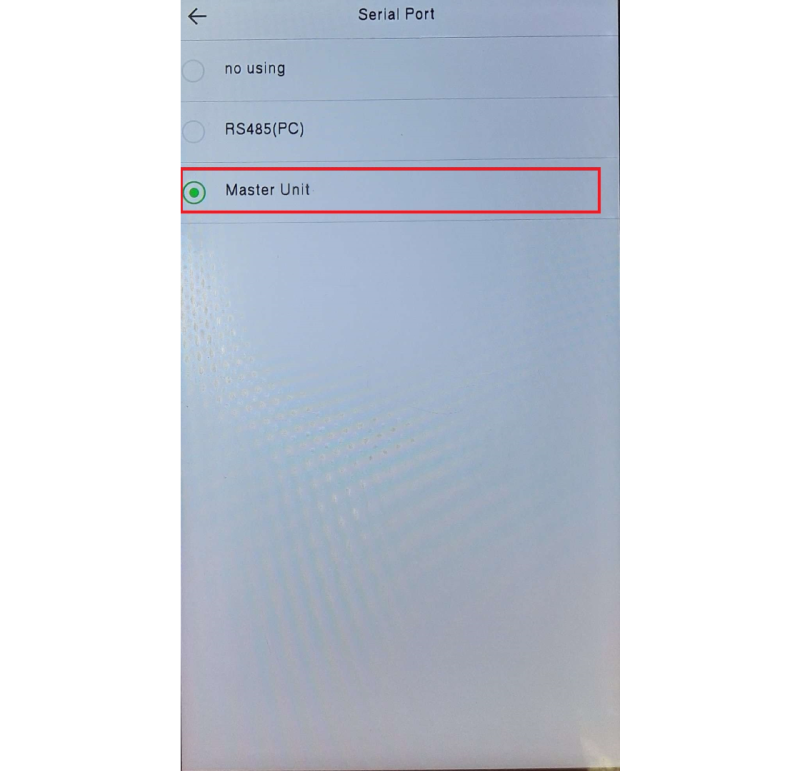
Picture 4 : Select Serial Port
Picture 5 : Select Master Unit
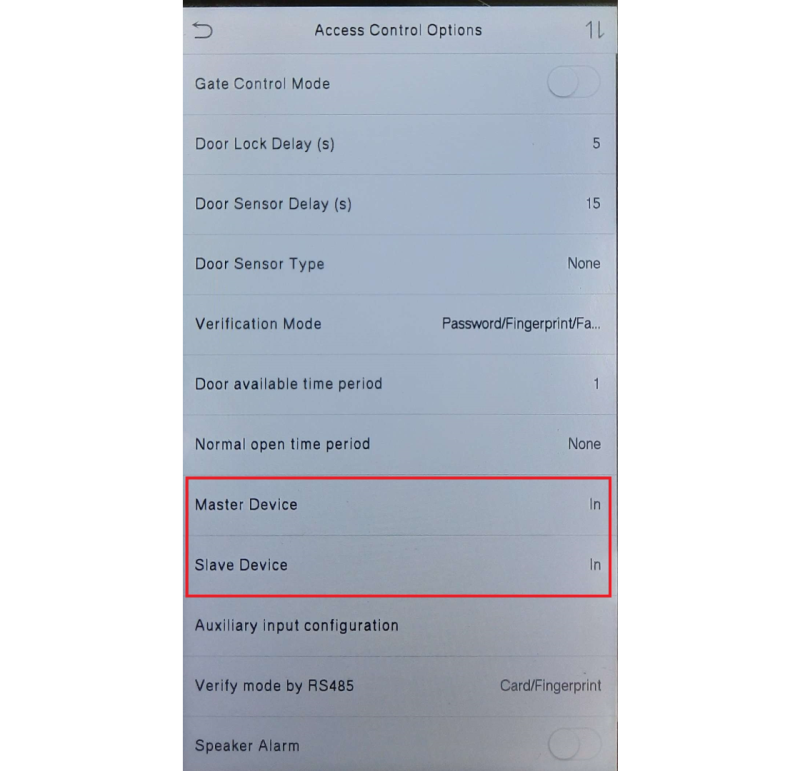
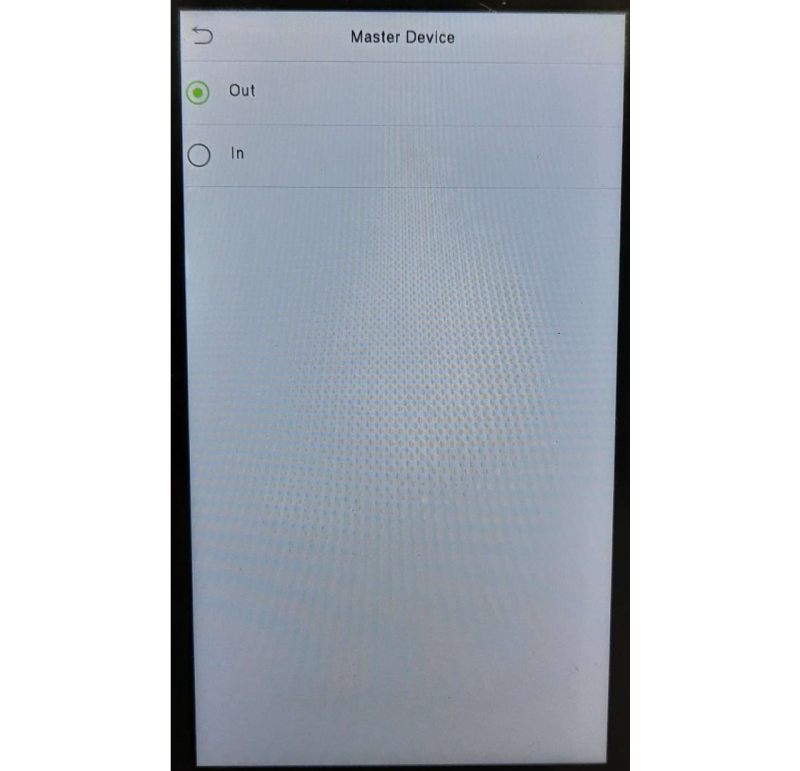
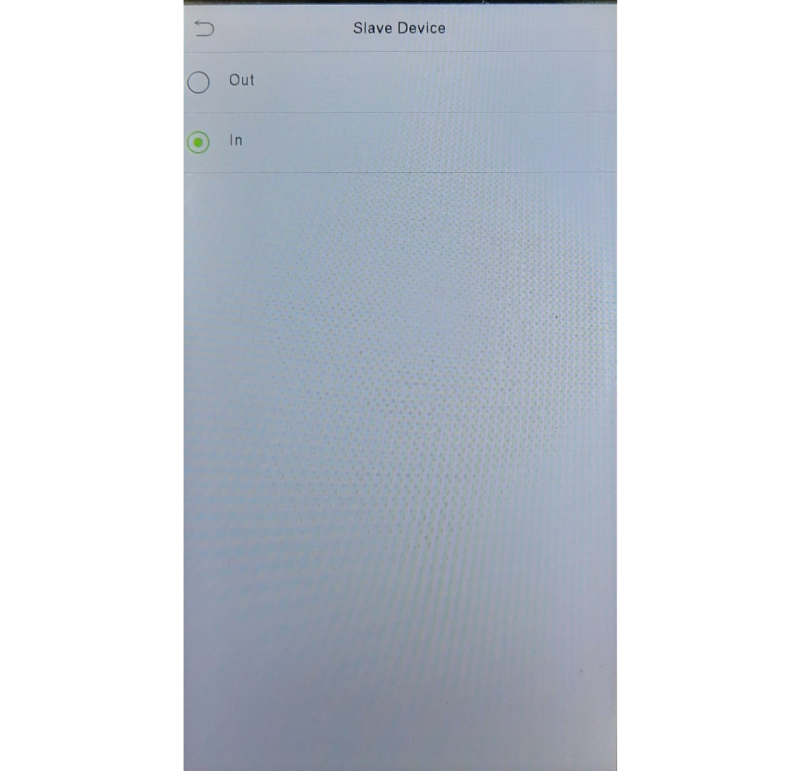
After setting the Face ID 5 as a Master Unit, the IN and OUT for the device need to be set as to determine either the master will act as the IN device or OUT.
Picture 6: Push menu icon
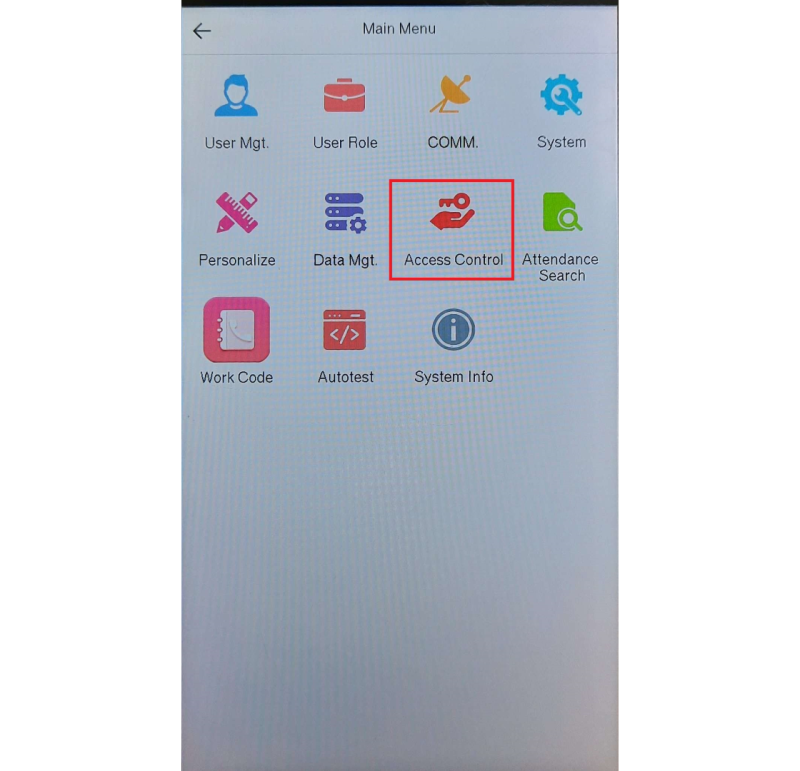
Picture 7 : Select Access Control
Picture 8: Select the Master device and Slave device for position for ether In or Out
Picture 9 : Master Device select In or Out
Picture 10 : Slave Device select In or Out
Note: If some of the screenshots or steps viewed here are different from the ones in the current system, this is due to our continuous effort to improve our system from time to time. Please notify us at [email protected], we will update it as soon as possible.
Introduction
Adding new Smart AC1, Smart AC1/TD, Smart AC1/FTD, Face ID 5, Face ID 5/TD, or Face ID 5/FTD in existing TimeTec AWDMS and Ingress software might lead to problems of synchronizing user data from software to the new device. This is due to not having configured an access level for the new device. Follow the steps below to overcome this difficulty:
Process
Before connecting your devices into the TimeTec AWDMS and Ingress software, kindly check the following:
1. Please check your PC server IP address using Windows Command Prompt. Run CMD > Type ipconfig > Press Enter. You can see from the picture below that the PC IP address is 192.168.4.214. (Wireless LAN)
2. Go to the device. Press Menu > COMM. > Cloud Server Setting > Insert your PC IP address > Set Server Port to 8088.IMPORTANT NOTE: If you are using Wireless network (WIFI), please make sure you connect the device with the same wireless network. Menu > Wireless Network > Turn ON WIFI > Select the same network with your server PC.
3. Then, run TimeTec Cloud AWDMS > Click on Access > Device > Search Device > Search. After completed, the device details will be listed as per screenshot below.
4. After you manage to get the device listed in AWDMS, please run your Ingress software. Go to Devices > Add Device > Set the Device Name > Select AWDMS as Communication Mode > Key in Serial Number > Click ADD.
5. After you successfully add the device in Ingress software, you need to assign the new device to the existing Access Group. Go to Access level > Select Full Access > Click Edit > Click Add > Select Door (New door) > Click OK > Save. Please make sure to not skip these steps as the new device needs to be assigned to the existing access group in order for the user data to get synchronized to the new device.
6. Then, you need to do synchronization from Ingress software to the AWDMS. This will sync all the access level settings that have been made in Ingress software to the new device. Click on the Ingress logo at top left corner > Notification > Synchronize Device Setting > Tick all check box > Tick sync to AWDMS > Click on Start Synchronize. During this access group sync, the user list should also be synced to the device automatically.
IMPORTANT NOTE: Please make sure you already download all the user data such as Face, Fingerprint or Palm template from the current device into Ingress software. This is to make sure there is no data missing during the synchronization process.
*IMPORTANT NOTES :
1) ONLY SYNC 1 TIME TO THE DEVICE.
2) IF YOU ADD NEW USER IN THE FUTURE, ASSIGN USER TO EXISTING ACCESS
LEVEL AND USE UPLOAD FUNCTION TO UPLOAD NEW USER
3) IF YOU ADD NEW USER IN THE FUTURE AND ASSIGN TO A NEW ACCESS LEVEL,
PLEASE SYNC THE SETTING AGAIN FOLLOWING THE STEPS BELOW
7. Lastly, you may check in AWDMS if the new device is already assigned to the access group. Click on Access > Access Control > Access Level > Select one of the access levels > Check the device listed at the right side. Then, you can check in the device whether the user data is successfully transferred.
Note: If some of the screenshots or steps viewed here are different from the ones in the current system, this is due to our continuous effort to improve our system from time to time. Please notify us at [email protected], we will update it as soon as possible.





.png)
1.png)
.jpg)
.jpg)
.jpg)
6.jpg)
3.jpg)
1.jpg)
1.jpg)
2.jpg)




1.jpg)
.jpg)
1.jpg)
1.jpg)
1.jpg)
1.jpg)
1.jpg)
.jpg)
.jpg)
1.jpg)
1.jpg)


