Introduction
This post is intended to those who may face problem in setting up Face ID 2 FMM220 with R2c combination.
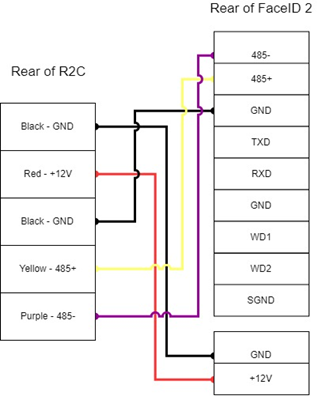
Wiring installation
Settings in Face ID 2 FMM220
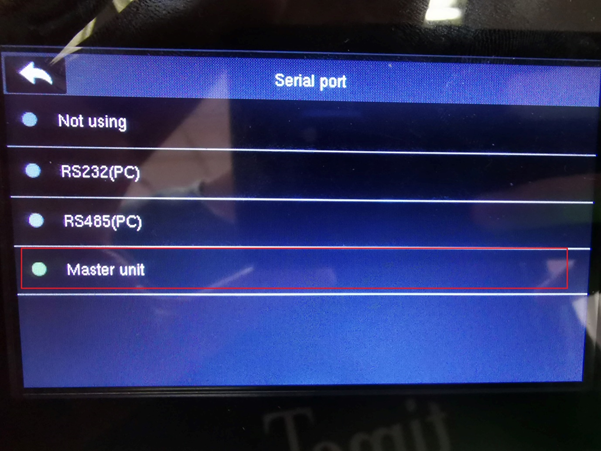
Other than the proper wiring setup, there is a setting to configure in Face ID 2 (Master) for master-slave setup to work correctly.
Go to Face ID 2 terminal, enter Menu > Comm. > Serial Port > Master Unit. Tick ‘Master Unit’ to complete the setup.
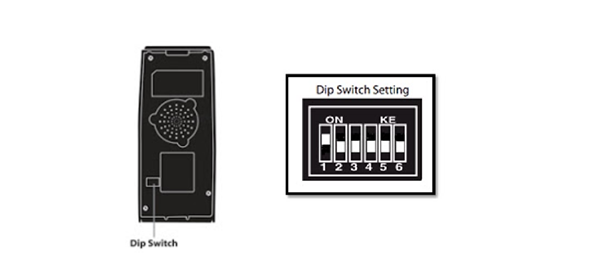
**Do not adjust the dip switch unless you are connecting the R2c with the Ingressus controller. If your R2c is unable to send any fingerprint or card data to the master terminal, please check the dip switch. Make sure it is set to the default settings as highlighted.
Note: If some of the screenshots or steps viewed here are different from the ones in the current system, this is due to our continuous effort to improve our system from time to time. Please notify us at
[email protected], we will update it as soon as possible.
Introduction
Access Combo is an access control function that requires verifications to be done by a combination of different users. This function is suitable for highly-secured rooms or vaults that need more than senior-level employees from different departments to verify their identities before the door can be accessed. This tip will explain how to set this function in case your company would want to use it.
Steps and Procedures
To set up an access combo for two persons, each person must be assigned to a different group and a different combination
To set up a group and assign a user into a group.
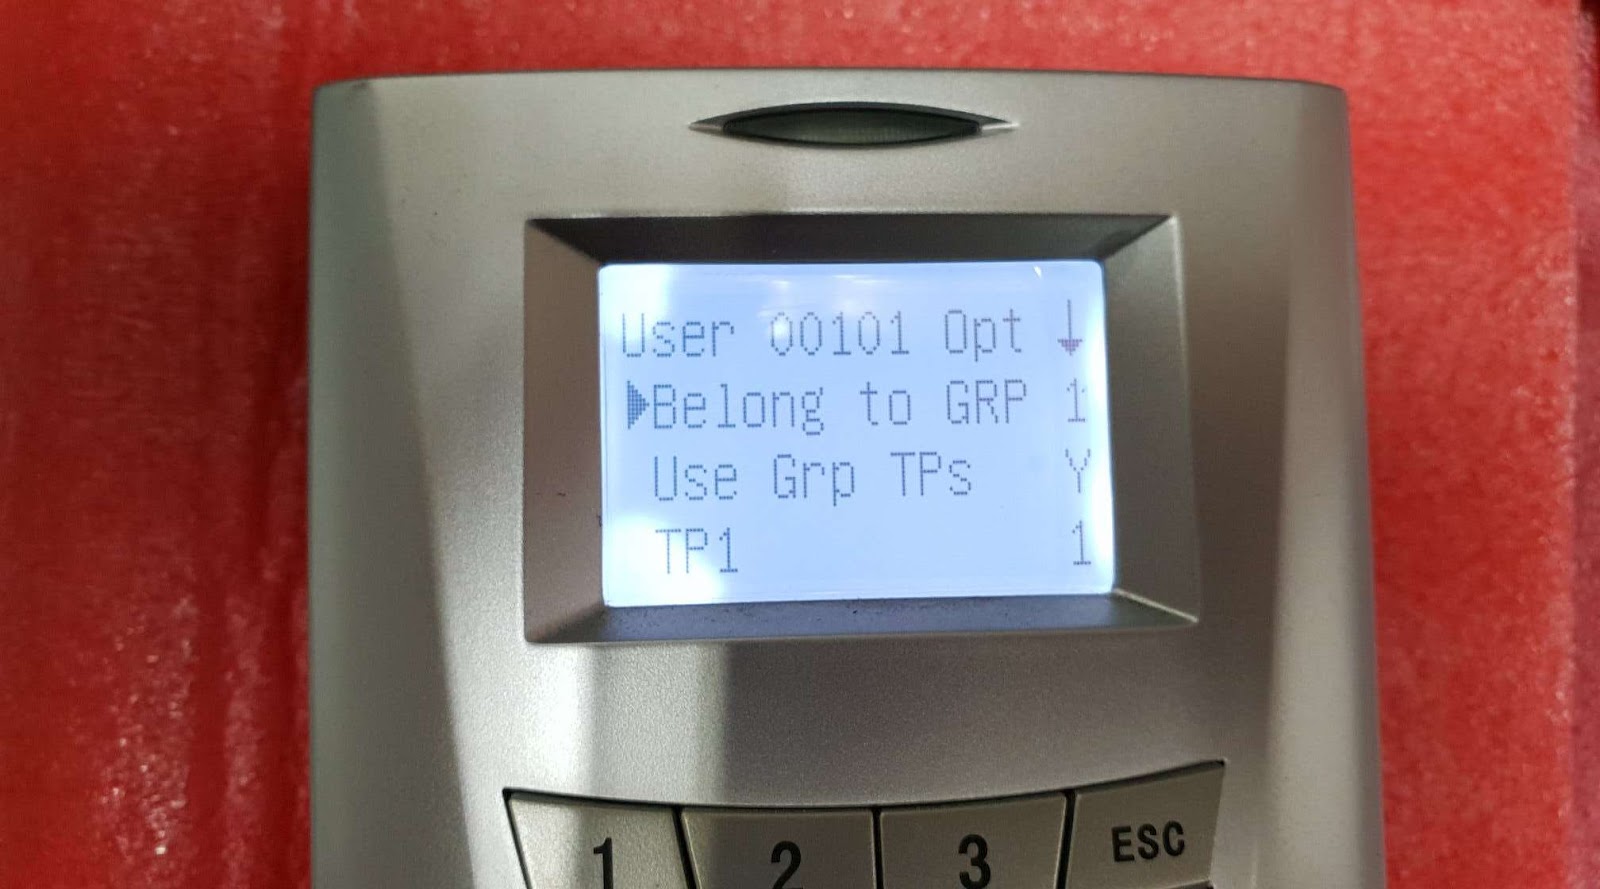
Menu > Options > Access options > User acc opts > ”define user pin” example (101) > Belong to GRP “1”.
Repeat Step 1 for the second user: -
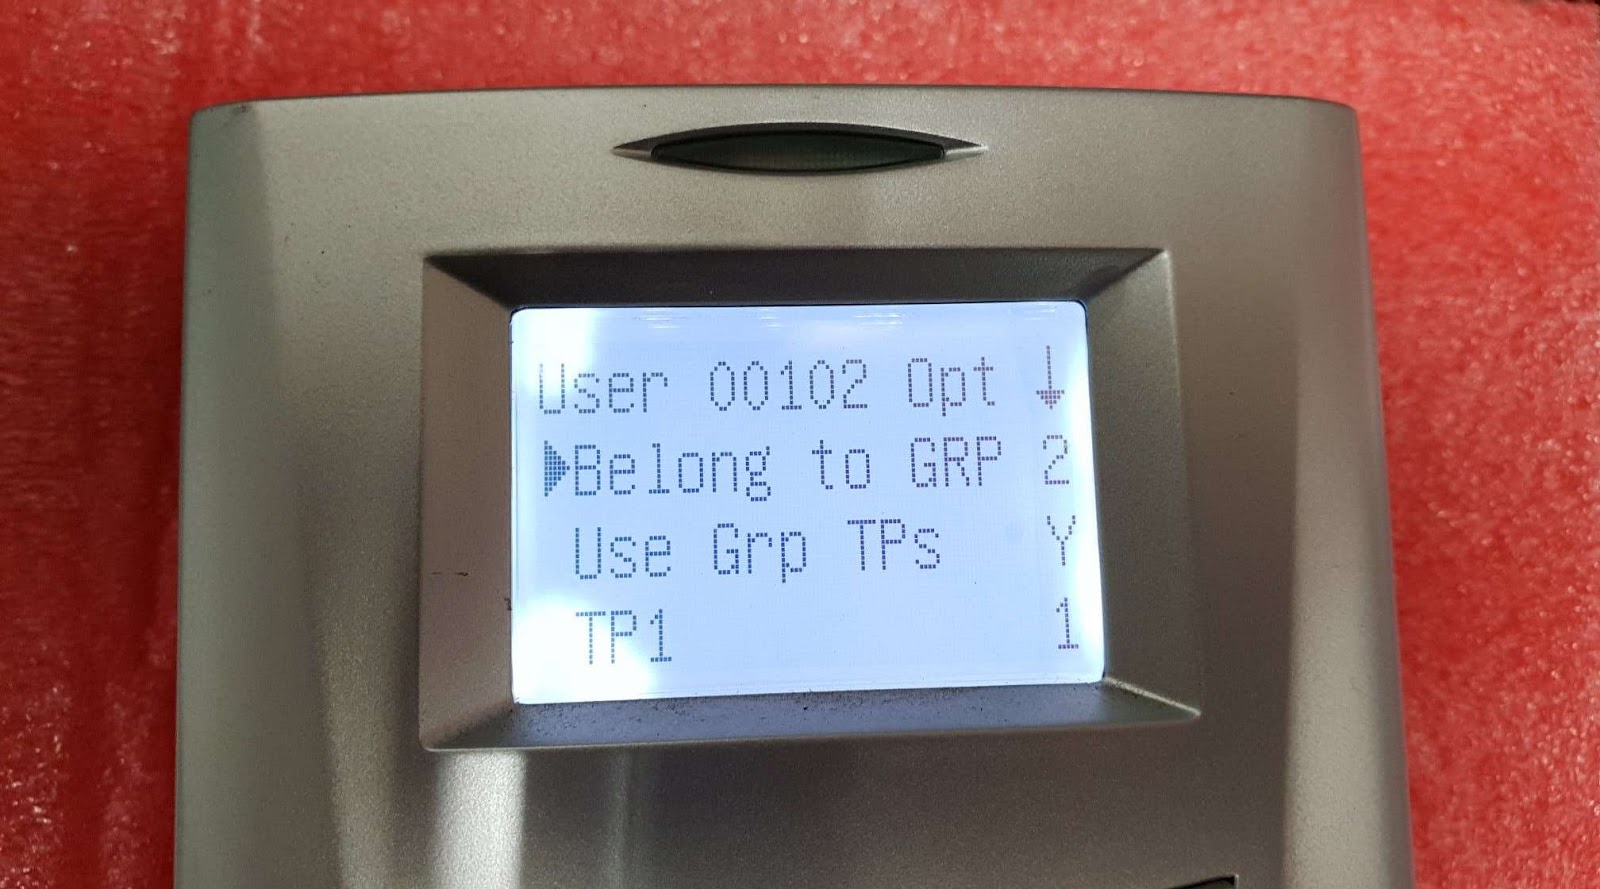
Menu > Options > Access options > User acc opts > “define user pin” example (102) > Belong to GRP “2”.
To assign two persons for an operation combo
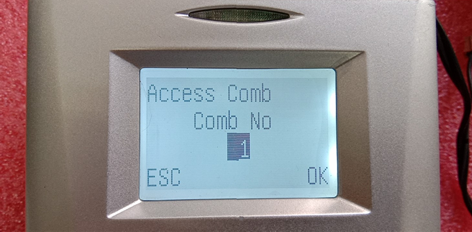
2.1 We need to create a combo name, in this example is Combo No 1.
Menu > Options > Access Options > Access Comb > Comb No 1 > OK.
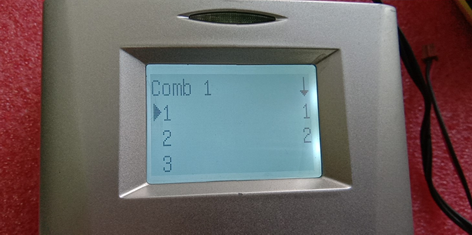
Next, we need to assign two persons in this Operation Combo:-
Person number one belongs to GROUP “1” and Person number two belongs to GROUP “2”.
3. Access Combo For three Persons
Below is an example of Access Combo for three persons but the access can be granted by only two persons at one time: -
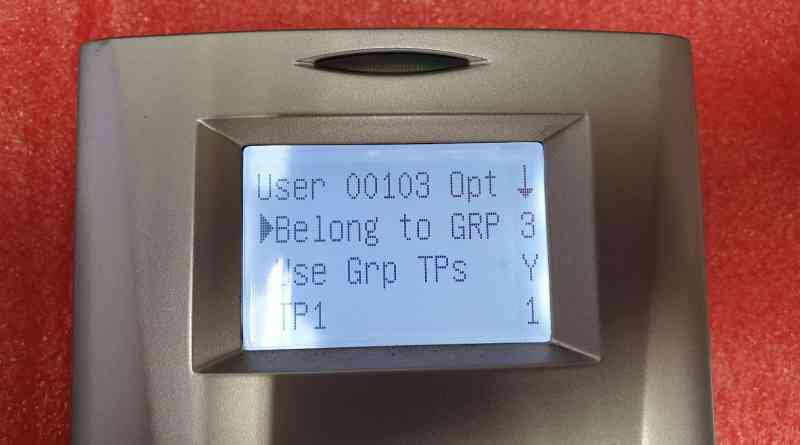
3.1 Repeat Step 1 for User Number 3 that belongs to Group 3:-
Menu > Options > Access options > User acc opts > “define user pin” example (103) > Belong to GRP “3”
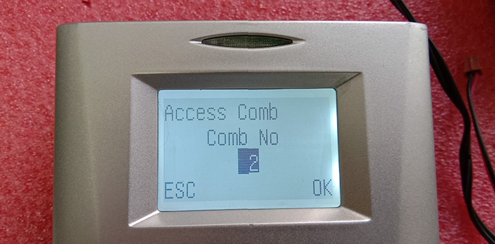
3.2 Create another combo named as Combo No 2:-
Menu > Options > Access options > Access Comb > Comb No 2 > OK: -
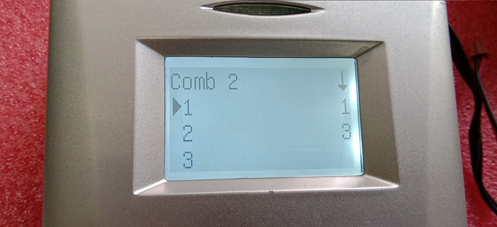
In Combo No 2, the users must be assigned as:-
Person number one belongs to GRP “1” and Person number three belongs to GRP “3”.
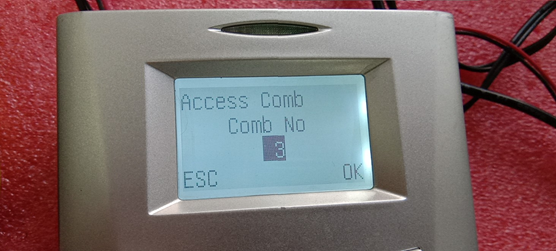
3.3 Create another combo named as Combo 3: -
Menu > Options > Access options > Access Comb > Comb No. 3 > OK: -
In Combo No. 3, the users must be assigned as:-
Person number one belongs to GRP “2” and Person number two belongs to GRP “3”.
When the settings have been done, and the door access is assigned with Access Combo function, the relevant people’s fingerprints have to be presented at the door in order to access it.
Anti Passback for One Time IN, One Time Out for R2c (Slave) and R2
Anti Passback is a feature that prevents users from tailgating through controlled areas by tracking the entry and exit counts. A user can only exit an area that they have already been entered and can only enter an area that they have been previously exited.
How to Use
First, we need to determine which device will be assigned as IN and OUT, depends on the installation of the device.
If the R2 has been determined as IN for the door, you can change the configuration as below: -
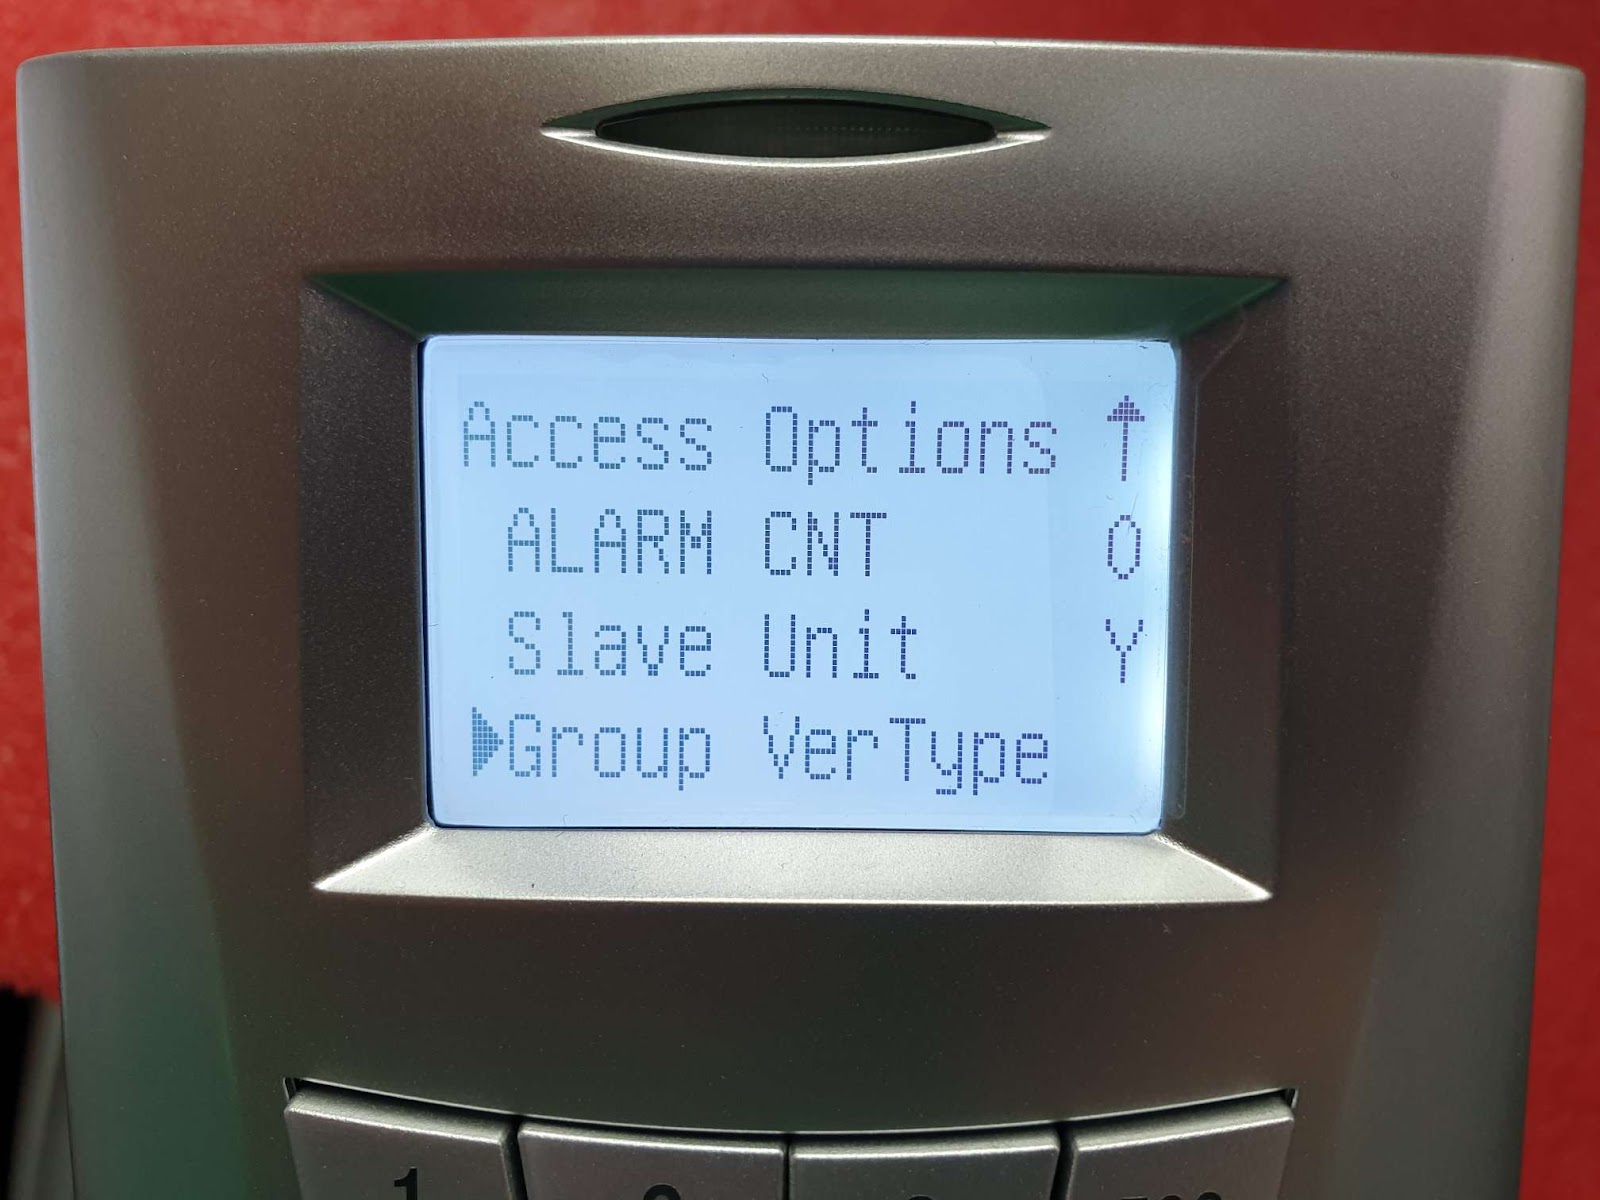
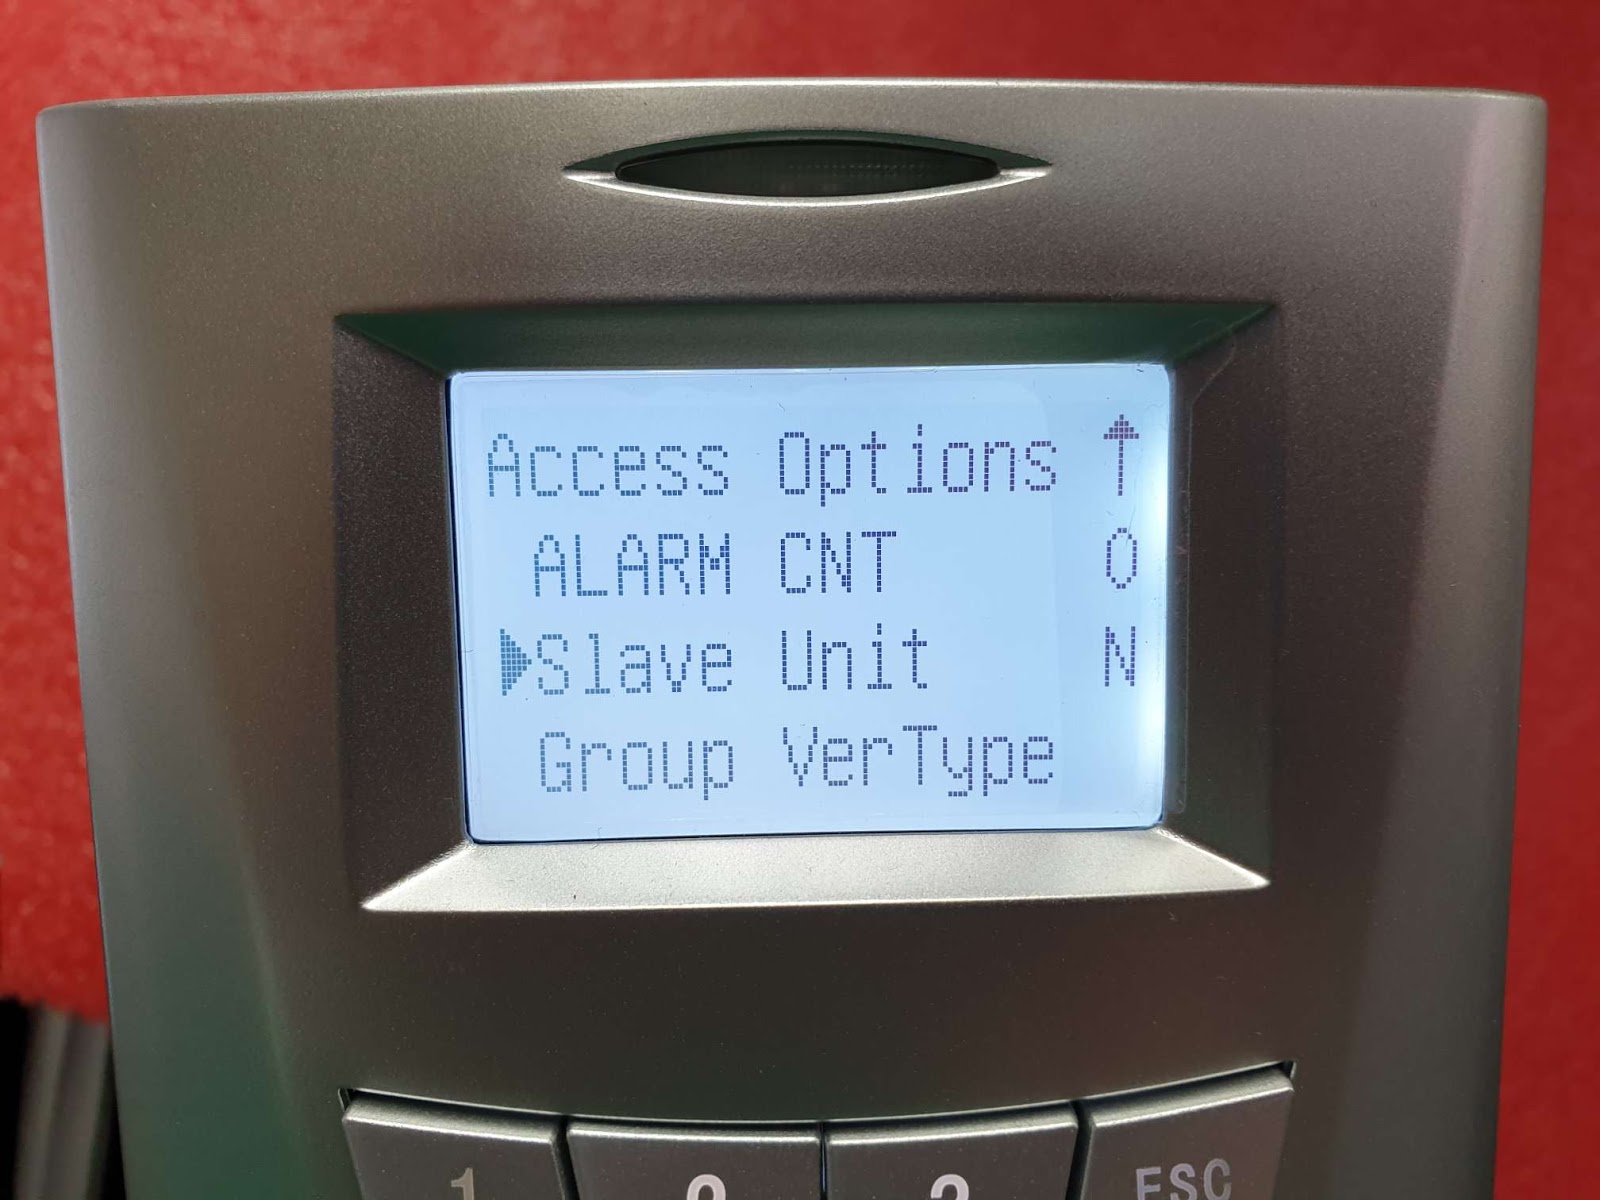
Menu > Access Options > Slave Unit “Y”
If the R2c (Slave) has been determined as IN for the door, you can change the configuration as below: -
Menu > Access Options > Slave Unit “N”
The configuration for an Anti Passback can be set as below: -
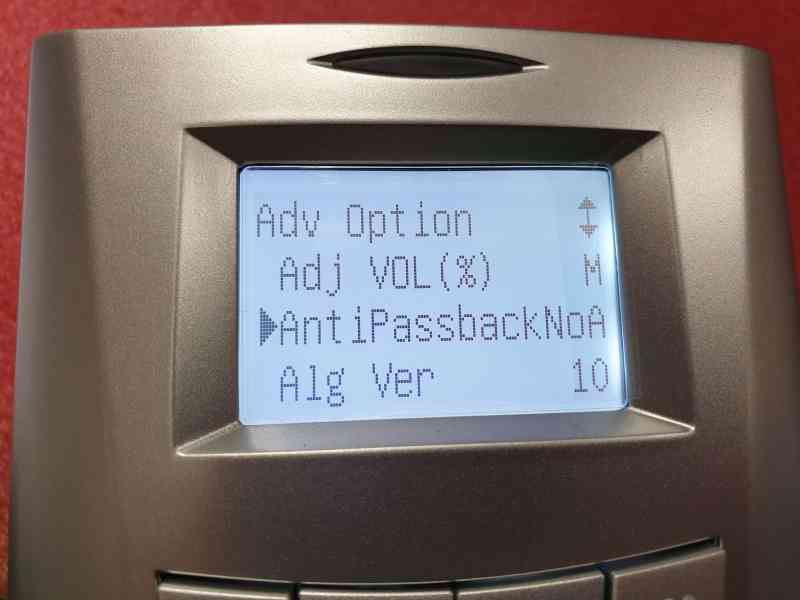
Menu > Options > System opt > Adv Option > Anti Passback NoA
Menu > Options > System opt > Adv option > Anti Passback “In Out” > OK > Esc > Save
If the configuration doesn't work, it means that the CMOS battery inside the R2 has already drained. To fix this, change the battery CR11220 inside the R2 and all enrolled users have to be *deleted. Then, re-enroll the users via Ingress software.
*Please make sure to do the back up from the device before you delete the enrolled users.
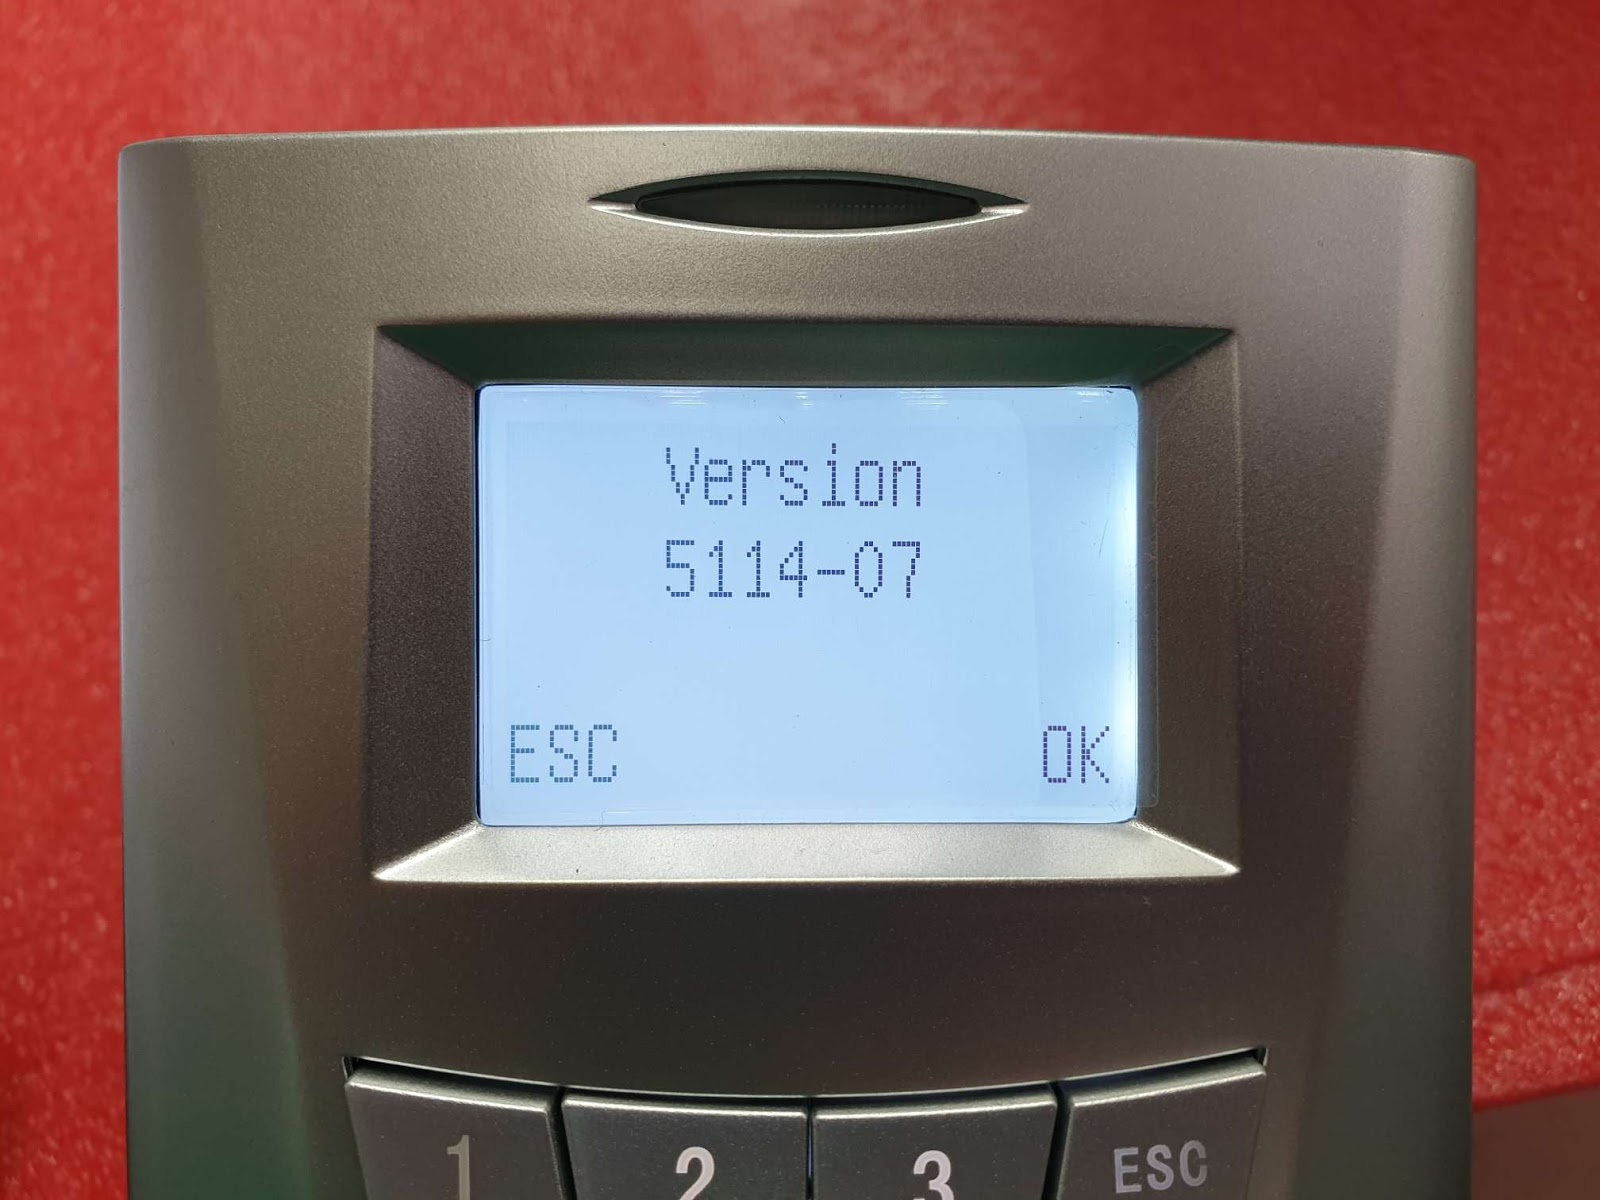
NOTE: For R2 Firmware, the version is 5114-07. Once you have checked the firmware version, key in the number “6 1 6 1” and then press the “Up” button.
If you find the firmware version is different from the picture above, please contact
[email protected] to request for an assistance to update the firmware.
Note: If any of the screenshots or steps in this manual are different from the current system, it is due to our continuous effort to improve our system from time to time. Please notify us at
[email protected]. We will update it as soon as possible.
INTRODUCTION
Previously FingerTec R2 was paired with the slave device R2i. Due to major improvements carried out on the slave, R2c was introduced as a replacement to R2i. However, with the improvements, the new R2c can only support R2 with Biobridge VX10.0 algorithm and incompatible to R2 version 565 with Biobridge VX9.0 algorithm. The differences in algorithm versions disallow transfer of fingerprint templates between the previous R2 and the latest R2. And to use the new R2, users need to reenroll all user fingerprint templates again, a very impractical solution for organizations that have a large number of employees. As an alternative solution, we suggest the pairing of the old R2 unit (565) with H2i unit to work as master-slave in-out readers. This combination can be configured to work with Biobridge VX9.0 algorithm smoothly.
BENEFITS
By choosing this method, you can skip the reenrollment of users’ fingerprint templates and use the existing fingerprint templates (BioBridge VX9.0) from the old device to be transferred into the new units.
PROCESS
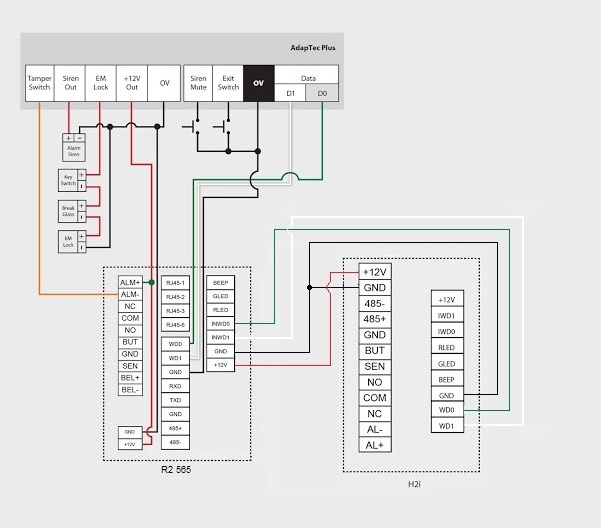
To set up this R2-H2i combination, you need to connect these 2 terminals according to the connection diagram below.
Terminal configurations:
AT R2 (565) MASTER
Change BioBridge Algorithm Version from Vx10 to Vx9.0
Press Menu > Option > System Option > Adv Option > Alg Ver > 9.0 > Ok > Esc & Save
Setting For Wiegand Input For R2.
Press Menu > Option > System Option > Wiegand > Input setting > FP device > Input format = WG26 with ID > Esc > Input = User > Esc & Save
AT H2i SLAVE
Download the FingerTec Terminal Function Tools at http://www.fingertec.com/download/terminal-func.zip
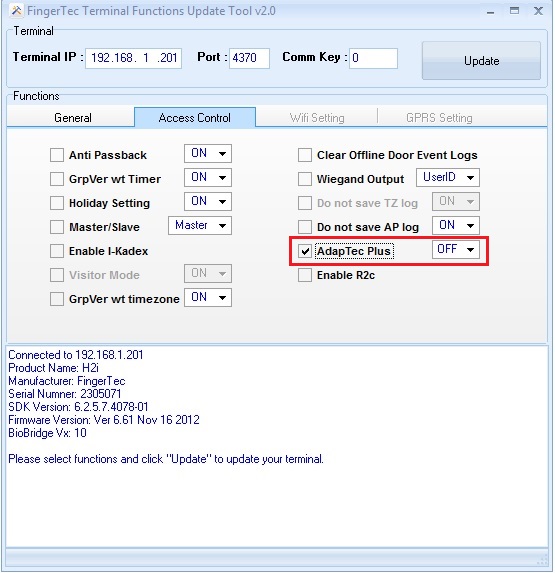
Change AdapTec Plus to Off
Start up the FingerTec Terminal Function Tool and connect to the H2i terminal and change the AdapTec Plus to OFF at Access Control menu.
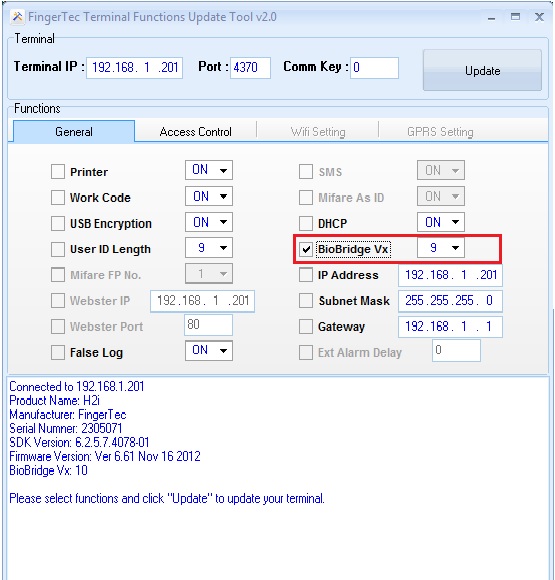
Change BioBridge Algorithm Version to Vx 9.0
Start up the FingerTec Terminal Function Tool and connect to the H2i terminal and change the BioBridge Algorithm to Vx 9.0 at General Menu.
And now you’re done. By pairing old R2 565 version with the latest H2i, it could save you tonnes of time enrolling the new templates for all users. If you found yourself stumbled upon this predicament, give this suggestion a serious consideration. Contact us at
[email protected] for further information.
Introduction
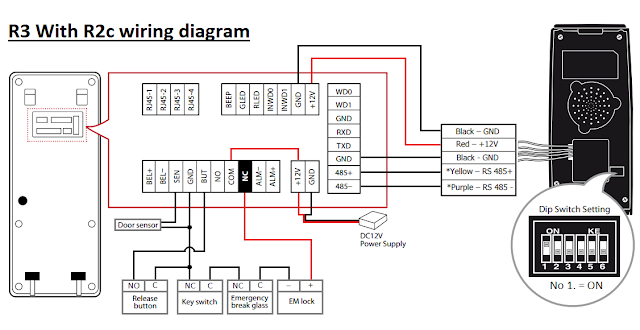
With the new release of our latest products, some terminal installations are different from our previous guides and diagrams. Below is the full installation wiring diagram and settings to connect R3 with R2c.
Benefits
By pairing R3 with R2c, you can have a totally secured biometrics with having to invest in two master terminals. All verifications and data storage are managed by the master terminal. You can also control the employee movements by implementing the Anti-PassBack settings when you pair the R3 with R2c.
Process
Settings at R3:
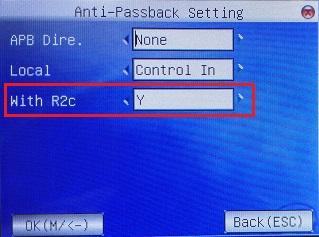
Enable the R2c setting at the R3: Press Menu > User Management > Access > Anti-Passback Setting > With R2c > Set to Y
If the R2c does not respond during installation:
Check on the below R3 settings:
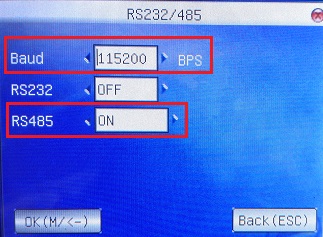
1. Make sure the settings in R3 are set as below.
Baud : 115200 BPS
RS232 : OFF
RS485: ON
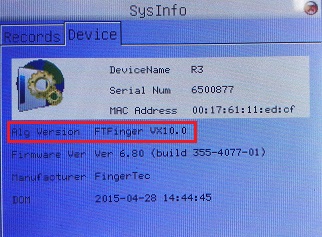
2. Make sure the R3 Fingerprint algorithm is BioBridge VX 10.0: Press Menu > System Info
> Device > Alg Version FTFinger VX10.0
**If you found that the Alg Version is FTFinger VX9.0, you need to change it to
VX10.0: Press Menu > System > System > Alg Version > FTFinger VX10.0
Check on the R2c settings:
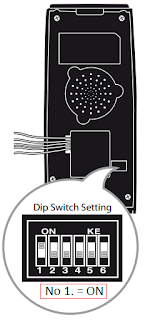
1. Check the Dip Switch settings below:
To refer to R3 and R2c manuals, click here for R3 and click this link here for R2c.
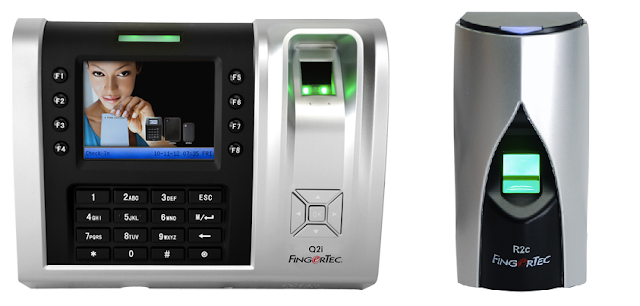
Effective immediately, Q2i
devices can now be paired with R2c readers. However, this is only possible for
Q2i devices with a core board that is version FEM800. When purchasing a brand
new Q2i terminal, remember to notify the sales person that the terminal is to
be paired with R2c as the slave reader.
If you are already using a
Q2i device at your place, please check the core board's version (either FEM600 or FEM800) before pairing it
with an R2c reader. You can check this info by using the FingerTec Device Info
tool. Read more for the step-by-step guide to enable the Q2i-R2c pairing.
Effective
immediately, AC900 devices can now be paired with R2c readers. However, this is
only possible for AC900 devices with a core board that is version FEM565. When purchasing a brand
new AC900 terminal, remember to notify the sales person that the terminal is to
be paired with R2c as the slave reader.
If you are already
using a AC900 device at your place, please check the core board's version (either FEM500 or FEM565) before pairing it with an R2c reader. You can check this info by using the FingerTec Device Info tool (Click HERE to download).
To Enable AC900 to
pair with R2c, Press Menu > Option > Access Option > 485 Reader Fun.
> Y or N > Set to Y > Save > Restart both the AC900 and R2c.
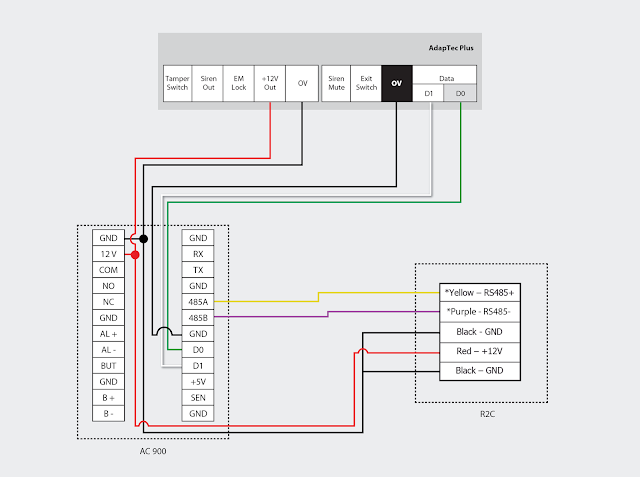
For your reference,
below is an installation diagram for the AC900 and R2c devices with the new
AdapTec Plus.
Effective immediately, H2i devices can now be paired with R2c readers. However, this is only possible through a customization request. When purchasing a brand new H2i terminal, remember to notify the sales person that the terminal is to be paired with R2c as the slave reader.
If you are already using a H2i device at your place, simply send it over back to us for an update of the MCU board. This is because an update of the MCU board using PIC controller is necessary in order for the H2i device to support R2c.
For your reference, below is an installation diagram for the H2i and R2c devices with the new AdapTec Plus.
With the launch of the Ingress software
just around the corner, FingerTec has released the Ingress Trial Version for
our resellers as well as end-users to test out the software before actually making a
purchase. The trial version is strictly accessible only to FingerTec’s
Authorized Resellers & Distributors and End-Users of FingerTec only.
The instructions below are intended to
help you understand the workflow, types of testing environment, and what you
need to prepare before you start the test.
Supported Models:
Multimedia Models:
AC100C, TA100C, TA100TC, TA200 Plus.
Access Control
& Time Attendance Models: Ingressus, Q2i, i-Kiosk 100 Plus, AC900, R2, H2i,
R2c.
Face Recognition
Models: Face ID 2, Face ID 3, Face ID 4, Face ID 4d.
Card Reader
Models: TimeLine 100, Kadex, m-Kadex, k-Kadex, i-Kadex.
Please make sure that the FingerTec
terminal you use for testing is listed above. Any terminals excluded from the list will not work with the Ingress Software. Next up, go to Ingress’s trial
version page to fill in the request form and submit it back to us. You are
required to insert your FingerTec terminal’s serial number for us to generate
the trial product key.
If you are not using a FingerTec terminal for testing,
you are still required to insert the testing terminal’s serial number,
and we will process it accordingly. If you do not have a terminal to test the
Ingress software, just leave the serial number text box empty and we will
provide you with an 8-digit device serial number and the trial product key. We
will email you once your Ingress trial application has been approved.
You can
access Ingress’s trial version page by clicking this link.
Once your application has been approved,
you may download the Ingress Trial Version software installer here.
Unzip the file, right click the
installation file and select Run as administrator to prompt the installation.
Follow the onscreen instructions to complete the installation.
Upon the Ingress installation, it is
mandatory to activate the device before you can use it to perform testing. There
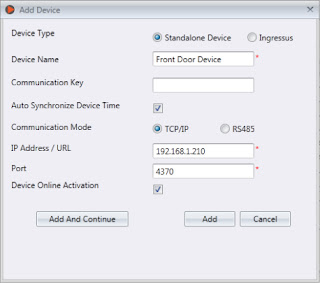
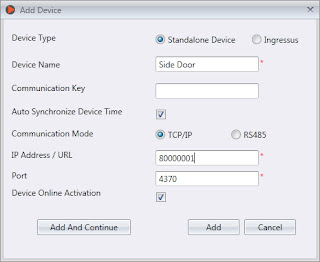
are 2 ways to activate the device. While adding new devices to the software, tick
the checkbox for Device Online Activation.
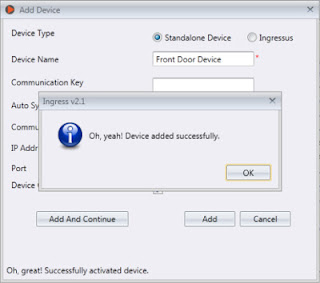
Once the activation is completed, you
can see a “Successful Activation” message at the bottom left corner of the
window.
As mentioned above, if you do not have any
terminals to perform testing, please insert the given serial number at the IP
Address / URL text box and tick the checkbox for Device Online Activation. Click Add to
activate the serial number and then you may start to use the Ingress software
for testing.
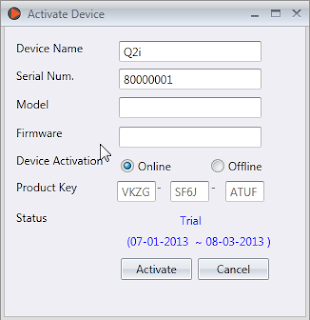
Another way to activate the terminal is in Devices.
Click on the device that you want to activate and click Activate Device.
At the Activate Device window, there are 2
methods to activate the device; either Online or Offline. If you choose
to activate the device online, select Online and click Activate. The Ingress Software
will connect to our database server to verify and activate the device
accordingly. You will see the device’s activation status as well as the expiry
date.
If you choose to activate the device offline, kindly
contact us at [email protected] to request for the trial product key. Then insert
the given product key into the text box. Select Offline and click Activate to
proceed with the activation.
Written by Vincent


.jpg)
