Introduction
There are various methods of registering visitors in TimeTec VMS, either for walk-in visitors or pre-registered visitors. For walk-in visitors who do not have a visitation ticket during the pre-registration process, a front desk officer or security personnel can register them using the Walk-In Registration method. This article explains the steps.
Process
A. Walk-In Registration from TimeTec VMS Web
1. From the Dashboard in TimeTec VMS, click on the New Visit button.
2. Select purpose of visit, employee to meet and visitor count, then click Next to proceed.3. For MyKad users, insert visitor’s MyKad into the smart card reader slot. Wait a while until the flashing white LED stops blinking and becomes static. Then, click on the Read Smart Card. Once successful, the profile photo, which is the photo in MyKad, will appear with the Name and ID number on each field accordingly.
4. For visitors without MyKad or unreadable MyKad, click on the Profile Photo to open a webcam mode to capture their profile photo. Then, instruct visitors to stand in front of the webcam properly.
5. Fill up the visitor's details accordingly. For visitors with scanned MyKad, their ID no. and Name will be automatically filled in after a successful scan. Continue to fill up any necessary fields. Then Submit to proceed.6. Visitation Details consisting of the QR Code will appear. If the QR code is required for door access, click on Download Ticket and select Save and Open. Once downloaded, the PDF ticket will open. Print the ticket or instruct the visitor to snap a photo of the QR code using their mobile device to unlock the access door.
B. Walk-In Registration from I-Vizit Tablet
1. From I-Vizit app homepage, tap on Walk In
2. Select Purpose of Visit, Employee name and No. of Visitor. Then click Next to proceed.
3. Insert Body Temperature and choose a relevant answer to the Health Screening form questionnaire.4. Tap the call button if required to call the host, inform about visitors for approval, or tap the Proceed to Check-In button to proceed with registration.
5. To scan MyKad or Driving Licence using the OCR feature, tap on the ID/Driving License Photo box, the camera mode will appear to capture the photo of the ID or license card. Otherwise, insert visitor’s details accordingly into each required field. Once completed, click on the Check-In button.
6. A success message will appear indicating a successful visitor registration. Click OK to proceed.
7. Visitation tickets will appear. If the QR code is required for door access, ask the visitor to capture the image of the QR code using their mobile device or click Print if the tablet is linked to a thermal printer.Note: If some of the screenshots or steps viewed here are different from the ones in the current system, this is due to our continuous effort to improve our system from time to time. Please notify us at
[email protected], we will update it as soon as possible.
Introduction
In the latest i-Neighbour enhancement, there is a new feature under visitor rules. This feature lets the admin select whether Visitor Pass should be compulsory or not.
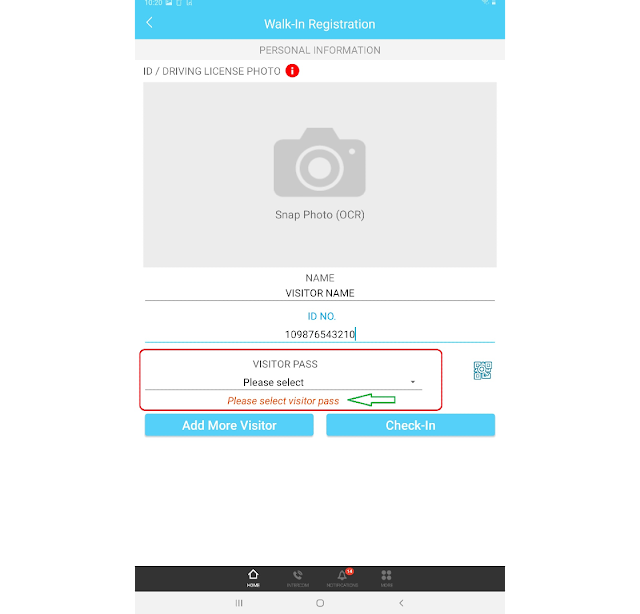
After enabling this option, the i-Vizit application (Guard House tablet) will prevent a security guard from pressing the check-in button without selecting a visitor pass.
It is easier for the security guard to determine which car/person the visitor is and ease the checkout process by having a visitor pass.
For example:
If the guard post is busy with visitors checking and out simultaneously, the security guard can collect the visitor passes from the checking out visitors and let them exit the compound and carry on with the ongoing registrations of the incoming visitors. Later, when the guard post is less busy, the guard can check out those visitors from the system using the visitor passes collected. Without Visitor Passes, the security guard might overlook who have checked out the residence.
Process
1. To enable “Compulsory Assign Visitor Pass”
COMMUNITY > SETTING > VISITOR SETTING > RULES > EDIT > Enable this setting;
.jpg)
2. At the i-Vizit application (Guard House Tablet) , Press Synchronize/update to refresh the application
HOMEPAGE > SYNC ICON > UPDATE
3. During the registration process, if the security guard directly presses the Check-In button without selecting a visitor pass, the system will show this message.
Note: If some of the screenshots or steps viewed here are different from the ones in the current system, this is due to our continuous effort to improve our system from time to time. Please notify us at
[email protected], we will update it as soon as possible.
Introduction
i-Neighbour residents can now connect their i-TimeTec Smart Home Alarm with the community i-Neighbour’s i-Vizit Guard House Panel. Whenever their home alarm is triggered, it will send instant notification to i-Vizit Guard House Panel. The guard will know the unit number and send someone to check it immediately.
Follow the 5 steps below to connect i-TimeTec Smart Home Alarm with the community i-Vizit Guard House Panel.
Process
Step 1:
In i-TimeTec App, after configuring all smart alarm devices at i-TimeTec App, go to “More”, tap “Connect to i-Neighbour”
Step 2:
Tap “+” to connect your home security alarm to your i-Neighbour account.
1.png)
Step 3:
Pair up account by selecting location of your alarm (which will be listed in the drop down selection) and the smart gateway.
Step 4:
Enter your i-Neighbour login account and password. Tap “Next” to continue.
Step 5:
The dropdown selection will show your unit no. and your community name, select it and tap “Confirm”. It’s that simple -- Your unit is now protected! If the alarm is triggered, the i-Vizit at the i-Neighbour Guard house will send an alert instantly!
Note: If some of the screenshots or steps viewed here are different from the ones in the current system, this is due to our continuous effort to improve our system from time to time. Please notify us at [email protected], we will update it as soon as possible.
Introduction
Even with the current advanced Visitor Management System implemented in respective gated guarded communities, issues caused by human behaviour still tend to occur daily. Guards are still granting visitors entry without going through proper registration in the system.
TimeTec BLE-2 is a device meant to be an intermediary between i-Neighbour guard panel and a barrier gate controller, intending to automate and monitor the opening of the barrier gate upon registration of a visitor through the i-Neighbour Visitor Management System using Bluetooth Low Energy (BLE) technology.
In this article, we cover topics as follows:
1. Benefits of using TimeTec BLE-2 and the challenges it overcomes
2. How it connects to the barrier gate & i-Neighbour Visitor Management System (i-Vizit)
BLE-2 Benefits
Facilitate the workflow of security guards - Guards will no longer need to press on the push button to open the barrier gate after registering a visitor. With BLE-2 installed, the guards will only have to register the visitors via i-Vizit system and the barrier gate would automatically be raised allowing the visitor to enter.
The Challenges it Overcomes
The push-button can also be locked to prevent guards from using the push button to open the barrier gate manually to improve security. This way, we can ensure that the guards will be compelled to register the visitors before allowing them to enter the compound. Hence, it prevents guards from manually pressing the push button, bypassing the system to grant visitors entry without registration.
How it connects to the barrier gate & i-Vizit.
BLE-2 I/O is connected to the barrier gate via a push button. Upon completing the registration process, i-Vizit will send a signal to BLE-2 via Bluetooth Low Energy network. BLE-2 will then trigger the push button to open the barrier gate.
Note: If some of the screenshots or steps shown here are different from the current system, this might be due to our continuous effort to improve our system from time to time. Please notify us at [email protected], and we will update it as soon as possible.
Introduction
Some neighbourhoods do require every visitor, including the contractors to register at the guard house before admitting into the neighborhood. It is common to have the contractors walk in in a big group and often, the security guard will only register all contractors under one same vehicle car plate number and one same house number. Some places might even register only the driver.
In the previous version of i-Vizit, the security guards had to enter the vehicle information and the home numbers manually and repetitively. For example, when a group of four contractors approach the guardhouse for registration, the security guard will have to go through the same process four times.
Normal Check-in (Per visitor):
(Enter vehicle number> select street name / home number> host phone for verification> scan ID / license (OCR)> Press the "check in" button
However, in the latest version of i-Vizit, the security guards will only need to enter their vehicle information and home number once. Scan each ID / license per visitor (OCR) and once the "check in" button has been pressed, all contractors will be registered under the same vehicle number and the same house number.
After activating the Group Registration:
(enter vehicle number> select street name / home number> call host for verification> scan ID / license (OCR)> scan ID / license (OCR) for other visitors in the same group> Press the "sign in" button
Benefit
- Speed up the process of registering visitors who come in groups (especially Groups of contractors)
- Security guards can now register all the visitors under the same group and with all their records kept in the i-Vizit system.
A) How to activate group registration [By Admin and Security Guard]
Step 1 - [Admin Only] - Activate the group registration in the i-Neighbour Web
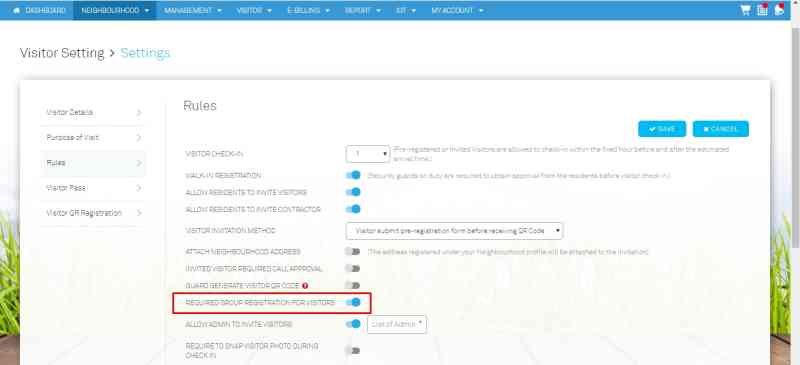
Neighbourhood > Setting > Visitor Setting > Rules > Edit > Enable “Required Group Registration For Visitor”
Step 2 - [Security Guard] - Click the Update button to Synchronize/update i-Vizit.Security guard must press the update button in i-Vizit to load all new data and new settings which has been done by the admin : Homepage > Synchronize icon > Press update button > * Please ensure that the date and time is up to date.2.png)
1.png)
B) How to Register/Check-in visitor (Group registration) using i-Vizit [By Security Guard]
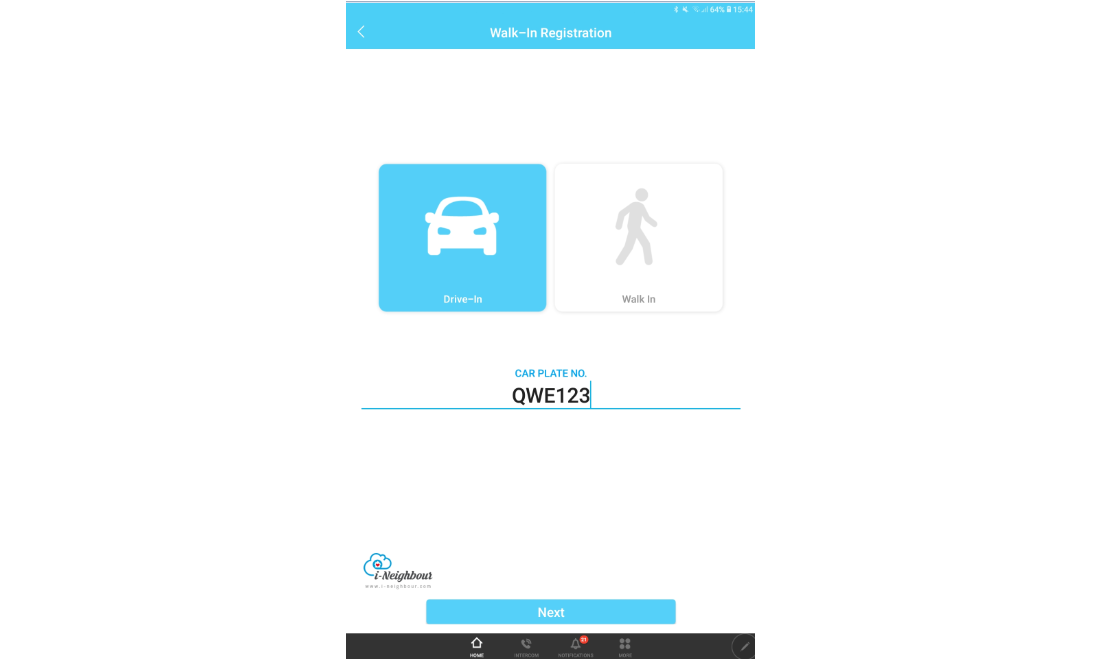
Step 1 - Press “Walk In” > Select Drive-In or Walk in > Press “Next”
For Drive-in - Please fill in Car Plate number
For Walk in - Please fill in ID/Driving license number
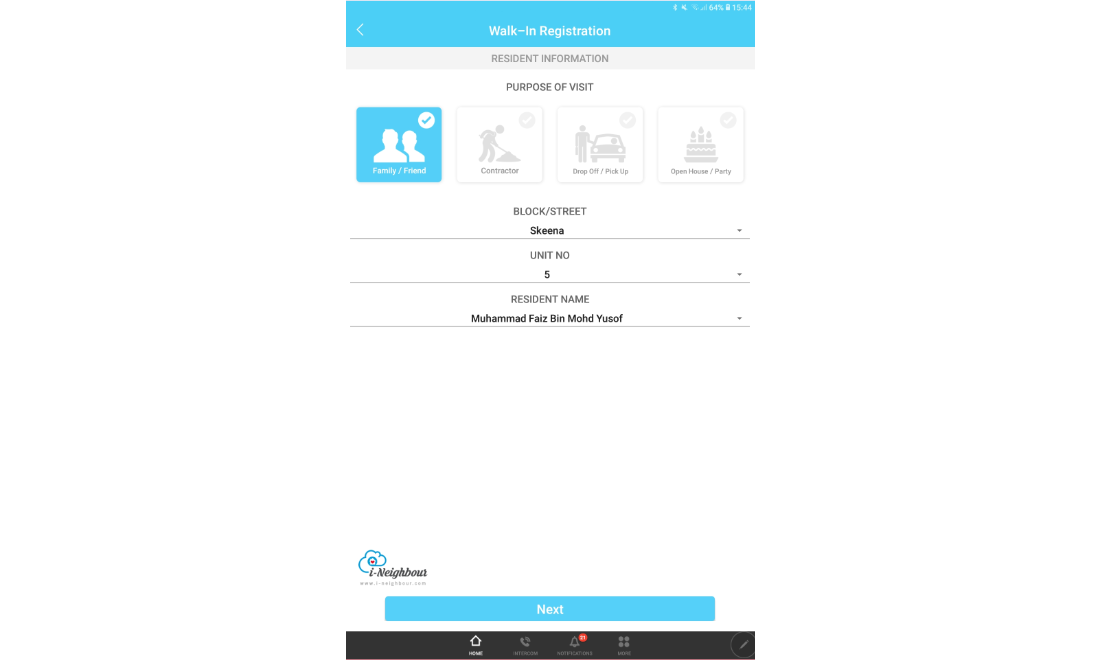
Step 2 - Resident Information
Select Purpose of visit > Select block/street > Select unit number > Select resident name
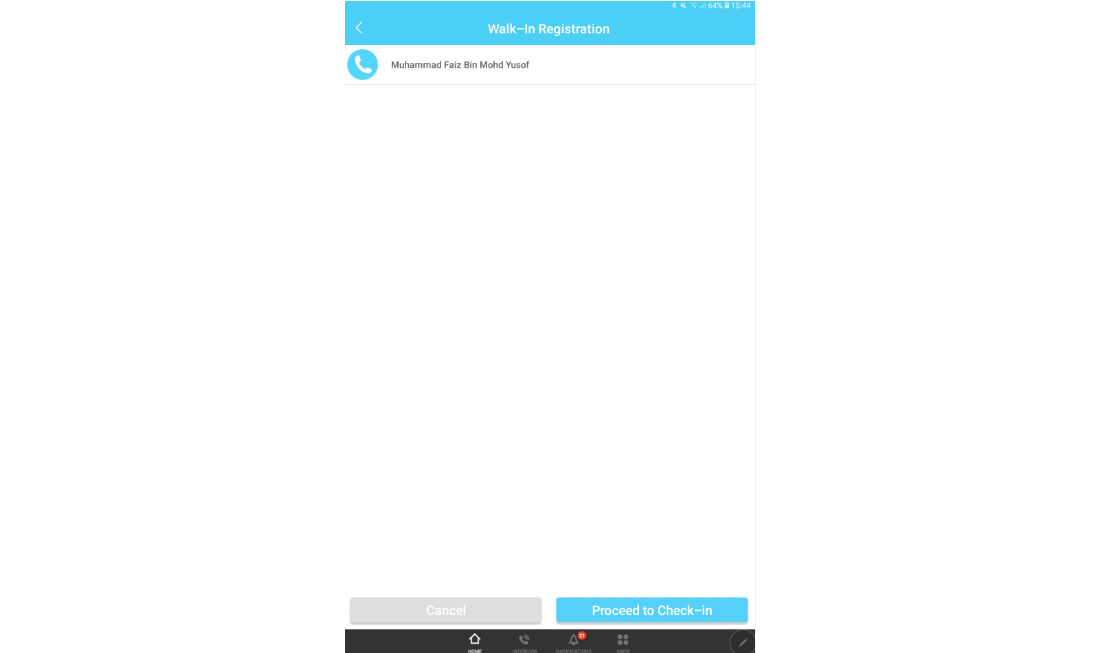
Step 3 [Optional] - Intercom to seek approval from unit/house owner
Press owner name > Choose App as “Phone” > Get approval > press “Proceed to Check-in”
Step 4 - Visitor personal Information
(For example, a group of contractors come in with 2 person)
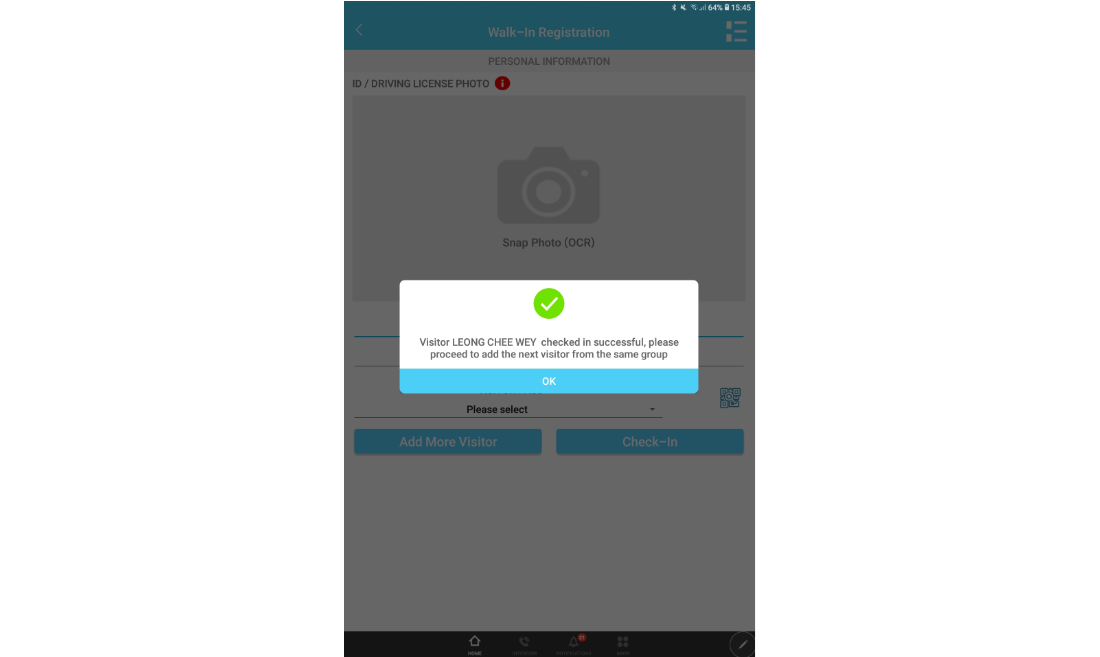
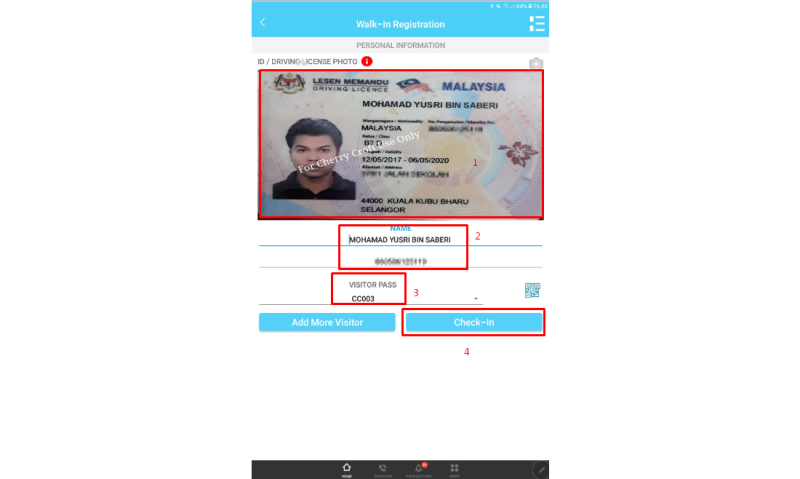
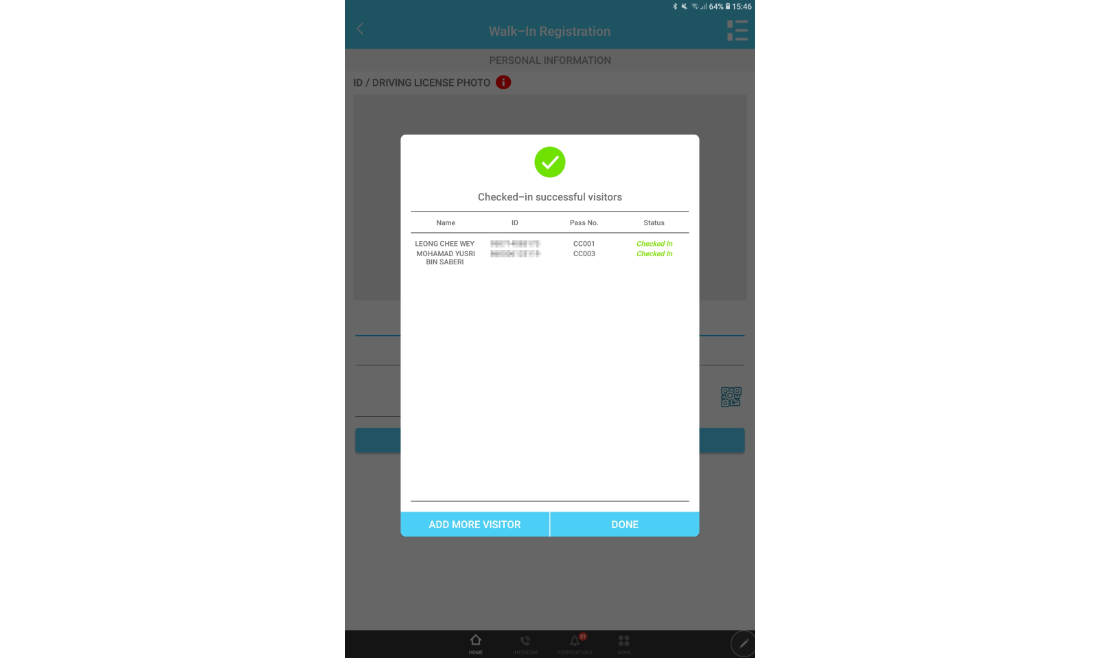
Snap OCR photo (1st person) > The system will automatically detect the name of the visitor, ID number and the visitor’s ID photo > select visitor pass > Press “Add more visitor” > Click “OK” to register the next visitor to allocate them under the same group > Repeat the steps for the rest of the visitors.
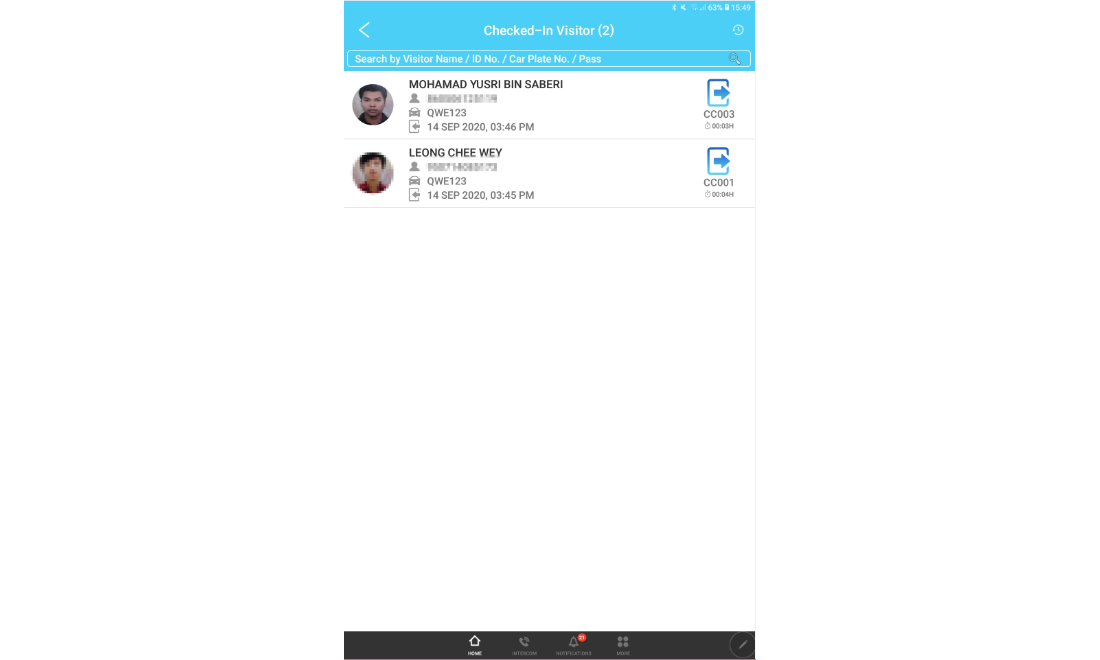
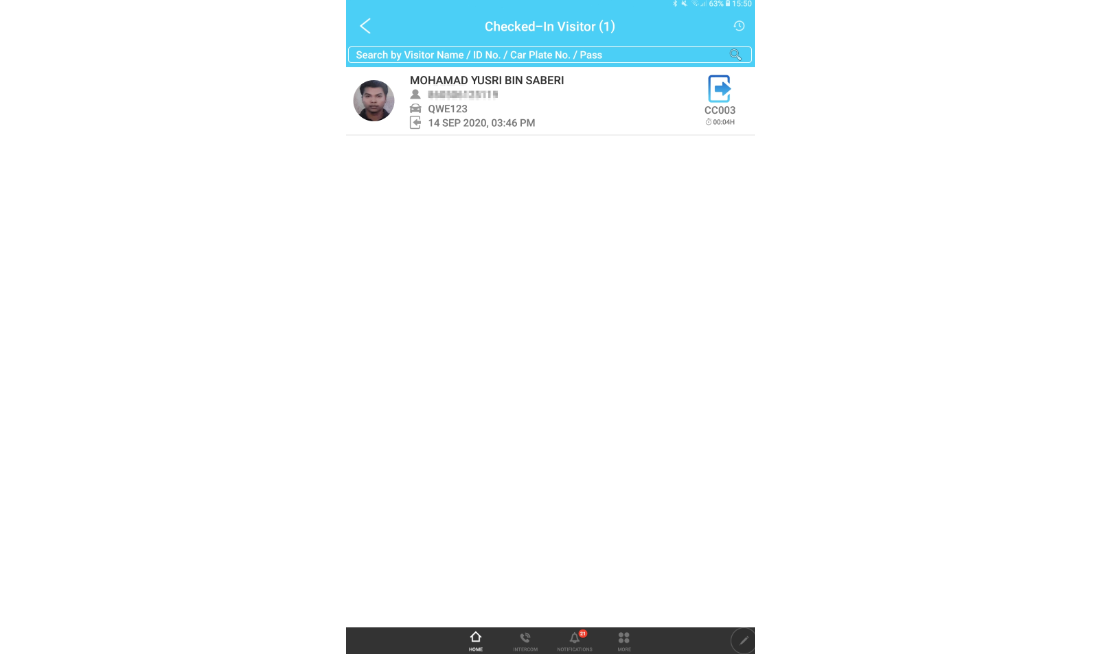
Once you have selected the visitor pass for the last visitors > Press “Check in” > Click “DONE” > All the visitor names will then appear under the “Checked-in visitor”.
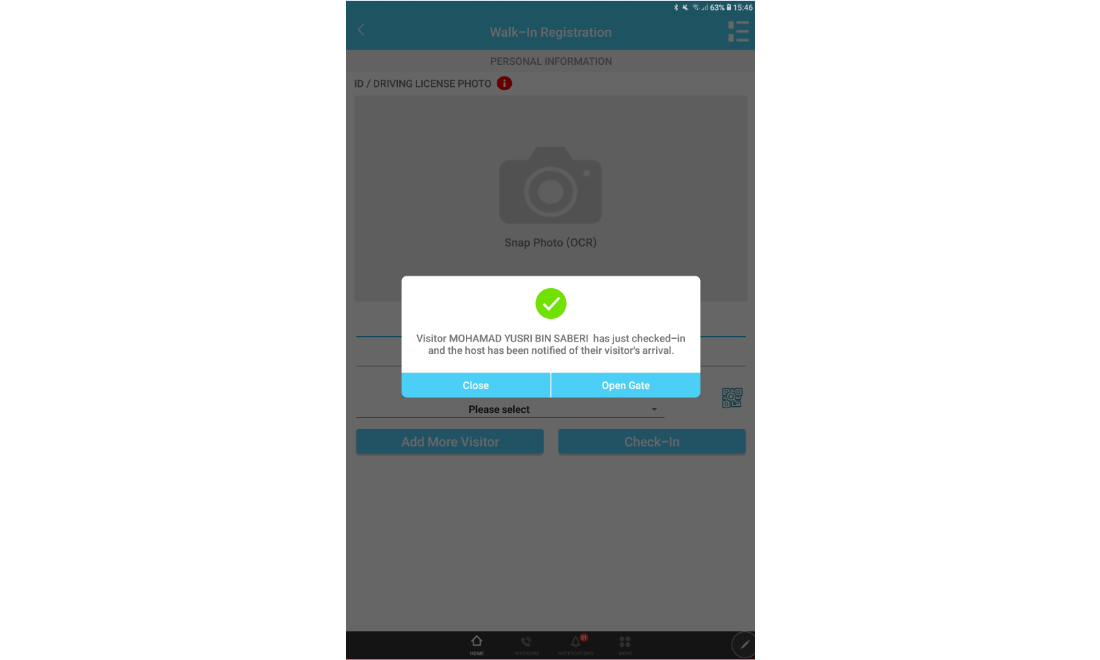
(For 1 visitor only)Snap OCR photo > The system will automatically detect the name of the visitor, ID number and visitor’s ID photo > select visitor pass > Press “Check in” > Click “DONE” > The name of the visitor will then appear under the “Checked-in visitor”.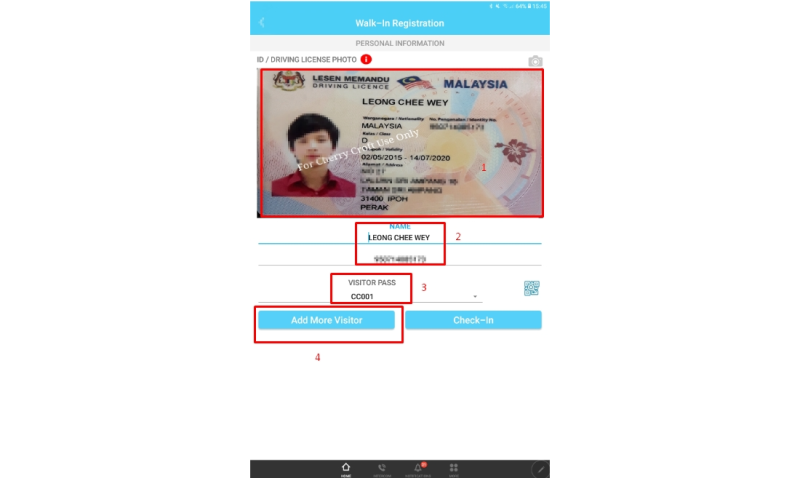
C) How to Check-Out visitor (Group registration) using i-Vizit [By Security Guard]
Check-out all visitor in the same group
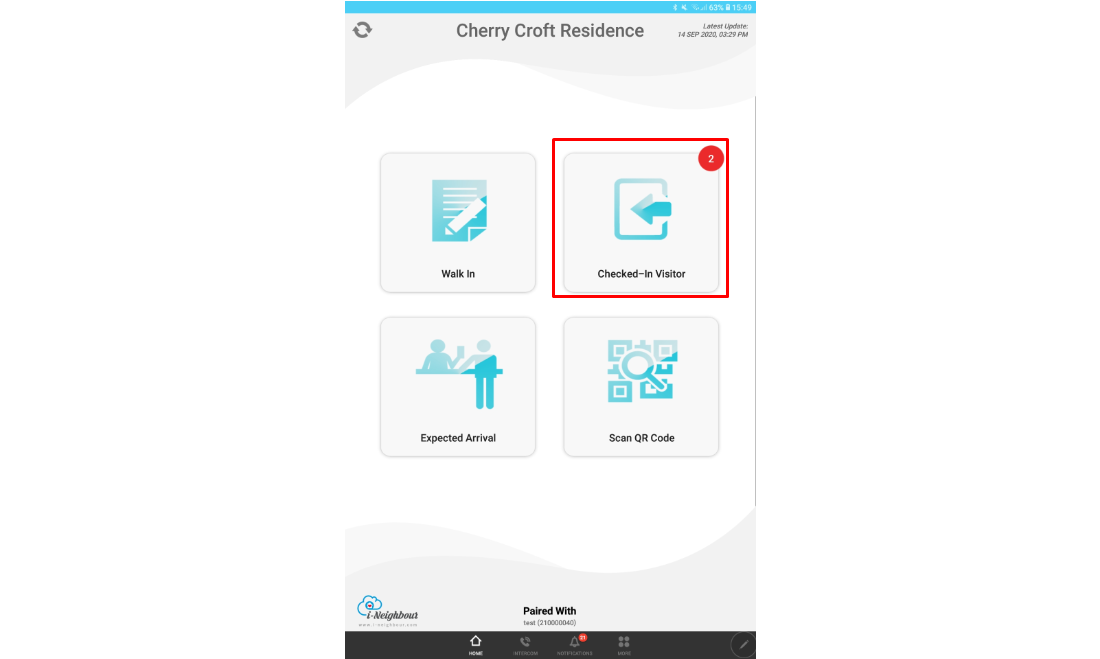
Step 1 - On the homepage, press “Check-in Visitor”
Step 2 - Press “Check-out” icon 
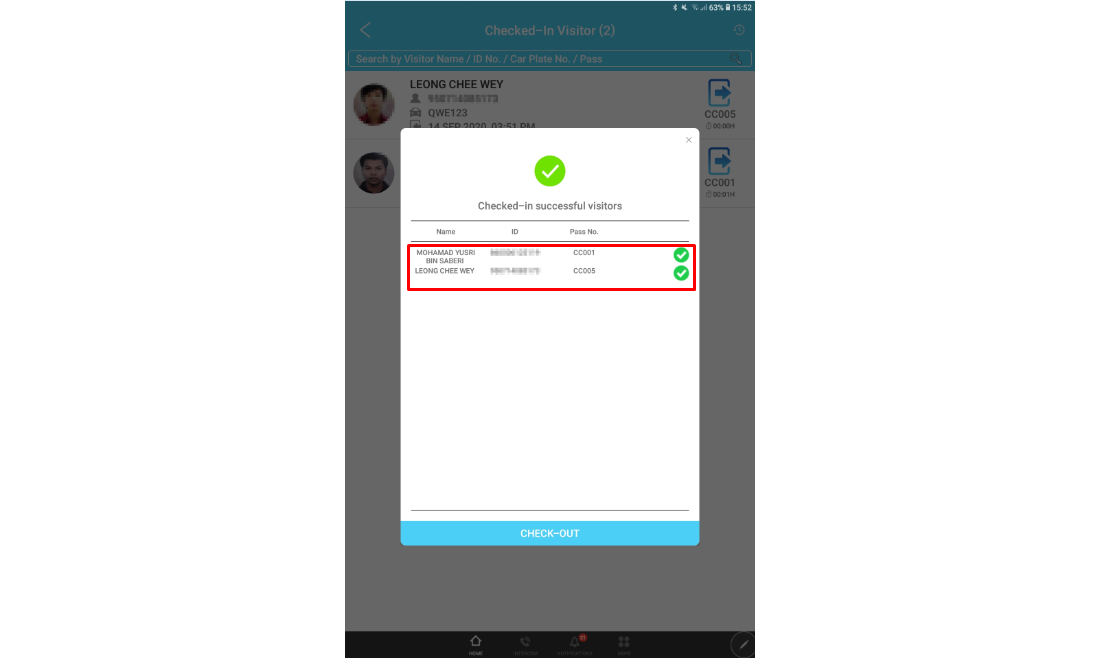
Step 3 - Tick/select all visitor name > Press “Check Out”
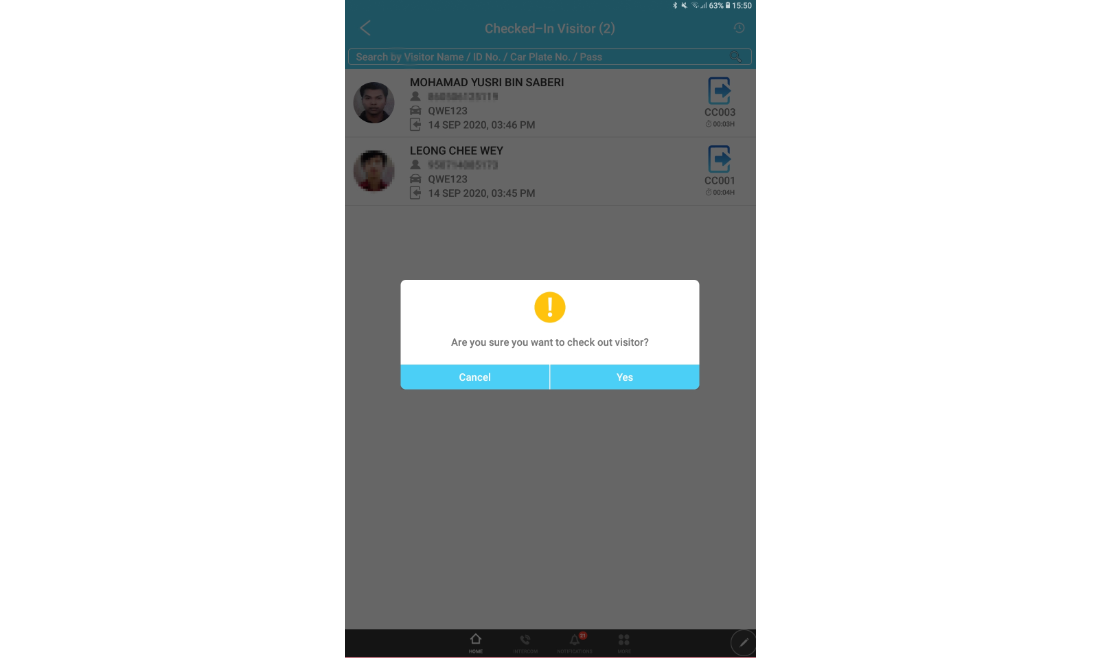
Step 4 - Click “Yes” to check out visitor
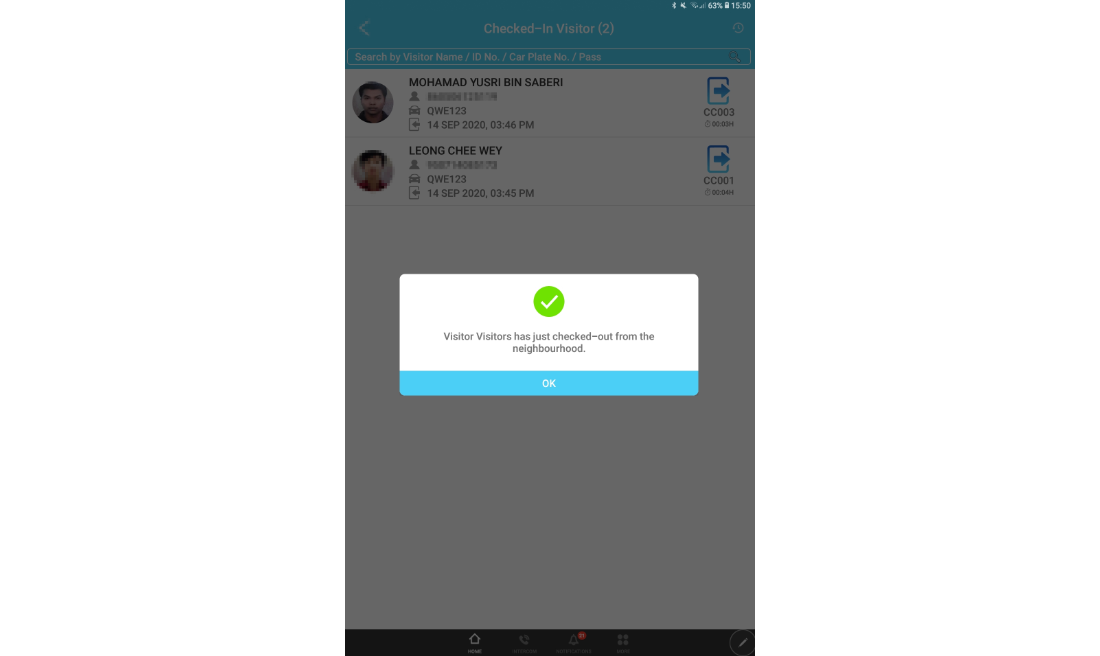
Step 5 - Click “OK” > Successfully checked-out.
2. Check-out several visitor in the same group
Step 1 - On the homepage, press “Check-in Visitor”
Step 2 - Press “Check-out” icon
Step 3 - Tick/select several visitor name > Press “Check Out”
Step 4 - Click “Yes” to check out visitor
Step 5 - Click “OK” > Successfully checked-out. 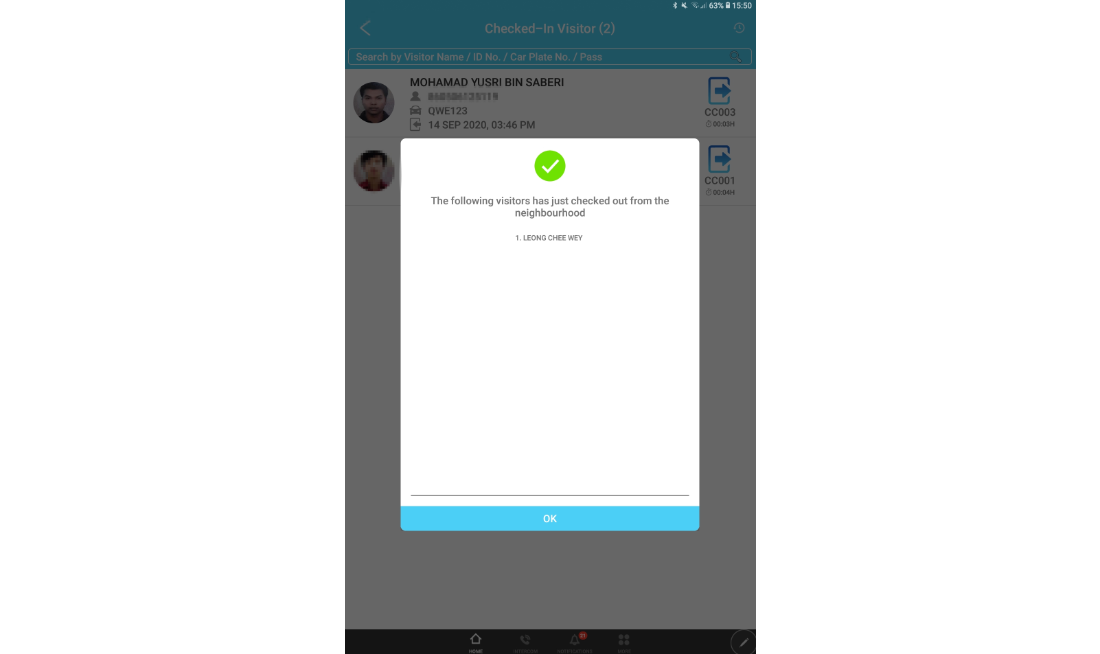
Note: If some of the screenshots or steps viewed here are different from the ones in the current system, this is due to our continuous effort to improve our system from time to time. Please notify us at [email protected], we will update it as soon as possible.



2.jpg)
.jpg)
1.jpg)
1.jpg)
1.jpg)
.jpg)
3.png)
2.png)
.png)
2.png)
4.png)
4.png)
1.png)

.jpg)
.jpg)
.png)


.png)
1.png)
1.png)
.png)
1.png)
.png)
.png)
.png)

2.png)
1.png)
