Configure Anti-Passback Mode Using Ingress
In
FingerTec's integrated access control application,
Ingress, there is a function called anti-passback. This function is primarily used to prevent the misuse of access control systems by establishing a specific sequence in which access cards must be used in order for the system to grant access. For instance, users can be stopped from entering an area a second time without first leaving it.
If you would like to move straight to configuring the anti-passback feature in Ingress, do skip to the ‘
Configuration Steps (Standalone Device)’ section below for a step-by-step guide. Those steps are applicable when you are using standalone devices e.g R2, Kadex and etc. However, if you are using Ingressus controller, please refer to another post
here.
Before we proceed to the configuration steps though, let’s look at some of the basic questions users may have on this feature:
Q1: If I have “X” number of doors and require the Anti-passback function, how many devices should I use?
•
One Door: Install 2 standalone devices that must be configured with a
Master and slave connection for entry and exit at the door. Also, please be informed that for standalone devices, anti-passback
can only be configured on one door.
•
2 to 4 doors: Install Ingressus II (up to 2 doors) or Ingressus IV (up to 4 doors) with slave readers. e.g. If there are 2 doors, after activating the anti-passback between Door 1 and Door 2, users must have an Out record from Door 1, before granted access to Door 2. For more information on how to use an Ingressus controller for this, refer
here.
•
More than 4 doors: Currently, the available devices do not support anti-passback for more than 4 doors. However, please write in to us at
[email protected] with your requirements for us to provide you with our recommendations.
Q2: Then which are the models that support the Anti-passback function?
•
Fingerprint models: R2, R3, H2i, Q2i and the R2c slave device
•
Card: Kadex, m-Kadex with k-Kadex, i-Kadex slave
•
Facial Recognition: Face ID3
•
Controller: Ingressus I, Ingressus II, Ingressus IV
For more information on the features available for all of our devices, please click
here.
Q3: For the configuration on one door, can we use 2 master devices, e.g. 2 Kadex devices, one Kadex will be 'In' and the other 'Out'?
You must configure the first reader as Master and second reader as Slave before you can set the anti-passback function in Ingress. For more information, refer to tips
here.
Configuration Steps (Standalone
Device):
1. Click
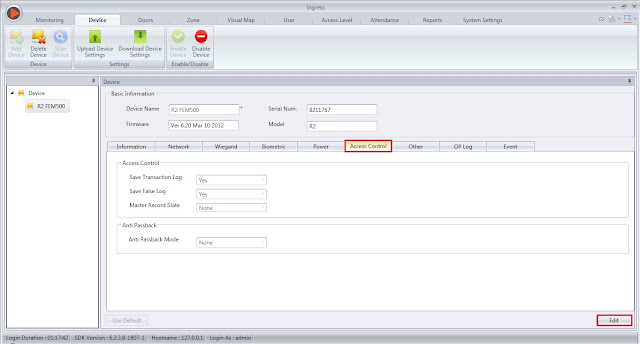
Device > Click on the terminal where you wish to apply the anti-passback mode.
2. Click
Access Control >
Edit.
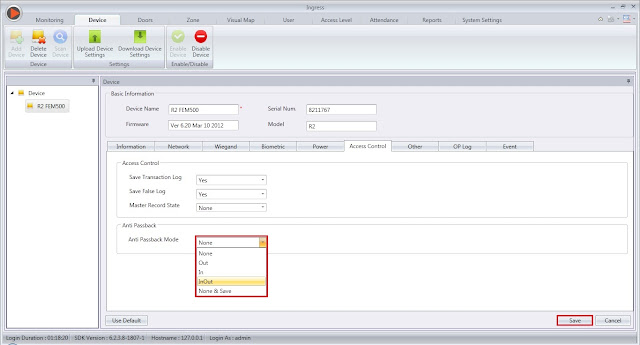
3. Choose the anti-passback mode you wish to apply and click
Save. Click
here for more info on anti-passback modes.
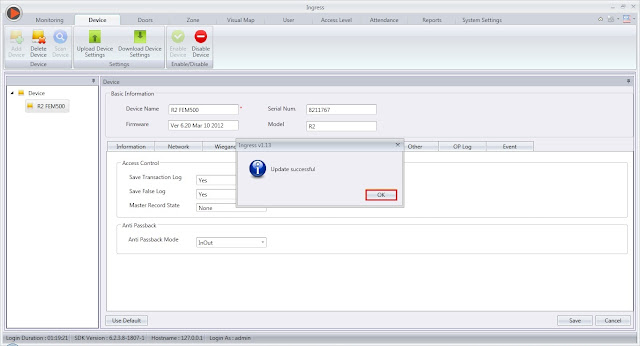
4. Click
OK to confirm the changes you have made.
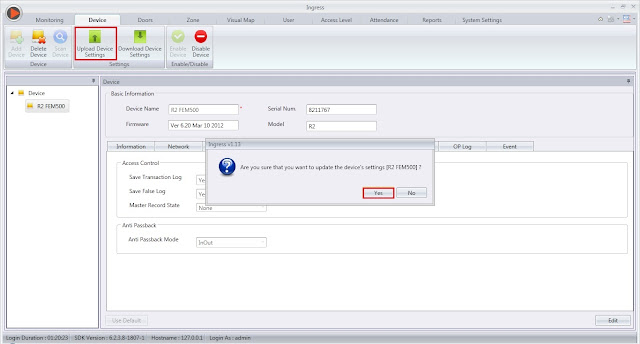
5. Click
Upload Device Settings > Click
Yes to confirm your selection.
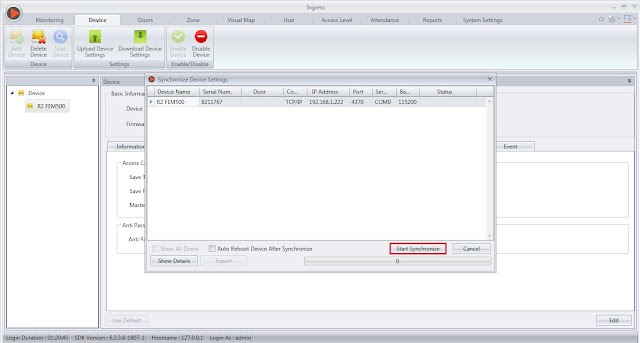
6. Click
Start Synchronize.
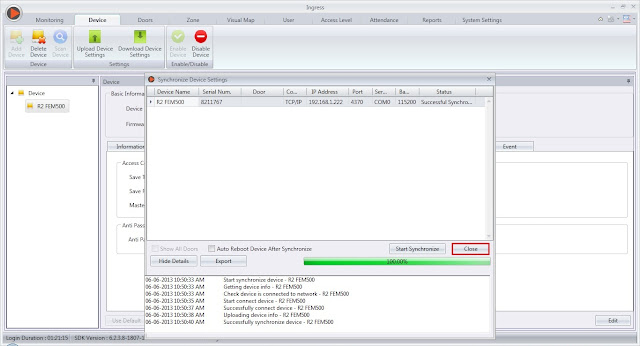
7. Click
Close.
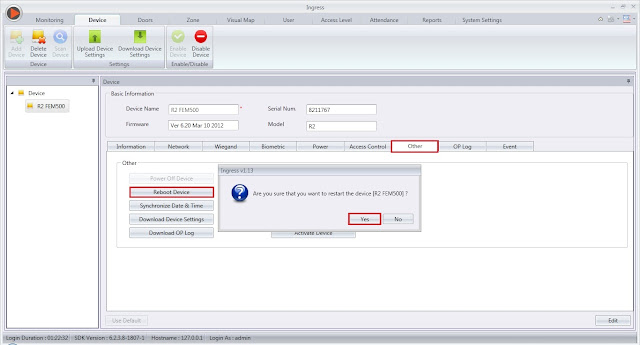
8. Click at
Other >
Reboot Device > Click
Yes to confirm your selection. After the reboot, the selected terminal will function according to the configurations you have made.
Voila!





2 comments:
Have any questions or inquiries about FingerTec? Drop your input here.