TCMS V3 Software Update v2.1.0.12 (18-05-2017)

Wednesday, May 24, 2017 TimeTec 8 Comments


FingerTec newly released TCMS V3 fixed 2 minor bugs in the previous version.

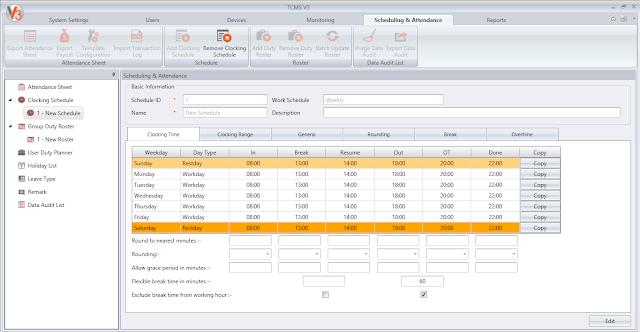
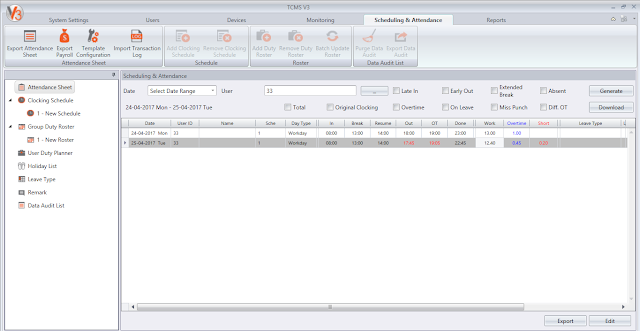
1. Fixed wrong calculation of Overtime when applied flexible break and break paid


In this release, you can set the flexible breaks in Out and OT columns. The result is shown in the picture below:


2. “Weekly Attendance Listing” will show more than one employees on the same page.
In this release, Weekly Attendance Listing report will show many users report in one page. In the previous version, one page report will only show one report for one user which could waste of a lot of papers when customer print it.


8 comments:

Have any questions or inquiries about FingerTec? Drop your input here.

FINGERTEC SPECIAL FEATURE - INGRESSUS CONTROLLERS FEATURES UPGRADED

Tuesday, May 23, 2017 TimeTec 0 Comments


Throughout the years, FingerTec Hardware Research and Development Team has been focusing its effort to deliver numerous features requested by customers the world over.  One of the products that was given a major improvement is Ingressus Controller.
The below article discusses the recently added features to Ingressus I (Single door Accecss controller), Ingressus II (2 doors Access controller), and Ingressus IV (4 Doors Access controller) and we are going to explore these features and their benefits.
Verification Type Selection
Ingressus Controllers can be facilitated with 3 different FingerTec slave readers for user verification and access in different modes namely Card, FingerPrint, PIN, and Password in solo and combination methods.
Compatible slave readers to Ingressus are listed in the following table with their details:

Connection Type
Verification Style Allowed
Maximum No of Devices on Ingressus
R2c
RS485 Reader
Fingerprint, Card
Ingressus I= 2
Ingressus II= 4 (2 In & 2 Out)
Ingressus IV= 8 (4 In & 4 Out)
i-kadex
Wiegand
Card
Ingressus I= 2
Ingressus II= 4 (2 In & 2 Out)
Ingressus IV= 4 (Only In)
K-kadex
Wiegand
Card, Pin (Password)
Ingressus I= 2
Ingressus II= 4 (2 In & 2 Out)
Ingressus IV= 4 (Only In)
Following the latest enhancement, Ingressus is now capable of supporting 7 different verification modes. Having various verification styles to select from, on top of improving access security, users are provided with more flexible feature selection.  Listed below are the Ingressus’ verification modes and their descriptions:
  1. Fingerprint: This method can be selected for Ingressus that is connected to R2c for verification purpose, to only allow users to perform verifications using fingerprints at selected doors.
  1. Card: All compatible slave readers with Ingressus support Smart Card (e.g. RFID card) verifications. Therefore, by selecting this option as the verification mode for doors at Ingressus, users need to use only card for verification.
  1. User ID and Password: The verification mode can be limited to User ID & Password only when the slave reader connected to Ingressus is k-Kadex. Selecting this method allows users to only enter their User ID followed by Password.
  1. Card & Fingerprint: R2c is the only slave reader that supports both card and fingerprint verifications. For better security, users are recommended to use a combination of verification style. When this verification method is implied, a user will only be able to perform a successful transaction on the device after fulfilling a verification of his registered card followed by his finger or vice versa.
  1. Card & Password: When the doors on Ingressus are equipped with k-Kadex reader, this verification method only allows users to access the door upon performing his card verification followed by a password or vice versa.
  1. Card or Fingerprint: This verification allows users to do verification with either one of cards or fingerprints. However, PIN and password are no longer an option when this method is selected.
  1. Card or User ID & Password: The most recently added verification style to Ingressus firmware, allows users to have either a card verification, or access the door by entering the ID followed by Password for k-Kadex only. Selecting this option leaves out fingerprint verification for the users.

How to Configure Verification Styles on Ingressus:
Every FingerTec access control device is bundled with Ingress, the door access and time attendance software. Our developers have carefully designed the Ingress software, to allow users to perform all required configurations remotely through the software by simply connecting the device in TCP/IP mode in the software. Inside Ingress, door by door settings of Ingressus controllers, including the selection of verification method can be performed by following the simple steps below:
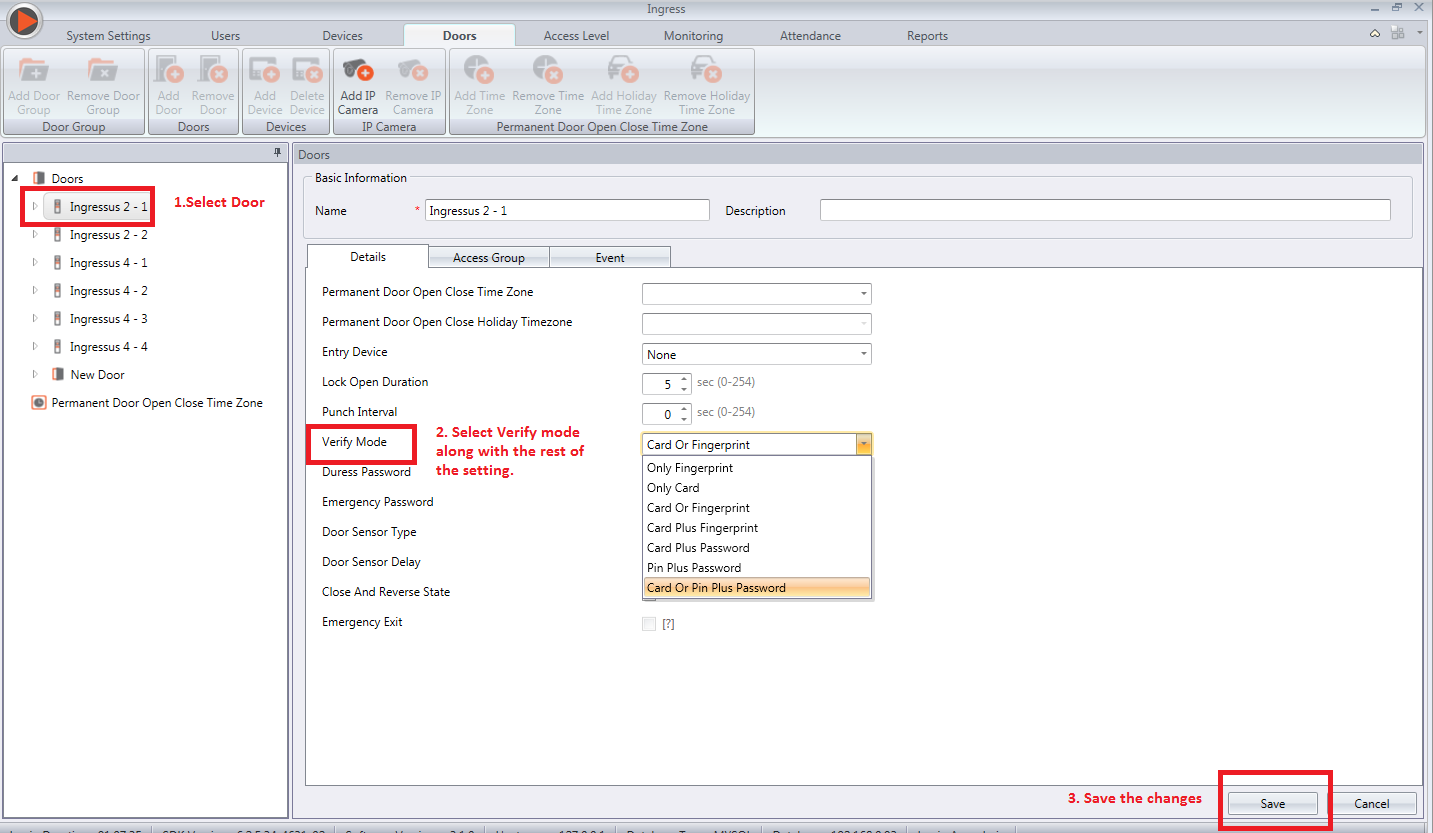
  1. After having the Ingressus activated in Ingress, go to the doors tab and select the preferred door. The details tab allows the setup of various door settings.  At the verify mode selection, choose the preferred style, and save the settings.
  1. To imply the settings in the Controllers, synchronize the changes once to the device accordingly.
Anti-Passback Mode
The Anti-Passback feature controls entry-exit activities of users in selected premises. The main objective of having Anti-Passback setting for the doors is to prevent users from tailgating one another while entering or exiting selected doors. Having the Anti-Passback option turned on, the list of users that have entered the premises can be obtained. This can come handy when an unexpected incident requires immediate evacuation of the employees.
Ingressus Controllers are equipped with multiple Anti-Passback selections, making it more flexible for users to setup multi door premises with Anti-Passback. Briefly explained below are the Anti-Passback options available for Ingressus II and Ingressus IV configurations:
Ingressus II Anti-Passback Selection
1. Anti-Passback between readers of Door 1: Upon a user’s entry to door 1, he will be required to perform exit verification from door 1, before being able to re-enter door 1 again.
2. Anti-Passback between readers of Door 2: Similar to Anti-Passback option 1 above, setting this option will only allow users re-entry to door 2, as an exit verification is performed by the user on the same door.
3. Anti-Passback between readers of Door 1 and between the readers of Door 2 respectively: This is the combination of the first 2 options, where at each door anti-passback is effectively turned on.
4. Anti-Passback between Door 1 and Door 2: If a user enters through door 1, he will only be able to exit the door 2, while his attempt to exit or re-enter door 1 will result in anti-passback. Vice versa, entry from door 2, only grants exit from door 1.
5. Anti-Passback between in readers and out readers of both doors: Having this anti-passback option selected, user can exit through either one of the doors, after entry verification is performed, yet re-entry is only possible from any of the doors when one time exit is performed.
Ingressus IV Anti-Passback Selection
1. Anti-Passback between Door 1 and Door 2: Just like Ingressus II, by selecting this option, upon entry from door 1, user can only exit from door 2 and vice versa.
2. Anti-Passback between Door 3 and Door 4: Refer to above details, this time for door 3 and 4 only.
3. Anti-Passback between Door 1 and Door2, and between Door 3 and Door 4: This selection is to enable anti-Passback option 1 and 2 explained above in combination. E.g. if a user enters from door 1, he will only be able to exit from door 2, and there will be anti-passback for any exit attempt on door 1, 3, and 4.
4. Anti-Passback between Door 1, 2 and Door 3, 4: Briefly explained in remarks below:
* If a user enters from door 1 or door 2, exit can only be performed from either door 3 or 4, but not door 1 or door 2.
* If a user enters from door 3 or door 4, exit can only be performed from either of door 1 or 2, but not door 3 or door 4.
5. Anti-Passback between Door 1 and Door 2, 3: Briefly explained in remarks below:
* If a user enters from door 1, exit can only be performed from either of door 2 or 3, but not door 1.
* If a user enters from door 2 or door 3, exit can only be performed from door 1, but not door 2 or 3.
6. Anti-Passback between Door 1 and Door 2, 3: Briefly explained in remarks below:
* If a user enters from door 1, exit can only be performed from either of door 2, 3 or 4, but not door 1.
* If a user enters from door 2, door 3 or door 4, exit can only be performed from door 1, but not door 2 ,3 or 4.
7. Anti-Passback between In readers and Out readers of Door 1, 2 and Door 3, 4 (Only Available for R2c Slave Reader): Briefly explained in remarks below:
* If a user enters from door 1 or door 2, he can exit from either of door 1 and door 2, but exit from door 3, and 4 is not allowed.
* If a user enters from door 3 or door 4, he can exit from either of door 1 and door 2, but exit from door 1, and 2 is not allowed.
8. Anti-Passback between In readers and Out readers of Door 1, 2,3 and 4 (Only Available for R2c Slave Reader):
* If a user enters from any of the doors 1,2,3 and 4, he can choose to go out from any of the doors 1,2,3 and 4. Anti-passback happens when the user has not performed out from any of the doors before re-entering the premises.
How to configure Anti-passback settings at Ingressus through Ingress
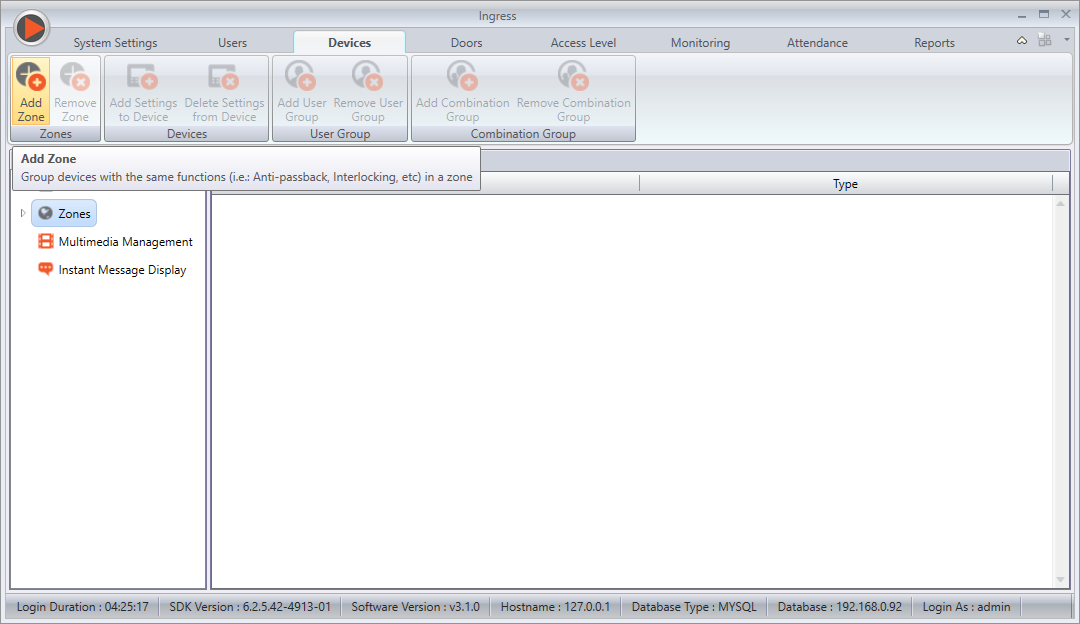
After activation of Ingressus on Ingress software, proceed to Add Zone which can be found by clicking on Zones under Device tab.

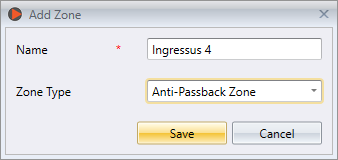
  1. Insert the zone name and select the Zone type as Anti-Passback Zone.

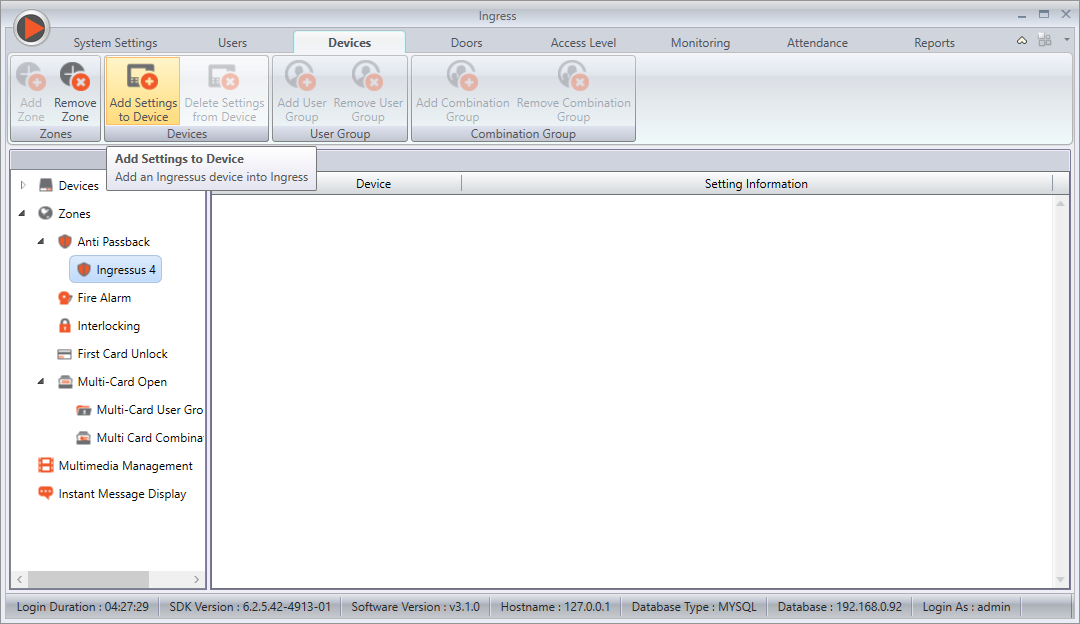
  1. Next, click on the zone you created and choose Add Settings to Device from above.
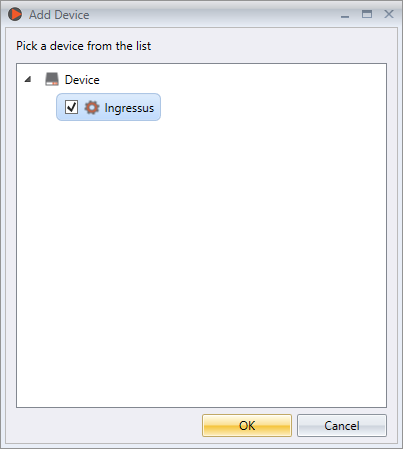
4. Select the device name and click OK.
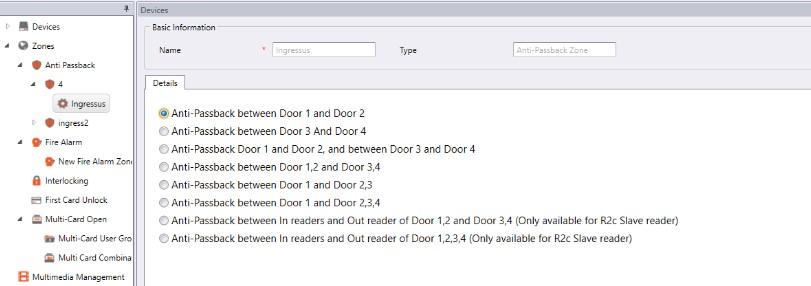
  1. Select the preferred anti-passback option for Ingressus and synchronize the changes to your controller. Below displays the available options for Ingressus II and IV respectively.
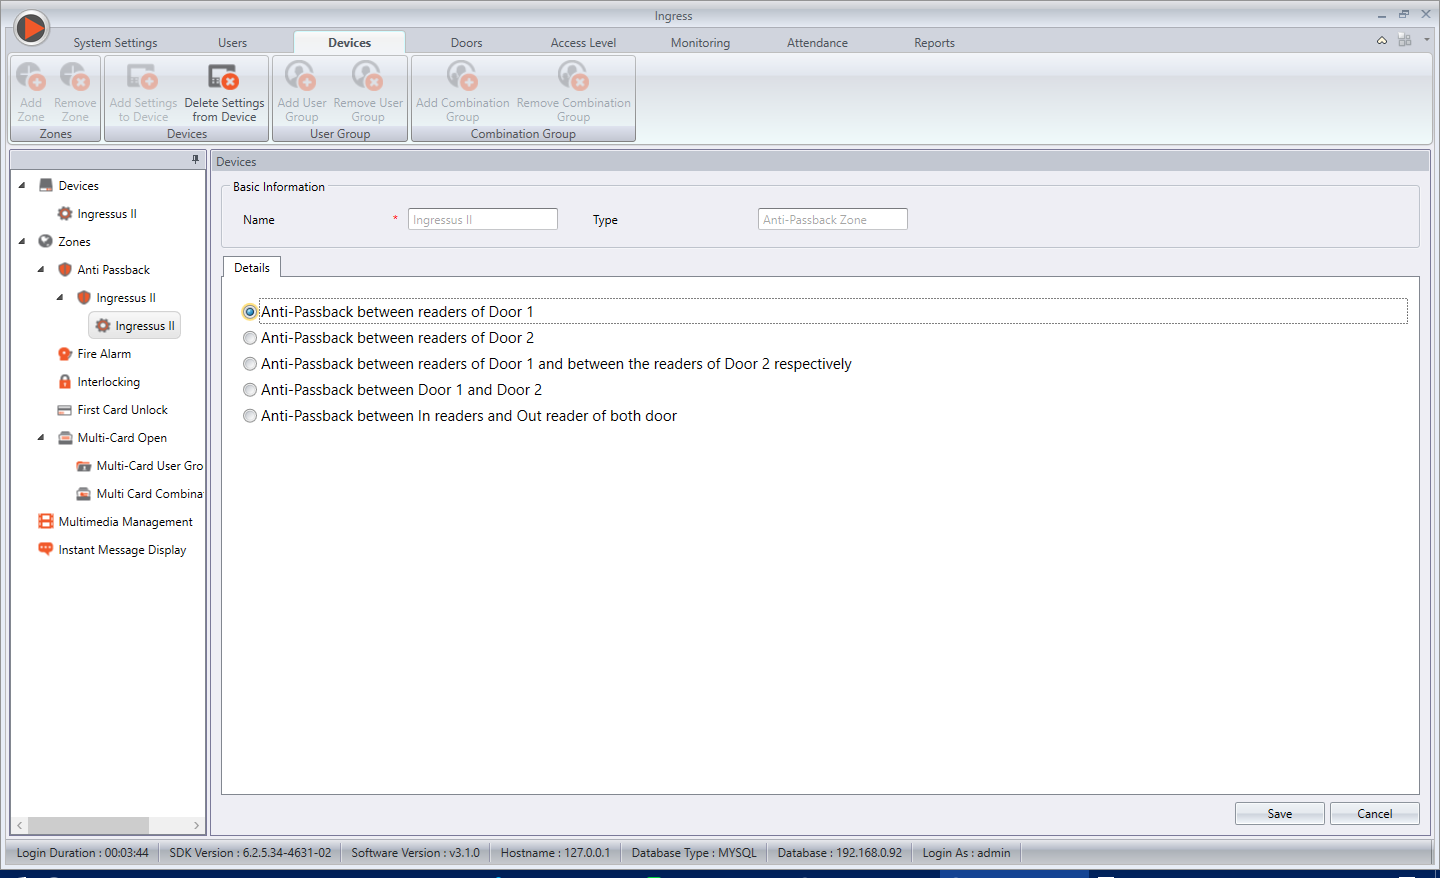
Ingressus II antipassback.png
C:\Users\Admin\AppData\Local\Microsoft\Windows\INetCacheContent.Word\ingressus IVoptions.jpg


0 comments:

Have any questions or inquiries about FingerTec? Drop your input here.

Step-by-Step Guide on Using Mifare Card in TA100C

Friday, May 19, 2017 TimeTec 3 Comments


Introduction
FingerTec terminal such as TA100C can be customized to use MiFare card rather than RFID card as one of the verification options in the device. MiFare card is a type of smart card that can contain data and be read at the device without storing the transactions into the device’s memory. This tip will lead you to get to know the features in TA100C when you are using MiFare module starting from enrollment until the verification process.


Process 

1) Enroll as ID Card: 
To use this feature, first you need to ENABLE “Verify ID Card Only”. Go to IC Card > IC Card Options > Verify ID Card Only > Turn on. This option needs to be turned on because enrolling a MiFare card as an ID Card will only verify the ID Card and it’ll not verify other information stored in the card. So when a user wants to verify his identity, he just needs to wave the card at the antenna to be verified instantly.
2) Enroll as Fingerprint Card: 
This process is to store fingerprint templates inside a MiFare card. Input user ID as per required and input fingerprint template based on your preferred fingers and how many template to be stored inside the card will be based on how many fingerprint count you set in IC Card > IC Card Options >Stored Fingerprint Count. After inserting the fingerprint template, you will be asked to wave your MiFare card at the antenna, then save. By enrolling it this way, when you want to verify a user, you need to wave your card, then it will ask you to place your finger on the fingerprint scanner .

Note: Turn off “Verify ID Card Only” to make sure that the device will prompt for fingerprint during verification.

3) Clean Card Data : 
This option is to erase all memory and information stored in your MiFare card. After clean Card Data, you may use it to enroll new user with different information. You only need to wave the card at the antenna, and wait until it shows you Operation Successful.
Menu > IC Card > Clean Card Data > Wave your Card > If the terminal shows green circle, it means that the card information has been cleared.


4) Copy Card Data: 
This option is divided to 2 types where you can choose to Copy User Data Only, or Copy User Data and Fingerprint. This option is used to copy user’s information from a MiFare card into a reader. By right, after you copied user data only or along with fingerprints, when you want to do verification, you can just place your finger on the scanner while waving your card at the antenna, because your reader has already copied user’s information that has been stored in the MiFare card.

5) IC Card Options: 


i) Verify ID Card Only : Turn off if you want user to verify Card ID with Fingerprint and turn on if you only need user to verify using Card only

ii) Card Data Storage Mode :


a) Not Save in device: The user ID and user information will not be stored in the terminal.
b) Save User Data in Device: The system will save the user ID in the terminal.
c) Save user and fingerprint in Device: The system will save the user ID and FP in the terminal.

iii) IC Card Passcode :
NOTE: Please do not do any amendments on this option because it is the default passcode.

iv) Stored Fingerprint Count :
You may determine the number of fingerprint that you require to store inside a MiFare card. For MiFare 4k , if you are using Fingerprint template vx10, you can store up to 2 fingerprint templates, and if you are using Fingerprint template vx9.0, you can store up to max 4 fingerprint templates in one MiFare card.


3 comments:

Have any questions or inquiries about FingerTec? Drop your input here.

Retrieve Attendance Logs from FCC into the FTDP software

Friday, May 19, 2017 TimeTec 2 Comments


Introduction
FCC is a cloud-based solution that backs up all your FingerTec terminals’ data on a cloud server. With FCC, you can centralize your data for easy viewing and managing. You can stop worrying about data lost because the original data will always be available online for instant retrieval.

Benefit
The new feature in FTDP allows the software to retrieve the transaction from FCC into FTDP software that is being used by those who want to collect raw clocking data from device and connect to a different format of database (like oracle) for their third party integration.

Procedure
Step 1
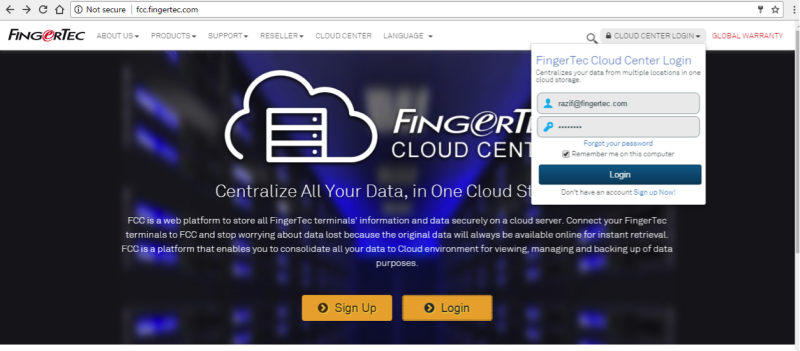
Login your FCC account > Click your username beside the Subscription option


Step 2
Go to the user profile tab > Ingress / TCMSv3 Login Detail


Step 3
Login the FTDP software as an administrator > Go to Transactions tab > Click FCC Log


Step 4
Login your username and password. Refer the details at Step 2


Step 5
You can retrieve your transaction log by choosing the date range and user ID > click Search. If you want to retrieve all transaction data > click Search without configuring the date range and user ID


Step 6
Then, click Save AttLog into PC


2 comments:

Have any questions or inquiries about FingerTec? Drop your input here.

Easy Data Migration From FingerTec Cloud Centre (FCC) To TCMS V3

Friday, May 19, 2017 TimeTec 0 Comments


Introduction

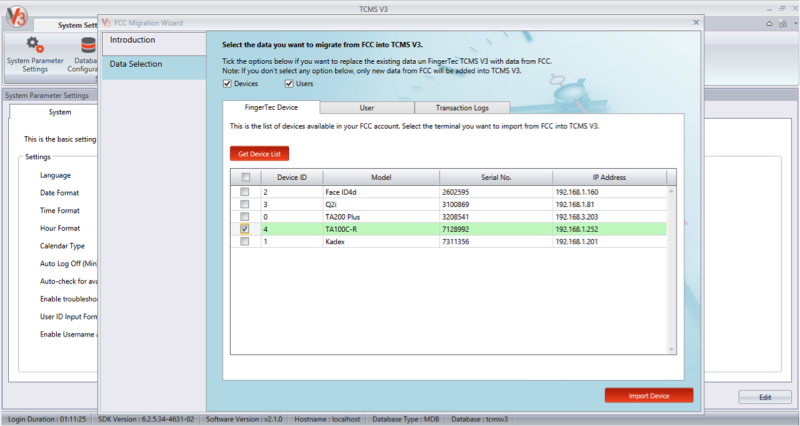
Good news for our client who are using TCMS V3 software. With the new release of TCMS V3, you can now migrate data from FingerTec Cloud Centre (FCC) to TCMS V3.

FingerTec Cloud Centre (FCC) is a web platform that stores FingerTec terminals' information and data securely on a cloud server. In the latest release, the FCC Migration Wizard feature is made user-friendlier, as it can connect to the web service login. It also has data selection feature, allowing users to migrate from FCC to TCMS V3. This new function replaces the previous Select User and Import tab in this wizard.

Advantages of the New Features
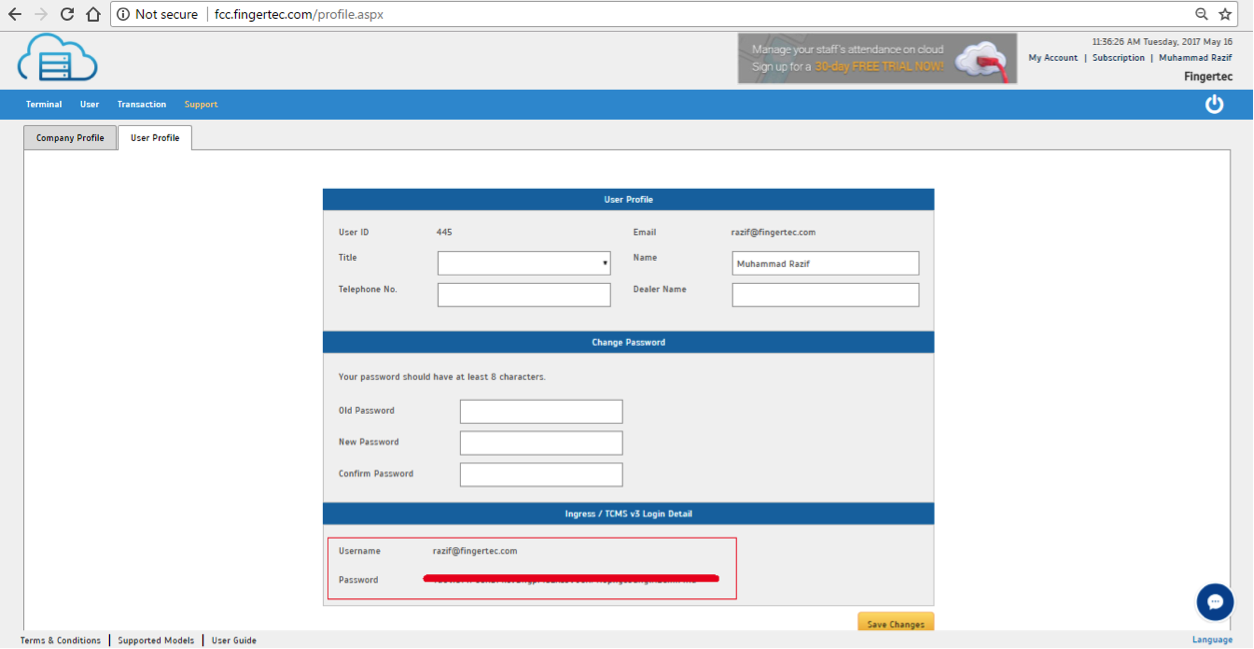
With this new update, now users will only need to get the Username and Password by logging into fcc.fingertec.com > click the “Username” at the right upper corner of the window > User Profile > scroll to the bottom “Ingress / TCMS V3 Login Detail” for the Login Username and Password.

Before that, please Login into you FCC account at: http://fcc.fingertec.com
Make sure that you have set and entered the IP address and Port of the FCC Software into the terminal before you can establish a connection between the FingerTec terminals and FingerTec Cloud Center. The FCC Web Server and Port is 54.215.80.154 : 80.

For FEM Color Screen device (AC100C, TA100C, TA200 Plus)
Go to Menu > Comm. > Web Setup > Set the FCC Web server IP and port.

For FMM Color Screen device (AC100C FMM, TA100C FMM)
Go to Menu > Comm. > Webserver > Set the Server Address and Server Port.


If you still cannot connect your FingerTec terminal with our FCC, kindly get your FCC devices’ licences from our sales department at [email protected]. Once you get the licenses, you can add the device into your account by selecting Add More License.

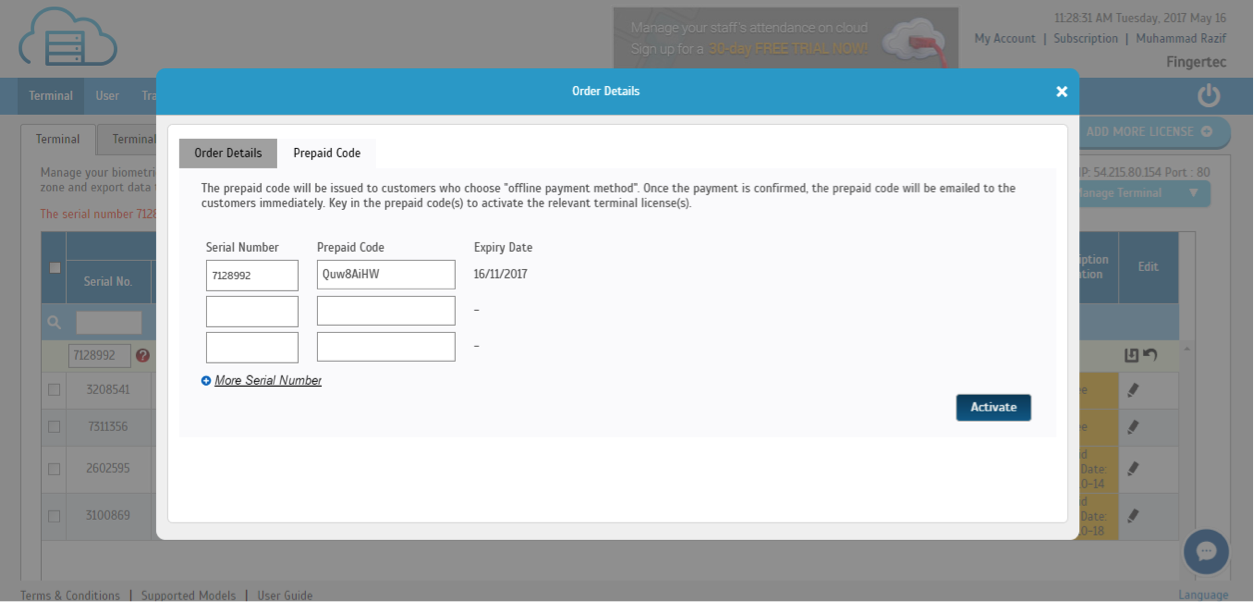
After that go to your FCC account and key in the Serial Number and the Prepaid Code that you have received from our Sales person and press Activate.


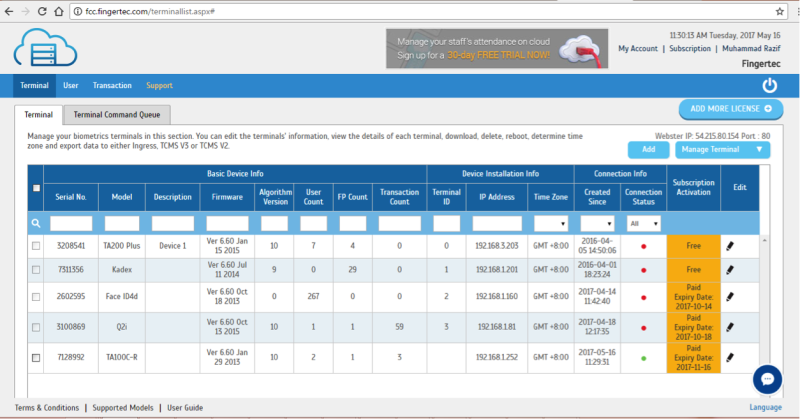
Now you can see the devices connected to your FCC account.


The next step is to get your FCC Username and Password, go at the right upper corner of the window > User Profile > scroll to the bottom “TCMS v3 Login Detail” for the Login Username and Password.


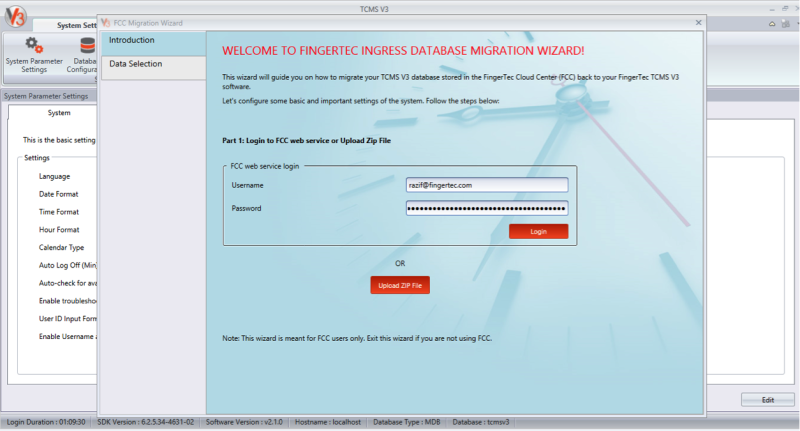
Use this Username and Password to migrate your data from FCC into your TCMS V3.


Here you can retrieve your Terminal Info, User Data and Transaction Log and restore it back to TCMS V3.
Terminal Info: Click the Get Device List > Choose your terminal serial number > Import Device.
User Data : Choose your terminal serial number > Get User List > Select all the user ID > Import User.
Transaction Log : Choose the date range > get transaction list > download log.


0 comments:

Have any questions or inquiries about FingerTec? Drop your input here.

Enable TimeTec TA Mobile App Clocking

Friday, May 19, 2017 TimeTec 0 Comments


Introduction
TimeTec TA App provides TimeTec TA users a simple and useful tool to perform clocking activities, check attendance history and generate reports on a smartphone easily.
Benefit
By having TimeTec TA App on your smartphone at all times, you’ll never missed attendance and you can also monitor your staff whenever required.
Process
For TimeTec TA users to be able to do the clocking through TimeTec TA App and access the attendance on their own mobile application, admins need a few configurations to be done in the TimeTec TA account.
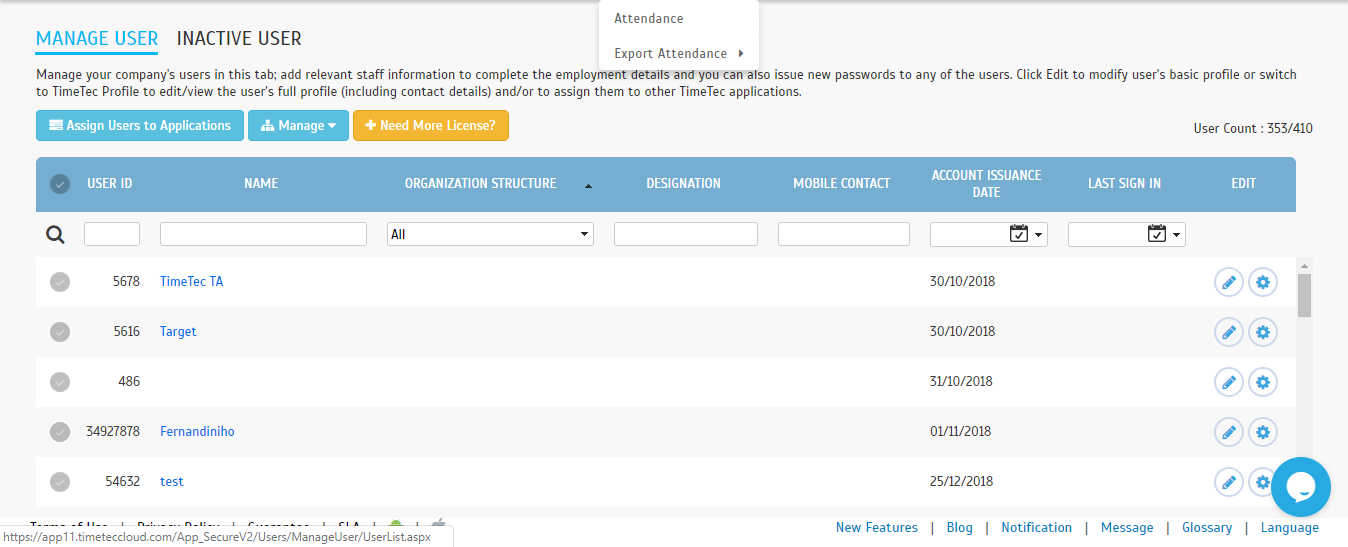
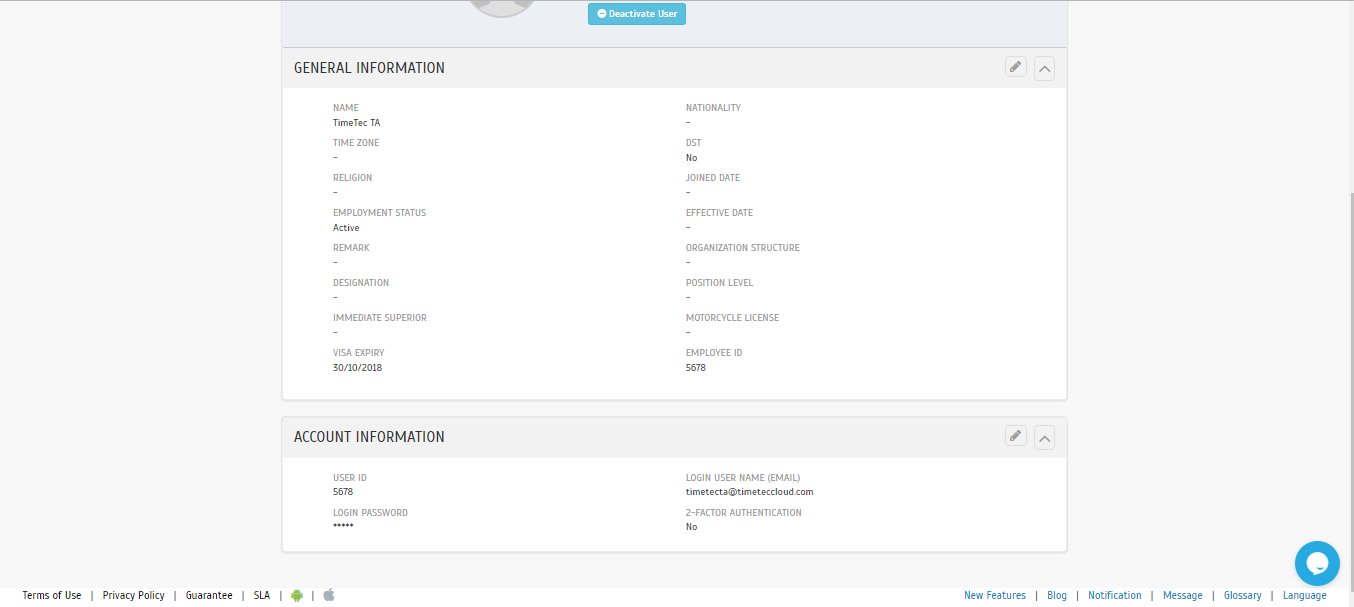
1) Configure a login credential for the user.
System Infor
Go to your TimeTec TA account > User > Manage User tab > Select the user > Click Edit > go to System Information tab > configure the options listed below
- Login User Name [ email – please make sure the email address is valid]
- Login Password


2) Allow the user access for TimeTec Mobile and TimeTec TA web access
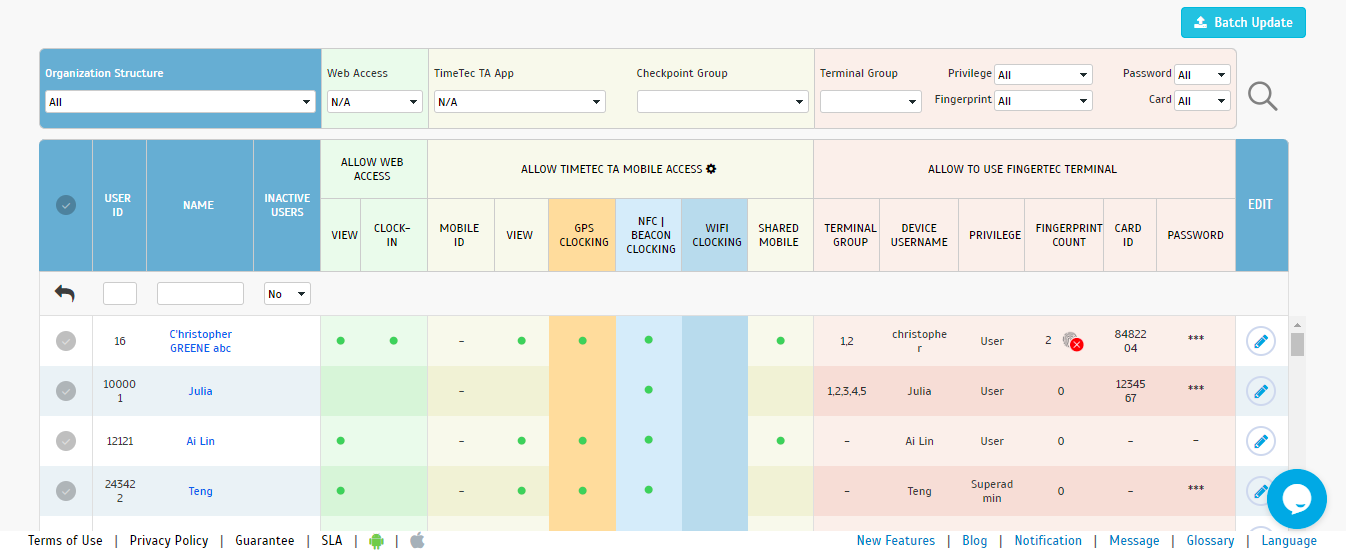
a) Go to Device > Assign User to Device
b) At the user with Clocking issue, press edit, (Pencil tag at the end of each user’s row)
c) Configure the following settings to allow the user access
- Allow web access column > View > Set to “Yes” [ You can only view from web access and cannot perform clocking from the web]
- Allow Time Tec Mobile Access > View & Clocking Set to “Yes” [ You can view and perform clocking from the mobile device]

3) Then, try to login from the TimeTec TA App
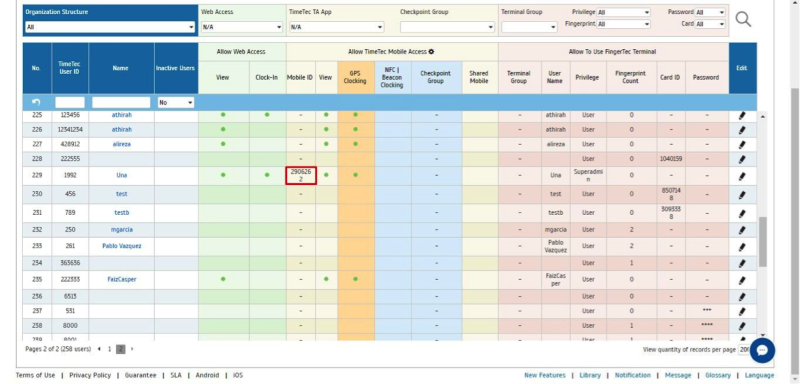
The Mobile ID for each smartphone is unique when you log into TimeTec TA via mobile. The ID will be captured and stored in TimeTec TA account when the user login through the TimeTec TA App. You can view the ID in TimeTec TA at Device Tab > Assign User to device.

0 comments:

Have any questions or inquiries about FingerTec? Drop your input here.

Face Recognition Terminal Installation Guide

Friday, May 19, 2017 TimeTec 0 Comments


Introduction
Face recognition device is light-sensitive, hence the surrounding condition’s lighting must be controlled from the terminal. The intensity of the light like brightness is measured as the rate at which light energy is delivered to a unit of surface, or energy per unit time per unit area.  The light intensity from indoor lamp or external light will affect the face sensor.  Excessive light to the terminal may interrupt face detection process which may lead to:
  1. 1. Enrollment difficulty
  2. 2. Lower sensitivity of face sensor
  3. 3. Longer time to verify
  4. 4. Failure to enroll
  5. 5. Failure to verify

Recommended installation 
Illuminance is measured in foot candles (ftcd, fc, fcd) or lux (in the metric SI system). A foot candle is one lumen of light density per square foot; one lux is one lumen per square meter.
  • 1 lux = 1 lumen / sq meter = 0.0001 phot = 0.0929 foot candle (ftcd, fcd)  
  • 1 phot = 1 lumen / sq centimeter = 10000 lumens / sq meter = 10000 lux 
  • 1 foot candle (ftcd, fcd) = 1 lumen / sq ft = 10.752 lux 

The light intensity between 0 – 800 lux needs to be considered for indoor installation, depending on your light source. The sun light intensity is 1200 + lux.
You need to make sure that the location of your device installation follow the rules in figure 1.
  1. 1. At least 2 meters from direct indoor light source
  2. 2. At least 3 meter from  direct outdoor light source

Figure 1

Locations that are not recommended because it’ll affect the sensor reading.
  1. 1. Direct sunlight outdoor
  2. 2. Direct sunlight indoor
  3. 3. Indirect sunlight indoor (reflection)
  4. 4. Too close to light source 


0 comments:

Have any questions or inquiries about FingerTec? Drop your input here.

TCMS V3 v2.1.0.9 New Release ( Date: 02.05.2017 )

Wednesday, May 03, 2017 TimeTec 0 Comments


1.    Added a new FingerTec Cloud Center migration feature


FCC is a web platform that stores FingerTec terminals' information and data securely on a cloud server. In the latest release, the FCC Migration Wizard feature is made user-friendlier, as it can connect to the web service login. It also has data selection feature, allowing users to migrate from FCC to Ingress software. This replaces the previous Select User and Import tab in this wizard.


The user will need to get the Username and Password by logging in to fcc.fingertec.com > click the “Username” at the right upper corner of the window > User Profile > scroll to the bottom “Ingress / TCMS v3 Login Detail” for the Login Username and Password.


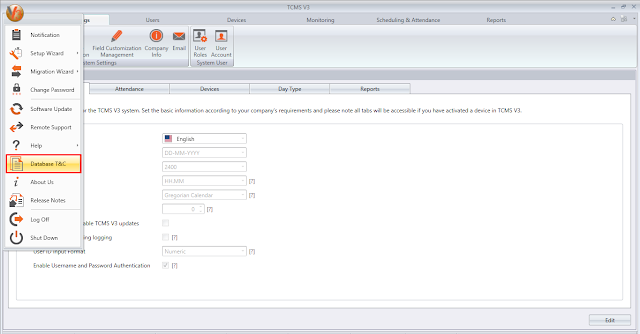
2.    Added Database Terms & Conditions

In this feature contain the Terms and Condition of the database. Please note that FingerTec will not be responsible for the unwarranted adjustments and changes to the database by any unqualified personnel of customers and repairing the said database could incur a cost on the customer’s part.

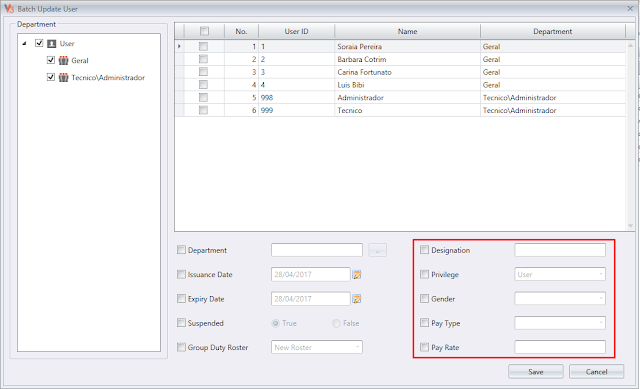
3.   Added the following fields in Batch Update User: Designation, Privilege, Gender, Pay Class, Pay Type, and Pay Rate.'


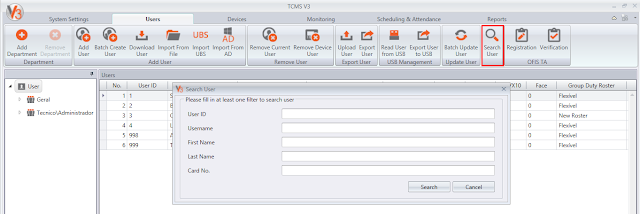
4.   Added search function in Device Module


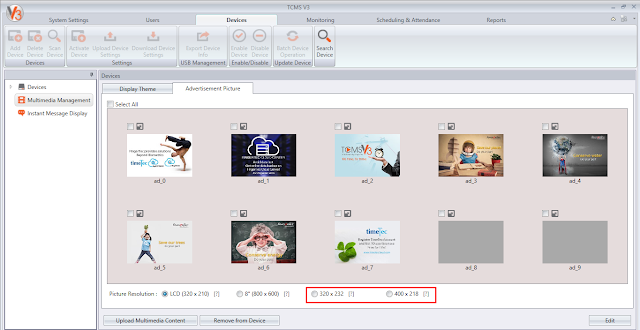
5.   Added new advertisement size (400x218 and 300x232), in Terminal Multimedia Management


6.   Added hints on Terminal Multimedia Management Resolution

These hints explain the resolution compatible for devices. The details are as follow:
LCD (320 x 210) - Q2i, R3, TA100C, TA200 Plus
8” (800 x 600) - I-Kiosk 100 Plus
320 x 232 - Face ID 2
400 x 218 - TA100C (FMM)


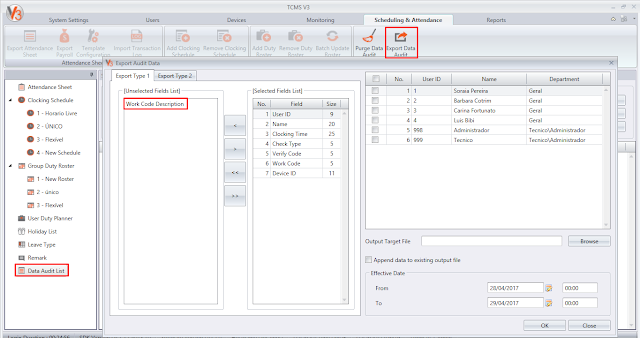
7.    Added "Work Code Description" option when export Audit Data


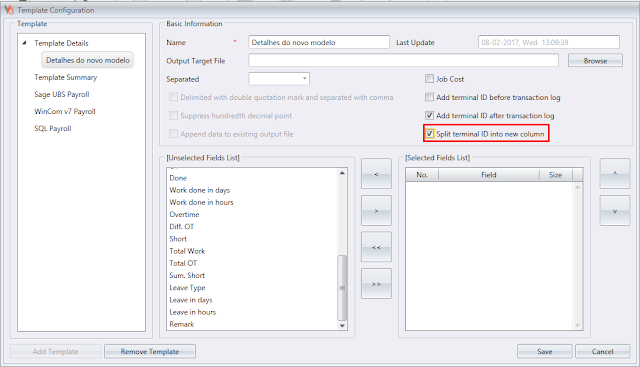
8.    Added option to split Terminal ID into new column when export Attendance Data


This option is available at Scheduling & Attendance Tab > Attendance Sheet > Export > Template Configuration.


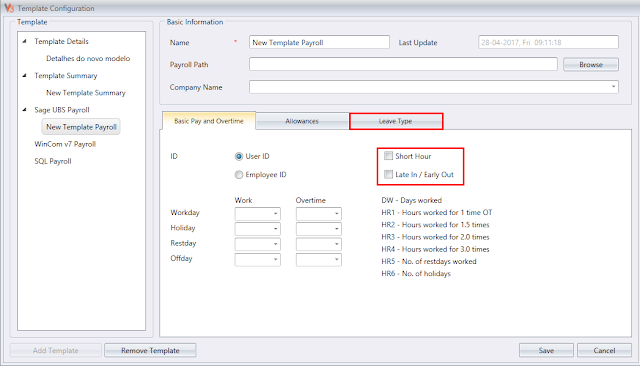
9.    Added Total Absent column in Export Attendance Summary


10.    Added Export Short Hour & Leave Type in UBS Payroll


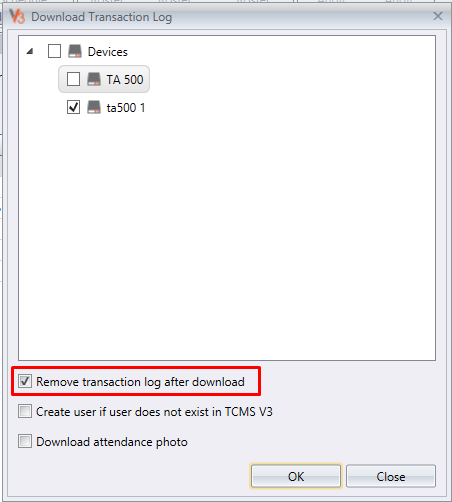
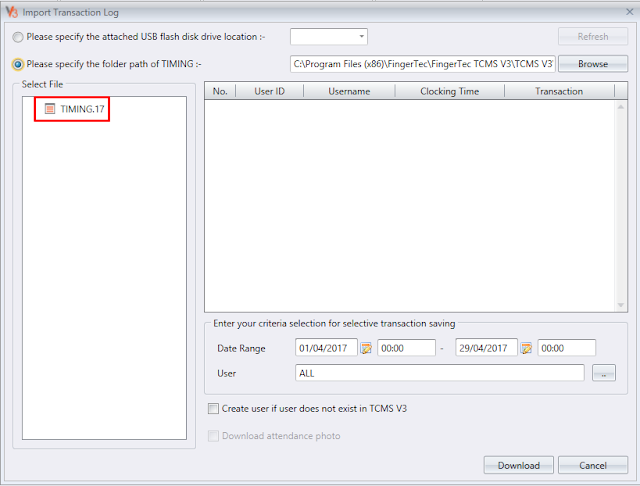
11.   Write "TIMING" file when download transaction log after delete

This feature contains all the transactions that already been deleted at the terminal. It will store to the TIMING file as a backup.


To restore the file, go to Scheduling & Attendance Tab > Import Transaction Log. By default, the TIMING file located at C:\Program Files (x86)\FingerTec\FingerTec TCMS V3\TCMS V3\TIMING.


12.   Enhanced Import User from USB and Export User to USB mechanism

The mechanism of USB data management has been enhanced for a better data transfer.

13.   Removed Leave Summary in Detailed ETC Report


In this release, there are some features that have already been fixed:

Fixed print report in Landscape issues
Fixed user maximum password length from 9 to 8
Fixed User ID showed square when download user via USB
Fixed incorrect value exported for Leave in days when Export Attendance Details

0 comments:

Have any questions or inquiries about FingerTec? Drop your input here.