Introduction
QR110 QR Code Scanner is FingerTec latest product that comes with a new verification method: QR Code along with the capabilities to scan RFID/MiFare access cards as well. As a slave reader, QR110 will need to be paired with FingerTec Ingressus controllers and master readers such as R3, R2, Q2i and etc before the whole system works.
Supported model:
Q2i, R3, R2, Face ID 3, Kadex, m-Kadex, Ingressus I/II/IV
QR110 is built with a 26-bit Wiegand communication. Even though FingerTec master devices comes with 34-bit and 26-bit Wiegand, by default all FingerTec Master Devices is set with 26-bit Wiegand Communication.
For information on QR110 (MiFare), please refer to this post:
How To Pair QR110 (MiFare) With FingerTec Master Readers
Please follow the steps below for QR110 (RFID) installation:
Process:
1) Connect the wirings between QR110 and FingerTec Controller and Biometrics Devices
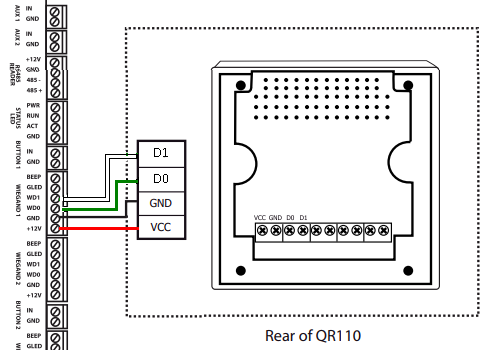
For Ingressus I,II, and IV, please connect the respective devices to the following QR110 ports (D1, D0, GND, VCC) as shown in the circuit diagram below:
QR 110 to Ingressus
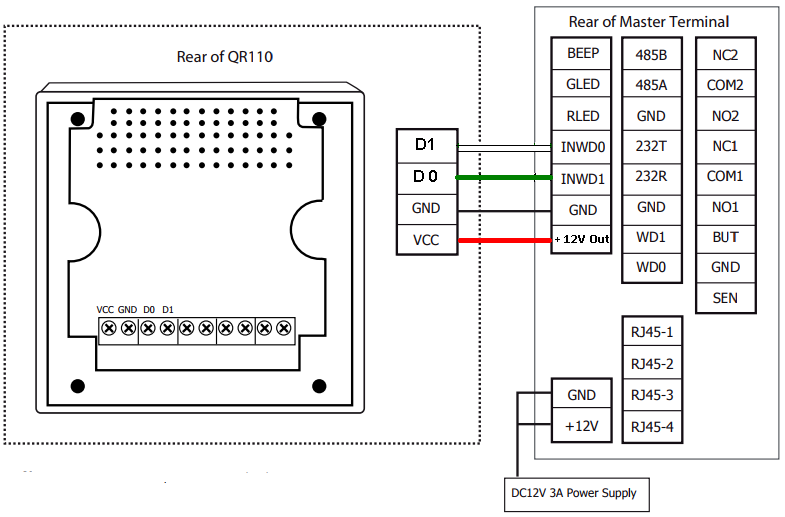
For Master Readers (R2, R3, Kadex, m-Kadex, Q2i, Face ID 3), please connect the respective
devices to the following QR110 ports (D1, D0, GND, VCC) as shown in the circuit diagram below:
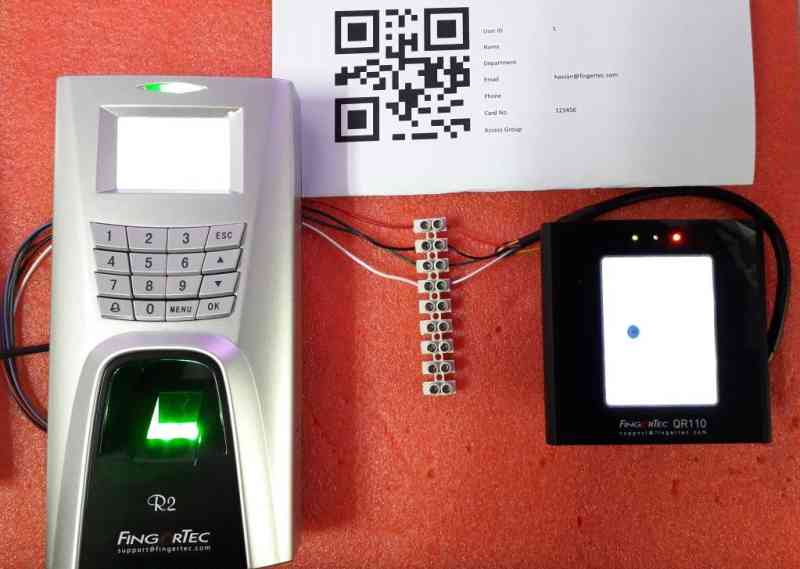
Example : R2 Connection to QR110
2) If there is no response on Master device when you wave card or scan QR code on QR110, please check the Wiegand bit Format in FingerTec Device
*QR110 is not compatible with Q2i (FEM 510)
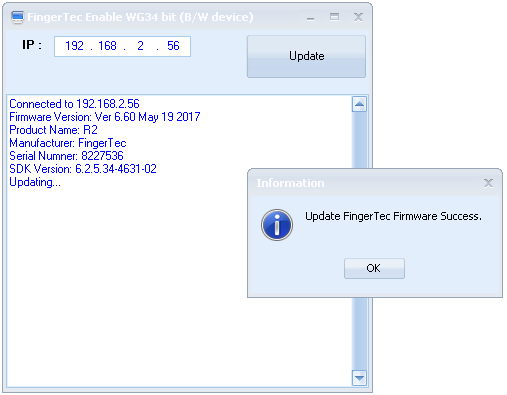
and proceed to input the IP address of m-Kadex into the software tool. Once updated, the
m-Kadex device will now accept 26-bit Wiegand Connection. (This method can also be applied
to R2 and Kadex) Please refer to the screenshot below for more information:
In Ingressus I, II, and IV, the devices will automatically detect and configure its Wiegand Connection once connected to QR110. Therefore, removing the need for any manual setting.
After the configuration is done, the FingerTec devices will then be paired with QR110.
FingerTec have updated Face ID 3 firmware to include the much anticipated feature: Per Day Verification Type as well as an additional Verification type - Face or Password & Card.
Feature Description
With Per Day Verification, user can now set a specific verification style for a particular day and time. For example, the usual Monday to Friday can be customized to “Face Only” during office hours (8am – 5pm), and “Face & Card” for out of office hours (5pm – 8am) while Saturday and Sunday can be arranged to “Face & Card” for the whole day.
This feature is suitable for company who wishes to strengthen their security after working hours and during rest days.
Feature Settings
To enable this feature in Face ID 3, first you need to update the firmware to version 4835-01 or later. Then download a tool from the link below in order to enable this function.
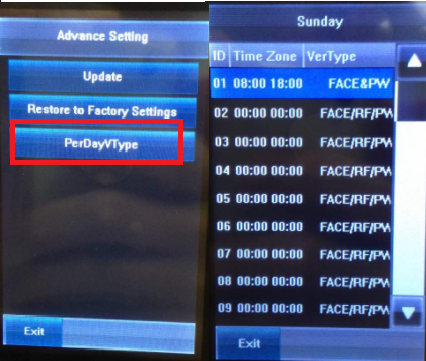
The settings of this feature can be manually set in the device [System > Advance Setting > PerDayVType] as shown in the picture below.
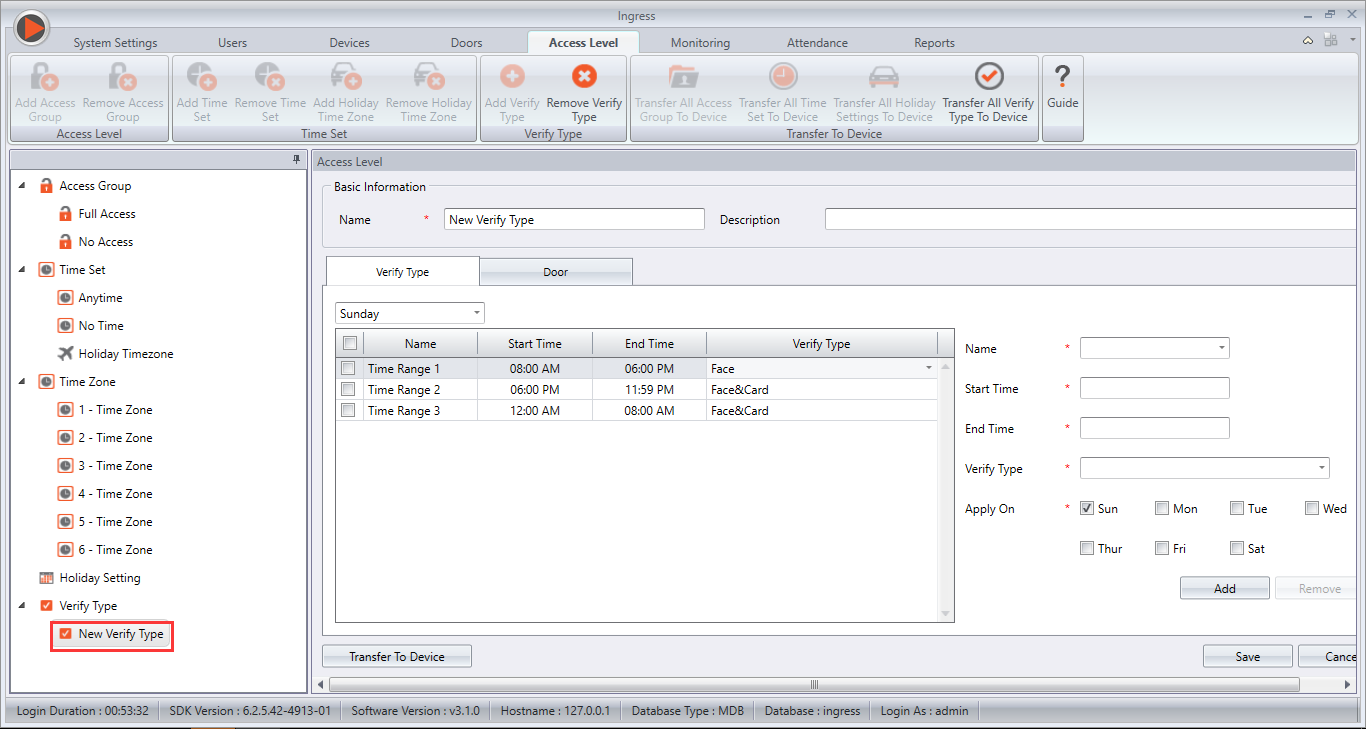
Alternatively, if the Face ID 3 is connected to Ingress Software, the settings can then be done under Access Level > Verify Type. After setting up the verify types and time zone, please make sure to Add Door and synchronize the device in order for it to take effect.
Remark: If PerDay Verification Type is turned ON, group and individual verification type will not be active. If timezone is not set in PerDay Verification Type, default type will be selected instead, which is Face, Password or Card.
Introduction
Access level configuration is a function that could help clients secures their property. Clients are able to set different Access Level for each authorized user according to the time zone, with combination of verification type. With this function, you can enhance security by limiting user access to your premises with specific time zone and group verification type.
Benefits
By configuring the Access Level, the security mechanism for your premises is tightened to prevent it from being invaded by any unauthorized individuals.
Process
1. Add a door > add your R3 and FaceID3 device to the door
2. Define the start and end time applicable for this Time Set. You can configure up to 3 different time sets in a day. Access Level > Time Set > Create a time set. Take note that the time access periods need to set continuously without overlapping, as shown in picture below. Following the example below, users will be granted access from 9am to 6pm and 8pm to 10pm every day.
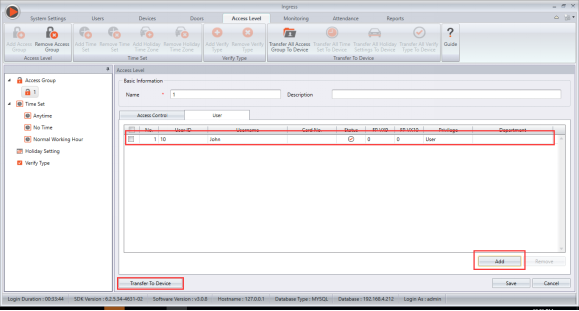
3. Access Group > Create a new access group > Add the door that which to upload the access level > Choose the time set created in step 2 > Select group verify type
4. Add user into the access group > Transfer to device
*Note that this step will transfer the access group to the terminal along with the users in the group; user(s) that are not in any access group will be deleted from the terminal.
Previously,
our Face ID terminal camera will automatically perform facial identification
during the verification process and or in the situation when users can be
detected within the vicinity of the terminal.
Responding
to our customers’ feedback, our R&D team have come out with a new firmware
enabling users the option to select whether they want the terminal to
automatically perform face identification.
You can download the latest face ID 3 firmware
here.
New
Feature
In
addition to that, we have also come up with a new feature for Face ID 3. This
feature makes it compulsory for users to select any status key on the screen of
the terminal (i.e. Check-in, OT-out, etc.) before switching on the camera for
verification.
Go
to Menu > System > Log Settings > Limit Face > Select either ‘Yes’
or ‘No’.
If
‘Yes’ is selected, users must press the status key before verification in order
for the camera function to be activated.
If
‘No’ is selected, the camera will automatically scan the users even though they
are just merely passing by. However, this function will speed up the
verification process as you do not need to press any key before verification.
Face ID 2 & Face ID 3 (FEM 800) from FingerTec now supports External Schedule Bell with a minimum of 5 seconds for trigger time. Read more for the latest Face ID firmware download link and steps to upgrade for the feature.
Now you can pair a Thermal Receipt Printer with Face ID 3! A receipt can be printed after every clocking in is done at a Face ID 3 terminal. Currently, the thoroughly tested model of a Thermal Receipt Printer that works with Face ID 3 is the EPSON TM-T88IV (sold in Malaysia). However, the same printer model might consist of different configurations in different countries.
To enable the printer option with Face ID 3, you need to update the device with the latest Firmware. Please refer to the steps below:
The automatic sliding door can be opened by activating control methods such as motion
detectors, push buttons, key switches and access control readers.
There
are three types of input that can be used by the automatic sliding door controller/motor
if you want to implement access control as the activating control method. Read more to see the three inputs.
FingerTec has developed a new, added safety feature for Face ID 3 and Face ID 4/4d! When a face template fails to be identified by a terminal after a certain period of time, a photo of the face will be captured and stored. Below are some sample screenshots for a failed verification:
 |
| Failed verification in Face ID 3 |
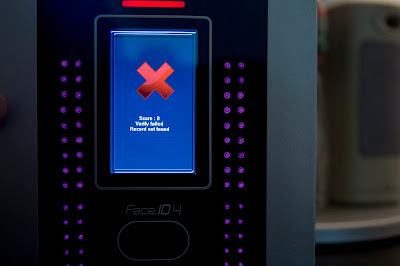 |
| Failed verification in Face ID 4 |
This is useful as administrators can trace back and determine the failure frequency of a particular individual by using FingerTec's TCMS V2 software.
The fail time period of each terminal is set to 10s by default. However, the time period is adjustable. To do so, simply follow the steps below:
Menu > System > Log Settings > Face Fail Time > Enter desired
duration
With the launch of the Ingress software
just around the corner, FingerTec has released the Ingress Trial Version for
our resellers as well as end-users to test out the software before actually making a
purchase. The trial version is strictly accessible only to FingerTec’s
Authorized Resellers & Distributors and End-Users of FingerTec only.
The instructions below are intended to
help you understand the workflow, types of testing environment, and what you
need to prepare before you start the test.
Supported Models:
Multimedia Models:
AC100C, TA100C, TA100TC, TA200 Plus.
Access Control
& Time Attendance Models: Ingressus, Q2i, i-Kiosk 100 Plus, AC900, R2, H2i,
R2c.
Face Recognition
Models: Face ID 2, Face ID 3, Face ID 4, Face ID 4d.
Card Reader
Models: TimeLine 100, Kadex, m-Kadex, k-Kadex, i-Kadex.
Please make sure that the FingerTec
terminal you use for testing is listed above. Any terminals excluded from the list will not work with the Ingress Software. Next up, go to Ingress’s trial
version page to fill in the request form and submit it back to us. You are
required to insert your FingerTec terminal’s serial number for us to generate
the trial product key.
If you are not using a FingerTec terminal for testing,
you are still required to insert the testing terminal’s serial number,
and we will process it accordingly. If you do not have a terminal to test the
Ingress software, just leave the serial number text box empty and we will
provide you with an 8-digit device serial number and the trial product key. We
will email you once your Ingress trial application has been approved.
You can
access Ingress’s trial version page by clicking this link.
Once your application has been approved,
you may download the Ingress Trial Version software installer here.
Unzip the file, right click the
installation file and select Run as administrator to prompt the installation.
Follow the onscreen instructions to complete the installation.
Upon the Ingress installation, it is
mandatory to activate the device before you can use it to perform testing. There
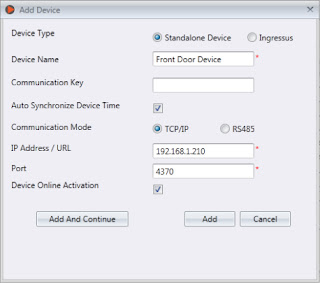
are 2 ways to activate the device. While adding new devices to the software, tick
the checkbox for Device Online Activation.
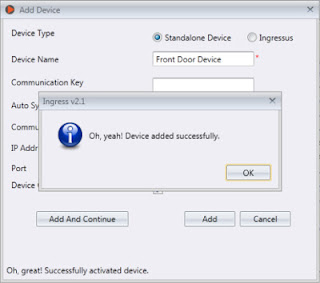
Once the activation is completed, you
can see a “Successful Activation” message at the bottom left corner of the
window.
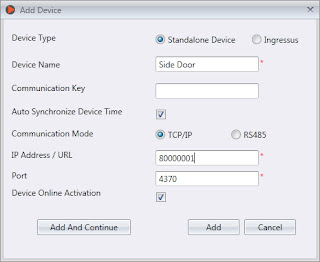
As mentioned above, if you do not have any
terminals to perform testing, please insert the given serial number at the IP
Address / URL text box and tick the checkbox for Device Online Activation. Click Add to
activate the serial number and then you may start to use the Ingress software
for testing.
Another way to activate the terminal is in Devices.
Click on the device that you want to activate and click Activate Device.
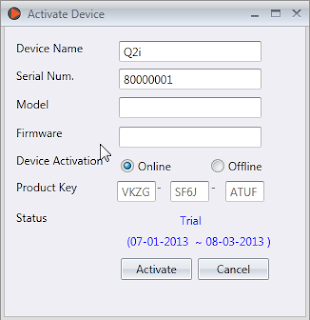
At the Activate Device window, there are 2
methods to activate the device; either Online or Offline. If you choose
to activate the device online, select Online and click Activate. The Ingress Software
will connect to our database server to verify and activate the device
accordingly. You will see the device’s activation status as well as the expiry
date.
If you choose to activate the device offline, kindly
contact us at [email protected] to request for the trial product key. Then insert
the given product key into the text box. Select Offline and click Activate to
proceed with the activation.
Written by Vincent
