Introduction
FingerTec QR110 is a slave QR code reader for door access, and recently this model has been designed to also read MiFare card. This is a quick guide on how to pair QR110 (MiFare) with FingerTec Master Readers.
For information on QR110 (RFID) please refer to this post:
How to pair FingerTec QR110 Slave Reader with FingerTec Master Readers
QR110 (MiFare) Compatible Device -
Below are the list of FingerTec device models that are compatible with QR110 (MiFare):
1. R2
2. R3
3. Q2i (FEM 800 only)
4. Kadex
5. M-Kadex
6. Ingressus Controller
Note that QR110 (MiFare) is using 34-bit Wiegand signal to communicate with the master readers.
Requirement -
The main requirements needed for pairing QR110 (MiFare) with the master readers are:
1. Wiegand-In Port
2. Wiegand 34-bit Communication
3. MiFare Card
Connection between QR110 and FingerTec Master Readers -
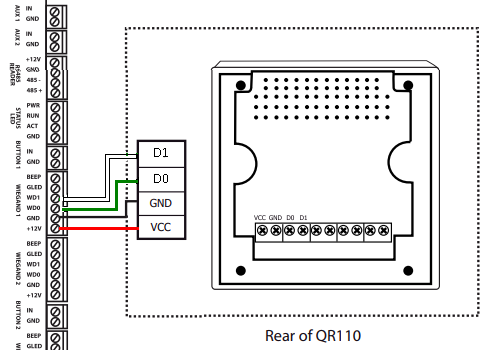
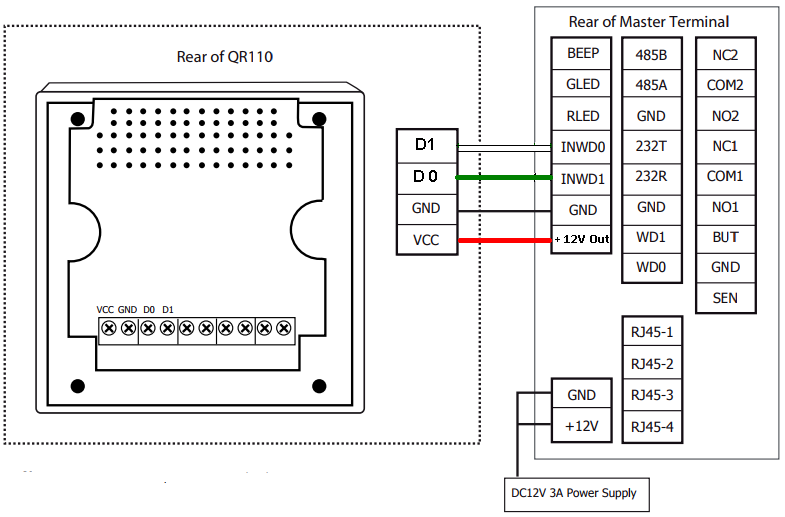
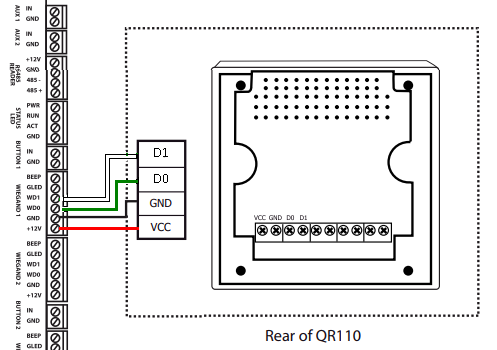
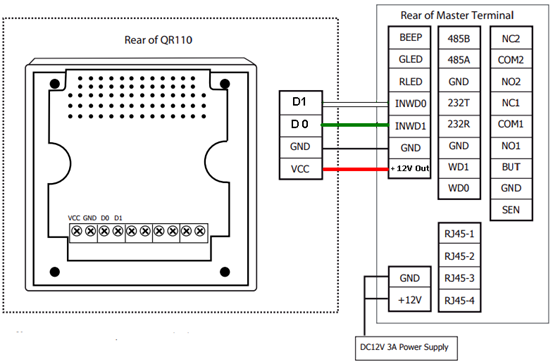
The connection for QR110 (MiFare) with the Master Readers is the same with QR110 (RFID). You may find the connection details as shown in the diagram below:
1. Pairing With Ingressus Controller
2. Pairing With FingerTec Master Readers.
QR110 MiFare Setting -
As QR110 MiFare reader is a very simple and convenient reader to begin with, no configuration or setting is required from the device. All users need to do is just plug in the device and the process is complete.
Master Readers Setting -
Before pairing the Master Readers with QR110, the devices on the other hand, will first need to be enabled in Wiegand 34-bit format as per the setting below:
1. R2 and Kadex:
Menu > option > system option > Wiegand input setting > FP device > Input format = WG34 Without ID > Restart.
2. R3 and Q2i:
Menu > Comm > Wiegand > input option > Define = 34 > Bit counts = 34 > Input = NO. > Restart.
3. Face ID 3:
Menu > comm > Wiegand input > Wiegand Format = Wiegand 34 > Input = Card No. > Save > Restart.
4. m-Kadex:
Requires a tool update as provided below (also works with R2 and Kadex):
https://s3.amazonaws.com/files.fingertec.com/Azim+Tools/Tools/FTEnableWG34_BWdevice.exe
5. Ingressus:
Connect 3 Wiegand cables between QR110 (MiFare) reader and Ingressus (no other settings required).
Once done, FingerTec Master Readers will thus be paired up with the QR110 (MiFare) reader.
Note: If some of the screenshots or steps viewed here are different from the ones in the current system, this is due to our continuous effort to improve our system from time to time. Please notify us at [email protected], we will update it as soon as possible.
FingerTec has updated Kadex and R2(FEM 565) firmware from the previous version 3544-05 to the latest version 5114-07 which now includes the new feature to support 99 Access Groups.
Feature Description
Previously, the maximum Access Group that is allowed for 3544-05 firmware is limited to 5 access groups. Hence to further benefit users, the updated firmware now allows the users to include up to 99 access groups. This improvement is perfectly suitable for big companies that have a huge number of employees as well as intend to restrict their employees’ access into certain areas within certain time zones.
Example:
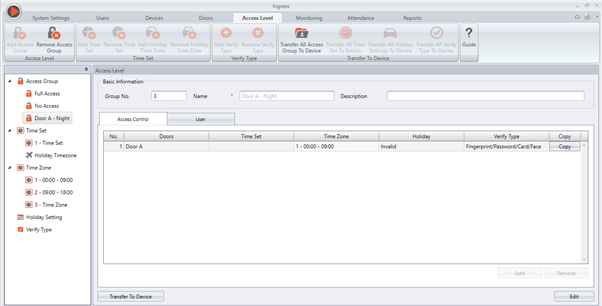
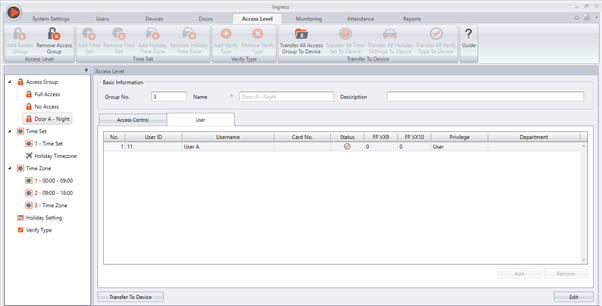
During Weekdays, Door A in a company can be accessed by User A within 12.00 am to 09.00 am and User B within 09.00 am to 6.00 pm. In this case, Admins can create 2 different access groups with 2 different Access Level settings as shown below:
Access Group 1: Door A, Night (12.00 am to 09.00 am), User A
Access Group 2: Door B, Morning (09.00 am to 6.00 pm), User B
Feature Settings
Configuration of Access Group can be done in Ingress software, at Access Level module. You can download the latest Ingress software from the link provided below:
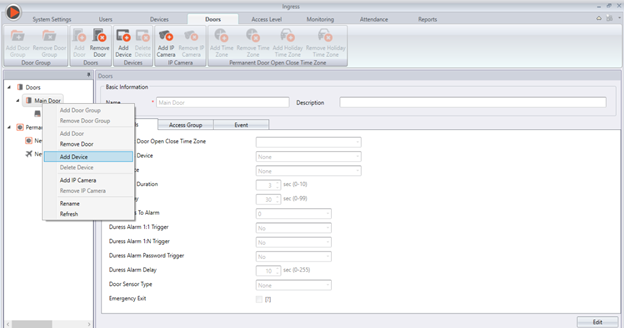
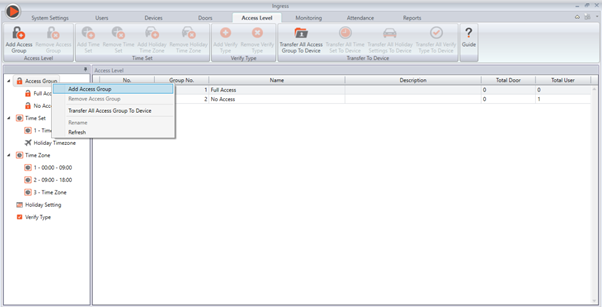
To configure the settings under Access Level, please first ensure that the terminal is connected with Ingress and added as a device to the door.
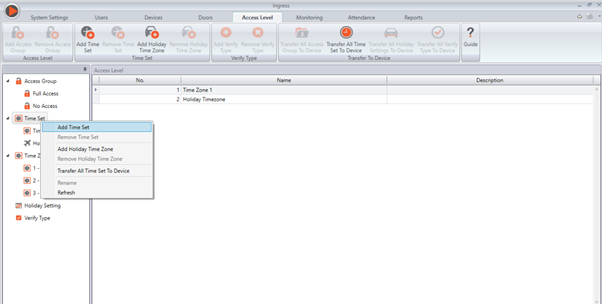
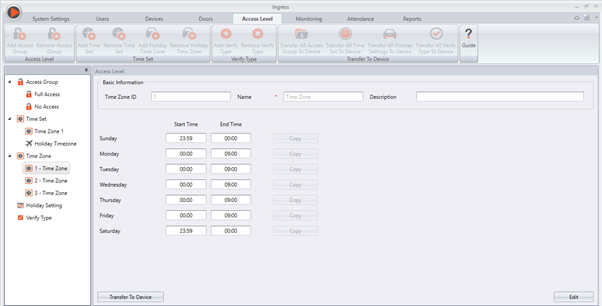
Next, add Time Set. When Time Set is added, 3 Time Zones will be created. In Time Set 1, first interval represents Time Zone 1, second interval represents Time Zone 2 and third interval represents Time Zone 3. The same goes for other Time Set when it is created.
Edit the Access Time in the Time Zone accordingly.
Add Access Group under Access Level.
After creating a new Access Group, select the Time Zone with the appropriate timing. Users can also be added into the Access Group under the User tab.
Remarks: 1 User can ONLY be added into 1 Access Group.
Introduction
QR110 QR Code Scanner is FingerTec latest product that comes with a new verification method: QR Code along with the capabilities to scan RFID/MiFare access cards as well. As a slave reader, QR110 will need to be paired with FingerTec Ingressus controllers and master readers such as R3, R2, Q2i and etc before the whole system works.
Supported model:
Q2i, R3, R2, Face ID 3, Kadex, m-Kadex, Ingressus I/II/IV
QR110 is built with a 26-bit Wiegand communication. Even though FingerTec master devices comes with 34-bit and 26-bit Wiegand, by default all FingerTec Master Devices is set with 26-bit Wiegand Communication.
For information on QR110 (MiFare), please refer to this post:
How To Pair QR110 (MiFare) With FingerTec Master Readers
Please follow the steps below for QR110 (RFID) installation:
Process:
1) Connect the wirings between QR110 and FingerTec Controller and Biometrics Devices
For Ingressus I,II, and IV, please connect the respective devices to the following QR110 ports (D1, D0, GND, VCC) as shown in the circuit diagram below:
QR 110 to Ingressus
For Master Readers (R2, R3, Kadex, m-Kadex, Q2i, Face ID 3), please connect the respective
devices to the following QR110 ports (D1, D0, GND, VCC) as shown in the circuit diagram below:
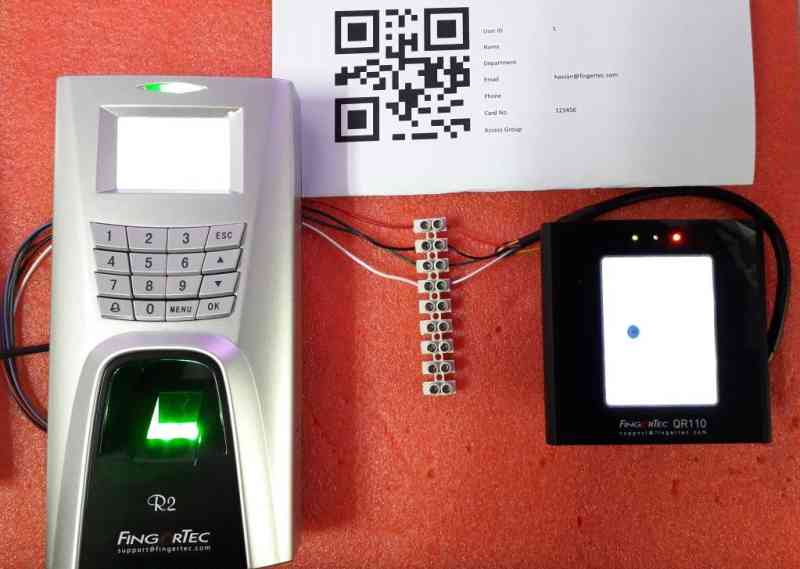
Example : R2 Connection to QR110
2) If there is no response on Master device when you wave card or scan QR code on QR110, please check the Wiegand bit Format in FingerTec Device
*QR110 is not compatible with Q2i (FEM 510)
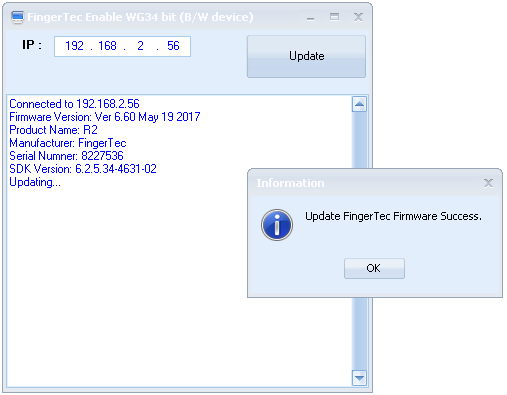
and proceed to input the IP address of m-Kadex into the software tool. Once updated, the
m-Kadex device will now accept 26-bit Wiegand Connection. (This method can also be applied
to R2 and Kadex) Please refer to the screenshot below for more information:
In Ingressus I, II, and IV, the devices will automatically detect and configure its Wiegand Connection once connected to QR110. Therefore, removing the need for any manual setting.
After the configuration is done, the FingerTec devices will then be paired with QR110.
Introduction
FingerTec Kadex is an Access Control and Time Attendance smart card reader. This terminal allows password and card verification in both single and combination mode including Card only, Password only, Card/Password, and Card & Password verification styles. Furthermore, Kadex terminal can be used as an Entry and Exit terminal by pairing it to its compatible slave reader: i-Kadex. Please note that i-Kadex slave reader uses a Wiegand-out connection to master Kadex.
Fault & Fix
A) Fault:
Reportedly, on firmware build 3544-02, Ver 6.60 July 2014, paired Kadex and i-Kadex would malfunction while the user verification was selected as Card & Password. The error occurs whenever User A and User B performs card verification at Kadex (Entry Device) and on i-Kadex (Exit Reader) respectively, simultaneously. Following the error, the door would not be released and both user A and B will fail to access the supposed door. As a result, Kadex terminal faces a temporary “Hang” before returning to normal functional mode.
B) Fix:
With reference to the fault description, FingerTec hardware developers have released firmware build 3544-02, Ver 6.60 March 2017. This firmware changes the behavior of the terminal on a similar scenario, whereby User A verifies at the entry device (Kadex) while the concurrent verification of User B at the exit terminal (i-Kadex) will be rejected until the Card and Password entry of User A is completed.
*Please consult your reseller or direct your enquiry to [email protected] before updating your device firmware.
Due to the wear
and tear of terminal parts, some of the terminals will automatically turn ON
and OFF on its own at times without any command given.
Below are the
steps that you can take to rectify this issue on your own.
·
Sleep and Automatic OFF Settings (For AC900
only)
If these settings are configured, the terminal will
automatically turn off or go into sleep mode.
To disable this setting, go to Menu > Option >
Power Management > Change the Idle Minute to ‘0’.
·
Webserver IP Setting
When this setting is used, the reader will attempt to
connect to the Webserver IP and restart after it fails to find the IP which has
been set.
To disable this setting, go to Menu > Option >
Comm Option > Change the Webserver IP to 0.0.0.0
When both of
these settings has been turned off, the reader will not automatically turn ON
and OFF on its own anymore.
Previously, it was reported that it would be a delay in door release when the card was produced in front of the R2 and Kadex terminal.
FingerTec
has released the new firmware for both R2 and Kadex to solve this issue.
You can now download the Kadex's & R2’s latest firmware here.
FingerTec Worldwide has improved the Door Open/Close Configuration
tool from 1 time zone to 5. Access control terminals such as R2,
Kadex and AC900 now can have up to 5 different time zones. Read more for the download link and instructions on how to use it.
The automatic sliding door can be opened by activating control methods such as motion
detectors, push buttons, key switches and access control readers.
There
are three types of input that can be used by the automatic sliding door controller/motor
if you want to implement access control as the activating control method. Read more to see the three inputs.
With the launch of the Ingress software
just around the corner, FingerTec has released the Ingress Trial Version for
our resellers as well as end-users to test out the software before actually making a
purchase. The trial version is strictly accessible only to FingerTec’s
Authorized Resellers & Distributors and End-Users of FingerTec only.
The instructions below are intended to
help you understand the workflow, types of testing environment, and what you
need to prepare before you start the test.
Supported Models:
Multimedia Models:
AC100C, TA100C, TA100TC, TA200 Plus.
Access Control
& Time Attendance Models: Ingressus, Q2i, i-Kiosk 100 Plus, AC900, R2, H2i,
R2c.
Face Recognition
Models: Face ID 2, Face ID 3, Face ID 4, Face ID 4d.
Card Reader
Models: TimeLine 100, Kadex, m-Kadex, k-Kadex, i-Kadex.
Please make sure that the FingerTec
terminal you use for testing is listed above. Any terminals excluded from the list will not work with the Ingress Software. Next up, go to Ingress’s trial
version page to fill in the request form and submit it back to us. You are
required to insert your FingerTec terminal’s serial number for us to generate
the trial product key.
If you are not using a FingerTec terminal for testing,
you are still required to insert the testing terminal’s serial number,
and we will process it accordingly. If you do not have a terminal to test the
Ingress software, just leave the serial number text box empty and we will
provide you with an 8-digit device serial number and the trial product key. We
will email you once your Ingress trial application has been approved.
You can
access Ingress’s trial version page by clicking this link.
Once your application has been approved,
you may download the Ingress Trial Version software installer here.
Unzip the file, right click the
installation file and select Run as administrator to prompt the installation.
Follow the onscreen instructions to complete the installation.
Upon the Ingress installation, it is
mandatory to activate the device before you can use it to perform testing. There
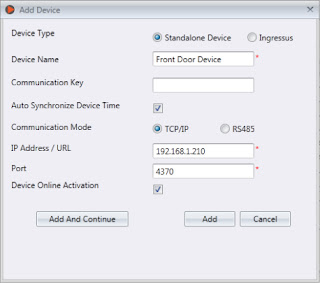
are 2 ways to activate the device. While adding new devices to the software, tick
the checkbox for Device Online Activation.
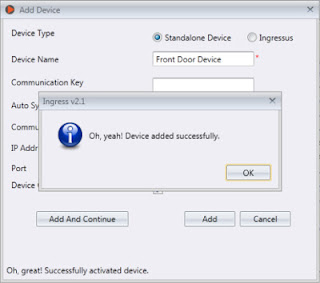
Once the activation is completed, you
can see a “Successful Activation” message at the bottom left corner of the
window.
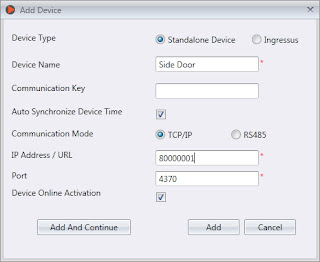
As mentioned above, if you do not have any
terminals to perform testing, please insert the given serial number at the IP
Address / URL text box and tick the checkbox for Device Online Activation. Click Add to
activate the serial number and then you may start to use the Ingress software
for testing.
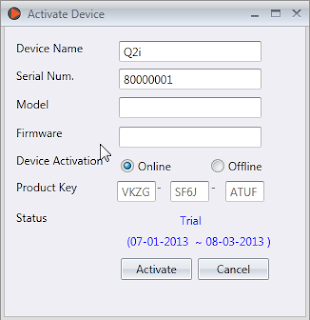
Another way to activate the terminal is in Devices.
Click on the device that you want to activate and click Activate Device.
At the Activate Device window, there are 2
methods to activate the device; either Online or Offline. If you choose
to activate the device online, select Online and click Activate. The Ingress Software
will connect to our database server to verify and activate the device
accordingly. You will see the device’s activation status as well as the expiry
date.
If you choose to activate the device offline, kindly
contact us at [email protected] to request for the trial product key. Then insert
the given product key into the text box. Select Offline and click Activate to
proceed with the activation.
Written by Vincent
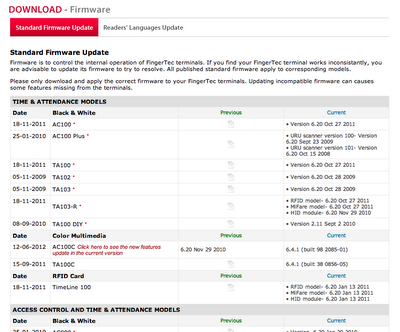
FingerTec provides regular firmware updates for our devices to enhance our existing features, and to fix some minor glitches that might have been found in each device. These updates are readily available for download for FingerTec Authorized Resellers at http://tips.fingertec.com/.
FingerTec has recently updated the Firmware Download page. Now, you can see the version of each firmware for each model in the Tips website. With this new organization of the page, you will now be able to check the firmware version of your terminals before proceeding to download/update the firmware.
Contact [email protected] if you are still unsure about how to proceed, or if you would like more information.
Initiated and Written by: Henry Pang
After weeks of
testing and fine-tuning, our R&D team has drastically improved the Master
& Slave terminal verification as a response to our customers’ feedback.
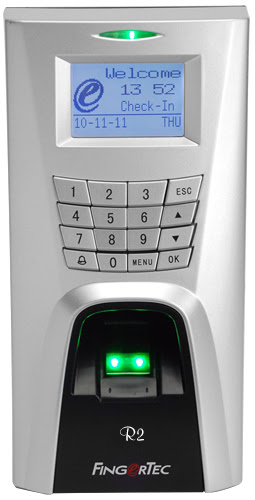 FingerTec R2
(FEM500)
The new R2
(FEM500) firmware will enhance the Master & Slave terminal to provide a
faster and more accurate verification. We have also reduced the R2i’s
verification failure problem. Upon the firmware update, you sill see significant differences before and after the firmware update.
You can get your device firmware by providing serial number to your reseller or Fingertec support at [email protected] and they will provide you the exact firmware that suits your device coreboard version.
There are two
R2 firmwares, R2 (FEM500) and R2 (FEM565). It is very important that you
determine the terminal’s platform before you update the firmware into the
respective terminals. If the wrong firmware is updated, the terminal will cease
to function properly. Click here
for the information on how to determine the terminal platform and update the
firmware.
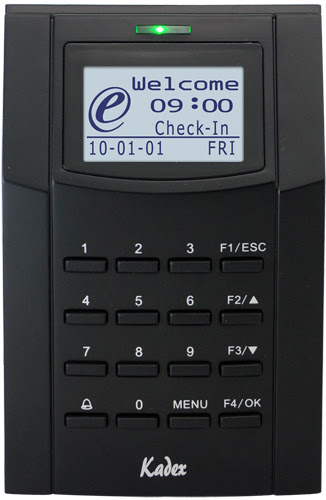 FingerTec Kadex
The new Kadex
firmware will enhance the Master & Slave terminal, providing a faster and
more accurate verification.
You can get your device firmware by providing serial number to your reseller or Fingertec support at [email protected] and they will provide you the exact firmware that suits your device coreboard version.
Permanent
Door Open/Close Tool:
We have
resolved the bug for the Time Zone column that is non-editable. You can
download the new Permanent Door Open/Close Tool here.
For more
information regarding the Permanent Door Open/Close Tool, please refer to the
step-by-step installation and usage guide here.
Written by Vincent
All the FingerTec terminals are equipped with a
flash memory to store transaction data, fingerprint templates, face templates, etc.
The flash memory is a permanent (non-volatile) storage and it can store data
even without the power supply. The FingerTec terminals’ memory capacity varies for
each model. Time attendance only terminals have far less transaction storage
capacity compared to the multimedia models.
When you perform a successful verification, the
terminal will store a transaction log into its memory. The transaction will be
stored in the terminal until it is downloaded into our TCMSv2 software, or
manually deleted. If you do not download or delete the transaction data after a
period of time, the memory’s storage will reach its maximum capacity and the
terminal will cease to work or function properly. If you are using a USB flash
disk to manage the transaction records, click here for further instructions. If you are only using the
FingerTec terminal for door access purposes and do not need the transaction
data, it is recommended that you perform a housekeeping to ensure that the
terminals to continue to work in a tip top condition.
You can set a reminder at the terminal before
its memory reaches the maximum capacity. If the configured figure is 99, the
terminal will alert users when it reaches its last 99 transaction
storage.
For terminals AC100, TA100, AC900, R2,
Kadex : Press Menu >
Options > Log Opt > Alm SuperLog / Alm Attlog
Alm SuperLog: to instruct
the terminal to alert user if the transaction storage of administrator login is
less than the configured figure. The default figure is 99.
Alm AttLog: to instruct
the terminal to alert user if the transaction storage is less than the
configured figure. The default figure is 99.
For terminals AC100C, TA100C, TA200 Plus,
Q2i, I-Kiosk 100, R3, and TA500: Press
Menu > System > System > Log Alert
For terminals Face ID 2, Face ID 3: Press Menu > System > Log Setting > Log
Alert
For terminal I-kiosk 100 Plus: Press Menu > System > Param Setup > Log Alert
Log Alert: To instruct the terminal to alert user if the transaction storage
is less than the configured figure. The default figure is 99.


