INTRODUCTION
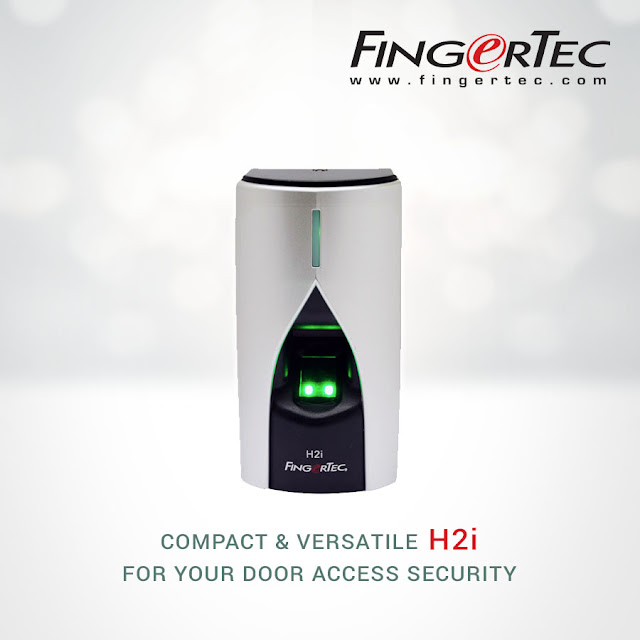
Previously FingerTec R2 was paired with the slave device R2i. Due to major improvements carried out on the slave, R2c was introduced as a replacement to R2i. However, with the improvements, the new R2c can only support R2 with Biobridge VX10.0 algorithm and incompatible to R2 version 565 with Biobridge VX9.0 algorithm. The differences in algorithm versions disallow transfer of fingerprint templates between the previous R2 and the latest R2. And to use the new R2, users need to reenroll all user fingerprint templates again, a very impractical solution for organizations that have a large number of employees. As an alternative solution, we suggest the pairing of the old R2 unit (565) with H2i unit to work as master-slave in-out readers. This combination can be configured to work with Biobridge VX9.0 algorithm smoothly.
BENEFITS
By choosing this method, you can skip the reenrollment of users’ fingerprint templates and use the existing fingerprint templates (BioBridge VX9.0) from the old device to be transferred into the new units.
PROCESS
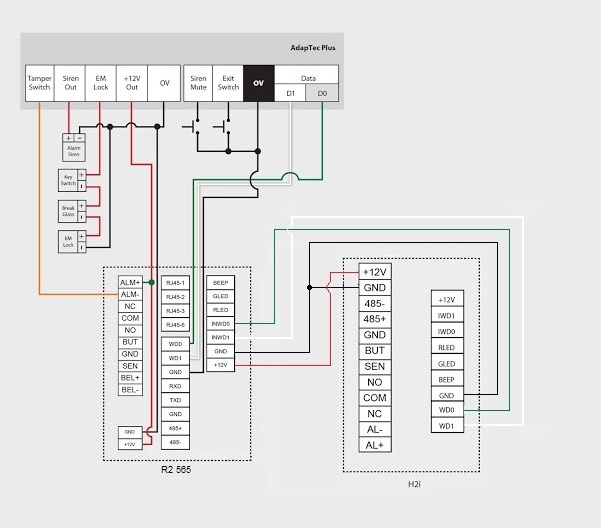
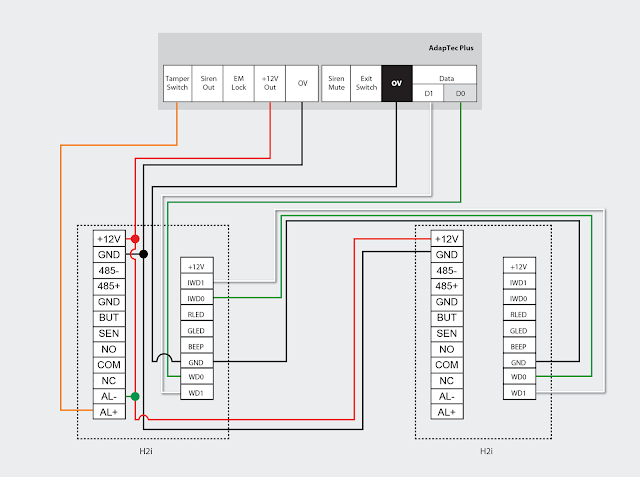
To set up this R2-H2i combination, you need to connect these 2 terminals according to the connection diagram below.
Terminal configurations:
AT R2 (565) MASTER
Change BioBridge Algorithm Version from Vx10 to Vx9.0
Press Menu > Option > System Option > Adv Option > Alg Ver > 9.0 > Ok > Esc & Save
Setting For Wiegand Input For R2.
Press Menu > Option > System Option > Wiegand > Input setting > FP device > Input format = WG26 with ID > Esc > Input = User > Esc & Save
AT H2i SLAVE
Download the FingerTec Terminal Function Tools at ../../static/file/terminal-func.zip
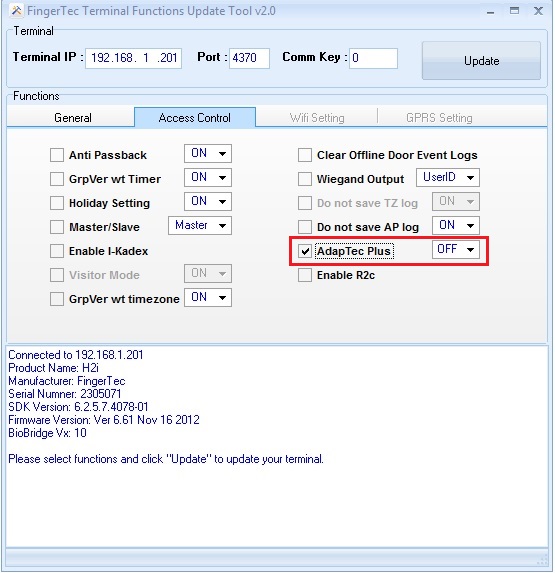
Change AdapTec Plus to Off
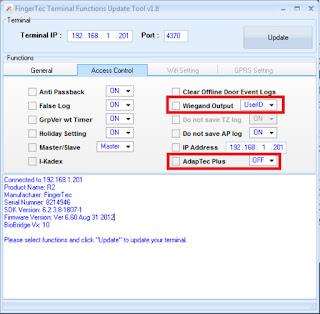
Start up the FingerTec Terminal Function Tool and connect to the H2i terminal and change the AdapTec Plus to OFF at Access Control menu.
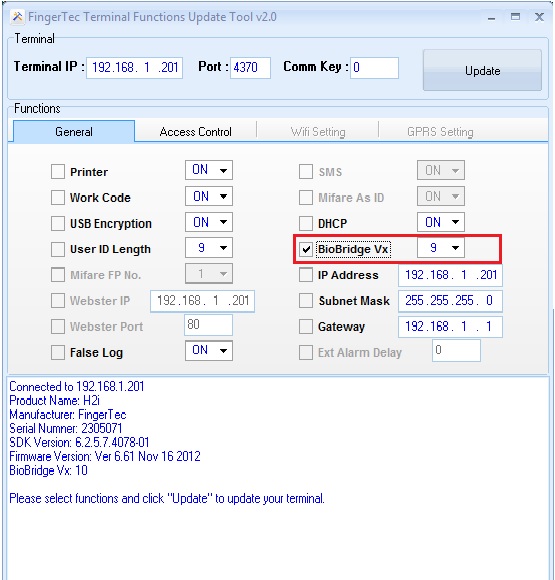
Change BioBridge Algorithm Version to Vx 9.0
Start up the FingerTec Terminal Function Tool and connect to the H2i terminal and change the BioBridge Algorithm to Vx 9.0 at General Menu.
And now you’re done. By pairing old R2 565 version with the latest H2i, it could save you tonnes of time enrolling the new templates for all users. If you found yourself stumbled upon this predicament, give this suggestion a serious consideration. Contact us at
[email protected] for further information.
All the FingerTec terminals are equipped with a flash memory to store
transaction data, fingerprint templates, face templates, etc. The flash memory
is a permanent (non-volatile) storage and it can store data even without the
power supply. The FingerTec terminals’ memory capacity varies for each model.
Time attendance only terminals have far less transaction storage capacity
compared to the multimedia models.
When you perform a successful verification, the
terminal will store a transaction log into its memory. The transaction will be
stored in the terminal until it is downloaded into our TCMSv2 software, or
manually deleted. If you do not download or delete the transaction data after a
period of time, the memory’s storage will reach its maximum capacity and the
terminal will cease to work or function properly. If you are using a USB flash
disk to manage the transaction records, click here for further instructions. If you are only using the FingerTec terminal
for door access purposes and do not need the transaction data, it is
recommended that you perform a housekeeping to ensure that the terminals to
continue to work in a tip top condition.
You can set a reminder at the terminal before
its memory reaches the maximum capacity. If the configured figure is 99, the
terminal will alert users when it reaches its last 99 transaction
storage.
Fo terminals AC100, TA100, AC900, R2,
Kadex: Press Menu
> Options > Log Opt > Alm SuperLog / Alm Attlog
Alm SuperLog: to
notify users if the operational log storage is less than the configured figure.
The default figure is 99.
Alm AttLog: to
notify users if the transaction storage is less than the configured figure. The
default figure is 99.
For AC100C, TA100C, TA200 Plus, Q2i,
I-Kiosk 100, R3, and TA500: Press Menu > System > System > Log
Alert
For AC100C, TA100C (FMM100): Press Menu > System > Attendance
> Attendance Log Alert
For Face ID Series (Face ID2, Face ID3, Face ID4, Face ID4d): Press Menu > System > Log Setting > Log Alert
For I-kiosk 100 Plus: Press Menu > System > Param Setup
> Log Alert
Log Alert: To
instruct the terminal to alert user if the transaction storage is less than the
configured figure. The default figure is 99.
Fingertec
H2i and m-Kadex terminal does not come with a LCD screen thus some settings
needs to be set with caution. After the registration of the administration card
is done, enrollment, deletion or resetting on the terminals cannot be performed
by anyone without the administration card.
In any case whereby the employee has misplaced their admin card, you can reset
the admin directly from the hardware as well as via our software.
Do take note that for H2i terminal,
User ID 1 is reserved for Administrator.
You can
refer to the respective terminals’ manual below for steps on how you can reset
the terminal to factory settings without the administrator card.
However, do take note that once your device has been
reset to default factory settings, all contents of the terminal will be deleted
including the administrator card, user information and transaction logs. All
settings will return to the default settings. The IP address will return to 192.168.1.201,
and terminal ID will return to 1 after the process.
Proceed
by re-enrolling the administrator.
To Reset via TCMSv2
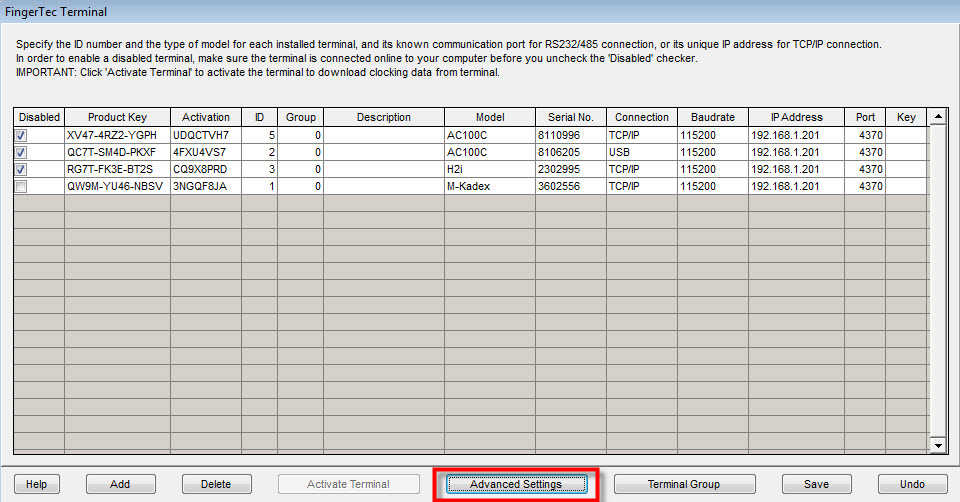
1) Add the
terminal to TCMSv2 and enable the device. Once it is enabled, proceed to click
at the Advanced Settings of the Terminal.
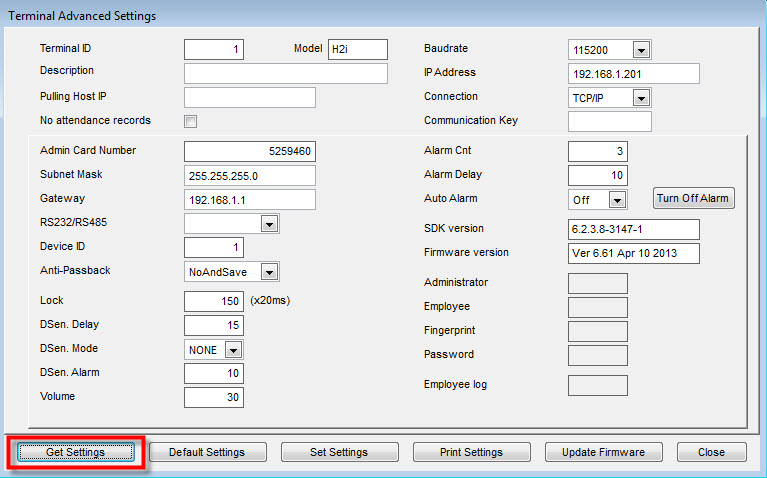
2) In
Advanced Settings, click Get Settings to download the terminals’ information.
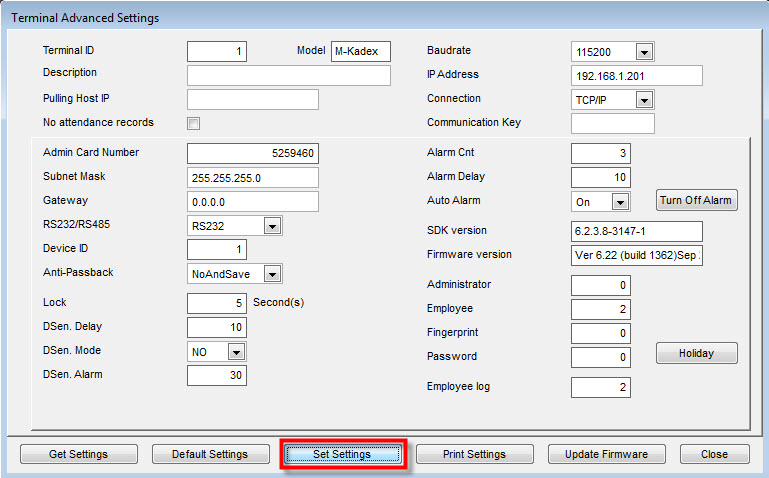
3) Change
the new admin card number at the ‘Admin Card Number’ column.
4) Once it
is done, click on Set Settings and the new card will be reflected in the
terminal. Now you can proceed to set the terminal settings using the new Admin
Card.
To Reset via Ingress
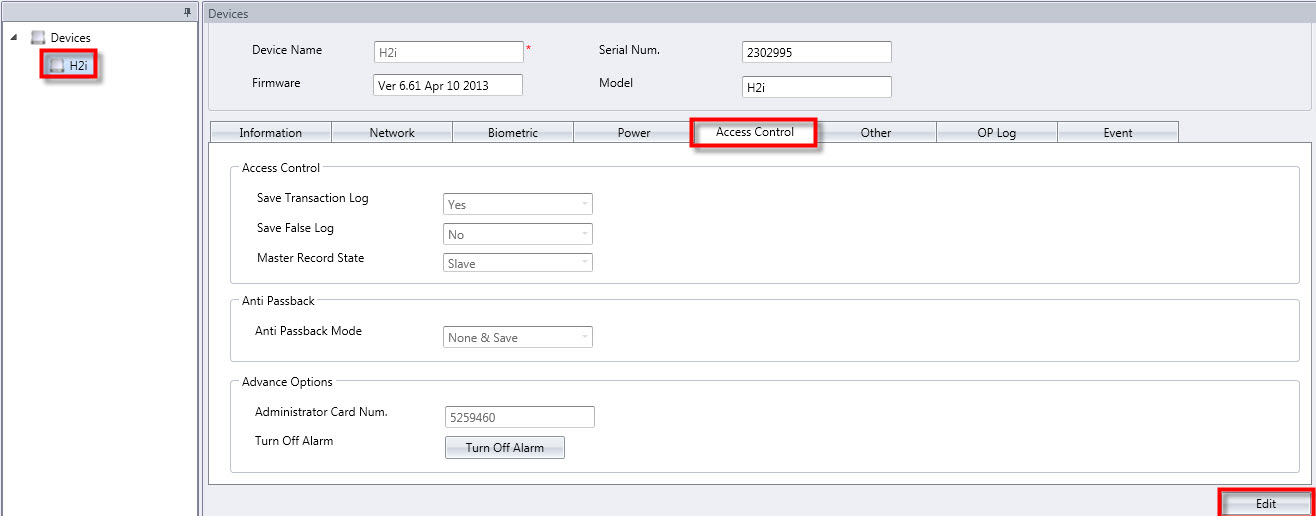
1)
Add the
terminal to Ingress and enable the device. Once it is enabled, click once on
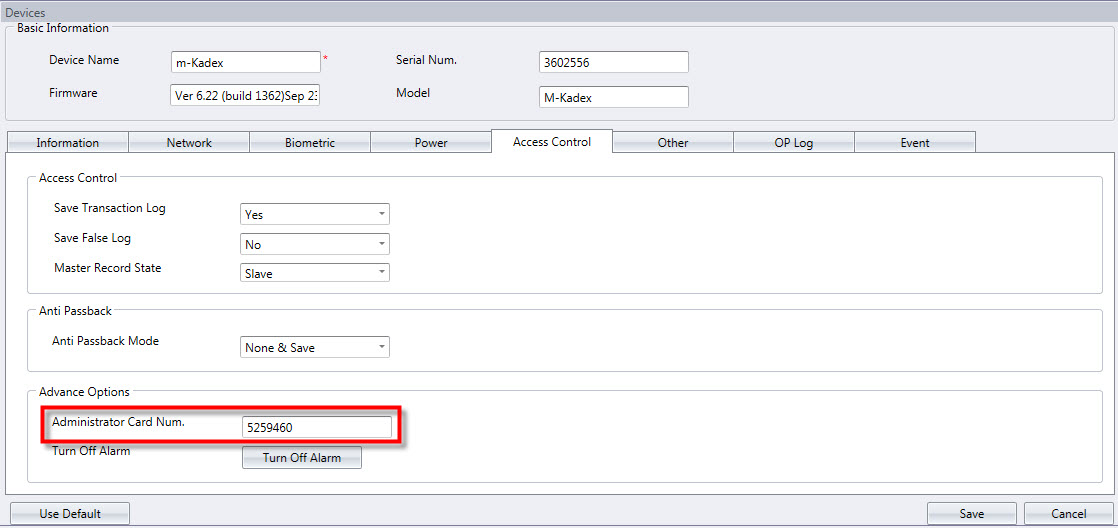
the device name > Select the Access Control Tab and Click Edit.
2)
At the
Advance Options column, enter the new Adminstrator Card Num > Click Save.
3)
Go to the
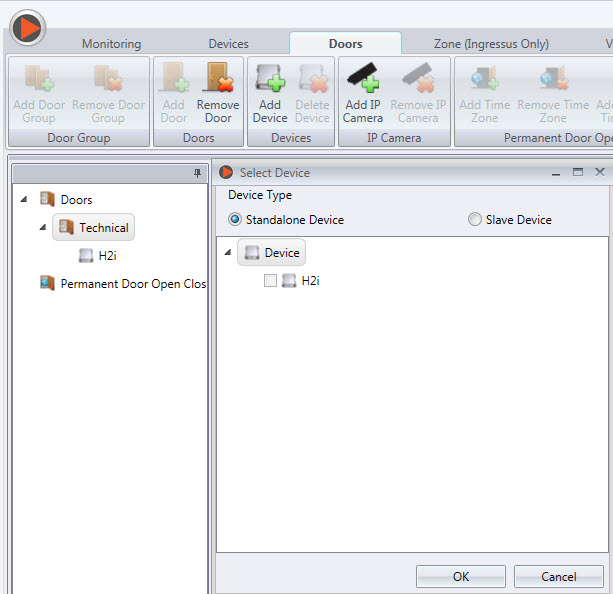
Door Tab > Create a door and add the device to the door.
Note:
Failure to do this will cause an inability to sync the changed settings to the
terminal.
4)
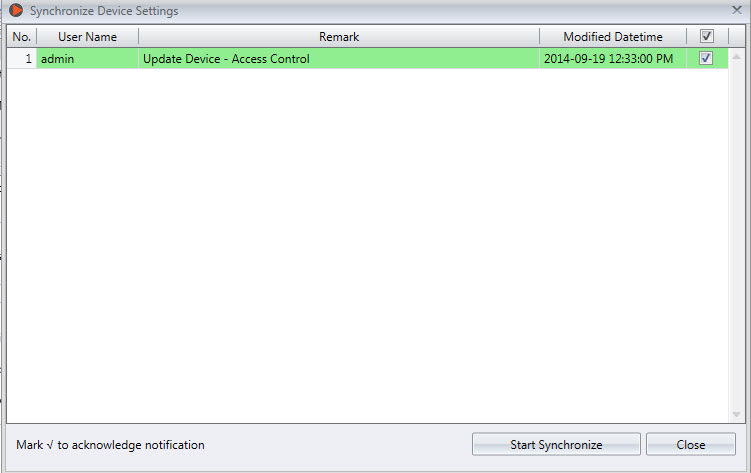
Once it
is done, Sync the changes to the terminal and the new card ID will be reflected
in the terminal. Now you can proceed to set the terminal settings using the new
Admin Card.
Our R&D have come out with a tool for H2i users to
remove the sound of alarms with ease, as the H2i terminal does not come with a
screen.
To download the tool, please click here.
*Please note that when this update is performed, the alarm
will not be triggered in the event of:~
1. Door
Forced Open
2. Failed
verification after a certain number of time.
3. Device
being forcefully removed as such the tamper switch is released.
Under certain configurations, FingerTec devices can be paired with each other in the same access control environment such as the H2i device. To pair one H2i device with another H2i device, the user needs to modify the setup for the master terminals to use it as master-slave terminals. For instructions on how to modify the setup, click here.
As a gentle reminder, please make sure that:
- Master reader - AdapTec Plus is turned ON and the Wiegand output is User ID.
- Slave reader - AdapTec Plus is turned OFF and the Wiegand output is User ID.
Please refer to the below wiring diagram for pairing two H2i devices and and AdapTec Plus:
Effective immediately, H2i devices can now be paired with R2c readers. However, this is only possible through a customization request. When purchasing a brand new H2i terminal, remember to notify the sales person that the terminal is to be paired with R2c as the slave reader.
If you are already using a H2i device at your place, simply send it over back to us for an update of the MCU board. This is because an update of the MCU board using PIC controller is necessary in order for the H2i device to support R2c.
For your reference, below is an installation diagram for the H2i and R2c devices with the new AdapTec Plus.
Before FingerTec Worldwide introduced Slave devices that could pair with Master devices, 2 master devices were used and modified to act as a Master-Slave setup for door access solution. Due to the distinct requirements by certain customers, the Master-Master setup is still widely used, most noticeably with the H2i, which is very popular due to its aesthetic quality. Its sophisticated design can cater to almost any style of office and home interiors.To modify the setup, please follow the instructions below:
- Download the FingerTec Terminal Function Tools here.
- Upon download, start up the FingerTec Terminal Function Tool
and connect to the terminal. Change the Wiegand Output to UserID and the
AdapTec Plus to OFF.
- You will need to perform the above steps for both terminals.
- After that, download the FingerTec Master Slave Tools here. (../../static/file/FTMasterSlave.zip)
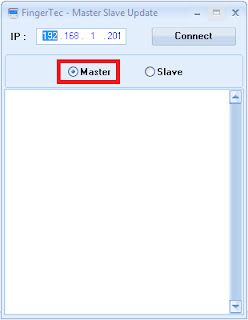
- For the Master terminal, update the tools as Master.
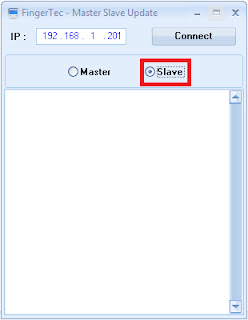
- For the Slave terminal, select Slave before you update
it.
Initiated by Aidid, Written by Vincent
With the launch of the Ingress software
just around the corner, FingerTec has released the Ingress Trial Version for
our resellers as well as end-users to test out the software before actually making a
purchase. The trial version is strictly accessible only to FingerTec’s
Authorized Resellers & Distributors and End-Users of FingerTec only.
The instructions below are intended to
help you understand the workflow, types of testing environment, and what you
need to prepare before you start the test.
Supported Models:
Multimedia Models:
AC100C, TA100C, TA100TC, TA200 Plus.
Access Control
& Time Attendance Models: Ingressus, Q2i, i-Kiosk 100 Plus, AC900, R2, H2i,
R2c.
Face Recognition
Models: Face ID 2, Face ID 3, Face ID 4, Face ID 4d.
Card Reader
Models: TimeLine 100, Kadex, m-Kadex, k-Kadex, i-Kadex.
Please make sure that the FingerTec
terminal you use for testing is listed above. Any terminals excluded from the list will not work with the Ingress Software. Next up, go to Ingress’s trial
version page to fill in the request form and submit it back to us. You are
required to insert your FingerTec terminal’s serial number for us to generate
the trial product key.
If you are not using a FingerTec terminal for testing,
you are still required to insert the testing terminal’s serial number,
and we will process it accordingly. If you do not have a terminal to test the
Ingress software, just leave the serial number text box empty and we will
provide you with an 8-digit device serial number and the trial product key. We
will email you once your Ingress trial application has been approved.
You can
access Ingress’s trial version page by clicking this link.
Once your application has been approved,
you may download the Ingress Trial Version software installer here.
Unzip the file, right click the
installation file and select Run as administrator to prompt the installation.
Follow the onscreen instructions to complete the installation.
Upon the Ingress installation, it is
mandatory to activate the device before you can use it to perform testing. There
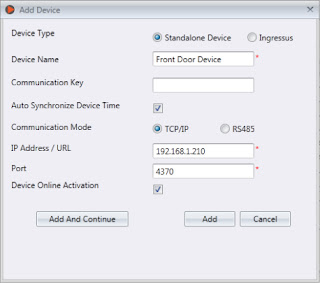
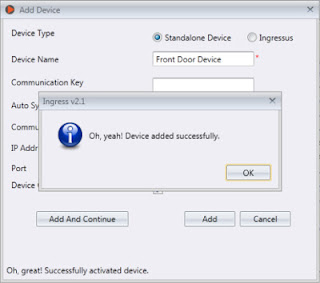
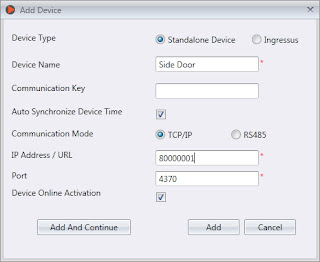
are 2 ways to activate the device. While adding new devices to the software, tick
the checkbox for Device Online Activation.
Once the activation is completed, you
can see a “Successful Activation” message at the bottom left corner of the
window.
As mentioned above, if you do not have any
terminals to perform testing, please insert the given serial number at the IP
Address / URL text box and tick the checkbox for Device Online Activation. Click Add to
activate the serial number and then you may start to use the Ingress software
for testing.
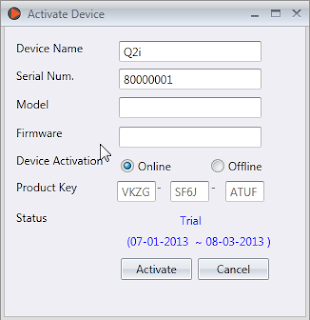
Another way to activate the terminal is in Devices.
Click on the device that you want to activate and click Activate Device.
At the Activate Device window, there are 2
methods to activate the device; either Online or Offline. If you choose
to activate the device online, select Online and click Activate. The Ingress Software
will connect to our database server to verify and activate the device
accordingly. You will see the device’s activation status as well as the expiry
date.
If you choose to activate the device offline, kindly
contact us at [email protected] to request for the trial product key. Then insert
the given product key into the text box. Select Offline and click Activate to
proceed with the activation.
Written by Vincent


