Introduction
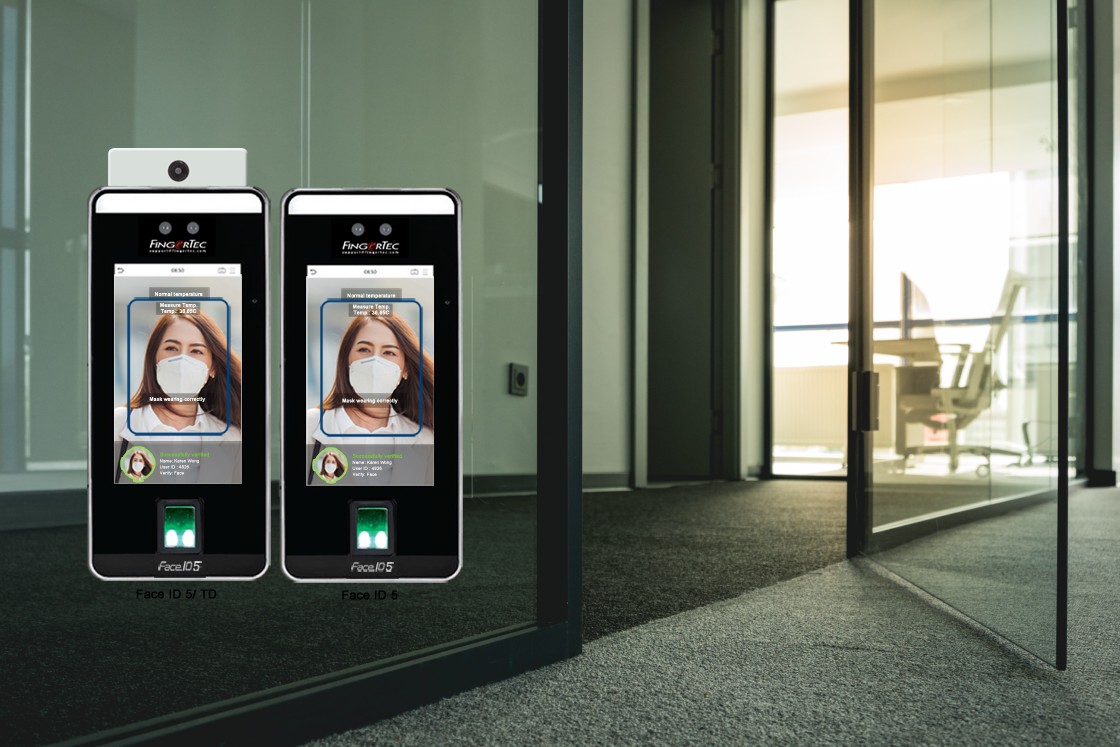
Good news, FingerTec has launched Face ID 5 recently, and the two new models that are equipped with temperature readers are Face ID 5 TD and Face ID 5 FTD that also can be used for building access control.
*Please state in your inquiries before purchasing the Face ID 5 with Access Push to be compatible with our software. This tip will show how the Face ID 5 can function as an access control system for in and out and pair with our R3c device.
Process
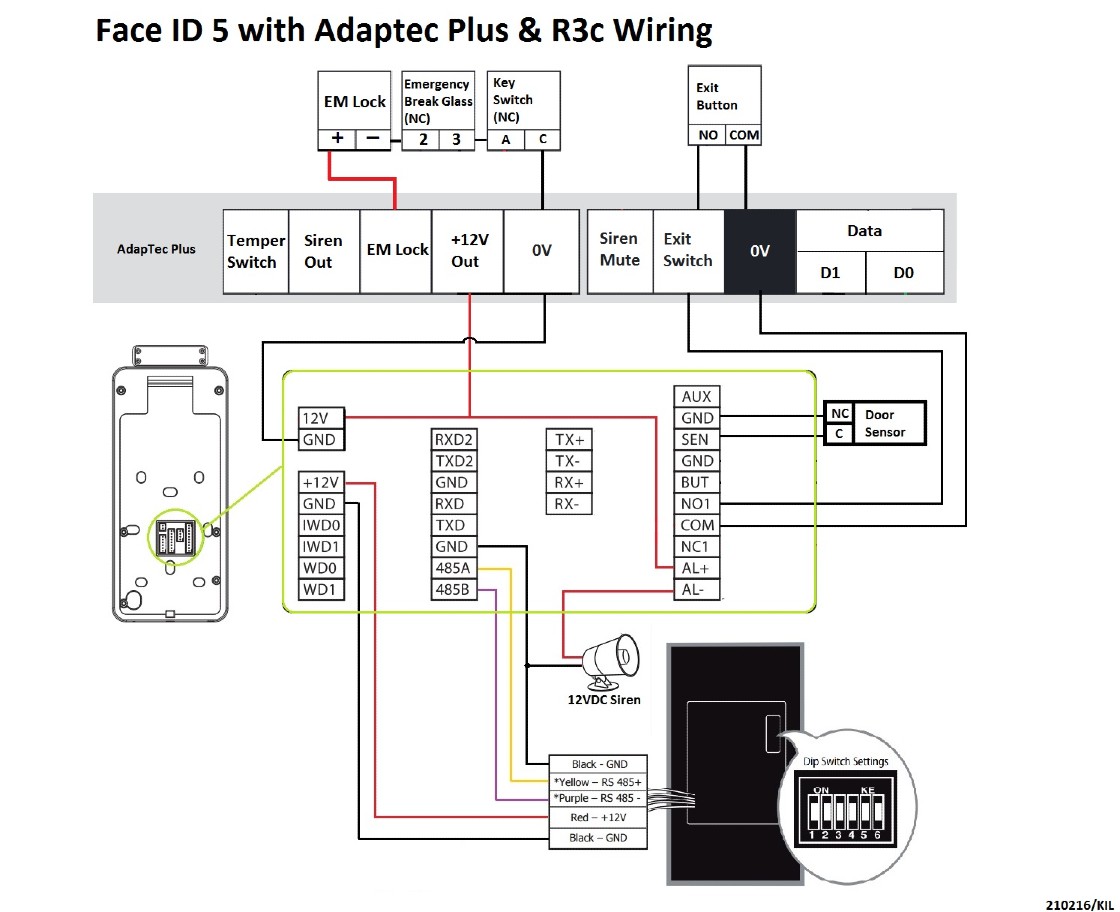
Diagram 1 : Connection of Face ID 5 with AdapTec Plus & R3c
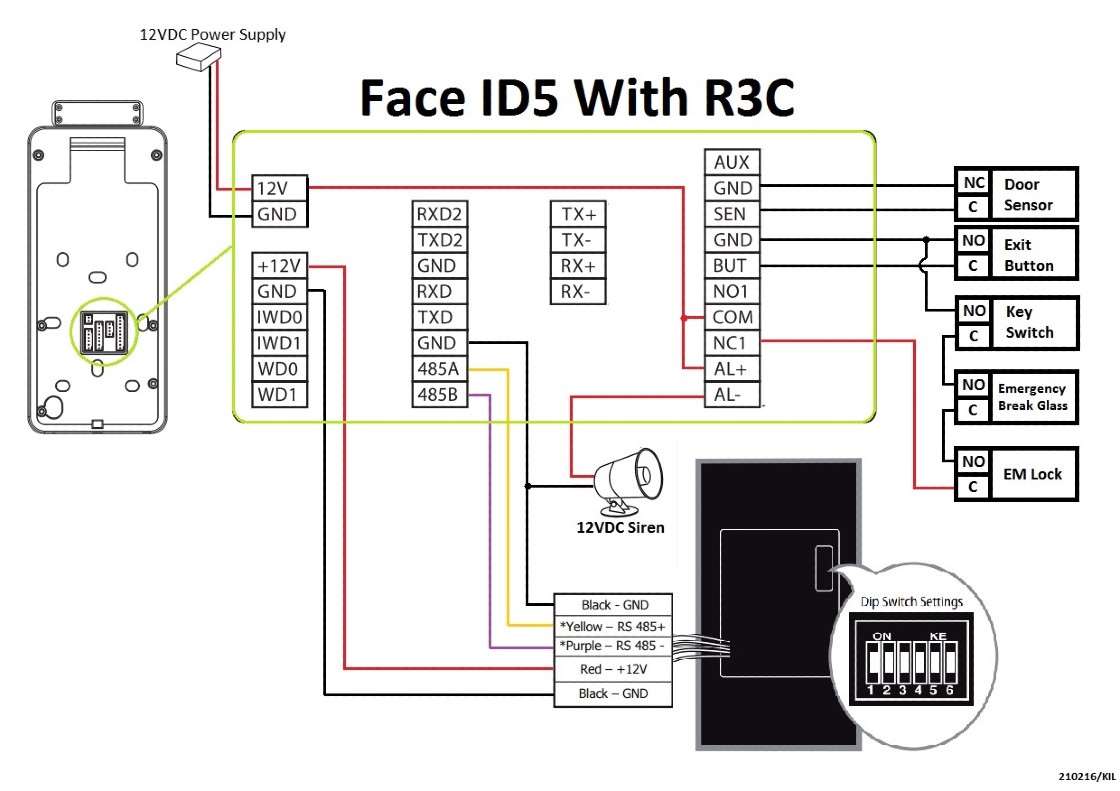
Diagram 2 : Connection of Face ID 5 with R3c
Face ID 5 settings at the device for Access control
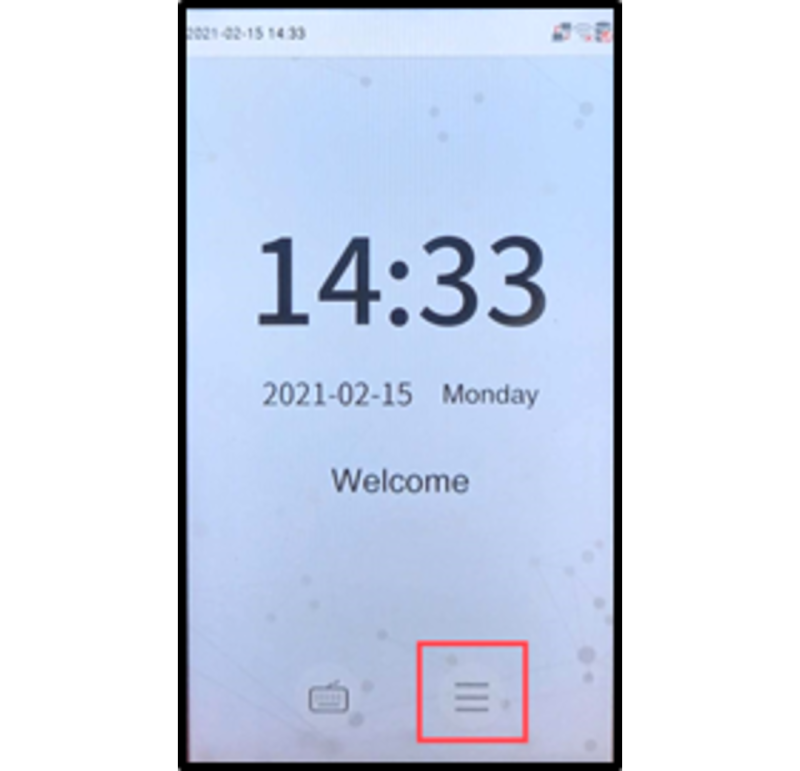
Picture 1 : Press Menu Icon
Picture 2 : Select COMM icon
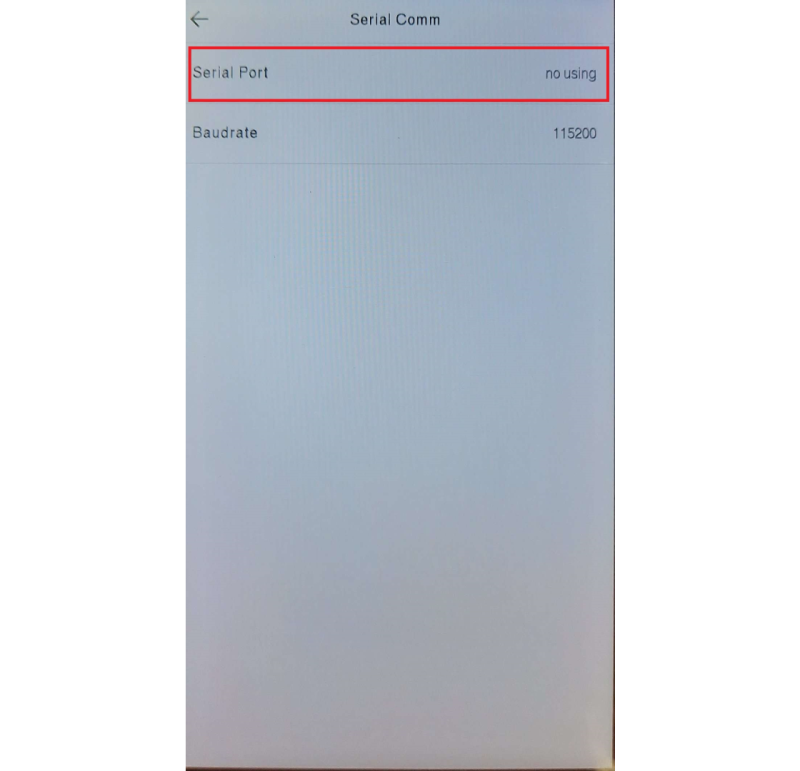
Picture 3 : Select Serial Comm
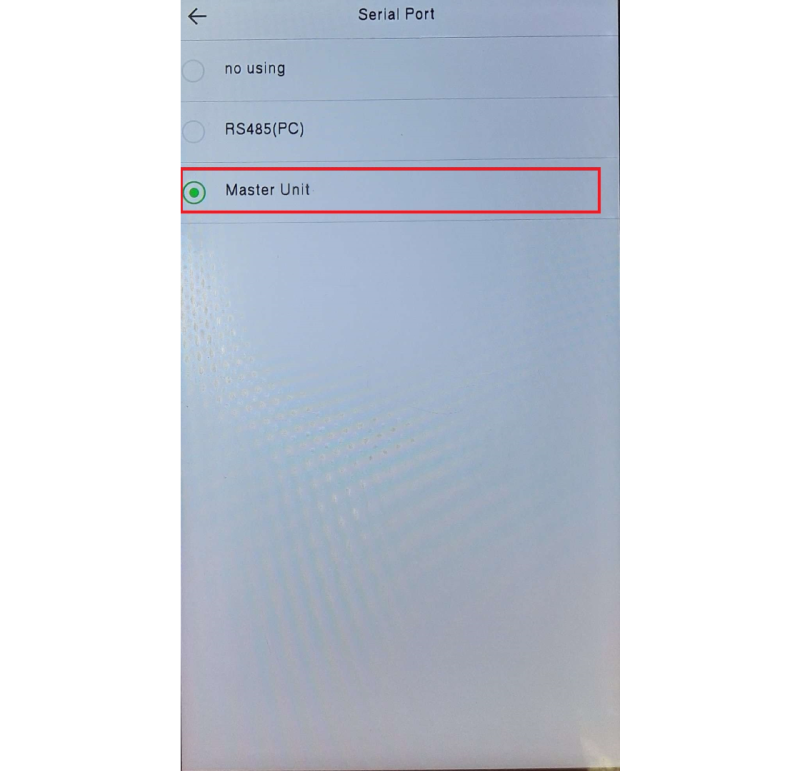
Picture 4 : Select Serial Port
Picture 5 : Select Master Unit
After setting the Face ID 5 as a Master Unit, the IN and OUT for the device need to be set as to determine either the master will act as the IN device or OUT.
Picture 6: Push menu icon
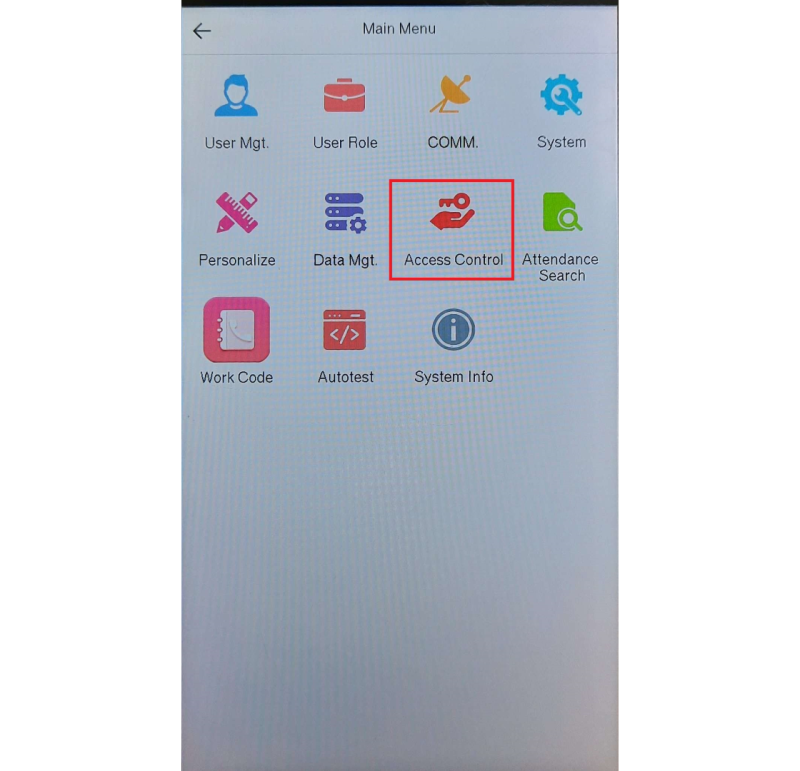
Picture 7 : Select Access Control
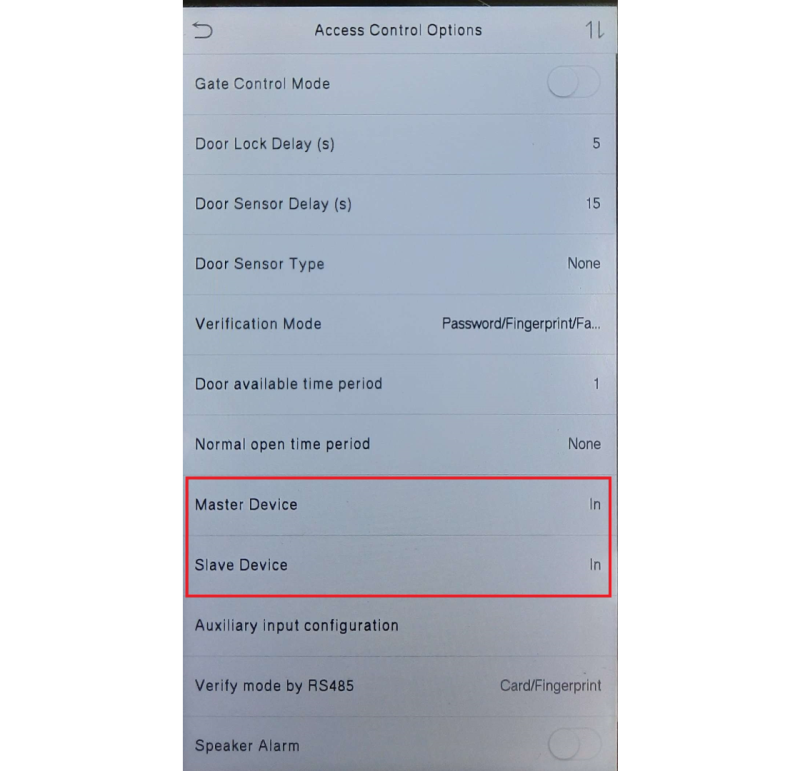
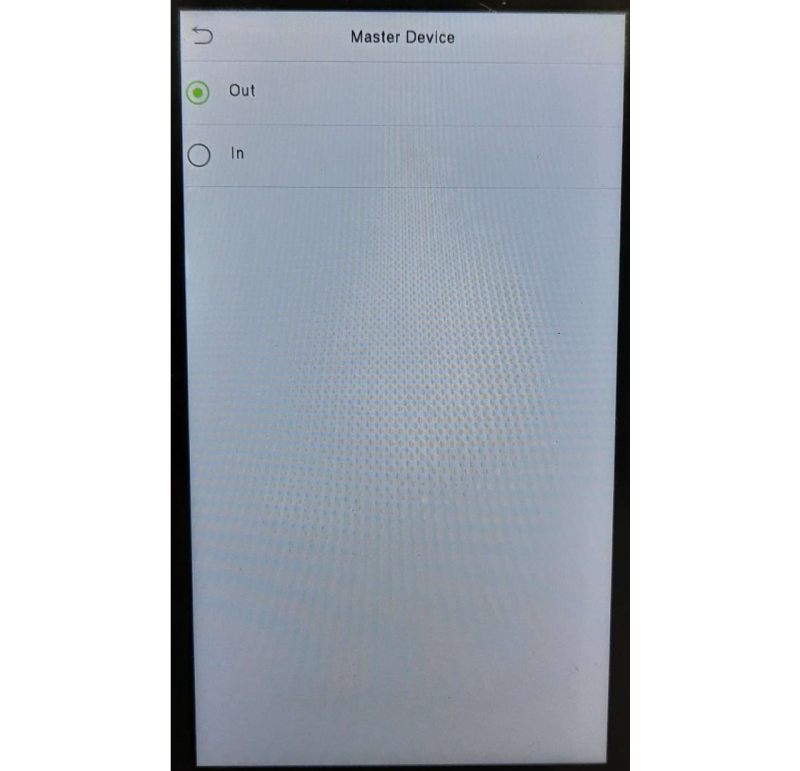
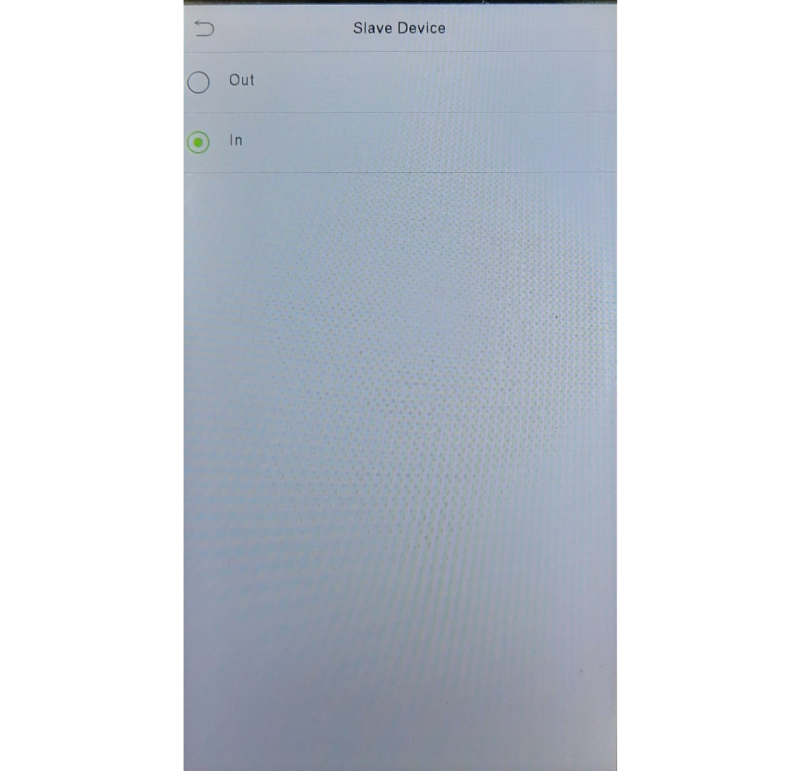
Picture 8: Select the Master device and Slave device for position for ether In or Out
Picture 9 : Master Device select In or Out
Picture 10 : Slave Device select In or Out
Note: If some of the screenshots or steps viewed here are different from the ones in the current system, this is due to our continuous effort to improve our system from time to time. Please notify us at [email protected], we will update it as soon as possible.
Introduction
A body temperature reading of people entering buildings and premises is a standard SOP in this pandemic era. It has become a new norm for us globally in combating Covid-19 spread.
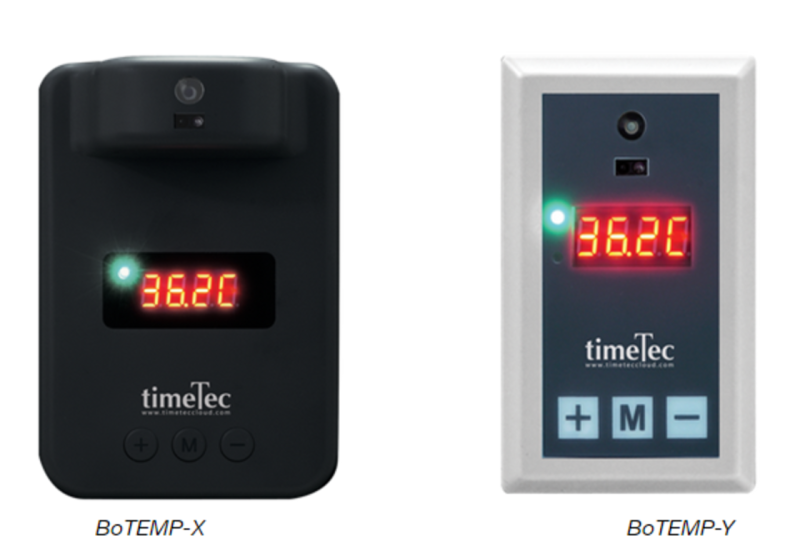
FingerTec offers temperature reading devices such as Face ID 5 series which can verify face, read body temperature and read a face mask. FingerTec also produces simpler body temperature devices, BoTEMP series consisting of BoTEMP X and BoTEMP Y.
Both BoTEMP models have the same functions with different designs, and they come with a door access control function. With BoTEMP devices, you can prevent access if a body temperature reads at 37.4C and above.
ProcessThree types of access to be considered when using BoTEMP.
1) BoTEMP + AdapTec Plus + FingerTec Master device + FingerTec Slave device connection
2) BoTEMP + AdapTec Plus + FingerTec Master device connection
3) BoTEMP Standalone Access
1)BoTEMP + AdapTec Plus + FingerTec Master device + FingerTec Slave device connection
Suitable to enhance the existing FingerTec Access control system that requires verification to enter and exit, with the body temperature reading.
.jpg)
.jpg)
*User needs to read his body temperature at BoTEMP before he scans his fingerprint, card, password or face on the access device.
2) BoTEMP + AdapTec Plus + FingerTec Master device connection
Suitable to enhance the existing FingerTec Access control system that requires verification to enter and exit, with the body temperature reading.
*User needs to read his body temperature at BoTEMP before he scans his fingerprint, card, password or face on the access device.
3) BoTEMP + AdapTec Plus
Suitable for public area access where no ID required, instead a temperature is a must.
*User needs to read his body temperature at BoTEMP before he can access a space.
Note: If some of the screenshots or steps viewed here are different from the ones in the current system, this is due to our continuous effort to improve our system from time to time. Please notify us at [email protected], we will update it as soon as possible.
Introduction
QF Master is the Android smart App (paired with BLE-2 or BLE-5) offering two methods of unlocking doors: Scanning of face and scanning of QR code for verification. You can integrate the QF Master with TimeTec Access to scan an employee's face or QR Code to authenticate access permission. In TimeTec Access, you may configure the employee's access rights for each access point to acquire a higher security requirement of the building access.
Process
Step 1 - Install QF Master apps from the Playstore or AppStore.
Step 2 - Run the QF Master apps. A mobile ID will display on the apps. Ensure the Bluetooth and GPS Location has been enabled prior to proceeding to the next steps. Additional charges for QF Master license will be applied. Please follow the steps to activate the application.
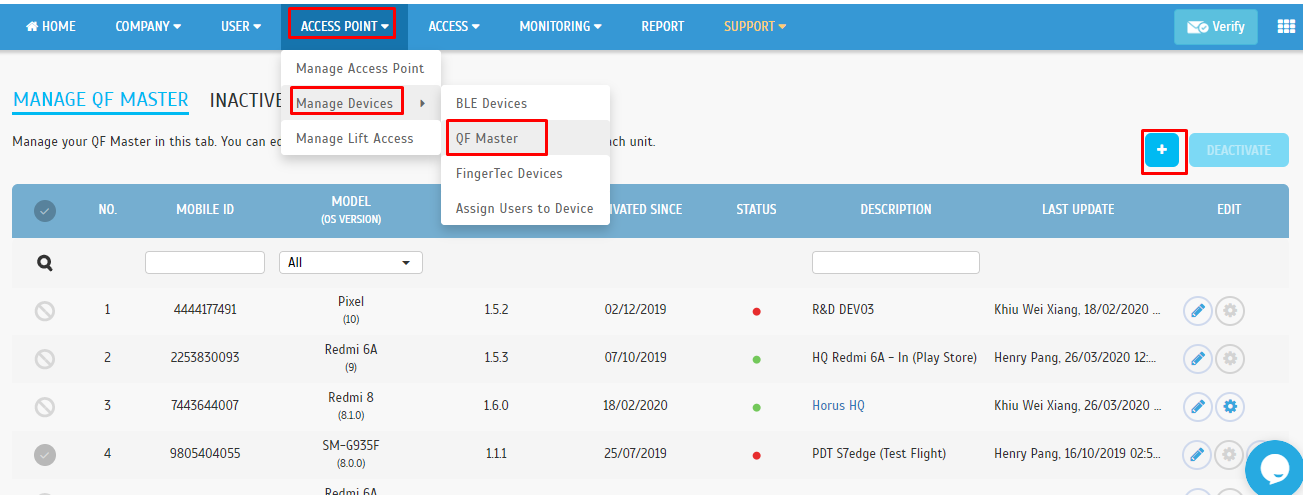
Step 3 - In TimeTec Access > Access Point tab > Manage Devices > QF Master > click on the ( + ) icon to add a new QF Master Device.
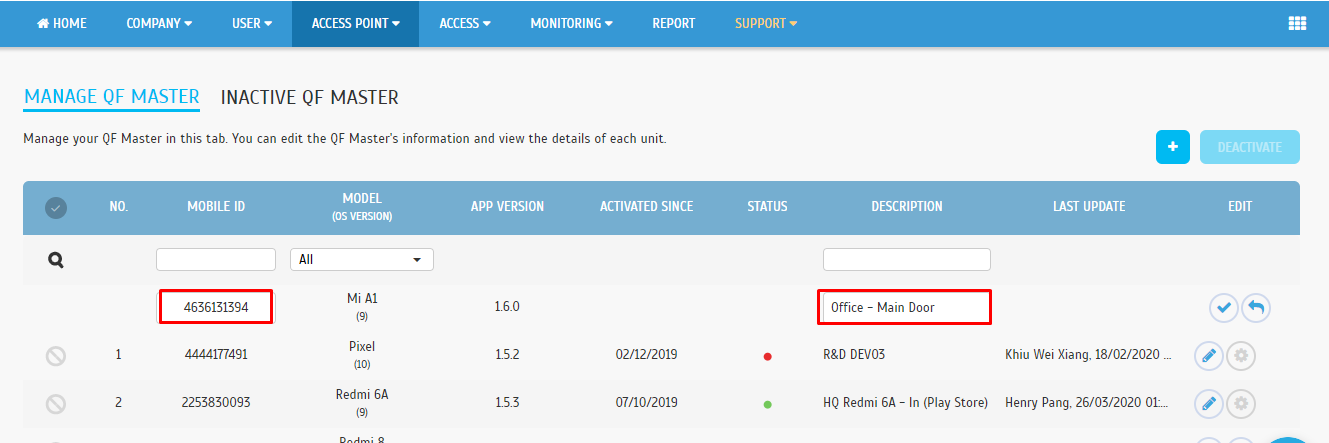
Step 4 - Insert the Mobile ID as shown in QF Master apps into the Mobile ID field. Then, key in relevant description and click the save button.
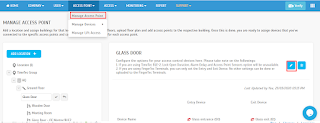
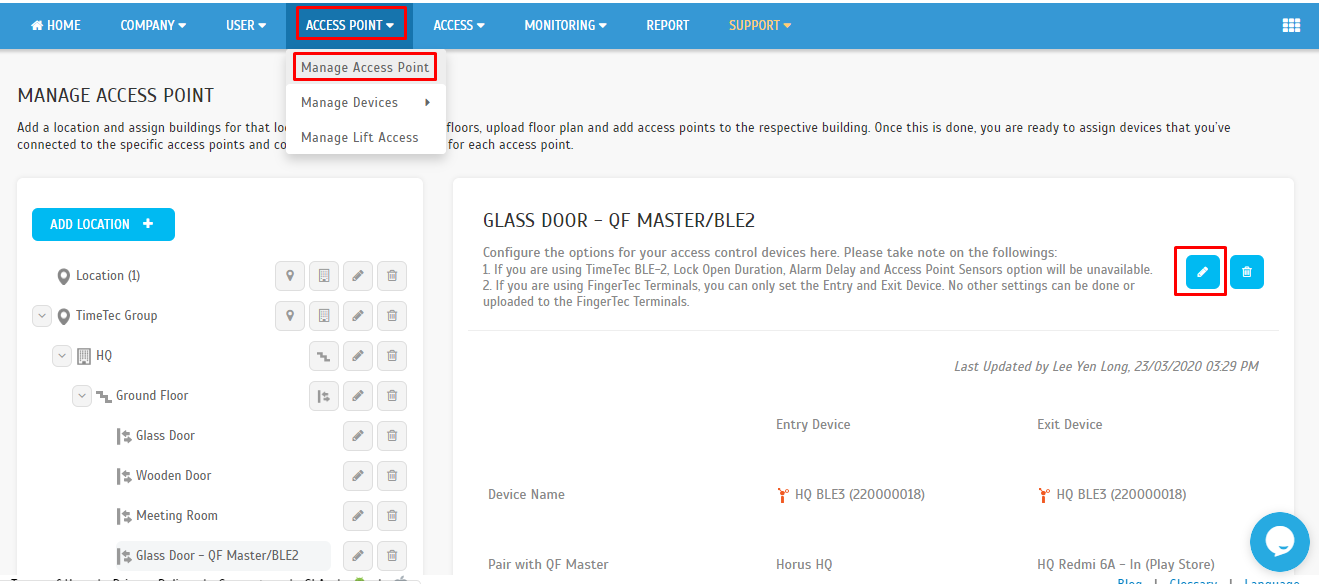
Step 5 - Next, go to the Access Point tab > Manage Access Point. Select the Access Point/Door that has been paired with BLE-2 / BLE-5. Click the Edit icon.
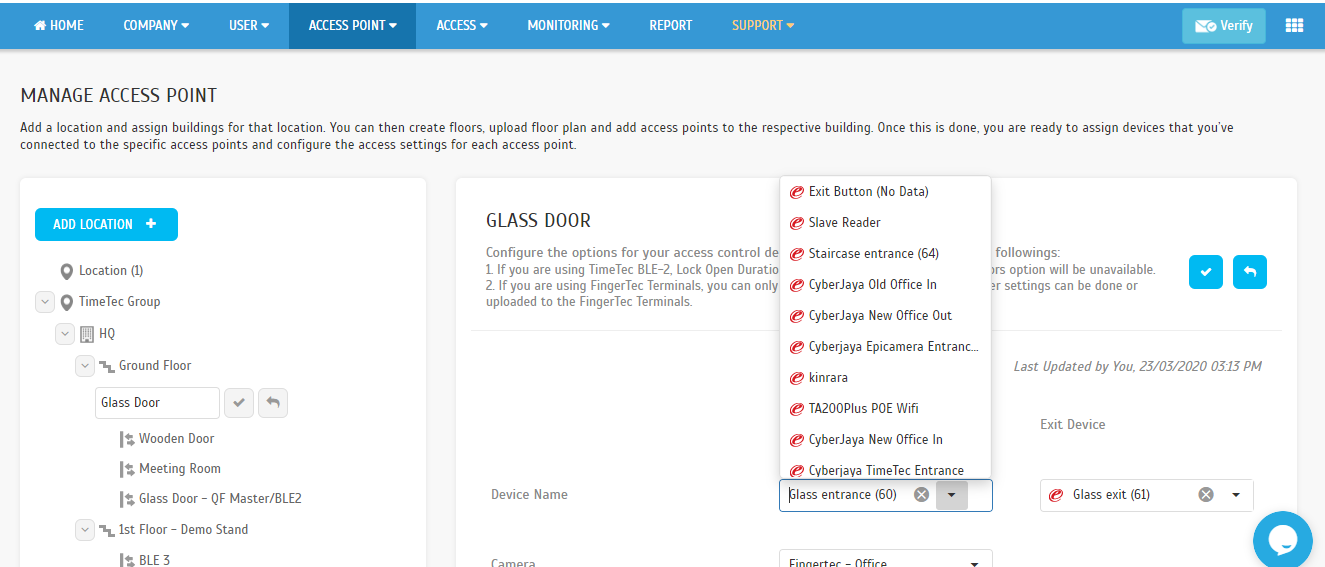
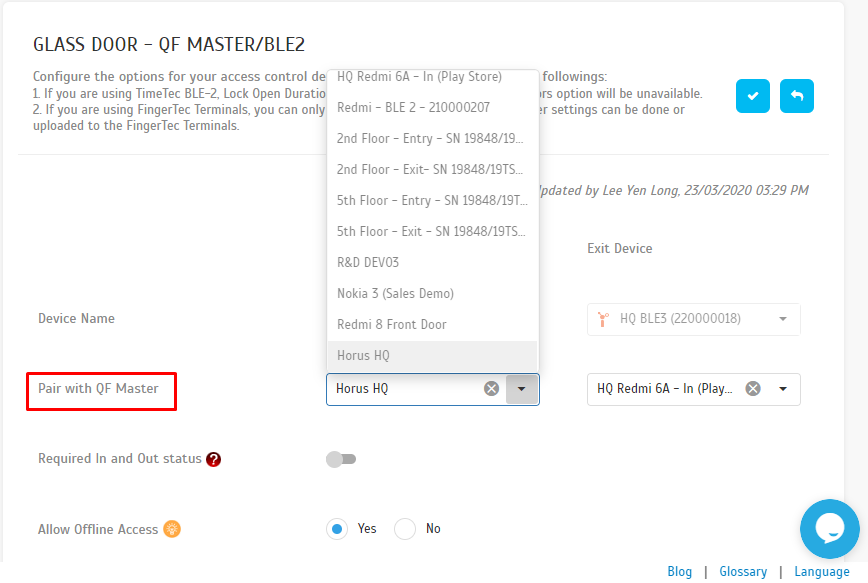
Step 6 - Select the added QF Master to be paired with that Access Point as the Entry Device or Exit Device. Click the Save button when the settings have been completed.
Step 7 - After settings are completed, go to QF Master Application mobile > Click on the setting Icon at the bottom right > and login to the admin account.
Step 8 - After settings are completed, go to QF Master Application mobile > Click on the setting Icon at the bottom right > and login to the admin account.
Step 9 -Kindly follow the instructions on the application to enrol a user’s face for verification > tap Submit. Try to verify the User’s face. In the case of verification failure, please re-enroll the user’s face.
Note: If some of the screenshots or steps viewed here are different from the ones in the current system, this is due to our continuous effort to improve our system from time to time. Please notify us at
[email protected], we will update it as soon as possible.
Introduction
The biometrics combined with TimeTec Access (ACaaS) has elevated the credibility of access security. Not only has the security assured with the most accurate biometrics authentication for users, but TimeTec Access is also able to provide the convenience of data access and data management directly from web browsers and mobile applications.
Process
Step 1 - Set the Web Server IP and Web Server Port on the FingerTec device.
Below are the Web settings for TimeTec Access:
Webster IP: 50.18.154.243
Port: 80 (90 for FMM devices)
*To check if your device platform is FMM models, press Menu > System Info > Platform.
Insert the web settings on the FingerTec device by pressing the Menu button:
A. Black/White display models: Menu → Option → Comm. Option → Web Server IP & Port
B. Color screen display models: Menu → Comm. Option → Webserver → Webserver IP & Port
* Please note that the device's IP Address is not required to set as a Public IP. Just key in a local IP address to the network that has internet access.
Step 2 - On TimeTec Access, go to the Access Point tab > Manage Device > FingerTec Devices > click Add button.
Step 3 - Insert the FingerTec device’s serial number, Terminal ID, Location and Time Zone, then click Save/Update. Make sure the light is turned green so that the connection status is ready to connect to the TimeTec Access. Otherwise, please check the connection setting on the device.
* You may get the FingerTec device’s serial number at the back cover of the device or in the device. Go to Menu > System Info.
Step 4 - Go to Access Point > Manage Access Point > Edit/Add Access Point. Select the added FingerTec device to assign it into the Access Point, then click the Save button.
Note: If some of the screenshots or steps viewed here are different from the ones in the current system, this is due to our continuous effort to improve our system from time to time. Please notify us at
[email protected], we will update it as soon as possible.
Introduction
Temporary Pass configuration helps users to secure their system because they can create different temporary access levels for each authorized user according to the Access Time. With this feature, you can limit the access of time of your vendor or interns in the Access Group. By doing so, this will enhance the security mechanism for your premises and will be able to tighten the surveillance of your surroundings to avoid all unnecessary invasion by unauthorized individuals.
Process
Step 1 - In TimeTec Access, go to the Access tab > Temporary Access > click on the Add button.
Step 2 - Label the name for Temporary Pass and amend the Start date/time and End date/time for that particular temporary access.

Step 3 - Select which User to be assigned to that Temporary Pass and click the Next button.
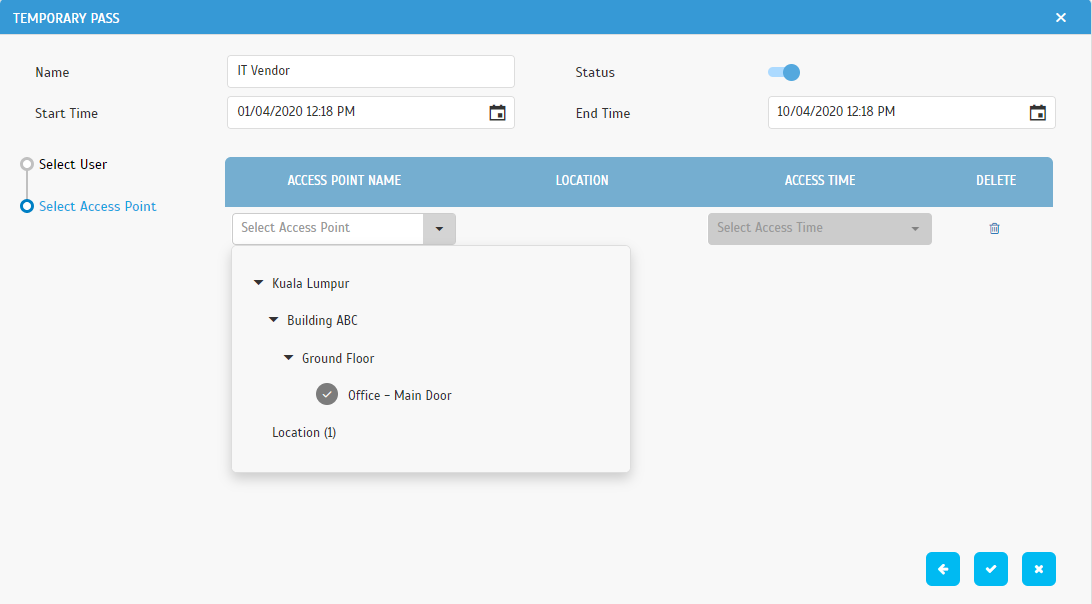
Step 4 - Select which Access Point/Door can be accessed by this group of Temporary Pass holders.
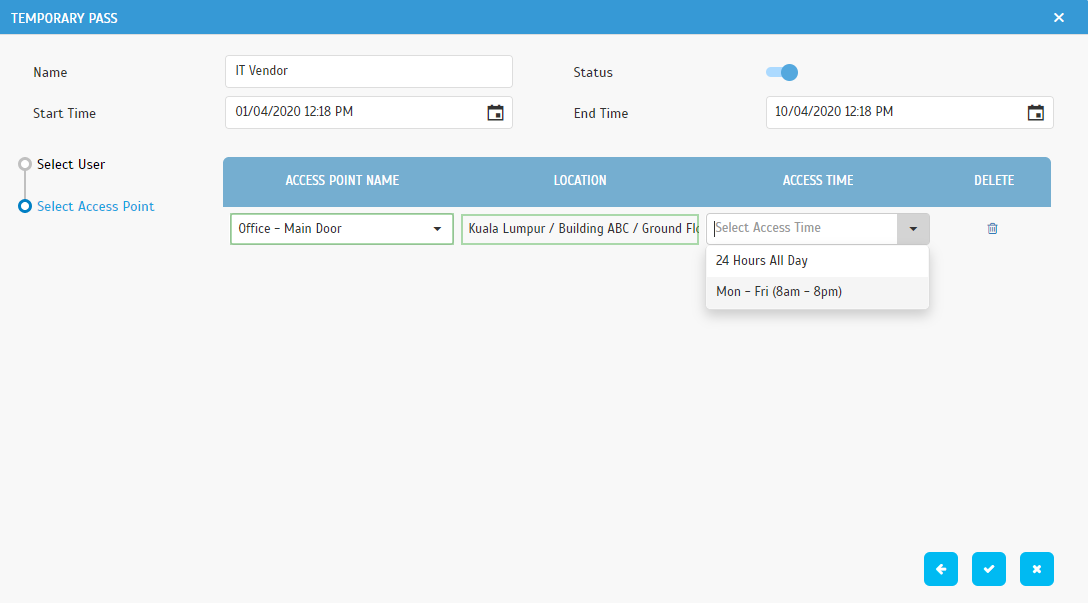
Step 5 - Select which Access Time is to be used by this group of Temporary Pass holders.
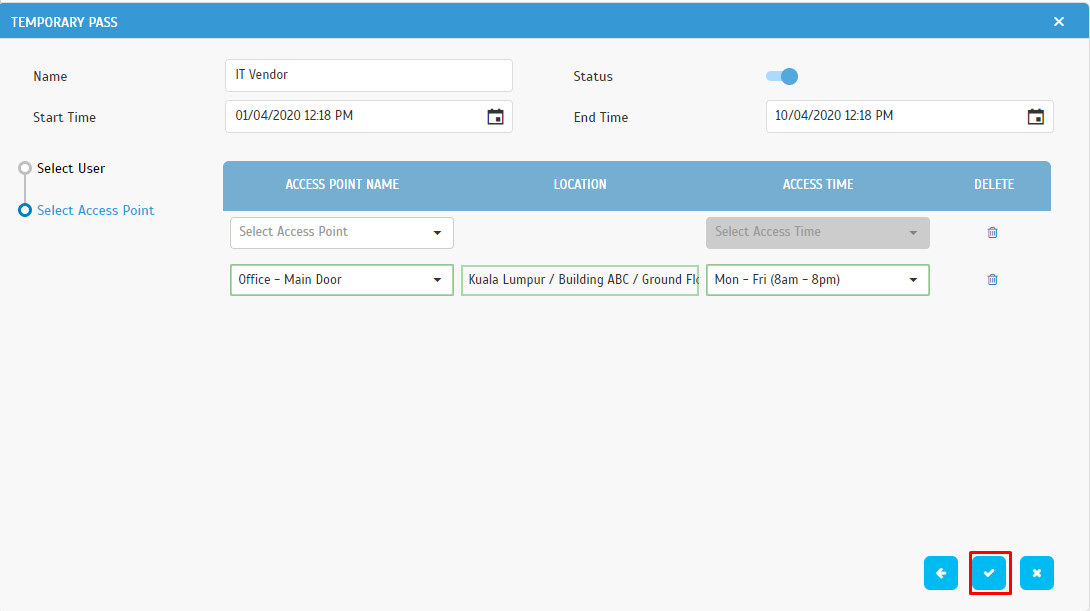
Step 6 - You can also add another Access Point and Access Time to the same Temporary Pass group. Click the Save button when all settings have been completed.
Step 7 - Here you may see the total Access Point assigned and the Access Time allocated to that Temporary Pass group. The Status will indicate if the Temporary Pass has been or hasn’t been activated.
Note: If some of the screenshots or steps viewed here are different from the ones in the current system, this is due to our continuous effort to improve our system from time to time. Please notify us at
[email protected], we will update it as soon as possible.
Introduction
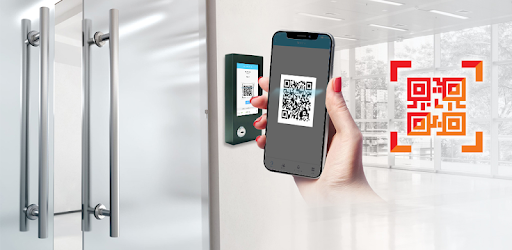
TimeTec BLE-2 Control Board functions as an intermediary device between a user’s Mobile App and the Door or Turnstile controller, whereby a user can tap on his/her Mobile Apps, send a voice command, or scan a QR Code to unlock the TimeTec BLE-2 via Bluetooth connection. Users no longer need to carry access cards or other physical access gadgets, this installation uses your smartphone as the ONLY credential powered by the Bluetooth Low Energy (BLE) technology to get encrypted access activities of the Access Point in real-time for high transparency and extra security.
Process
Step 1 - Log onto TimeTec Access, go to the Access Point tab > click Manage Devices > BLE Devices. Click the Add button, then insert BLE-2’s serial number and name of the location. The Serial Number can be retrieved at the back cover of the BLE-2.


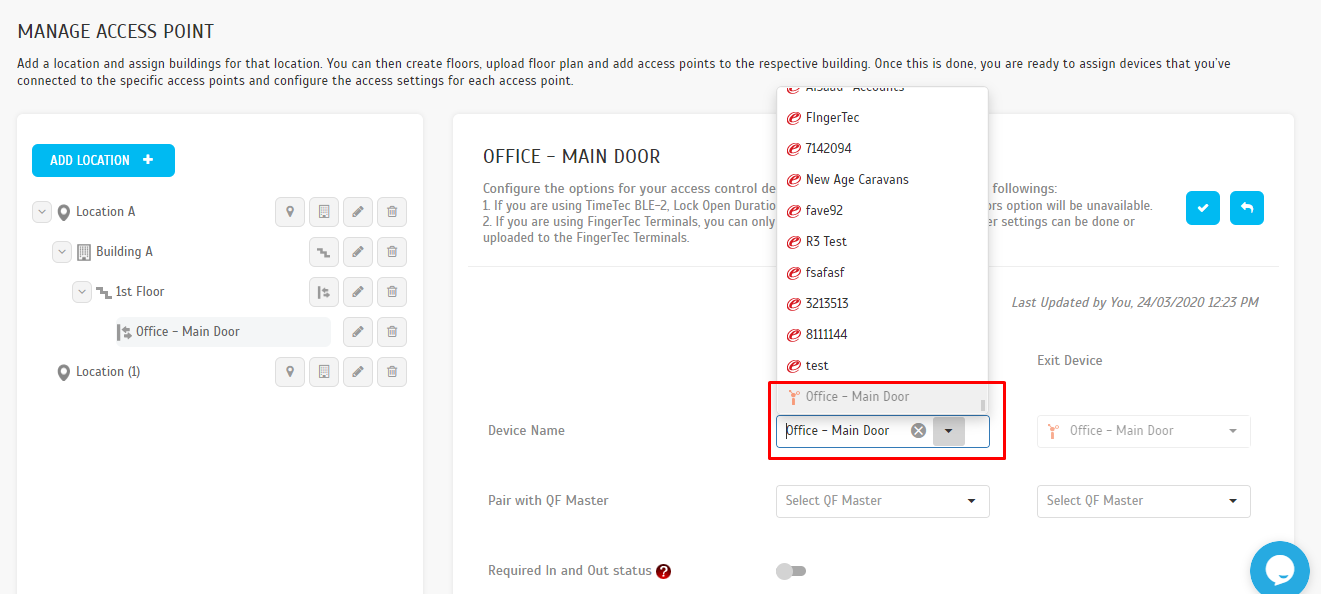
Step 2 - Assign added BLE-2 to the Access Point by click on Access Point tab > Manage Access Point > Select Access Point and click on the Add button.
Step 3 - Select Added BLE-2 from the list and click the Save button.
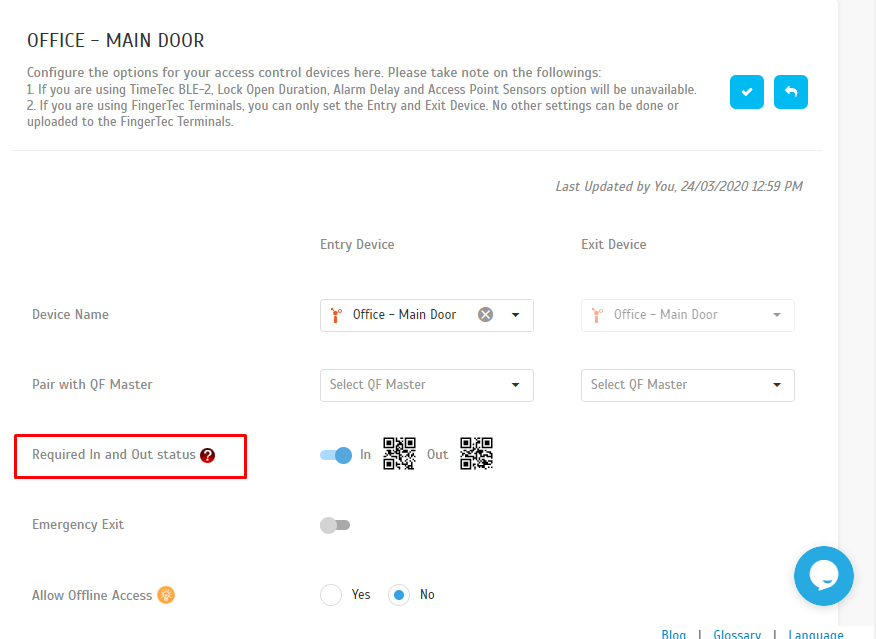
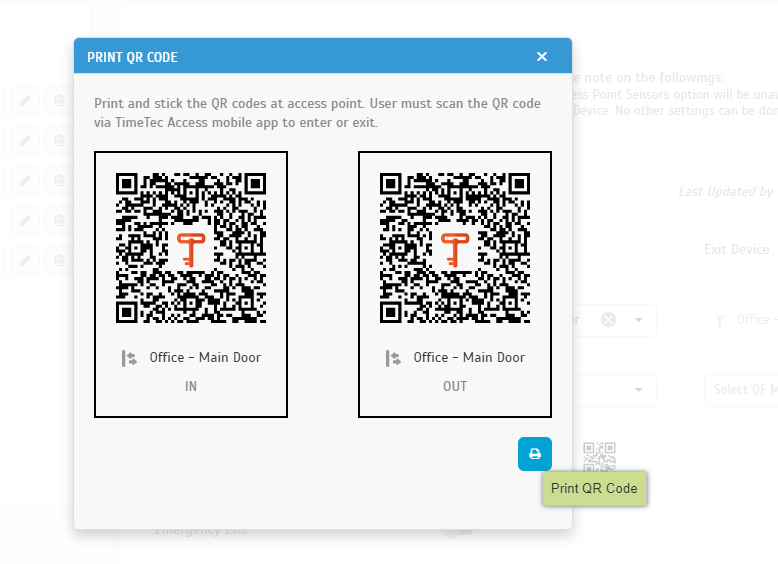
Step 4 - Additionally, you may enable the ‘In and Out status’ function if required. This will require all users of the TimeTec Access mobile app to scan the QR Code (install at Access Point) in order to get access at the Entry or Exit via setup Access Point. You may also acquire the QR Code sticker provided at the BLE-2’s box. Please click on the QR icon to print it otherwise.
Note: If some of the screenshots or steps viewed here are different from the ones in the current system, this is due to our continuous effort to improve our system from time to time. Please notify us at [email protected], we will update it as soon as possible.




.jpg)
.jpg)
.jpg)
.jpg)
.jpg)
1.jpg)


.png)
.png)
.png)


